2021 FORD EXPLORER light
[x] Cancel search: lightPage 102 of 577
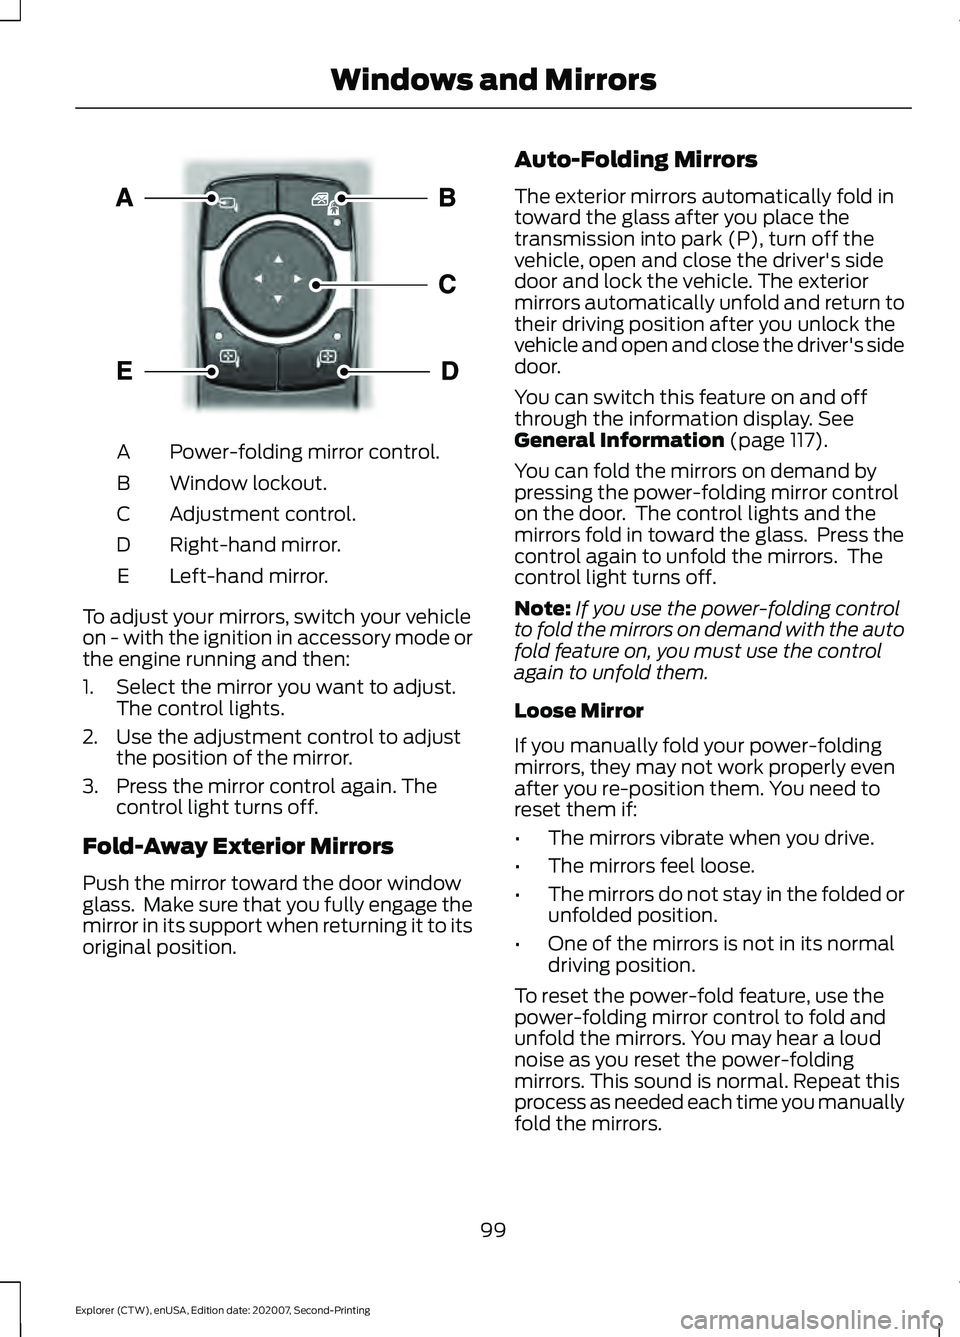
Power-folding mirror control.
A
Window lockout.
B
Adjustment control.
C
Right-hand mirror.
D
Left-hand mirror.
E
To adjust your mirrors, switch your vehicle
on - with the ignition in accessory mode or
the engine running and then:
1. Select the mirror you want to adjust. The control lights.
2. Use the adjustment control to adjust the position of the mirror.
3. Press the mirror control again. The control light turns off.
Fold-Away Exterior Mirrors
Push the mirror toward the door window
glass. Make sure that you fully engage the
mirror in its support when returning it to its
original position. Auto-Folding Mirrors
The exterior mirrors automatically fold in
toward the glass after you place the
transmission into park (P), turn off the
vehicle, open and close the driver's side
door and lock the vehicle. The exterior
mirrors automatically unfold and return to
their driving position after you unlock the
vehicle and open and close the driver's side
door.
You can switch this feature on and off
through the information display. See
General Information (page 117).
You can fold the mirrors on demand by
pressing the power-folding mirror control
on the door. The control lights and the
mirrors fold in toward the glass. Press the
control again to unfold the mirrors. The
control light turns off.
Note: If you use the power-folding control
to fold the mirrors on demand with the auto
fold feature on, you must use the control
again to unfold them.
Loose Mirror
If you manually fold your power-folding
mirrors, they may not work properly even
after you re-position them. You need to
reset them if:
• The mirrors vibrate when you drive.
• The mirrors feel loose.
• The mirrors do not stay in the folded or
unfolded position.
• One of the mirrors is not in its normal
driving position.
To reset the power-fold feature, use the
power-folding mirror control to fold and
unfold the mirrors. You may hear a loud
noise as you reset the power-folding
mirrors. This sound is normal. Repeat this
process as needed each time you manually
fold the mirrors.
99
Explorer (CTW), enUSA, Edition date: 202007, Second-Printing Windows and MirrorsE295322
Page 103 of 577
Heated Exterior Mirrors
See Heated Exterior Mirrors (page 144).
Memory Mirrors
You can save and recall the mirror
positions through the memory function.
See
Memory Function (page 152).
Auto-dimming Feature
The driver exterior mirror dims when the
interior auto-dimming mirror turns on.
Direction Indicator Mirrors
When the vehicle is running, the
forward-facing portion of the appropriate
mirror housing blinks when you switch on
the direction indicator.
Puddle Lamps
The lamps on the bottom part of the mirror
housing light when you use your
transmitter to unlock the doors or when
you open a door.
Blind Spot Information System
See
Blind Spot Information System
(page 264).
INTERIOR MIRROR WARNING:
Do not adjust the
mirrors when your vehicle is moving. This
could result in the loss of control of your
vehicle, serious personal injury or death.
Note: Do not clean the mirror housing or
glass with harsh abrasives, fuel or other
petroleum-based cleaning products. You can adjust the interior mirror to your
preference. Some mirrors also have a
second pivot point. This lets you move the
mirror head up or down and from side to
side.
Manual Dimming Mirror
Pull the tab below the mirror toward you
to reduce the effect of bright light from
behind.
Automatic Dimming Mirror (If Equipped)
Note:
Do not block the sensors on the front
and back of the mirror. A rear center
passenger or raised rear center head
restraint may also block light from reaching
the sensor.
The mirror dims to reduce the effect of
bright light from behind. It returns to
normal when the bright light from behind
is no longer present or if you shift into
reverse (R).
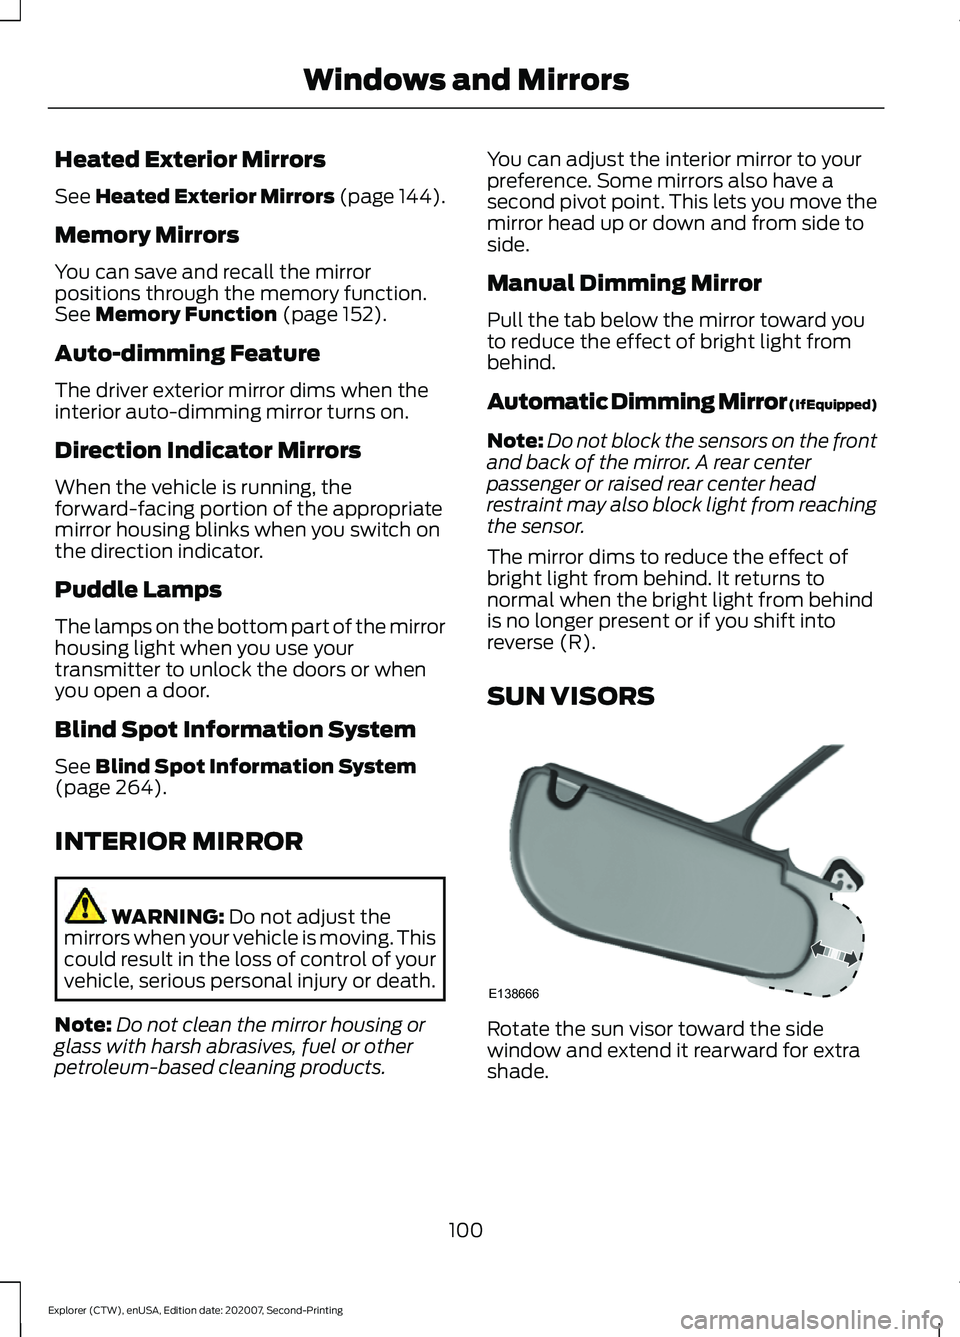
SUN VISORS Rotate the sun visor toward the side
window and extend it rearward for extra
shade.
100
Explorer (CTW), enUSA, Edition date: 202007, Second-Printing Windows and MirrorsE138666
Page 107 of 577
Note:
The fuel gauge may vary slightly
when your vehicle is moving or on a slope.
Low Fuel Reminder
A low fuel level reminder displays and
sounds when the distance to empty
reaches 75 mi (120 km) to empty for
MyKey, and at 50 mi (80 km), 25 mi
(40 km), 10 mi (20 km) and 0 mi (0 km)
for all vehicle keys.
Note: The low fuel reminder can appear at
different fuel gauge positions depending on
fuel economy conditions. This variation is
normal.
Distance to Empty
Indicates the approximate distance your
vehicle can travel on the fuel remaining in
the tank. Changes in driving pattern can
cause the value to not only decrease but
also increase or stay constant for periods
of time. Engine Coolant Temperature
Gauge WARNING:
Do not remove the
coolant reservoir cap when the engine is
on or the cooling system is hot. Wait 10
minutes for the cooling system to cool
down. Cover the coolant reservoir cap
with a thick cloth to prevent the
possibility of scalding and slowly remove
the cap. Failure to follow this instruction
could result in personal injury.
Indicates engine coolant temperature. At
normal operating temperature, the level
indicator will be in the normal range. If the
engine coolant temperature exceeds the
normal range, stop your vehicle as soon as
safely possible, switch off the engine and
let the engine cool.
GAUGES - VEHICLES WITH:
12.3 INCH INSTRUMENT
CLUSTER DISPLAY SCREEN
Note: Clusters shown in single gauge view.
Note: Displays may appear slightly different
depending on region.
104
Explorer (CTW), enUSA, Edition date: 202007, Second-Printing Instrument Cluster
Page 108 of 577
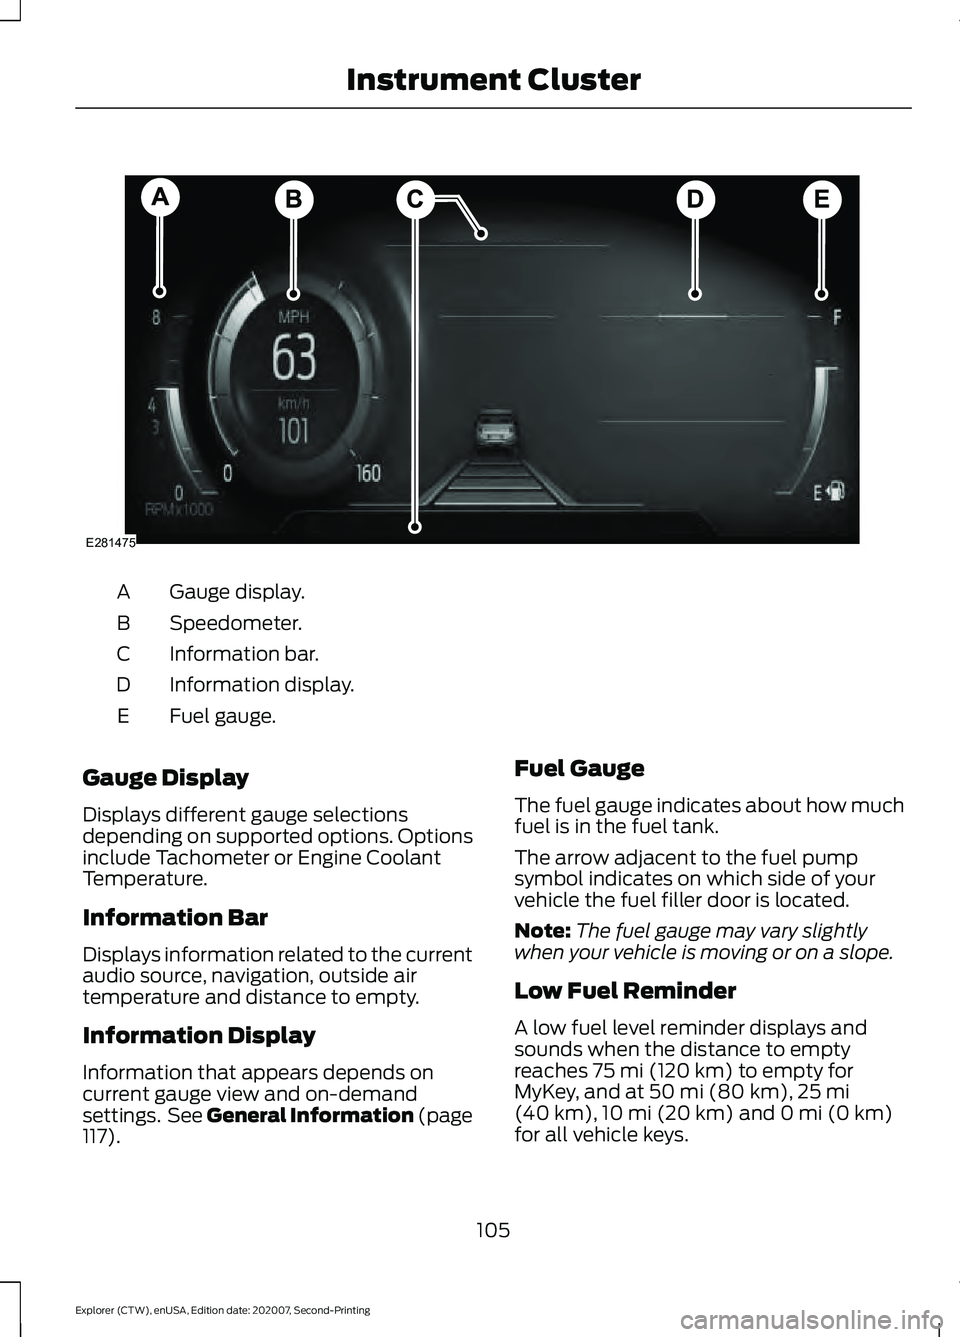
Gauge display.
A
Speedometer.
B
Information bar.
C
Information display.
D
Fuel gauge.
E
Gauge Display
Displays different gauge selections
depending on supported options. Options
include Tachometer or Engine Coolant
Temperature.
Information Bar
Displays information related to the current
audio source, navigation, outside air
temperature and distance to empty.
Information Display
Information that appears depends on
current gauge view and on-demand
settings. See General Information (page
117). Fuel Gauge
The fuel gauge indicates about how much
fuel is in the fuel tank.
The arrow adjacent to the fuel pump
symbol indicates on which side of your
vehicle the fuel filler door is located.
Note:
The fuel gauge may vary slightly
when your vehicle is moving or on a slope.
Low Fuel Reminder
A low fuel level reminder displays and
sounds when the distance to empty
reaches
75 mi (120 km) to empty for
MyKey, and at 50 mi (80 km), 25 mi
(40 km), 10 mi (20 km) and 0 mi (0 km)
for all vehicle keys.
105
Explorer (CTW), enUSA, Edition date: 202007, Second-Printing Instrument ClusterE281475
Page 110 of 577
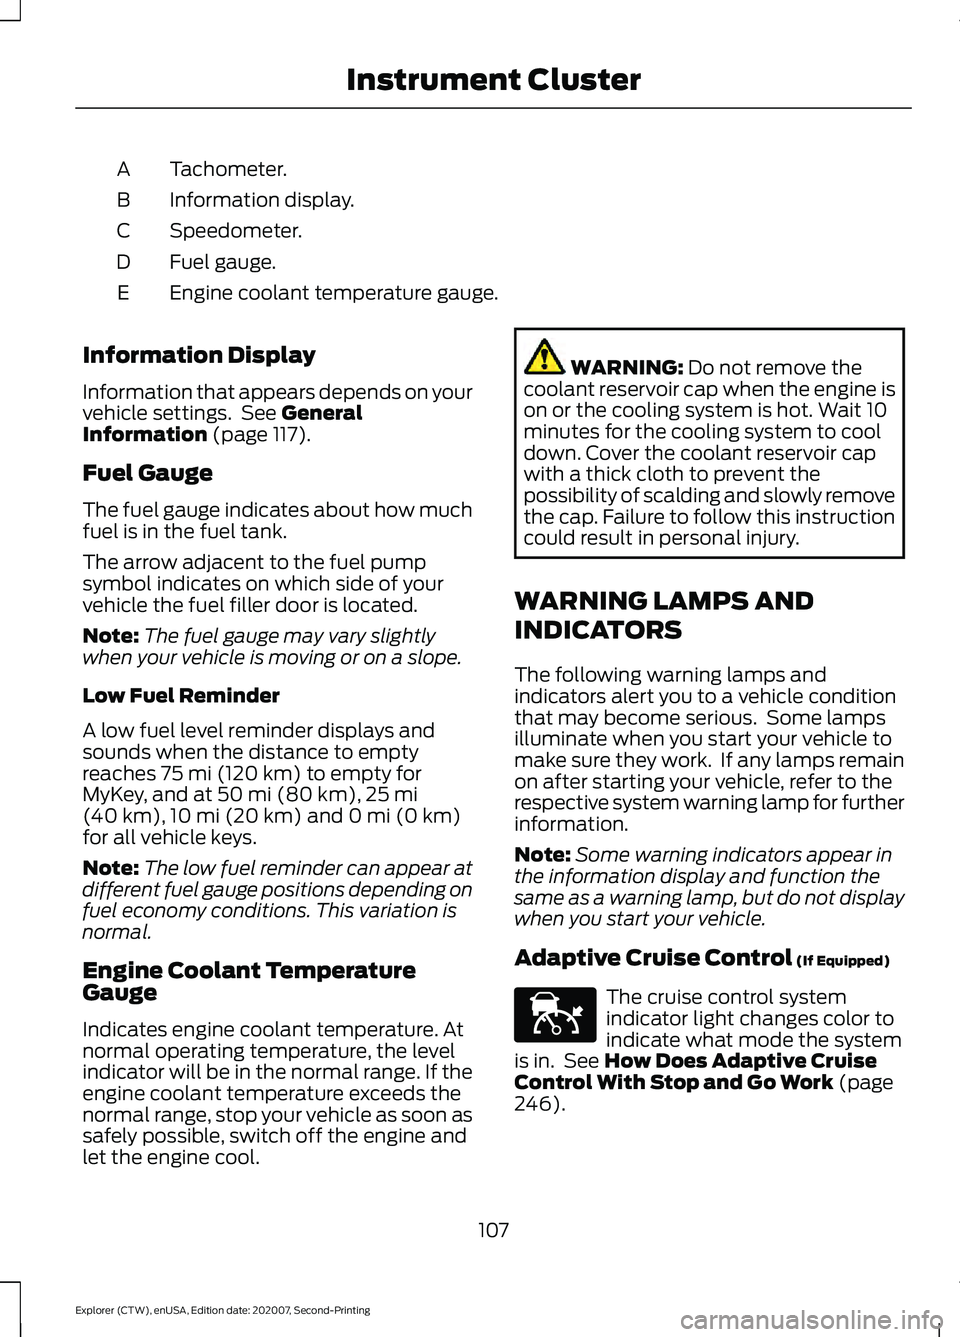
Tachometer.
A
Information display.
B
Speedometer.
C
Fuel gauge.
D
Engine coolant temperature gauge.
E
Information Display
Information that appears depends on your
vehicle settings. See General
Information (page 117).
Fuel Gauge
The fuel gauge indicates about how much
fuel is in the fuel tank.
The arrow adjacent to the fuel pump
symbol indicates on which side of your
vehicle the fuel filler door is located.
Note: The fuel gauge may vary slightly
when your vehicle is moving or on a slope.
Low Fuel Reminder
A low fuel level reminder displays and
sounds when the distance to empty
reaches
75 mi (120 km) to empty for
MyKey, and at 50 mi (80 km), 25 mi
(40 km), 10 mi (20 km) and 0 mi (0 km)
for all vehicle keys.
Note: The low fuel reminder can appear at
different fuel gauge positions depending on
fuel economy conditions. This variation is
normal.
Engine Coolant Temperature
Gauge
Indicates engine coolant temperature. At
normal operating temperature, the level
indicator will be in the normal range. If the
engine coolant temperature exceeds the
normal range, stop your vehicle as soon as
safely possible, switch off the engine and
let the engine cool. WARNING:
Do not remove the
coolant reservoir cap when the engine is
on or the cooling system is hot. Wait 10
minutes for the cooling system to cool
down. Cover the coolant reservoir cap
with a thick cloth to prevent the
possibility of scalding and slowly remove
the cap. Failure to follow this instruction
could result in personal injury.
WARNING LAMPS AND
INDICATORS
The following warning lamps and
indicators alert you to a vehicle condition
that may become serious. Some lamps
illuminate when you start your vehicle to
make sure they work. If any lamps remain
on after starting your vehicle, refer to the
respective system warning lamp for further
information.
Note: Some warning indicators appear in
the information display and function the
same as a warning lamp, but do not display
when you start your vehicle.
Adaptive Cruise Control
(If Equipped) The cruise control system
indicator light changes color to
indicate what mode the system
is in. See
How Does Adaptive Cruise
Control With Stop and Go Work (page
246).
107
Explorer (CTW), enUSA, Edition date: 202007, Second-Printing Instrument ClusterE144524
Page 111 of 577

On (white light): Illuminates when you
switch on the adaptive cruise control
system. Turns off when you switch the
cruise control system off.
Engaged (green light): Illuminates when
you engage the adaptive cruise control
system. Turns off when you disengage the
cruise control system.
Anti-Lock Braking System
If it illuminates when you are
driving, this indicates a system
error. You continue to have the
normal braking (without ABS) unless the
brake system warning lamp also
illuminates. Have the system checked by
an authorized dealer.
Automatic High Beam Control Illuminates when this feature is
on. See What Is Automatic
High Beam Control (page 94).
Auto Hold Active Illuminates when the system
holds your vehicle stationary.
Auto Hold Unavailable Illuminates when the system is
on, but unavailable to hold your
vehicle stationary.
Auto Start-stop
(If Equipped) Illuminates when the engine
shuts down or in conjunction
with a message. Battery If it illuminates while driving, it
indicates a system error. Switch
off all unnecessary electrical
equipment and have the system checked
by an authorized dealer immediately.
Blind Spot Monitor Illuminates when you switch this
feature off or in conjunction with
a message. See
Blind Spot
Information System (page 264).
Brake System Warning Lamp WARNING:
Driving your vehicle
with the warning lamp on is dangerous.
A significant decrease in braking
performance may occur. It may take you
longer to stop your vehicle. Have your
vehicle checked as soon as possible.
Driving extended distances with the
parking brake engaged can cause brake
failure and the risk of personal injury.
Note: Indicators vary depending on region.
This lamp is a dual function lamp and
illuminates when:
• You apply the parking brake with the
ignition on.
• Your vehicle has a brake fault or low
brake fluid level, regardless of parking
brake position. If the lamp illuminates when you
are moving, you may have the
parking brake applied. Make sure
the parking brake is off. Have
your vehicle checked as soon as
possible if the lamp continues to
illuminate.
108
Explorer (CTW), enUSA, Edition date: 202007, Second-Printing Instrument Cluster E197933 E322410 E197934 E322411 E151262 E270480
Page 115 of 577
GENERAL INFORMATION -
VEHICLES WITH: 6.5 INCH
INSTRUMENT CLUSTER
DISPLAY SCREEN
WARNING: Driving while distracted
can result in loss of vehicle control, crash
and injury. We strongly recommend that
you use extreme caution when using any
device that may take your focus off the
road. Your primary responsibility is the
safe operation of your vehicle. We
recommend against the use of any
hand-held device while driving and
encourage the use of voice-operated
systems when possible. Make sure you
are aware of all applicable local laws
that may affect the use of electronic
devices while driving.
You can control various systems on your
vehicle using the information display
controls on the steering wheel.
Corresponding information appears in the
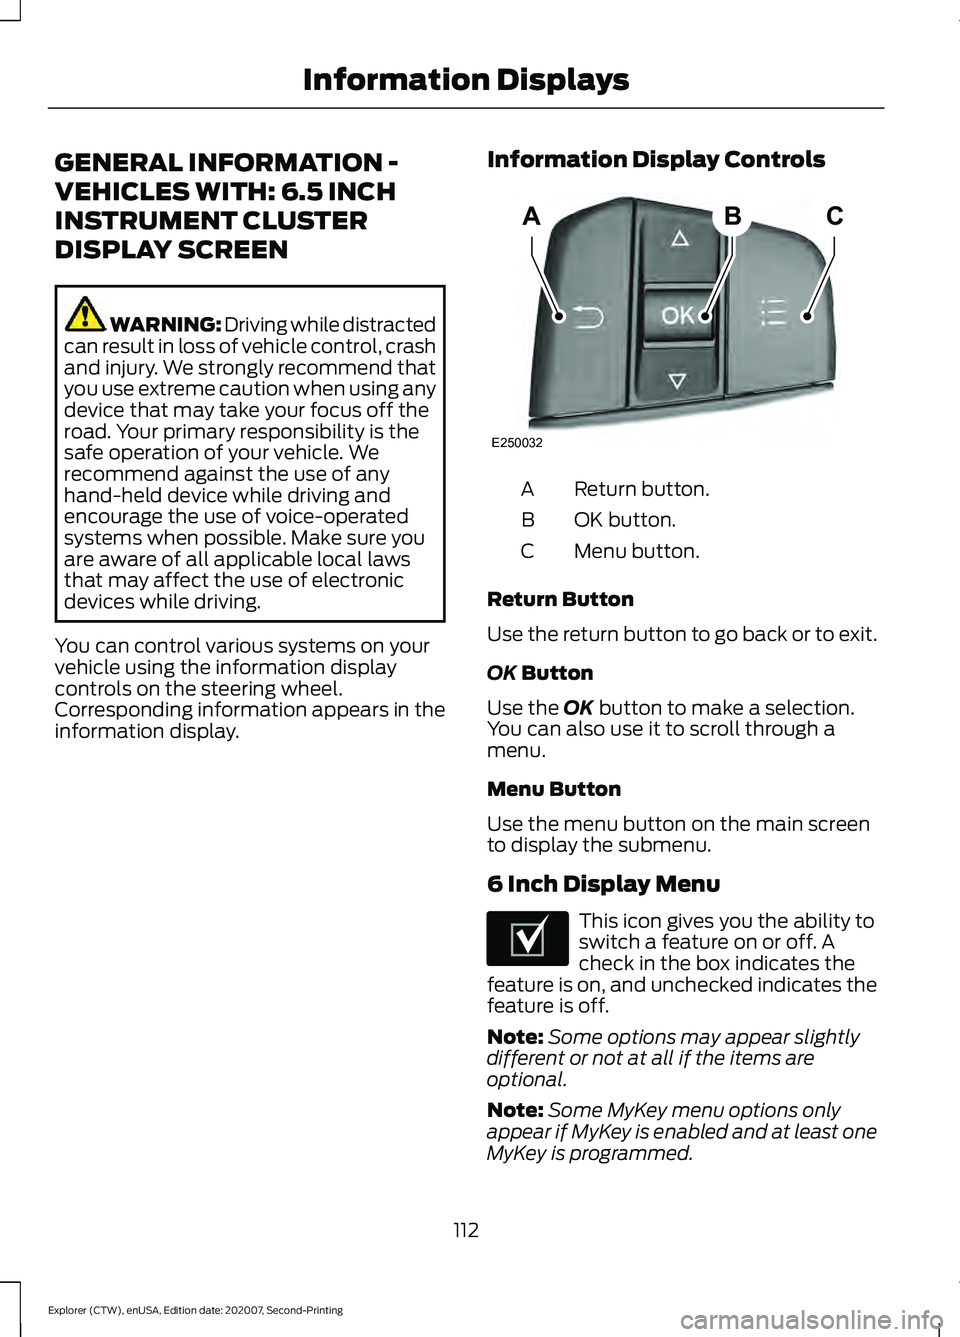
information display. Information Display Controls Return button.
A
OK button.
B
Menu button.
C
Return Button
Use the return button to go back or to exit.
OK Button
Use the
OK button to make a selection.
You can also use it to scroll through a
menu.
Menu Button
Use the menu button on the main screen
to display the submenu.
6 Inch Display Menu This icon gives you the ability to
switch a feature on or off. A
check in the box indicates the
feature is on, and unchecked indicates the
feature is off.
Note: Some options may appear slightly
different or not at all if the items are
optional.
Note: Some MyKey menu options only
appear if MyKey is enabled and at least one
MyKey is programmed.
112
Explorer (CTW), enUSA, Edition date: 202007, Second-Printing Information DisplaysABC
E250032 E204495
Page 118 of 577
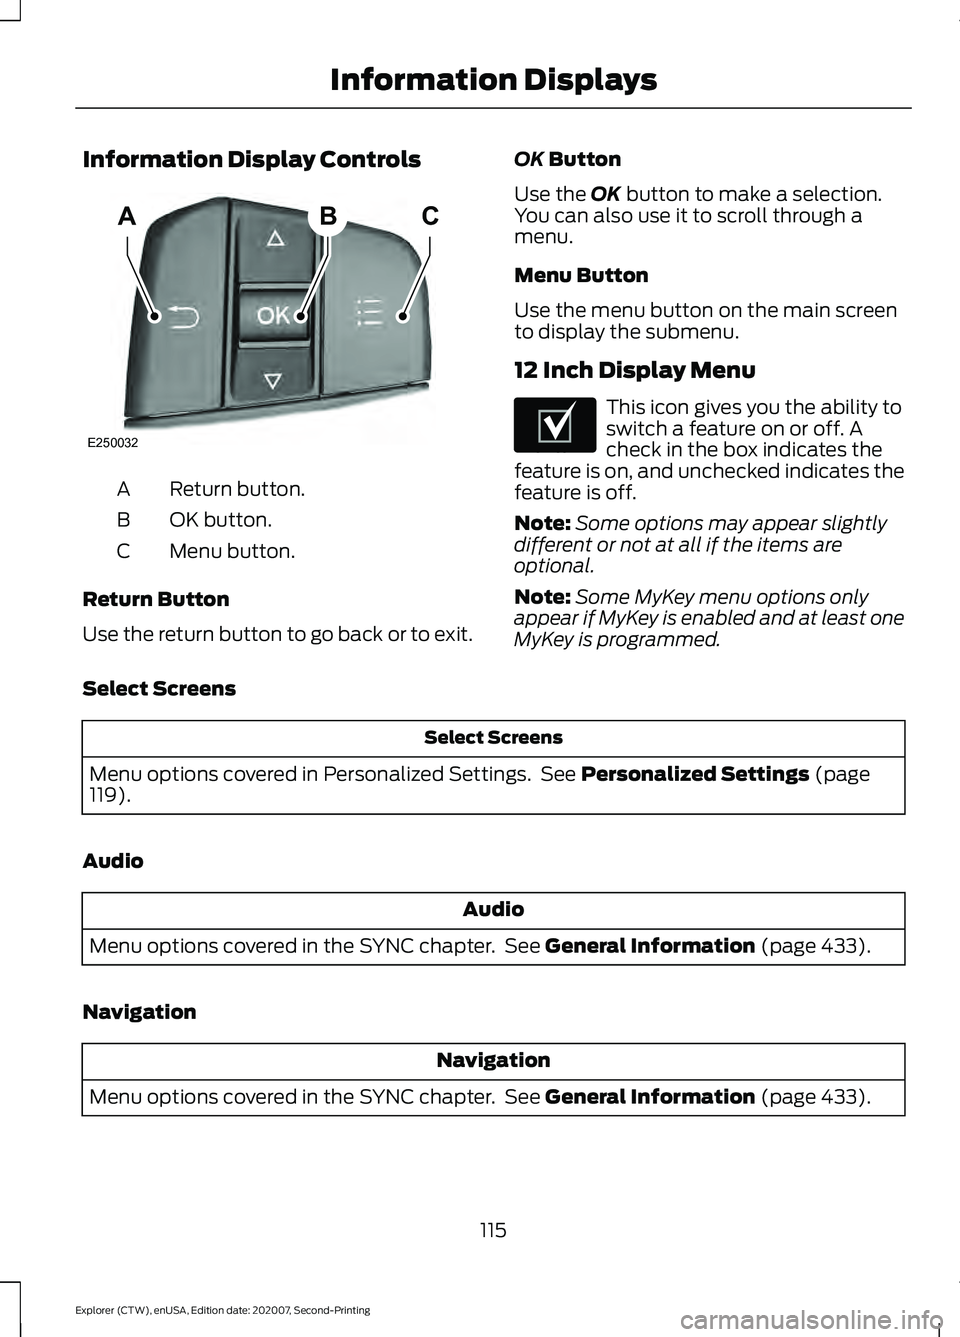
Information Display Controls
Return button.
A
OK button.
B
Menu button.
C
Return Button
Use the return button to go back or to exit. OK Button
Use the
OK button to make a selection.
You can also use it to scroll through a
menu.
Menu Button
Use the menu button on the main screen
to display the submenu.
12 Inch Display Menu This icon gives you the ability to
switch a feature on or off. A
check in the box indicates the
feature is on, and unchecked indicates the
feature is off.
Note: Some options may appear slightly
different or not at all if the items are
optional.
Note: Some MyKey menu options only
appear if MyKey is enabled and at least one
MyKey is programmed.
Select Screens Select Screens
Menu options covered in Personalized Settings. See
Personalized Settings (page
119).
Audio Audio
Menu options covered in the SYNC chapter. See
General Information (page 433).
Navigation Navigation
Menu options covered in the SYNC chapter. See
General Information (page 433).
115
Explorer (CTW), enUSA, Edition date: 202007, Second-Printing Information DisplaysABC
E250032 E204495