2021 FORD EXPLORER steering wheel
[x] Cancel search: steering wheelPage 117 of 577
Display Setup
Display Setup
Speedometer units Hold Ok to Reset
Driving History 1
1 Hybrid only
Note: Additional display settings are
available through your touchscreen. See
Settings (page 464).
Hybrid Display Information
(If
Equipped)
Unique hybrid vehicle information displays
on your information display when you shut
off your vehicle or come to a stop.
Brake Coach
The Brake Coach appears after the vehicle
has come to a stop. It coaches you to brake
in a manner that maximizes the amount
of energy returned through the
regenerative braking system.
The percent displayed is an indication of
the regenerative braking efficiency with
100% representing the maximum amount
of energy recovery. Brake Coach can be
turned on or off in the settings menu.
Trip Summary
The trip summary displays upon shutting
off your vehicle. The values are cumulative
since you last started your vehicle.
The information shown is the same as the
This Trip on demand screen. See
Personalized Settings
(page 119). GENERAL INFORMATION -
VEHICLES WITH: 12.3 INCH
INSTRUMENT CLUSTER
DISPLAY SCREEN WARNING: Driving while distracted
can result in loss of vehicle control, crash
and injury. We strongly recommend that
you use extreme caution when using any
device that may take your focus off the
road. Your primary responsibility is the
safe operation of your vehicle. We
recommend against the use of any
hand-held device while driving and
encourage the use of voice-operated
systems when possible. Make sure you
are aware of all applicable local laws
that may affect the use of electronic
devices while driving.
You can control various systems on your
vehicle using the information display
controls on the steering wheel.
Corresponding information appears in the
information display.
114
Explorer (CTW), enUSA, Edition date: 202007, Second-Printing Information Displays
Page 120 of 577
Trip Summary
The trip summary displays upon shutting
off your vehicle. The values are cumulative
since you last started your vehicle.
The information shown is the same as the
This Trip on demand screen. See
Personalized Settings (page 119).
GENERAL INFORMATION -
VEHICLES WITH: 4.2 INCH
INSTRUMENT CLUSTER
DISPLAY SCREEN WARNING: Driving while distracted
can result in loss of vehicle control, crash
and injury. We strongly recommend that
you use extreme caution when using any
device that may take your focus off the
road. Your primary responsibility is the
safe operation of your vehicle. We
recommend against the use of any
hand-held device while driving and
encourage the use of voice-operated
systems when possible. Make sure you
are aware of all applicable local laws
that may affect the use of electronic
devices while driving.
You can control various systems on your
vehicle using the quick action menu (QAM)
buttons on the right-hand side of the
steering wheel. The information display
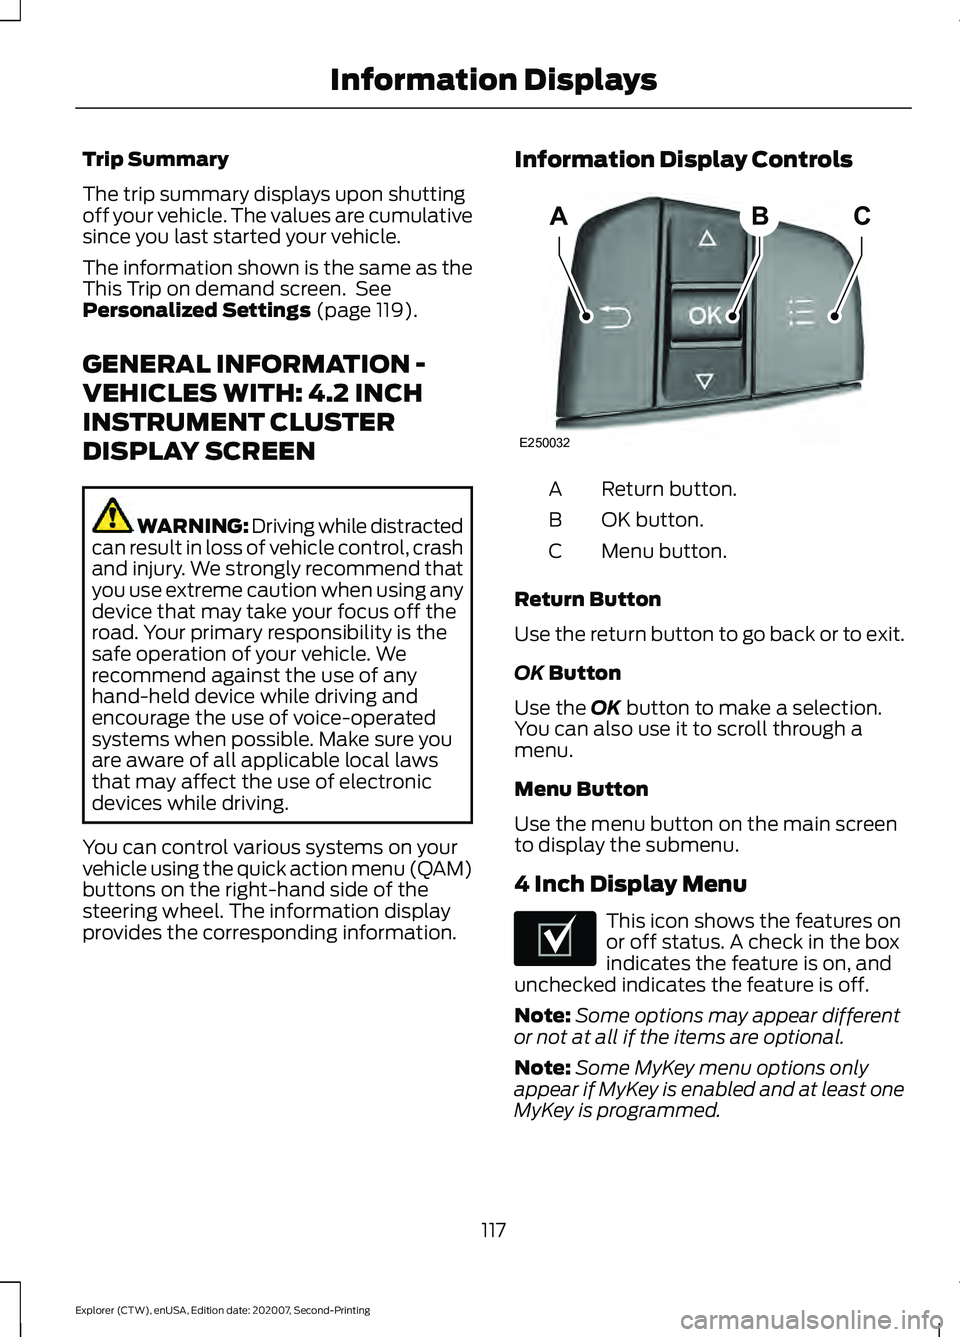
provides the corresponding information. Information Display Controls Return button.
A
OK button.
B
Menu button.
C
Return Button
Use the return button to go back or to exit.
OK
Button
Use the
OK button to make a selection.
You can also use it to scroll through a
menu.
Menu Button
Use the menu button on the main screen
to display the submenu.
4 Inch Display Menu This icon shows the features on
or off status. A check in the box
indicates the feature is on, and
unchecked indicates the feature is off.
Note: Some options may appear different
or not at all if the items are optional.
Note: Some MyKey menu options only
appear if MyKey is enabled and at least one
MyKey is programmed.
117
Explorer (CTW), enUSA, Edition date: 202007, Second-Printing Information DisplaysABC
E250032 E204495
Page 132 of 577

Lane Keeping System
Action
Message
The system has malfunctioned. Have the system checked as soon as possible.
Lane Keeping Sys.
Malfunction
Service Required
The system has detected a condition that has caused the systemto be temporarily unavailable.
Front Camera
Temporarily Not Available
The system has detected a condition that requires the windshieldto be cleaned to operate properly.
Front Camera Low
Visibility Clean Screen
The system has malfunctioned. Have the system checked as soon as possible.
Front Camera
Malfunction
Service Required
The system requests the driver to keep their hands on the steering wheel.
Keep Hands on
Steering Wheel
Maintenance Action
Message
Stop your vehicle as soon as safely possible and turn off the engine.
Check the oil level. If the warning stays on or continues to come onwith your engine running, have the system checked as soon as possible.
Low Engine Oil
Pressure
The engine oil life is low and needs to be changed soon.
Change Engine Oil
Soon
The engine oil life is low and needs to be changed immediately.
Oil Change
Required
The brake fluid level is low and the brake system should be
inspected immediately. See Brake Fluid Check (page 335).
Brake Fluid Level
Low
The brake system needs servicing. Stop the vehicle in a safe place. Contact an authorized dealer.
Check Brake
System
The engine coolant temperature is excessively high.
Engine Coolant
Over Temperature
The washer fluid is low and needs to be refilled.
Washer Fluid Level
Low
129
Explorer (CTW), enUSA, Edition date: 202007, Second-Printing Information Displays
Page 147 of 577

HEATED REAR WINDOW
Press the button to clear the rear
window of thin ice and fog. The
heated rear window turns off
after a short period of time.
Note: Do not use harsh chemicals, razor
blades or other sharp objects to clean or
remove decals from the inside of the heated
rear window. The vehicle warranty may not
cover damage to the heated rear window
grid lines.
HEATED EXTERIOR MIRRORS
(IF EQUIPPED)
When you switch the heated rear window
on, the heated exterior mirrors turn on.
Note: Do not remove ice from the mirrors
with a scraper or adjust the mirror glass
when it is frozen in place.
Note: Do not clean the mirror housing or
glass with harsh abrasives, fuel or other
petroleum-based cleaning products. The
vehicle warranty may not cover damage
caused to the mirror housing or glass.
REMOTE START (IF EQUIPPED)
The climate control system adjusts the
interior temperature during remote start.
You can switch this feature on or off and
adjust the settings using the touchscreen.
See
Settings (page 464).
You cannot adjust the climate control
setting during remote start operation.
Switch the ignition on to make
adjustments. Based on your remote start settings, the
following vehicle-dependent features may
or may not remain on after remote starting
your vehicle:
•
Climate controlled seats.
• Heated steering wheel.
• Heated mirrors.
• Heated rear window.
• Windshield wiper de-icer.
Note: For dual zone climate controlled
seats, the passenger seat setting defaults
to match the driver seat during remote start.
Automatic Settings
If
Auto is on, the system sets the interior
temperature to 72°F (22°C) and heats or
cools the vehicle interior as required to
achieve comfort.
Note: In cold weather, the heated rear
window and heated mirrors turn on.
Last Settings
If
Last Settings is on, the system uses the
settings last selected before you turned
off the vehicle.
Heated and Cooled Features
In Auto mode, certain heated features may
switch on during cold weather, and cooled
features during hot weather.
144
Explorer (CTW), enUSA, Edition date: 202007, Second-Printing Climate ControlE184884
Page 149 of 577
SITTING IN THE CORRECT
POSITION
WARNING: Sitting improperly, out
of position or with the seatback reclined
too far can take weight off the seat
cushion and affect the decision of the
passenger sensing system, resulting in
serious injury or death in the event of a
crash. Always sit upright against your
seat back, with your feet on the floor. WARNING: Do not recline the seat
backrest too far as this can cause the
occupant to slide under the seatbelt,
resulting in personal injury in the event
of a crash. WARNING:
Do not place objects
higher than the top of the seat backrest.
Failure to follow this instruction could
result in personal injury or death in the
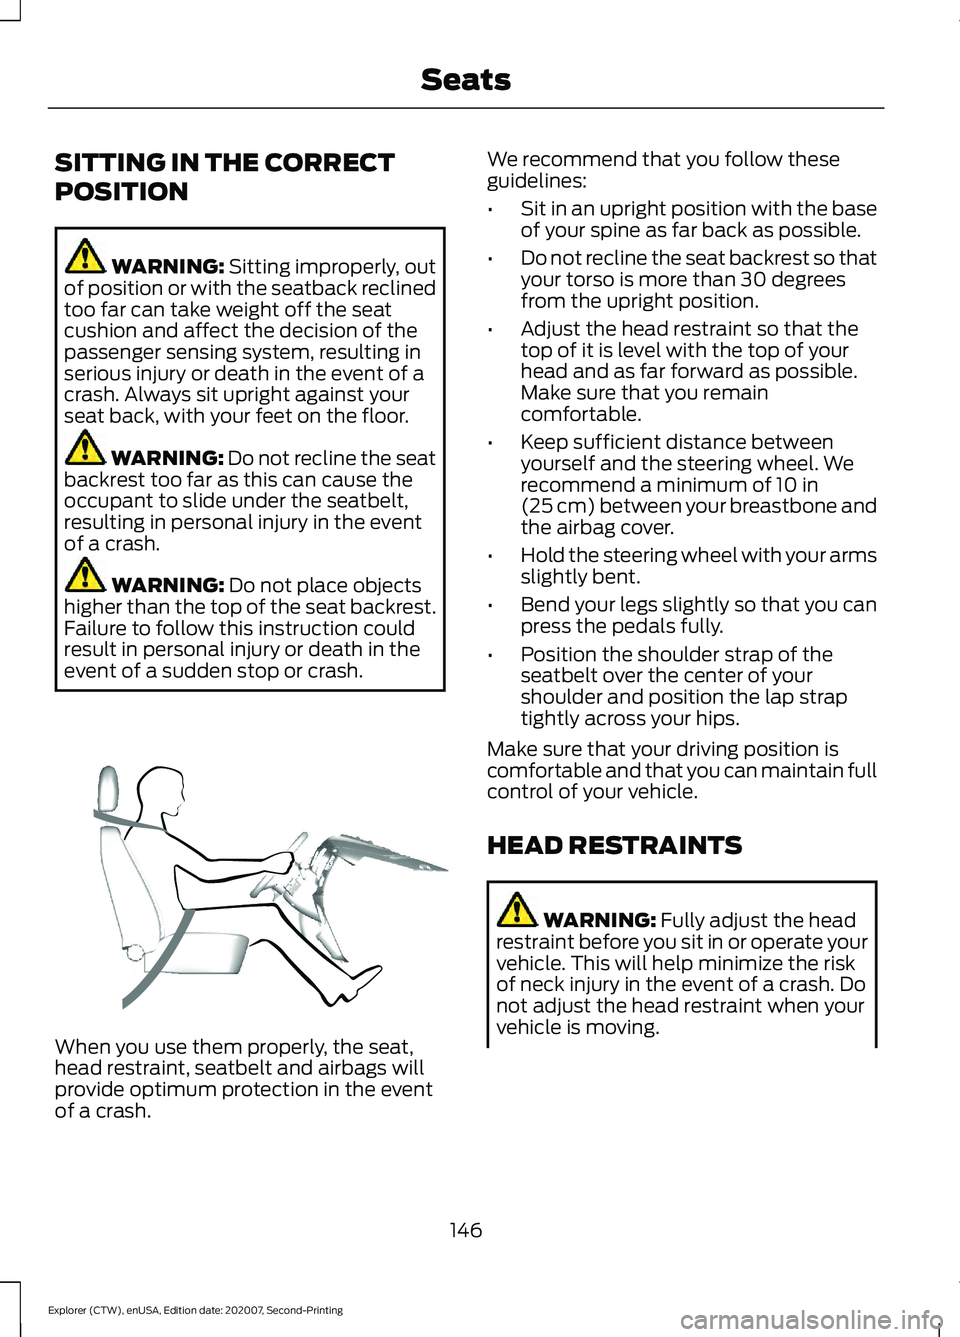
event of a sudden stop or crash. When you use them properly, the seat,
head restraint, seatbelt and airbags will
provide optimum protection in the event
of a crash. We recommend that you follow these
guidelines:
•
Sit in an upright position with the base
of your spine as far back as possible.
• Do not recline the seat backrest so that
your torso is more than 30 degrees
from the upright position.
• Adjust the head restraint so that the
top of it is level with the top of your
head and as far forward as possible.
Make sure that you remain
comfortable.
• Keep sufficient distance between
yourself and the steering wheel. We
recommend a minimum of
10 in
(25 cm) between your breastbone and
the airbag cover.
• Hold the steering wheel with your arms
slightly bent.
• Bend your legs slightly so that you can
press the pedals fully.
• Position the shoulder strap of the
seatbelt over the center of your
shoulder and position the lap strap
tightly across your hips.
Make sure that your driving position is
comfortable and that you can maintain full
control of your vehicle.
HEAD RESTRAINTS WARNING:
Fully adjust the head
restraint before you sit in or operate your
vehicle. This will help minimize the risk
of neck injury in the event of a crash. Do
not adjust the head restraint when your
vehicle is moving.
146
Explorer (CTW), enUSA, Edition date: 202007, Second-Printing SeatsE68595
Page 183 of 577
AUTO-START-STOP (IF EQUIPPED)
The system helps reduce fuel consumption
by automatically stopping and restarting
the engine when your vehicle has stopped.
The engine restarts automatically when
you release the brake pedal.
In some situations, your vehicle may restart
automatically, for example:
• To maintain interior comfort.
• To recharge the battery.
Note: Power assist steering turns off when
the engine is off.
Note: If your vehicle is flex fuel capable,
Auto-Start-Stop will be inhibited for a short
time after a refuel event while the system
is verifying the fuel type being used. WARNING:
Apply the parking
brake, shift into park (P), switch the
ignition off and remove the key before
you leave your vehicle. Failure to follow
this instruction could result in personal
injury or death. WARNING:
Apply the parking
brake, shift into park (P), switch the
ignition off and remove the key before
you open the hood or have any service
or repair work completed. If you do not
switch the ignition off, the engine could
restart at any time. Failure to follow this
instruction could result in personal injury
or death. WARNING:
The system may
require the engine to automatically
restart when the auto-start-stop
indicator illuminates green or flashes
amber. Failure to follow this instruction
could result in personal injury. The Auto-Start-Stop system status is
available at a glance within the information
display.
See Information Displays (page
112).
Enabling Auto-Start-Stop
The system automatically enables every
time you start your vehicle if:
• You do not press the Auto-Start-Stop
button (not illuminated).
• Your vehicle exceeds an initial speed
of
3 mph (5 km/h) after you have
initially started your vehicle.
• You have stopped your vehicle.
• Your foot is on the brake pedal.
• The driver door is closed.
• The interior compartment has cooled
or warmed to an acceptable level.
• The front windshield defroster is off.
• You have not turned the steering wheel
rapidly or you do not have it at a sharp
angle.
• The vehicle is not on a steep road
grade.
• The battery is within optimal operating
conditions (battery state of charge and
temperature in range).
• The engine coolant is near operating
temperature.
• Elevation is below about
12,000 ft
(3,650 m).
• Ambient temperature is moderate.
• The trailer is not connected.
• If you select Normal, Eco, Snow/Wet
or Grass/Gravel/Snow modes.
• You are not in 4H or 4L.
• You have not selected Manual shift
mode.
• Hill descent control is not active.
• You have not selected Tow haul, Sport,
Sand or Mud/Rut modes.
180
Explorer (CTW), enUSA, Edition date: 202007, Second-Printing Unique Driving Characteristics
Page 205 of 577
The electric parking brake may apply when
you shift to park (P) without the brake
pedal fully pressed. The electric parking
brake applies when you shift to park (P)
on large slopes. The electric parking brake
releases with the drive away release
function or manually as described in the
Releasing the Electric Parking Brake
section. See Electric Parking Brake
(page 215).
Note: A warning tone sounds if you open
the driver door and you have not shifted the
transmission selector to park (P).
Reverse (R)
With the transmission selector in reverse
(R), your vehicle moves backward. Always
come to a complete stop before shifting
into and out of reverse (R).
Neutral (N)
With the transmission selector in neutral
(N), you can start your vehicle and it is free
to roll. Hold the brake pedal down when in
this position.
Drive (D)
Drive (D) is the normal driving position for
the best fuel economy and smoothness.
Shift the transmission selector to drive (D)
to allow your vehicle to move forward and
shift automatically through the forward
gears.
The transmission shifts to the appropriate
gear for optimum performance based on
ambient temperature, road slope, vehicle
load and your input. Manual Mode (M) - Vehicles with
Paddle Shifters
With the transmission selector in manual
(M), the driver can change gears up or
down. After selecting the Manual (M)
button while the transmission range
selector is in Drive (D) position you now
have control of selecting the gear you
desire using shift buttons on the steering
wheel. See Understanding your SelectShift
Automatic
™ transmission later in this
section.
To exit manual mode, push the manual
(M) button on your transmission selector.
Low (L) - Vehicles without Paddle
Shifters
With the transmission selector in low (L),
your vehicle provides maximum engine
braking. You can shift the transmission into
low (L) at any vehicle speed. The intent is
not for use under extended or normal
driving conditions, and results in lower fuel
economy.
Automatic Return to Park
Note: This feature does not operate when
your vehicle is in Stay in Neutral mode or
neutral tow.
The transmission returns to park (P) if any
of the following occur:
• You switch the ignition off.
• Your seatbelt is not fastened, and you
open the driver door.
• The driver door is open, and you
unfasten your seatbelt.
If you switch the ignition off when your
vehicle is moving, your vehicle shifts into
neutral (N) until it slows down enough to
shift into park (P).
202
Explorer (CTW), enUSA, Edition date: 202007, Second-Printing Transmission
Page 207 of 577
SelectShift Automatic
™
Transmission (If Equipped)
Your vehicle has a SelectShift Automatic
transmission, which gives you the ability
to change gears up or down, without a
clutch, as preferred.
To prevent the engine from running at too
low an RPM, which may cause it to stall,
SelectShift still automatically makes some
downshifts if it has determined that you
have not downshifted in time. Although
SelectShift makes some downshifts for
you, it still allows you to downshift at any
time if SelectShift determines that
damage to the engine from over-revving
does not occur.
Note: Engine damage may occur if you
maintain excessive engine revving without
shifting.
Note: Vehicles may have either steering
wheel controls or gearshift lever controls.
SelectShift could upshift if the engine
reaches its RPM limit. It may also be
upshifted by pressing the + button on the
steering wheel or shift lever control.
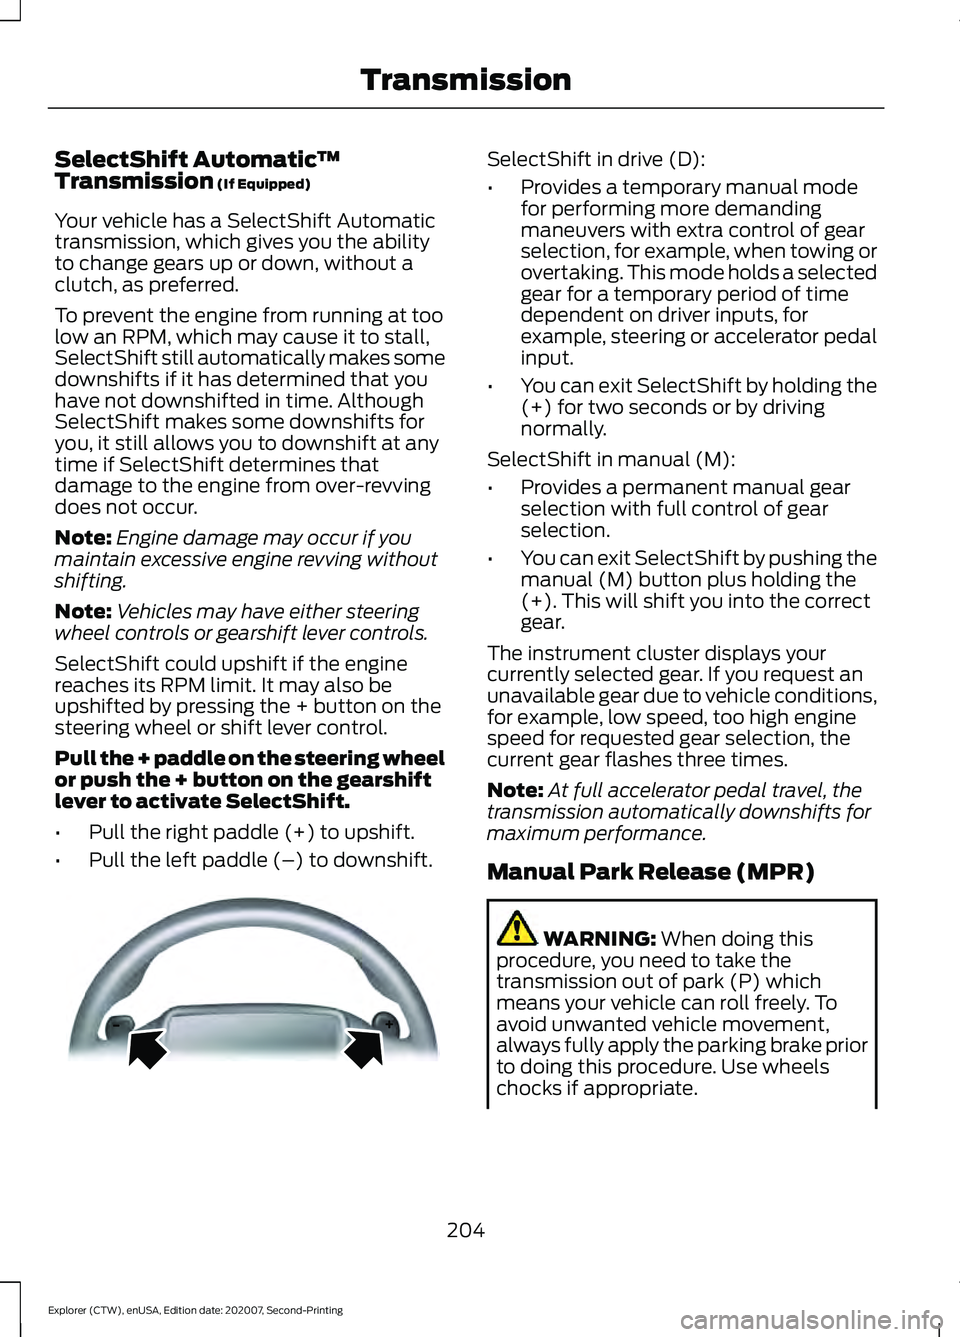
Pull the + paddle on the steering wheel
or push the + button on the gearshift
lever to activate SelectShift.
• Pull the right paddle (+) to upshift.
• Pull the left paddle (–) to downshift. SelectShift in drive (D):
•
Provides a temporary manual mode
for performing more demanding
maneuvers with extra control of gear
selection, for example, when towing or
overtaking. This mode holds a selected
gear for a temporary period of time
dependent on driver inputs, for
example, steering or accelerator pedal
input.
• You can exit SelectShift by holding the
(+) for two seconds or by driving
normally.
SelectShift in manual (M):
• Provides a permanent manual gear
selection with full control of gear
selection.
• You can exit SelectShift by pushing the
manual (M) button plus holding the
(+). This will shift you into the correct
gear.
The instrument cluster displays your
currently selected gear. If you request an
unavailable gear due to vehicle conditions,
for example, low speed, too high engine
speed for requested gear selection, the
current gear flashes three times.
Note: At full accelerator pedal travel, the
transmission automatically downshifts for
maximum performance.
Manual Park Release (MPR) WARNING:
When doing this
procedure, you need to take the
transmission out of park (P) which
means your vehicle can roll freely. To
avoid unwanted vehicle movement,
always fully apply the parking brake prior
to doing this procedure. Use wheels
chocks if appropriate.
204
Explorer (CTW), enUSA, Edition date: 202007, Second-Printing TransmissionE144821