2021 FORD ESCAPE clock
[x] Cancel search: clockPage 354 of 589

3. Disconnect the electrical connector.
4. To install, reverse the removal
procedure.
Changing a Front Fog Lamp Bulb
1. If you are replacing the driver side bulb,
turn the steering wheel all the way to
the right. If you are replacing the
passenger side bulb, turn the steering
wheel all the way to the left. 2. Remove the six lower splash shield
push pins and pull the splash shield
back. 3. Disconnect the bulb electrical
connector.
4. To remove the bulb from the headlamp
assembly, turn it counterclockwise,
then pull it straight out.
5. To install, perform these steps in reverse order.
Changing a Reversing Lamp Bulb 1. Remove the screws with a flathead
screwdriver and pull the lamp
assembly away from the vehicle.
2. Remove the bulb by turning the lower bulb socket counterclockwise. Gently
pull the bulb straight out of the socket.
3. To install, reverse the removal procedure.
INTERIOR BULBS
Interior Bulb Specification Chart
Your vehicle has LED lamps. These are not
serviceable items. See an authorized dealer
if they fail.
351
Escape (CTC) Canada/United States of America, Vehicles Built From: 02-11-2020, enUSA, Edition date: 202011, First-Printing MaintenanceE311716 E311715 E307887
Page 381 of 589

•
In the first stage, the tire will be
reinflated with a sealing compound
and air. After the tire has been inflated,
you will need to drive the vehicle a
short distance approximately 4 mi
(6 km) to distribute the sealant in the
tire.
• In the second stage, you will need to
check the tire pressure and adjust, if
necessary, to the vehicle's specified
tire inflation pressure.
First Stage: Reinflating the Tire
with sealing compound and air WARNING:
Do not stand directly
over the kit while inflating the tire. If you
notice any unusual bulges or
deformations in the tire's sidewall during
inflation, stop and call roadside
assistance. WARNING:
If the tire does not
inflate to the recommended tire pressure
within 15 minutes, stop and call roadside
assistance.
Park the vehicle in a safe, level and secure
area, away from moving traffic.
Turn the hazard lights on. Apply the parking
brake and power off the vehicle. Inspect
the flat tire for visible damage.
If a puncture is located in the tire sidewall,
stop and call roadside assistance.
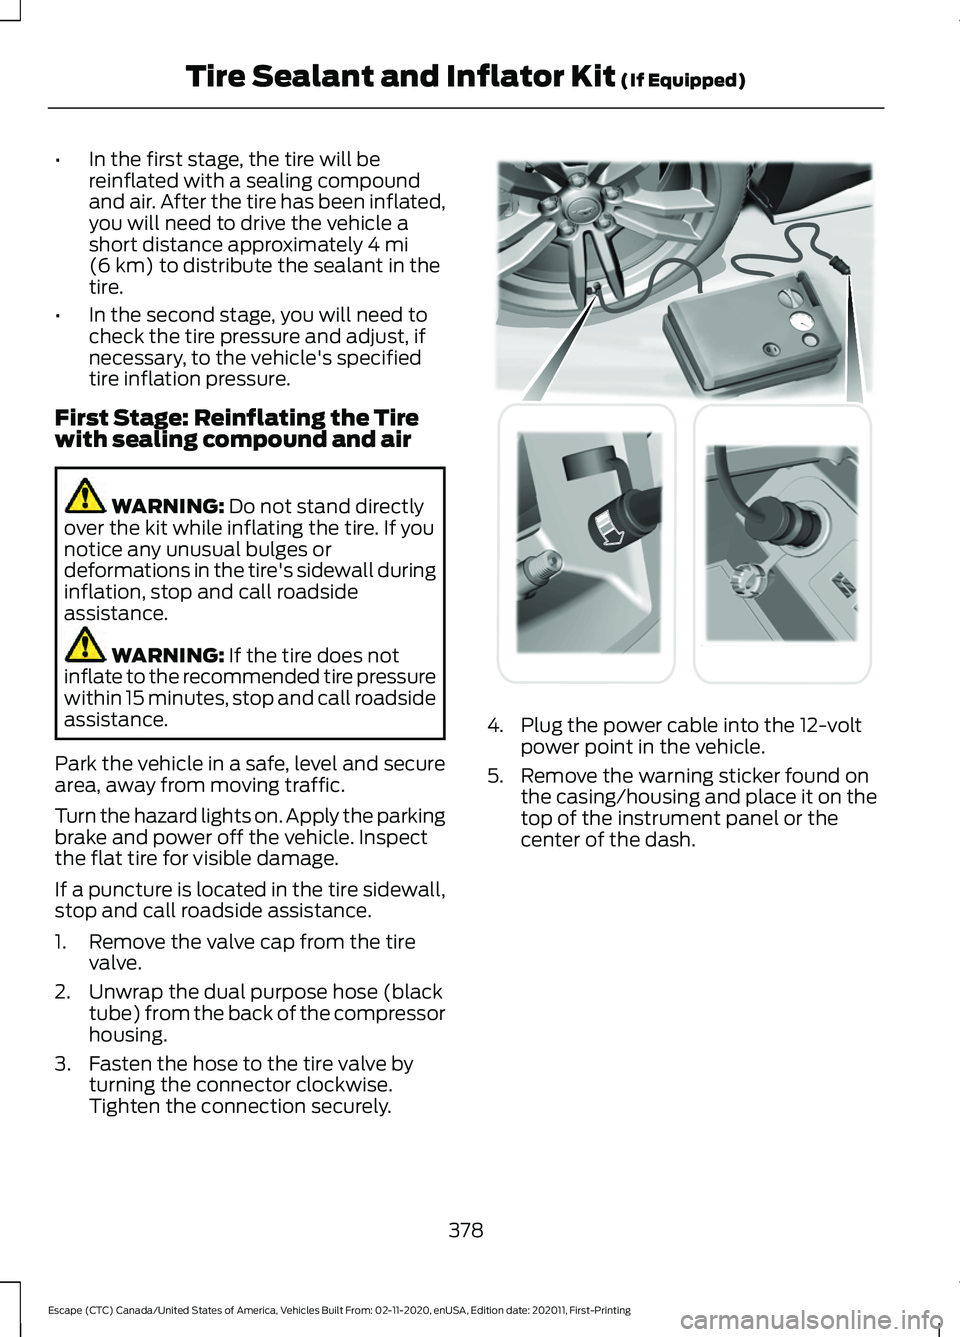
1. Remove the valve cap from the tire valve.
2. Unwrap the dual purpose hose (black tube) from the back of the compressor
housing.
3. Fasten the hose to the tire valve by turning the connector clockwise.
Tighten the connection securely. 4. Plug the power cable into the 12-volt
power point in the vehicle.
5. Remove the warning sticker found on the casing/housing and place it on the
top of the instrument panel or the
center of the dash.
378
Escape (CTC) Canada/United States of America, Vehicles Built From: 02-11-2020, enUSA, Edition date: 202011, First-Printing Tire Sealant and Inflator Kit
(If Equipped) E175979
Page 382 of 589

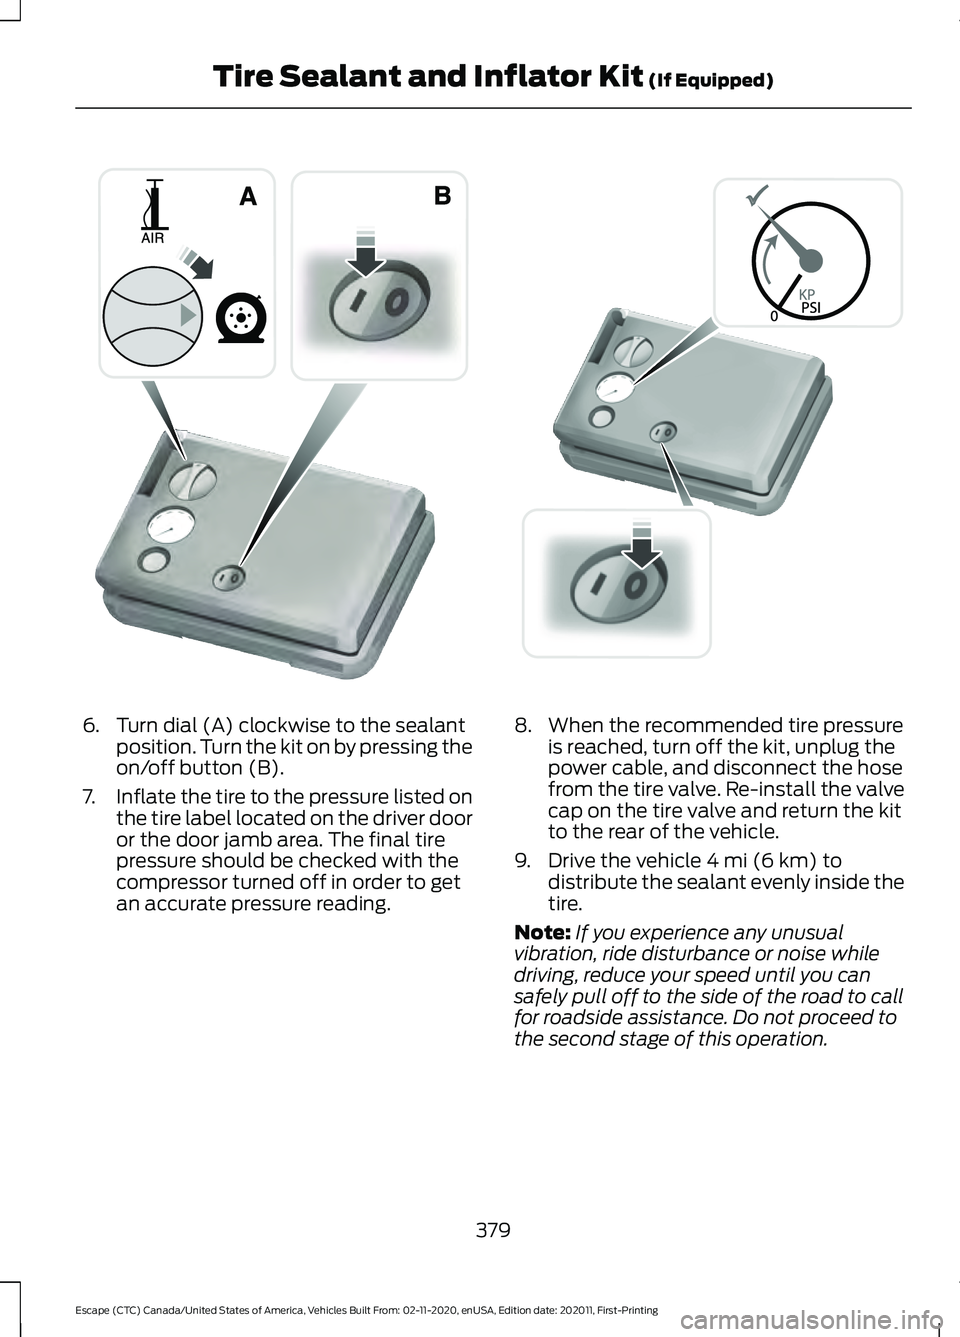
6. Turn dial (A) clockwise to the sealant
position. Turn the kit on by pressing the
on/off button (B).
7. Inflate the tire to the pressure listed on
the tire label located on the driver door
or the door jamb area. The final tire
pressure should be checked with the
compressor turned off in order to get
an accurate pressure reading. 8. When the recommended tire pressure
is reached, turn off the kit, unplug the
power cable, and disconnect the hose
from the tire valve. Re-install the valve
cap on the tire valve and return the kit
to the rear of the vehicle.
9. Drive the vehicle 4 mi (6 km) to
distribute the sealant evenly inside the
tire.
Note: If you experience any unusual
vibration, ride disturbance or noise while
driving, reduce your speed until you can
safely pull off to the side of the road to call
for roadside assistance. Do not proceed to
the second stage of this operation.
379
Escape (CTC) Canada/United States of America, Vehicles Built From: 02-11-2020, enUSA, Edition date: 202011, First-Printing Tire Sealant and Inflator Kit
(If Equipped)E175981 E175982
Page 383 of 589

Second Stage: Checking the tire
pressure with the inflator kit
WARNING: If the tire does not
inflate to the recommended tire pressure
within 15 minutes, stop and call roadside
assistance. WARNING:
The power plug may
get hot after use and should be handled
carefully when unplugging.
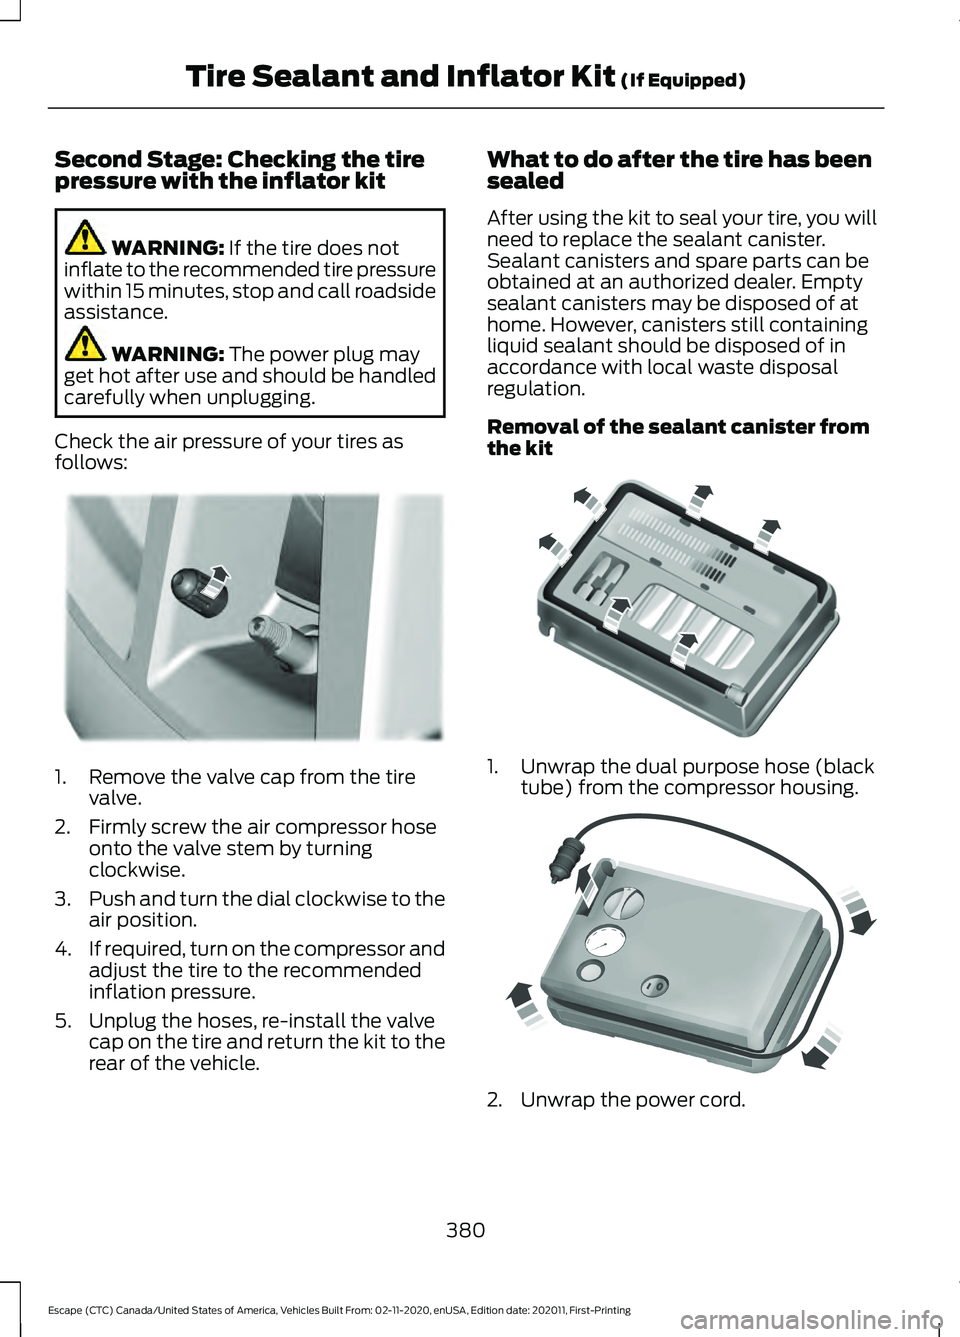
Check the air pressure of your tires as
follows: 1. Remove the valve cap from the tire
valve.
2. Firmly screw the air compressor hose onto the valve stem by turning
clockwise.
3. Push and turn the dial clockwise to the
air position.
4. If required, turn on the compressor and
adjust the tire to the recommended
inflation pressure.
5. Unplug the hoses, re-install the valve cap on the tire and return the kit to the
rear of the vehicle. What to do after the tire has been
sealed
After using the kit to seal your tire, you will
need to replace the sealant canister.
Sealant canisters and spare parts can be
obtained at an authorized dealer. Empty
sealant canisters may be disposed of at
home. However, canisters still containing
liquid sealant should be disposed of in
accordance with local waste disposal
regulation.
Removal of the sealant canister from
the kit
1. Unwrap the dual purpose hose (black
tube) from the compressor housing. 2. Unwrap the power cord.
380
Escape (CTC) Canada/United States of America, Vehicles Built From: 02-11-2020, enUSA, Edition date: 202011, First-Printing Tire Sealant and Inflator Kit
(If Equipped)E175983 E175984 E175985
Page 390 of 589

3. Lift and remove the carpeted cargo
area floor to access the spare tire and
jack.
4. Remove the wing nut that secures the spare tire by turning it
counterclockwise.
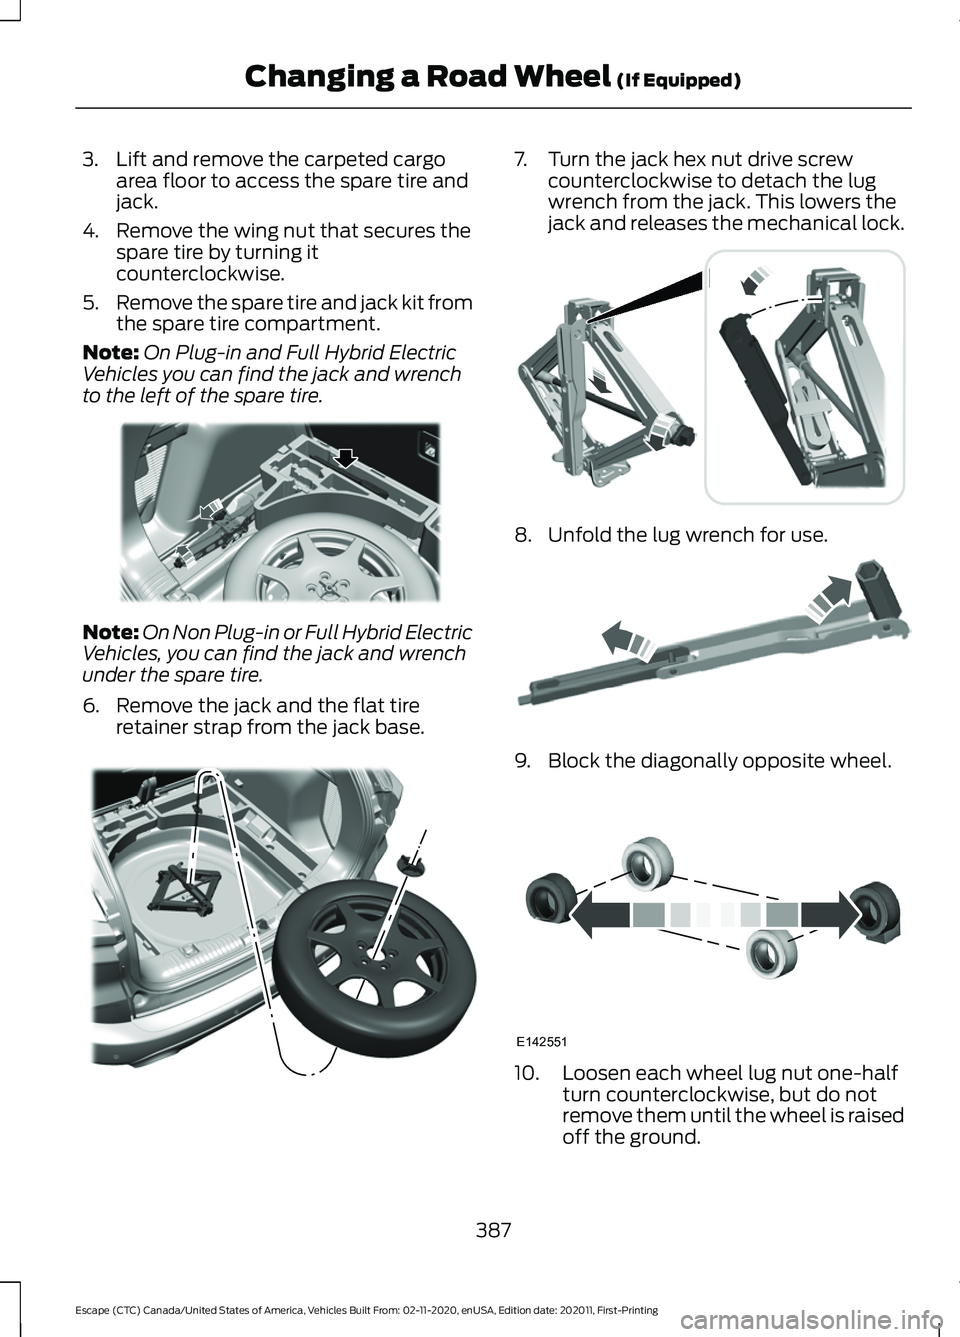
5. Remove the spare tire and jack kit from
the spare tire compartment.
Note: On Plug-in and Full Hybrid Electric
Vehicles you can find the jack and wrench
to the left of the spare tire. Note:
On Non Plug-in or Full Hybrid Electric
Vehicles, you can find the jack and wrench
under the spare tire.
6. Remove the jack and the flat tire retainer strap from the jack base. 7. Turn the jack hex nut drive screw
counterclockwise to detach the lug
wrench from the jack. This lowers the
jack and releases the mechanical lock. 8. Unfold the lug wrench for use.
9. Block the diagonally opposite wheel.
10. Loosen each wheel lug nut one-half
turn counterclockwise, but do not
remove them until the wheel is raised
off the ground.
387
Escape (CTC) Canada/United States of America, Vehicles Built From: 02-11-2020, enUSA, Edition date: 202011, First-Printing Changing a Road Wheel (If Equipped)E294118 E305308 E294117 E181744 E142551
Page 391 of 589

Note:
Jack at the specified locations to
avoid damage to the vehicle.
11. The vehicle jacking points shown here
are also depicted on the warning
label on the jack. Small arrow-shaped
marks on the vehicle sills show the
location of the jacking points.12. Turn the wrench clockwise to raise
the vehicle until the flat tire is
completely off the ground.13. Remove the lug nuts with the lug
wrench.
Note: For vehicles with full wheel covers
with exposed wheel nuts, remove the wheel
nuts prior to removing the wheel cover or
damage to the wheel cover may occur.
14. Replace the flat tire with the spare tire, making sure the valve stem is
facing outward. Reinstall the lug nuts
until the wheel is snug against the
hub. Do not fully tighten the lug nuts
until the wheel has been lowered. 15. Lower the wheel by turning the jack
handle counterclockwise.
16. Remove the jack and fully tighten the
lug nuts in the order shown. Stowing the flat tire
1. To store the jack kit on Non Plug-in or
Full Hybrid Electric Vehicles, fold the
jack and wrench handle and engage it
to the bracket of the jack base using
the lug wrench pin.
Note: To store the jack and wrench on
Plug-in and Full Hybrid Electric Vehicles,
fold the jack and wrench into the closed
position, and place the wrench into the
storage compartment. Position the jack
assembly into the closed position and make
sure the jack is fastened securely before you
drive.
2. When attaching the folded wrench on the jack, swing the wrench upward and
adjust the jack height until the wrench
hook engages the hole on the jack.
Tighten the hex nut clockwise until
secure.
388
Escape (CTC) Canada/United States of America, Vehicles Built From: 02-11-2020, enUSA, Edition date: 202011, First-Printing Changing a Road Wheel (If Equipped)E145908 E338668 12
3
4
5E306781
Page 418 of 589

Note:
The audio mutes briefly while the
system saves the preset and returns once it
is stored.
Note: You can save presets from multiple
sources to the memory preset bar.
MUTING THE AUDIO Press the button on the steering
wheel to mute the audio.
Press to mute the signal. Press
again to restore the signal.
ADJUSTING THE SOUND
SETTINGS
Balance and Fade (If Equipped)
1. Access the vehicle drawer on the touchscreen.
2. Press
SETTINGS.
3. Press
Sound.
4. Press
Balance / Fade.
5. Press the arrows to adjust the settings.
Tone Settings
1. Access the vehicle drawer on the touchscreen.
2. Press
SETTINGS.
3. Press
Sound.
4. Press
Tone Settings.
5. Use the slider bar to adjust the settings.
Speed Compensated Volume
1. Access the vehicle drawer on the touchscreen.
2. Press
SETTINGS.
3. Press
Sound.
4. Press
Speed Compensated Volume. 5. Press a setting.
Occupancy Mode
(If Equipped)
1. Access the vehicle drawer on the touchscreen.
2. Press
SETTINGS.
3. Press
Sound.
4. Press
Occupancy Mode.
5. Press a setting.
Sound Mode
(If Equipped)
1. Access the vehicle drawer on the touchscreen.
2. Press
SETTINGS.
3. Press
Sound.
4. Press
Sound Mode.
5. Press a setting.
SETTING THE CLOCK AND
DATE
1. Access the vehicle drawer on the touchscreen.
2. Press
SETTINGS.
3. Press
Clock.
4. Set the time.
Note: The
AM and PM options are not
available if 24-hour mode is on.
5. Press the arrows to adjust the settings.
Switching Automatic Time
Updates On and Off
1. Access the vehicle drawer on the touchscreen.
2. Press
SETTINGS.
3. Press
Clock.
4. Switch
Automatic time zone update
on or off.
415
Escape (CTC) Canada/United States of America, Vehicles Built From: 02-11-2020, enUSA, Edition date: 202011, First-Printing Audio System
Page 439 of 589

GENERAL INFORMATION
WARNING: Driving while distracted
can result in loss of vehicle control, crash
and injury. We strongly recommend that
you use extreme caution when using any
device that may take your focus off the
road. Your primary responsibility is the
safe operation of your vehicle. We
recommend against the use of any
hand-held device while driving and
encourage the use of voice-operated
systems when possible. Make sure you
are aware of all applicable local laws
that may affect the use of electronic
devices while driving.
About SYNC
The system allows you to interact with the
entertainment, information and
communication systems on your vehicle
using voice commands and a touchscreen.
The system provides easy interaction with
audio, phone, navigation, mobile apps and
settings.
Note: You can switch the system on and
use it for up to an hour without switching
the ignition on.
Note: You can use the system after you
switch the ignition off for up to 10 minutes
or until you open a door.
Note: For your safety, some features are
speed-dependent. Their use is limited to
when your vehicle speed is less than 3 mph
(5 km/h). Using the Touchscreen
Status bar.
A
Home screen.
B
Clock. See Settings (page 469).
C
Outside air temperature.
D
Feature bar.
E
Status Bar Cell phone microphone muted.
Audio system muted.
Software update installed.
Wi-Fi connected.
Cell phone roaming.
Text message received.
436
Escape (CTC) Canada/United States of America, Vehicles Built From: 02-11-2020, enUSA, Edition date: 202011, First-Printing SYNC™ 3
(If Equipped)E293823