2021 FORD BRONCO SPORT tires
[x] Cancel search: tiresPage 214 of 471
Why is the feature not available, line markings are gray, when I can see the lane markings
on the road?
Lane width is too narrow or too wide.
The camera has not been calibrated after a windshield replacement.
Driving on tight roads or on uneven roads. Why does the vehicle not come back toward the middle of the lane, as expected, in the
aid or aid + alert mode?
High cross winds are present.
There is a large road crown.
Rough roads, grooves or shoulder drop-offs.
Heavy uneven loading of the vehicle or improper tire inflation pressure.
The tires have been changed, or the suspension has been modified.
BLIND SPOT INFORMATION
SYSTEM WARNING: Do not use the blind
spot information system as a
replacement for using the interior and
exterior mirrors or looking over your
shoulder before changing lanes. The
blind spot information system is not a
replacement for careful driving. WARNING:
The system may not
operate properly during severe weather
conditions, for example snow, ice, heavy
rain and spray. Always drive with due
care and attention. Failure to take care
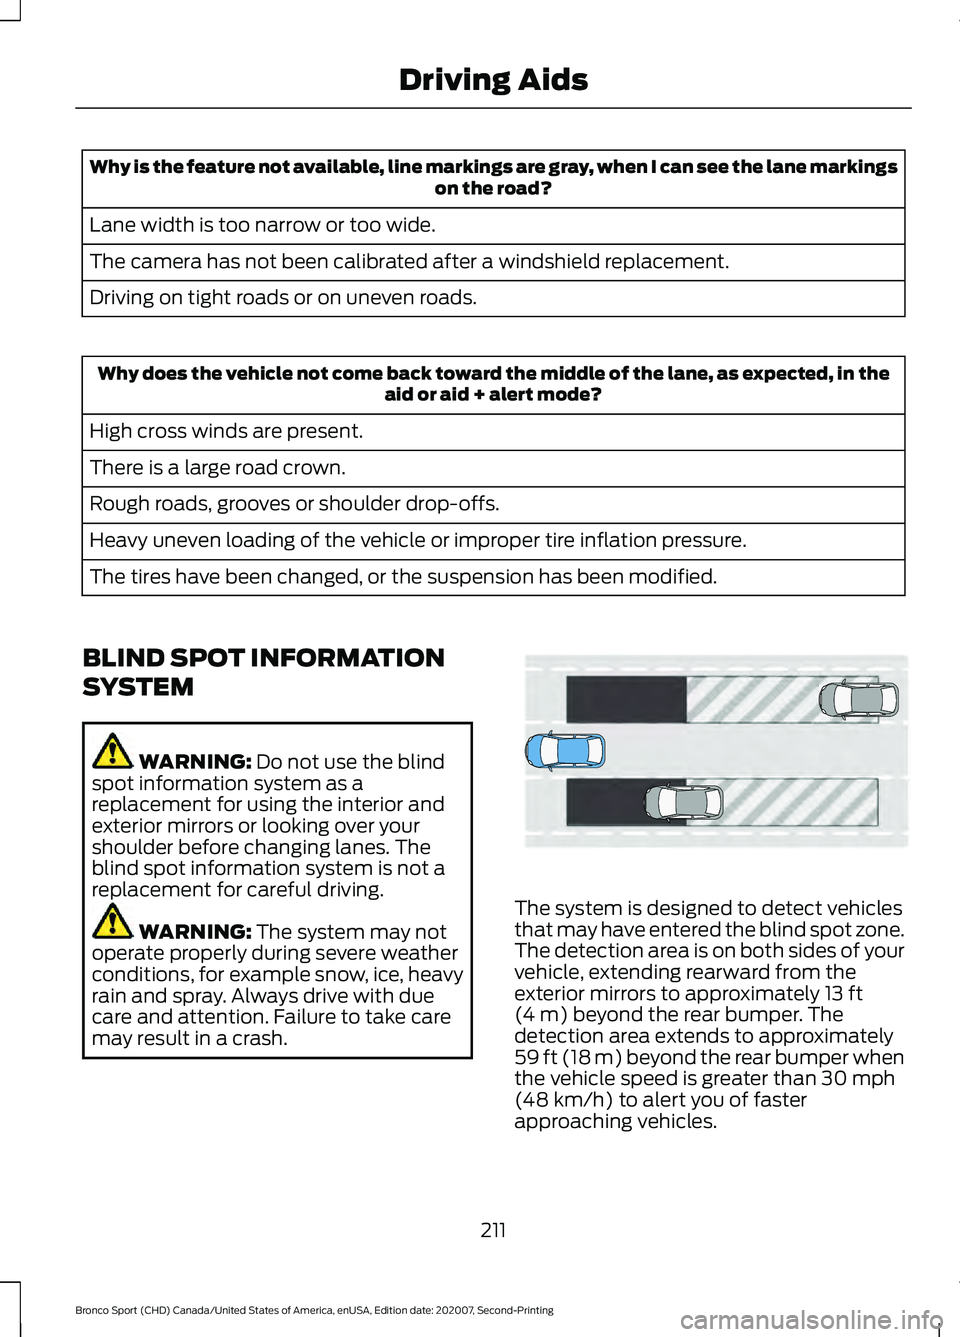
may result in a crash. The system is designed to detect vehicles
that may have entered the blind spot zone.
The detection area is on both sides of your
vehicle, extending rearward from the
exterior mirrors to approximately
13 ft
(4 m) beyond the rear bumper. The
detection area extends to approximately
59 ft (18 m)
beyond the rear bumper when
the vehicle speed is greater than 30 mph
(48 km/h) to alert you of faster
approaching vehicles.
211
Bronco Sport (CHD) Canada/United States of America, enUSA, Edition date: 202007, Second-Printing Driving AidsE255695
Page 233 of 471
be used for safe control of towed
vehicles and for trailers where the
Gross Combined Weight of the
towing vehicle plus the trailer
exceed the Gross Vehicle Weight
Rating of the towing vehicle.
The gross combined weight must
never exceed the Gross Combined
Weight Rating.
Note:
For trailer towing
information refer to the RV and
Trailer Towing Guide available at
an authorized dealer. WARNING: Do not exceed
the GVWR or the GAWR
specified on the certification
label. WARNING:
Do not use
replacement tires with lower
load carrying capacities than the
original tires because they may
lower your vehicle's GVWR and
GAWR limitations. Replacement
tires with a higher limit than the
original tires do not increase the
GVWR and GAWR limitations. WARNING: Exceeding any
vehicle weight rating can
adversely affect the
performance and handling of
your vehicle, cause vehicle
damage and can result in the
loss of control of your vehicle,
serious personal injury or death. Steps for determining the
correct load limit:
1. Locate the statement "The
combined weight of occupants
and cargo should never exceed
XXX kg or XXX lb." on your
vehicle ’s placard.
2. Determine the combined
weight of the driver and
passengers that will be riding
in your vehicle.
3. Subtract the combined weight
of the driver and passengers
from XXX kg or XXX lb.
4. The resulting figure equals the
available amount of cargo and
luggage load capacity. For
example, if the “XXX” amount
equals 1,400 lb. and there will
be five 150 lb. passengers in
your vehicle, the amount of
available cargo and luggage
load capacity is 650 lb.
(1400-750 (5 x 150) = 650 lb.)
5. Determine the combined
weight of luggage and cargo
being loaded on the vehicle.
That weight may not safely
exceed the available cargo and
luggage load capacity
calculated in Step 4.
6. If your vehicle will be towing a
trailer, load from your trailer
will be transferred to your
vehicle. Consult this manual to
determine how this reduces the
available cargo and luggage
load capacity of your vehicle.
230
Bronco Sport (CHD) Canada/United States of America, enUSA, Edition date: 202007, Second-Printing Load Carrying
Page 238 of 471
TOWING A TRAILER
WARNING: Towing trailers
beyond the maximum
recommended gross trailer
weight exceeds the limit of your
vehicle and could result in engine
damage, transmission damage,
structural damage, loss of
vehicle control, vehicle rollover
and personal injury. WARNING:
Do not exceed
the GVWR or the GAWR
specified on the certification
label.
Note: See
Recommended
Towing Weights (page 236).
Your vehicle may have electrical
items, such as fuses or relays,
related to towing. See
Fuses
(page 262).
Your vehicle's load capacity
designation is by weight, not by
volume, so you cannot necessarily
use all available space when
loading a vehicle or trailer.
Towing a trailer places an extra
load on your vehicle's engine,
transmission, axle, brakes, tires
and suspension. Inspect these
components periodically during,
and after, any towing operation. Load Placement
To help minimize how trailer
movement affects your vehicle
when driving:
•
Load the heaviest items closest
to the trailer floor.
• Load the heaviest items
centered between the left and
right side trailer tires.
• Load the heaviest items above
the trailer axles or just slightly
forward toward the trailer
tongue. Do not allow the final
trailer tongue weight to go
above or below 10-15% of the
loaded trailer weight.
• Select a ball mount with the
correct rise or drop and load
capacity. When both the
loaded vehicle and trailer are
connected, the trailer frame
should be level, or slightly
angled down toward your
vehicle, when viewed from the
side.
When driving with a trailer or
payload, a slight takeoff vibration
or shudder may be present due to
the increased payload weight.
Additional information regarding
proper trailer loading and setting
your vehicle up for towing is
located in another chapter of this
manual. See
Load Limit (page
227).
You can also find information in
the
RV & Trailer Towing Guide
available at your authorized
dealer, or online.
235
Bronco Sport (CHD) Canada/United States of America, enUSA, Edition date: 202007, Second-Printing Towing
Page 242 of 471
Trailer Lamps
WARNING: Never connect any
trailer lamp wiring to the vehicle's tail
lamp wiring; this may damage the
electrical system resulting in fire. Contact
your authorized dealer as soon as
possible for assistance in proper trailer
tow wiring installation. Additional
electrical equipment may be required.
Trailer lamps are required on most towed
vehicles. Make sure all running lights, brake
lights, turn signals and hazard lights are
working.
Before Towing a Trailer
Practice turning, stopping and backing up
to get the feel of your vehicle-trailer
combination before starting on a trip.
When turning, make wider turns so the
trailer wheels clear curbs and other
obstacles.
When Towing a Trailer
• Do not drive faster than
70 mph
(113 km/h) during the first 500 mi
(800 km).
• Do not make full-throttle starts.
• Check your hitch, electrical connections
and trailer wheel lug nuts thoroughly
after you have traveled 50 mi (80 km).
• When stopped in congested or heavy
traffic during hot weather, place the
transmission in park (P) to aid engine
and transmission cooling and to help
A/C performance.
• Turn off the speed control with heavy
loads or in hilly terrain. The speed
control may turn off automatically
when you are towing on long, steep
grades. •
Shift to a lower gear when driving down
a long or steep hill. Do not apply the
brakes continuously, as they may
overheat and become less effective.
• If your transmission is equipped with a
Grade Assist or Tow/Haul feature, use
this feature when towing. This provides
engine braking and helps eliminate
excessive transmission shifting for
optimum fuel economy and
transmission cooling.
• Allow more distance for stopping with
a trailer attached. Anticipate stops and
brake gradually.
• Avoid parking on a grade. However, if
you must park on a grade:
1. Turn the steering wheel to point your vehicle tires away from traffic flow.
2. Set your vehicle parking brake.
3. Place the automatic transmission in park (P).
4. Place wheel chocks in front and back of the trailer wheels. Chocks are not
included with your vehicle.
Launching or Retrieving a Boat or
Personal Watercraft (PWC)
Note: Disconnect the wiring to the trailer
before
backing the trailer into the water.
Note: Reconnect the wiring to the trailer
after
removing the trailer from the water.
When backing down a ramp during boat
launching or retrieval:
• Do not allow the static water level to
rise above the bottom edge of the rear
bumper.
• Do not allow waves to break higher
than
6 in (15 cm) above the bottom
edge of the rear bumper.
239
Bronco Sport (CHD) Canada/United States of America, enUSA, Edition date: 202007, Second-Printing Towing
Page 246 of 471
Driving In Sand
When driving over sand, try to keep all four
wheels on the most solid area of the trail.
Drive through the terrain without varying
vehicle speed. Apply the accelerator and
avoid excessive wheel slip.
When driving at slow speeds in deep sand
under high ambient temperatures, use low
(L) mode, or shift to a lower gear when
possible. Select Low (L) mode or select a
lower gear to maximize the engine and
transmission cooling capability. See
Transmission (page 166).
Use the vehicle's momentum to maintain
forward motion in sand. Avoid coming to
a stop on steep sand slopes as the vehicle
may not be able to continue forward after
it has stopped.
Driving In Mud
Be cautious of sudden changes in vehicle
speed or direction when you are driving in
mud.
Even four-wheel drive vehicles can lose
traction in slick mud. If your vehicle does
slide, steer in the direction of the slide until
you regain control of your vehicle.
After driving through mud, clean off residue
stuck to rotating driveshafts and tires.
Excess mud stuck on tires and rotating
driveshafts can cause an imbalance that
could damage drive components.
Note: The vehicle brakes are less effective
when wet or muddy.
Driving Over Rocks and Gravel
Gravel is a constantly changing, low-grip
surface. Driving at slow speeds on gravel
reduces the risk of losing traction when you
stop, accelerate or turn a corner.
When approaching large rocks, position
the vehicle so that the tires pass over the
largest obstacle. Note:
Never attempt to straddle a rock that
is large enough to strike your axles or
undercarriage.
Note: Never attempt to drive over a rock
which is large enough to contact the door
sills.
If you lose traction on your wheels facing
uphill, stop and choose a more suitable
route.
Leave a generous gap between your
vehicle and other vehicles to minimize the
risk of damage from flying gravel. Avoid
dust clouds as they reduce visibility.
Before navigating on uneven ground,
secure anything inside the vehicle. If
possible, remove any roof-rack items. Use
the lowest gear possible and approach the
obstacle at a slow speed.
If your vehicle begins to slide down a slope,
steer downhill and gently apply the
throttle. If you lose traction on your uphill
wheels, stop immediately and choose a
more suitable route.
Approach logs, rocky steps or ditches
diagonally. Keep at least three wheels on
the ground at all times.
Climbing A Hill WARNING:
Extreme care should
be used when steering the vehicle in
reverse down a slope so as not to cause
the vehicle to swerve out of control.
Although natural obstacles can make it
necessary to travel diagonally up or down
a hill or steep incline, try to drive straight
up or straight down.
Note: Avoid turning on steep slopes or hills.
A danger lies in losing traction, slipping
sideways and possible vehicle roll over.
Whenever driving on a hill, first determine
the route you can use.
243
Bronco Sport (CHD) Canada/United States of America, enUSA, Edition date: 202007, Second-Printing Driving Hints
Page 247 of 471
When climbing a steep slope or hill, start
in a lower gear rather than downshifting to
a lower gear from a higher gear. This
reduces strain on the engine and the
possibility of stalling.
If your vehicle stalls, do not try to turn
around because this could cause your
vehicle to roll over. It is better to reverse
back to a safe location.
Do not drive over the crest of a hill without
seeing what conditions are on the other
side. Do not drive in reverse over a hill
without the aid of an observer.
If the vehicle is unable to make it up the
hill, do not attempt to turn back down the
slope.
Apply the accelerator just enough for the
wheels to climb the hill.
Note:
Too much acceleration can cause
the tires to slip, spin or lose traction,
resulting in loss of vehicle control.
Descending A Hill:
• Use the same gear you would use to
climb the hill.
• Do not descend in neutral.
• Disengage overdrive.
• Avoid sudden and excessive braking.
Note: The front wheels have to be turning
in order to steer your vehicle.
When descending a steep hill in a manual
transmission vehicle do not leave the
vehicle in gear with the clutch depressed.
This could cause damage to your driveline.
Driving Through Water WARNING: Do not attempt to
cross a deep, fast flowing body of water.
Failure to follow this instruction could
result in the loss of control of your
vehicle, personal injury or death. As the water depth increases, you must
reduce your vehicle speed to avoid
potential vehicle damage.
The key to a safe crossing is the water
depth, current and bottom of the water's
condition. On soft bottoms, the vehicle
sinks in, effectively increasing the water
level on the vehicle. Make sure to consider
this when determining the depth of water.
Determine the depth and speed of the
current before attempting a water crossing.
Be aware that obstacles and debris may
be beneath the water
’s surface.
Note: Cross flowing water at an angle
heading slightly upstream.
Note: You should tread lightly and avoid
damage to the environment.
Drive slow when crossing water. Proceed
with a constant slow speed lightly pressing
on the accelerator.
Drive through the water very slowly when
entering, then build up momentum. Keep
your vehicle moving at a steady pace.
Note: Do not try to accelerate through the
water crossing.
When driving too fast in water or through
deep water, the engine, transmission,
transfer case, axles, electrical components
or vehicle interior could ingest water. Water
can cause permanent damage that may
not be covered by your vehicle warranty.
See
Driving Through Water Limitations
(page 246).
Note: Failure to follow the recommended
speeds can result in vehicle damage.
Never stop or shut a vehicle off when
crossing deep water unless your vehicle
ingested water into the engine air intake.
If the engine stalls, do not attempt to
restart it.
244
Bronco Sport (CHD) Canada/United States of America, enUSA, Edition date: 202007, Second-Printing Driving Hints
Page 248 of 471
Ease off the accelerator as you reach the
other side to diminish the front wave. Apply
the accelerator slowly and as necessary
to climb out of the other side.
Muddy waters can reduce the cooling
system effectiveness by depositing debris
into the radiator.
Extra care must be taken crossing any type
of water. Do not drive into water unless
necessary. You should only drive through
areas that are designated and approved.
High currents even in shallow water can
wash the dirt out from around your tires or
push your vehicle across slippery rocks or
surfaces.
Never attempt to cross flowing water that
is deeper than your vehicles ground
clearance. Even in low currents your
vehicles body surface area can be pushed
downstream and out of control.
Do not cross any body of water that is fast
flowing and rising, wait for the flow rate to
reduce.
Determine exit points that are downstream
of your entry point to allow for drifting.
If there are other vehicles ahead, wait until
they
’ve left the water. Unsettled water can
make a safe passage more challenging.
Know your vehicle ’s abilities and be able
to recover it if something goes wrong.
Keep the doors fully closed during a water
crossing.
Vehicles used to traverse water regularly
should be periodically inspected for signs
of water ingestion in all of the vehicle's
fluids. If water is found inside your vehicle
fluids, service your vehicle or see an
authorized dealer.
After driving through water and as soon as
it is safe to do so, check the brakes, horn,
lights, and steering wheel to make sure
everything is still in working order. Avoid Getting High-Centered
Always keep available ground clearance
in mind and pick a route that minimizes the
risk of catching the underside of the vehicle
on an obstacle and getting high-centered.
Freeing A Stuck Vehicle
WARNING: Do not spin the wheels
at over 34 mph (55 km/h). The tires may
fail and injure a passenger or bystander.
Recovery hooks are mounted to the
vehicle's structure and are used to pull out
the vehicle from a surface or location when
stuck. Recover your vehicle using various
towing apparatus attached to your
recovery hook such as winch, open hook,
or strap.
Note: Do not use recovery hooks to
recreationally tow your vehicle. See Towing
the Vehicle on Four Wheels
(page 240).
If your vehicle gets stuck in mud or snow,
you may rock it out by shifting between
forward and reverse gears, stopping
between shifts in a steady pattern. Press
the accelerator in each gear.
Note: Do not rock your vehicle if the engine
is not at normal operating temperature
damage to the transmission may occur.
Note: Do not rock your vehicle for more
than a minute damage to the transmission
and tires may occur or the engine may
overheat.
If you are unable to free your vehicle call
roadside assistance. See
Roadside
Assistance (page 250).
245
Bronco Sport (CHD) Canada/United States of America, enUSA, Edition date: 202007, Second-Printing Driving Hints
Page 250 of 471
Trail Control allows you to set a speed
between 1 mph (1.6 km/h) to 14 mph
(23 km/h) in a forward motion and 1 mph
(1.6 km/h) to 5 mph (8 km/h) in reverse.
The system controls acceleration and
braking in difficult off-road environments,
which allows you to focus on steering. See
What Is Trail Control
(page 184).
Trail Control Performance:
• Manages wheel slip to maximize
traction.
• Removes the need for you to use both
feet when driving in off-road situations.
• Provides braking to maximize traction
in descents.
• Gives you confidence in difficult
environments.
After Driving Your Vehicle Off-
Road WARNING:
After off-road use,
before returning to the road, check the
wheels and tires for damage. Off-road
use may cause damage to your wheels
and tires that can lead to tire failure, loss
of vehicle control, serious injury or death.
Driving off-road places more stress on your
vehicle than most on-road driving. After
driving off-road, check for damage to the
wheels, chassis and underbody.
Inspect the underbody of your vehicle by
checking tires, body structure, steering,
suspension, and exhaust system for
damage.
Inspect the tires for any cuts in the tread
or sidewall area. Also inspect the sidewall
for any bulge indicating damage to the tire.
Make sure that tires are inflated to proper
tire pressure as indicated on the tire
placard. Check the radiator for mud and debris and
clean as needed.
Check that the air filter is clean and dry.
Remove accumulations of plants or brush.
These things could be a fire hazard or hide
damage to the fuel lines, brake hoses, and
propeller shafts.
Make sure that the grille and radiator are
clear of any obstructions that may affect
cooling.
After extended operation in mud, sand,
water, or similar dirty conditions, inspect
the wipers and washers to make sure they
are working.
Note:
Mud caked windows are hard to see
through and can damage wiper blades or
motor.
Check wipers for debris or anything that
may scratch the windshield.
If you experience unusual vibration after
driving in mud, slush or similar conditions,
check the wheels for impacted material.
Impacted material can cause vibrations
when driving and wheel imbalance.
Remove the material to reduce the
vibration.
Note: If you have removed the impacted
material from the wheels and your vehicle
still has a vibration check your vehicle for
damage or see an authorized dealer.
Inspect the exhaust system for damage or
looseness.
Make sure that the brakes are in proper
working order and free of any mud, stones
and debris, which can become trapped
around the brake rotor, backing plate and
caliper.
Inspect the wheels for dents, cracks, or
other damage.
247
Bronco Sport (CHD) Canada/United States of America, enUSA, Edition date: 202007, Second-Printing Driving Hints