Page 33 of 44
 31
In the event of a breakdown
8Removing the battery
► Disconnect the negative terminal first (left-
hand side), next disconnect the positive terminal
(right-hand side): •
Unscrew and remove")
31
In the event of a breakdown
8Removing the battery
► Disconnect the negative terminal first (left-
hand side), next disconnect the positive terminal
(right-hand side): •
Unscrew and remove the screw from the
clamp.
•
Remove the clamp from the terminal.
► Make sure that any disconnected clamps
do not come into contact with the battery
terminals - Risk of short-circuit!
►
Unscrew the 2 fixing screws on the battery's
retainer brace.
►
Remove the retainer brace and then the
battery.
Refitting the battery
► Place the battery into its compartment.
► Replace the retainer brace and its 2 fixing
screws.
►
Reconnect the positive terminal first (right-
hand side), next reconnect the negative terminal
(left-hand side): •
Insert the nut horizontally into the terminal's
square housing.
•
Place the clamp on top of the terminal.
• Insert the screw into the terminal and nut
and screw tight.
Refitting rear bumper
► Bring the bumper close to the frame.
► Pass the lamp's suspended wiring loom in
front of the bumper.
►
Connect the indicator wiring looms.
► Place it in position and then push the bumper
horizontally until the attachment points clip into
place.
►
Screw the 2 upper side fixing screws into the
flaps.
►
Screw the 2 lower side fixing screws into the
wheel arches.
► Screw the 2 lower fixing screws into the
frame.
►
Clip the 2 upper access flaps to the wings.
► Finally, replace the number plate lamp.
For more information on the Number plate
lamp
, refer to the corresponding section.
Starting using another
battery
If the vehicle's battery is flat, the motor can be
started using a backup battery (either external or
from another vehicle) and jump leads or using a
battery booster.
Never start the motor by connecting a
battery charger.
Never use a 24
V or higher battery booster
.
Check beforehand that the backup battery
has a nominal voltage of 12
V and a capacity
at least equal to that of the discharged
battery
.
The two vehicles must not be in contact with
each other.
Disconnect or turn off all electrical devices in
both vehicles (portable devices, radio, wipers,
lights, etc.).
Do not disconnect the (+) terminal while the
motor is switched on.
Page 34 of 44
 32
In the event of a breakdown
► Connect the red cable to the (+) terminal of
the flat battery A , then to the (+) terminal of the
backup battery B, or booster.
►
Connect one end of the green")
32
In the event of a breakdown
► Connect the red cable to the (+) terminal of
the flat battery A , then to the (+) terminal of the
backup battery B, or booster.
►
Connect one end of the green or black cable
to the (-) terminal of the backup battery B
or of
the booster (or to an earth point on the assisting
vehicle).
►
Connect the other end of the green or black
cable to the negative (-) terminal of flat battery A.
►
Start the engine/switch on the motor on the
assisting vehicle and leave it running for a few
minutes.
►
Turn the ignition key to start the disabled
vehicle.
The traction battery takes over the supply to the
12
V circuit.
► Wait for the assisting vehicle to return to idle.
► Disconnect the jump leads in reverse
order.
► Leave the vehicle switched on for at least 30
minutes to allow the traction battery to recharge
the 12
V battery
.
If the battery charge level in the traction battery
is too low, connect the vehicle's charging cable.
Charging the battery using a
battery charger
For optimum service life of the battery, it is
essential to maintain an adequate level of
charge.
In some circumstances, it may be necessary to
charge the battery:
–
When using the vehicle mainly for short
journeys.
–
If the vehicle is to be taken off the road for
several weeks.
To recharge the vehicle's battery yourself:
–
Only use a charger compatible with lead-
acid batteries and with a nominal voltage of
12
V
.
–
Follow the instructions provided by the
manufacturer of the charger.
–
Never reverse polarities.
– Disconnect the 12 V battery
.
Make sure the vehicle's charging cable is not
connected at the same time.
► Switch the ignition off.
► Disconnect or turn off all electrical devices
(portable devices, wipers, lights, etc.).
►
Switch off charger B before connecting
the cables to the battery
, so as to avoid any
dangerous sparks.
►
Ensure that the charger cables are in good
condition.
►
Connect the cables from charger B as
follows: •
Positive (+) red cable to the (+) terminal on
battery A
.
•
Negative (-) black cable to the (-) terminal on
battery A
.
►
At the end of the charging operation, switch
off charger B before disconnecting the cables
from battery
A.
Page 35 of 44
33
In the event of a breakdown
8Towing the vehicle
Observe the legislation in force in the
country where you are driving.
Before towing the vehicle, it is essential to put
the vehicle in free-wheeling mode.
For more information on Free-wheeling, refer
to the corresponding section.
An electric vehicle must never be used for road transfers.
It may be used, for example, to exit a rut.
Towing constraints
Front
wheels on the
ground Rear
wheels on the
ground Flatbed 4
wheels on the
ground with
towbar
Use the towing eye only to free the vehicle when
stuck, or to secure it for recovery on a flatbed
lorry or trailer.
Page 36 of 44
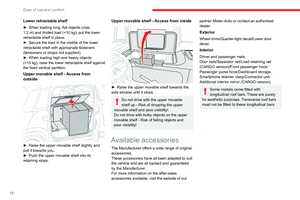
34
Technical data
Electric motor
VersionAMI AMI
CARGO
Model code:
9A... Z2CA Z2CA
Weights
Unladen weight,
battery included (kg) 471 478
Maximum loading
weight with driver
(kg) 150 140
Gross vehicle weight
(kg) 700 700
Tyres 155/65R14
Electric motor
Technology Synchronous with
permanent magnets
Nominal power: EC
standard (kW)/(hp) 6/8.2
Max. power: EC
standard (kW)/(hp) 9.4/12.6
Traction battery
Technology Lithium-Ion
Installed capacity
(kWh) 5.5
Domestic charging
Version AMI AMI
CARGO
Model code:
9A... Z2CA Z2CA
Alternating current
voltage (Vac) 230 (single-phase)
Rating (A) 16
Charging cable
length (m) 3
Charging time (hr) 3 hrs for 80%
Driving range (miles/
km) 46/75
Dimensions (mm)
These dimensions have been measured on an
unladen vehicle.
Page 37 of 44
35
Technical data
9
Identification markings
Various visible markings for vehicle identification
and vehicle search.
A. Tyres label
Attached to the base of the driver's seat.
Indicates tyre inflation pressures when cold. B. Manufacturer's label
Attached to the base of the passenger seat.
Bears the following information:
–
Manufacturer’
s name.
–
European whole vehicle type approval
number.
–
Vehicle Identification number (VIN).
– Noise level/Rated speed.
– Maximum power/Maximum speed.
– Gross vehicle weight (GVW).
Page 38 of 44
 36
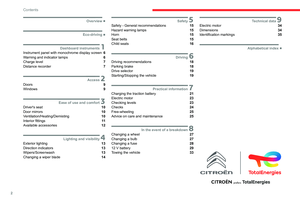
Alphabetical index
A
Accessories 12, 15
Adjusting seat 10
Advice on care and maintenance 25
Advice on driving 18
Audible warning 15
B
Battery, 12 V 24, 29
Bodywork 25
Brake")
36
Alphabetical index
A
Accessories 12, 15
Adjusting seat 10
Advice on care and maintenance 25
Advice on driving 18
Audible warning 15
B
Battery, 12 V 24, 29
Bodywork 25
Brake discs
24
Bulbs (changing) 27
C
Changing a bulb 27
Changing a fuse 28
Changing a wheel 27
Changing a wiper blade 14
Changing to free-wheeling 25
Charge level indicator 7
Charging cable 22
Checking the levels 23
Checks
24–25
Checks, routine 24
Children 15–17
Child seats 16–17
Cleaning (advice) 26
Closing the doors 9
Closing the windows 9
Controls, at steering 13, 15
D
Dashboard 4
Demisting 10
Dimensions 34
Direction indicators 13
Display screen 6
Distance recorder 7
Domestic charging 21–22, 34
Doors
9
Driver's seat
10
E
Eco-driving (advice) 5
Electric motor 3, 19, 23, 34
Emergency warning lamps 15
Energy recovery 19
Exterior lighting 13
F
Fittings, interior 11
Fitting the battery 30
Flashing indicators 13
Fluid, brake
23
Fuses
28
H
Hazard warning lamps 15
Heating 10
I
Ignition switch 19
Indicators, direction 13
Instrument panel 6
Instruments and controls
4
K
Key 3, 19
L
Labels, identification 35
Lamps, front 27
Lamps, rear
27–28
LED lamps
13
LEDs - Light-emitting diodes 27
Level, brake fluid 23
Levels and checks 23
Level, screenwash fluid 24
Light-emitting diodes - LEDs 27
Loading 11
Loading space 11
Page 39 of 44
 37
Alphabetical index
M
Mains socket (domestic network) 22
Maintenance (advice) 25
Maintenance, routine 5, 15, 23–24
Markings, identification 35
Mirrors, door
10
Mobility
, ele")
37
Alphabetical index
M
Mains socket (domestic network) 22
Maintenance (advice) 25
Maintenance, routine 5, 15, 23–24
Markings, identification 35
Mirrors, door
10
Mobility
, electric
3, 18
Motor
, electric
23, 34
Multifunction control 13, 15
N
Number plate lamps 28
O
On-board tools 27
Opening the doors 9
Opening the windows 9
P
Pads, brake 24
Parking brake 18, 24
Port, USB
11
Pressures, tyres
25, 35
Protecting children 16–17
R
Range 5, 7
Recharging the battery 32
Recharging the traction battery 21–22
Recovery of the vehicle 33
Regenerative braking (deceleration
by engine braking)
19
Removing the battery 30
Removing the front bumper 23
Removing the rear bumper 30
Replacing bulbs 27
Replacing fuses 28
Reservoir
, screenwash
24
S
Safety (advice) 3, 15
Screen, monochrome 6
Screenwash 13
Screenwash fluid 24
Seat belts
15
Selector
, drive
19
Serial number
, vehicle
35
Servicing 15, 24–25
Smartphone 11
Starting/Stopping the vehicle 19
Starting using another battery 31
Stickers, customising ~ Stickers,
expressive
25–26
Storage
11
Suspension 25
T
Tables of fuses 28
T echnical data 34
Thermal comfort equipment 5
T
otal distance recorder
7
T
owing eye
33
T
raction battery
3, 21, 34
T
raction battery charge
7, 21–22
T
yres
25, 27, 35
V
Ventilation 10
W
Warning and indicator lamps 6
W arnings and indicators 6
W
ashing (advice)
26
W
eights
1
1, 34
Windows
9
Wiper blades (changing) 14
Wipers
13
Page 40 of 44


 33
In the event of a breakdown
8Towing the vehicle
Observe the legislation in force in the
country where you are driving.
Before towing the vehicle, it is essential to put
the vehicle in free-wheeli")
 34
Technical data
Electric motor
VersionAMI AMI
CARGO
Model code:
9A... Z2CA Z2CA
Weights
Unladen weight,
battery included (kg) 471 478
Maximum loading
weight with driver
(kg) 150 140
Gross vehicl")
 35
Technical data
9
Identification markings
Various visible markings for vehicle identification
and vehicle search.
A. Tyres label
Attached to the base of the driver's seat.
Indicates tyre")
")