Page 9 of 44
 7
Dashboard instruments
1Minimum traction battery charge levelFixed, combined with the last bar on the
charge meter showing and an audible
signal (1 beep).
The traction battery has reached the first")
7
Dashboard instruments
1Minimum traction battery charge levelFixed, combined with the last bar on the
charge meter showing and an audible
signal (1 beep).
The traction battery has reached the first alert
threshold.
Put the vehicle on charge as soon as possible.
Fixed, combined with the flashing
vehicle driving range warning lamp
and an audible signal (1 beep).
The traction battery has reached the second
alert threshold.
The motor's power decreases rapidly.
You must put the vehicle on charge.
Limited powerFixed, accompanied by an audible signal
(1 beep).
A drop in performance in the drive train due to a
low battery temperature.
The decrease in motor power temporarily affects
the vehicle's performance.
Maximum traction battery temperature
Fixed, combined with the STOP
warning lamp and an audible
signal (1 beep).
The traction battery's temperature is too high.
You must stop the vehicle.
Stop as soon as it is safe to do so and switch off
the ignition.
Call a dealer or qualified workshop.
Green warning/indicator lamps
Direction indicators
Flashing left or right indicator with audible
signal.
The left or right direction indicator lamps are on.
Flashing left and right indicators with
audible signal.
The hazard warning lamps are on.
White indicator lamps
Foot on the brake
Flashing.
Insufficient pressure or no pressure
detected on the brake pedal for changing the
direction of travel.
Depress the brake pedal to select or change the
direction of travel.
Vehicle ready to driveFixed.
The vehicle is switched on.
The warning lamp remains on while driving.
The lamp will go out when you switch off the
motor and exit the vehicle.
Fixed, accompanied by an audible signal
(1 beep).
A drive position is selected without any pressure
on the pedals for 5 seconds.
Press D or R on the drive selector, then
accelerate or brake.
Vehicle driving rangeFixed.
The remaining driving range is displayed.
Cable connectedFixed, combined with the remaining
charging time.
The charging cable is connected to the charging
socket.
The traction battery is being charged.
Charge level
This indicates traction battery charge level,
showing up to 8 bars.
With the ignition switched on and the vehicle
moving, this is permanently displayed below the
remaining driving range (miles/kilometres).
When the vehicle is being charged, dashes
are displayed for the first 3 minutes, then the
time (hours/minutes) remaining until charging is
complete.
For more information about the Warning lamps,
refer to the corresponding section.
Distance recorder
This measures the total distance travelled by the
vehicle since its initial registration.
Page 10 of 44
8
Dashboard instruments
The distance recorder is permanently displayed
when the ignition is switched on and the vehicle
is being charged.
Page 11 of 44
 9
Access
2Doors
The vehicle has two doors which open in
opposite directions.
Do not open the door when moving.
From outside
► Turn the access key to the right/left in the
door lock to unloc")
9
Access
2Doors
The vehicle has two doors which open in
opposite directions.
Do not open the door when moving.
From outside
► Turn the access key to the right/left in the
door lock to unlock/lock it.
► Press the door lock to partially open the door.
After unlocking a door, do not turn the key to the left as you risk being trapped
in the vehicle when the door is closed again.
From inside
► To open the driver's door, pull strap 1 at the
end of the dashboard.
►
To open the passenger door
, pull strap 2 to
the right of the passenger seat.
►
To close the door
, pull strap 3 in the middle
of the door.
Windows
Each window has two parts:
– A fixed upper section.
– A moveable lower section.
To open:
► Press the locking handle to release the
window.
►
Lift the window until it stops to keep it fully
open.
Take care when opening the window - there is a risk of it unlocking and
lowering while driving, if it is not properly
locked in the stopped position or on a very
uneven road surface.
To close:
►
Pull the window to unlock it from the outside.
► Lower the window fully until it locks in place.
► Press against the window to check that it is
locked.
Take care when closing a window - you risk trapping your fingers!
Page 12 of 44
 10
Ease of use and comfort
Driver's seat
Longitudinal adjustment
► Lift the bar and slide the seat forwards or
backwards.
►
Release the bar to lock the seat in position on
one of the not")
10
Ease of use and comfort
Driver's seat
Longitudinal adjustment
► Lift the bar and slide the seat forwards or
backwards.
►
Release the bar to lock the seat in position on
one of the notches.
The passenger seat does not slide.
Door mirrors
The door mirrors are adjusted and folded
manually.
►
Move the door mirror in four directions in
order to obtain the best visibility.
Ventilation/Heating/
Demisting
The air circulating inside the passenger
compartment comes in from outside through an
opening at the base of the windscreen.
The controls are located on the central control
bar on the dashboard.
To ensure good air flow, be sure not to block the air inlet and extractors.
Ventilation
► Press this button to turn ventilation on/
off (confirmed by warning lamp lighting
up/going out).
Heating/Demisting
► Press this button to turn Heating/
Demisting on/off (confirmed by warning
lamp lighting up/going out).
The ventilation also turns on/off.
The demisting system reduces misting on the windscreen. If the side windows
are misted up, wipe them with a clean, soft
cloth.
Page 13 of 44
11
Ease of use and comfort
3Interior fittings
Except CARGO version
1.Open triple-compartment storage unit
2. Driver's storage compartment/Housing for
Bluetooth speaker
3. Smartphone rest/USB socket
4. Passenger storage compartment
With CARGO version
1.Open triple-compartment storage unit
2. Driver's storage compartment/Housing for
Bluetooth speaker
3. Smartphone rest/USB socket
4. Modular load space
5. Closed storage compartment
►
Press the
central button to open the cover.
USB socket
The USB socket can be used to charge a
portable device.
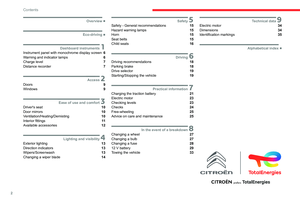
Modular load space
(With CARGO version)
The modular load space consists of:
1 Lower storage area
2 Lower retractable shelf
3 Central storage area
Lashing rings are provided for securing objects
with tensioners or straps (not supplied).
4 Upper movable shelf
(parked vehicle, max. 40
kg for occasional
use)
5 Document holders
Maximum loading weight: 140
kg
Page 14 of 44
 12
Ease of use and comfort
Lower retractable shelf
► When loading long, flat objects (max.
1.2 m) and limited load (<10 kg), put the lower
retractable shelf in place.
►
Secure the load in the m")
12
Ease of use and comfort
Lower retractable shelf
► When loading long, flat objects (max.
1.2 m) and limited load (<10 kg), put the lower
retractable shelf in place.
►
Secure the load in the middle of the lower
retractable shelf with appropriate fasteners
(tensioners or straps not supplied).
►
When loading high and heavy objects
(>10 kg), raise the lower retractable shelf against
the fixed vertical partition.
Upper movable shelf - Access from
outside
► Raise the upper movable shelf slightly and
pull it towards you.
►
Push the upper movable shelf into its
retaining stops.
Upper movable shelf - Access from inside
► Raise the upper movable shelf towards the
side window until it stops.
Do not drive with the upper movable
shelf up - Risk of dropping the upper
movable shelf and poor visibility!
Do not drive with bulky objects on the upper
movable shelf
- Risk of falling objects and
poor visibility!
Available accessories
The Manufacturer offers a wide range of original
accessories.
These accessories have all been adapted to suit
the vehicle and are all backed and guaranteed
by the Manufacturer.
For more information on the after-sales
accessories available, visit the website of our
partner Mister-Auto or contact an authorised
dealer.
Exterior
Wheel trims/Quarter-light decal/Lower door
decal.
Interior
Driver and passenger mats.
Door nets/Separator net/Load retaining net
(CARGO version)/Front passenger hook/
Passenger purse hook/Dashboard storage.
Smartphone retainer clasp/Connector unit.
Additional interior mirror (CARGO version).
Some models come fitted with
longitudinal roof bars. These are purely
for aesthetic purposes. Transverse roof bars
must not be fitted to these longitudinal bars.
Page 15 of 44
 13
Lighting and visibility
4Exterior lighting
When the ignition is switched on, all the lights
come on (sidelamps, dipped beam headlamps
and number plate lamps).
When the ignition is switched off, a")
13
Lighting and visibility
4Exterior lighting
When the ignition is switched on, all the lights
come on (sidelamps, dipped beam headlamps
and number plate lamps).
When the ignition is switched off, all the lights
go out.
In some weather conditions (e.g. low
temperature or humidity), misting on the
internal surface of the glass of the headlamps
and rear lamps is normal, and will disappear
after the lamps have been on for a few
minutes.
Never look too closely at the light beam
of LED lamps/headlamps: risk of serious
eye injury!
Direction indicators
► Left or right: lower or raise the multifunction
control stalk beyond the point of resistance.
Three flashes
► Press briefly upwards or downwards (without
going beyond the point of resistance) and the
direction indicators will flash 3 times.
Wipers/Screenwash
Wipers
► Turn the knob to the desired position:Continuous wipe
Intermittent wipe
Switching off
Before operating the wipers in wintry
conditions, clear any snow, ice or frost
from the windscreen, and from around the
wiper arms and blades.
Never operate the wipers when the
windscreen is dry. Before operating the
wipers when the weather is extremely cold or
hot, check that the wiper blades are not stuck
to the windscreen.
Screenwash
► Pull the wiper control stalk towards you and
hold.
The screenwash operates as long as you hold
the multifunction control stalk, followed by a
cycle of 5 wipes when you release the stalk.
To avoid damaging the wiper blades, do not operate the screenwash if the
screenwash reservoir is empty.
Only operate the screenwash if there is no
risk of the fluid freezing on the windscreen
and hindering visibility. In winter, use "very
cold climate" rated products.
Never top up with water.
To ensure flat-bladed wipers remain effective:
–
Handle them with care.
– Clean them regularly using soapy water.
– Do not use them to hold a piece of
cardboard against the windscreen.
Page 16 of 44
14
Lighting and visibility
– Replace them at the first signs of wear.
Changing a wiper blade
Removing/refitting
Take care not to hold the arms at the jet locations.
Do not touch the wiper blades. Risk of
irreparable damage.
Do not release them while moving them. Risk
of damaging the windscreen!
►
Clean the windscreen using screenwash
fluid.
►
Grasp the wiper blade by its rigid part and
pull it towards you as far as it will go.
►
While keeping the wiper arm raised, unclip
the worn blade and remove it.
►
While keeping the wiper arm raised, install
the new blade and clip it into place.
►
Lower the arm carefully and support it until it
reaches the windscreen.


 8
Dashboard instruments
The distance recorder is permanently displayed
when the ignition is switched on and the vehicle
is being charged.")
 11
Ease of use and comfort
3Interior fittings
Except CARGO version
1.Open triple-compartment storage unit
2. Driver's storage compartment/Housing for
Bluetooth speaker
3. Smartphone rest/USB s")
 14
Lighting and visibility
– Replace them at the first signs of wear.
Changing a wiper blade
Removing/refitting
Take care not to hold the arms at the jet locations.
Do not touch the wiper blades.")