2021 CHRYSLER VOYAGER tow
[x] Cancel search: towPage 209 of 348

SAFETY207
Adjustable Upper Shoulder Belt Anchorage
In the front and second row outboard seats the
shoulder belt can be adjusted upward or
downward to position the seat belt away from your
neck. Push or squeeze the anchorage button to
release the anchorage, and move it up or down to
the position that serves you best.
Adjustable Anchorage
As a guide, if you are shorter than average, you will
prefer the shoulder belt anchorage in a lower
position, and if you are taller than average, you will
prefer the shoulder belt anchorage in a higher
position. After you release the anchorage button,
try to move it up or down to make sure that it is
locked in position.
NOTE:The adjustable upper shoulder belt anchorage is
equipped with an Easy Up feature. This feature
allows the shoulder belt anchorage to be adjusted
in the upward position without pushing or
squeezing the release button. To verify the
shoulder belt anchorage is latched, pull downward
on the shoulder belt anchorage until it is locked
into position.Second Row Center (If Equipped) And Third
Row Center Seat Belt Operating
Instructions
The second row center (if equipped) and third row
center seat belts feature a seat belt with a
mini-latch plate and buckle, which allows the seat
belt to detach from the lower anchor when the seat
is folded. The mini-latch plate and regular latch
plate can then be stored out of the way in the
headliner for added convenience to open up
utilization of the storage areas behind the front
seats when the seat is not occupied.
1. Remove the mini-latch plate and regular latch plate from its stowed position in the headliner
slightly behind the second or third row seat.
Mini-Latch Stowage
WARNING!
Wearing your seat belt incorrectly could make
your injuries in a collision much worse. You
might suffer internal injuries, or you could
even slide out of the seat belt. Follow these
instructions to wear your seat belt safely and
to keep your passengers safe, too.
Position the shoulder belt across the shoulder
and chest with minimal, if any slack so that it
is comfortable and not resting on your neck.
The retractor will withdraw any slack in the
shoulder belt.
Misadjustment of the seat belt could reduce
the effectiveness of the safety belt in a crash.
Always make all seat belt height adjustments
when the vehicle is stationary.
6
21_RUV_OM_EN_USC_t.book Page 207
Page 211 of 348
SAFETY209
7. Position the lap belt so that it is snug and lies low across your hips, below your abdomen. To
remove slack in the lap belt portion, pull up on
the shoulder belt. To loosen the lap belt if it is
too tight, pull on the lap belt. A snug seat belt
reduces the risk of sliding under the seat belt
in a collision.
8. Position the shoulder belt on your chest so that it is comfortable and not resting on your neck.
The retractor will withdraw any slack in the
seat belt.
9. To release the seat belt, push the red button on the buckle.
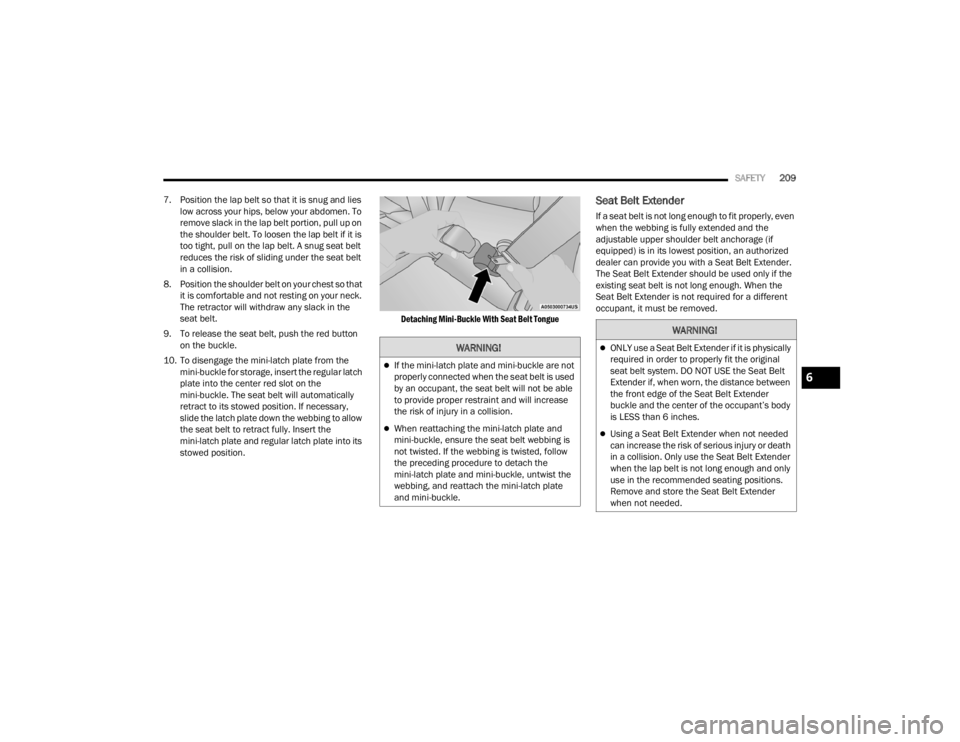
10. To disengage the mini-latch plate from the mini-buckle for storage, insert the regular latch
plate into the center red slot on the
mini-buckle. The seat belt will automatically
retract to its stowed position. If necessary,
slide the latch plate down the webbing to allow
the seat belt to retract fully. Insert the
mini-latch plate and regular latch plate into its
stowed position.
Detaching Mini-Buckle With Seat Belt Tongue
Seat Belt Extender
If a seat belt is not long enough to fit properly, even
when the webbing is fully extended and the
adjustable upper shoulder belt anchorage (if
equipped) is in its lowest position, an authorized
dealer can provide you with a Seat Belt Extender.
The Seat Belt Extender should be used only if the
existing seat belt is not long enough. When the
Seat Belt Extender is not required for a different
occupant, it must be removed.
WARNING!
If the mini-latch plate and mini-buckle are not
properly connected when the seat belt is used
by an occupant, the seat belt will not be able
to provide proper restraint and will increase
the risk of injury in a collision.
When reattaching the mini-latch plate and
mini-buckle, ensure the seat belt webbing is
not twisted. If the webbing is twisted, follow
the preceding procedure to detach the
mini-latch plate and mini-buckle, untwist the
webbing, and reattach the mini-latch plate
and mini-buckle.
WARNING!
ONLY use a Seat Belt Extender if it is physically
required in order to properly fit the original
seat belt system. DO NOT USE the Seat Belt
Extender if, when worn, the distance between
the front edge of the Seat Belt Extender
buckle and the center of the occupant’s body
is LESS than 6 inches.
Using a Seat Belt Extender when not needed
can increase the risk of serious injury or death
in a collision. Only use the Seat Belt Extender
when the lap belt is not long enough and only
use in the recommended seating positions.
Remove and store the Seat Belt Extender
when not needed.
6
21_RUV_OM_EN_USC_t.book Page 209
Page 212 of 348
210SAFETY
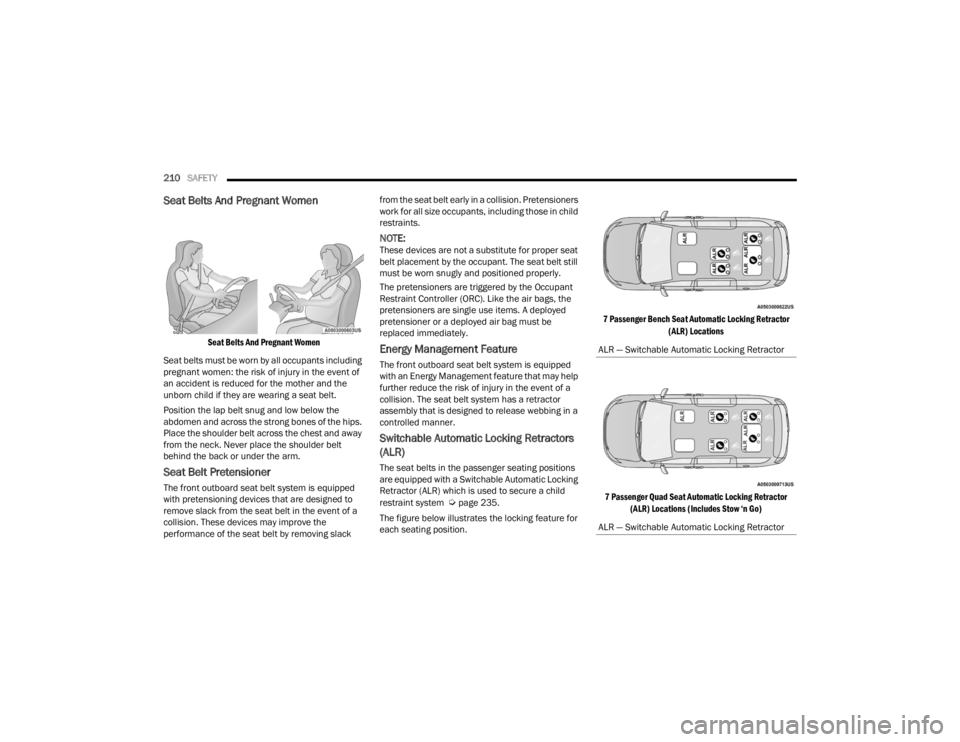
Seat Belts And Pregnant Women
Seat Belts And Pregnant Women
Seat belts must be worn by all occupants including
pregnant women: the risk of injury in the event of
an accident is reduced for the mother and the
unborn child if they are wearing a seat belt.
Position the lap belt snug and low below the
abdomen and across the strong bones of the hips.
Place the shoulder belt across the chest and away
from the neck. Never place the shoulder belt
behind the back or under the arm.
Seat Belt Pretensioner
The front outboard seat belt system is equipped
with pretensioning devices that are designed to
remove slack from the seat belt in the event of a
collision. These devices may improve the
performance of the seat belt by removing slack from the seat belt early in a collision. Pretensioners
work for all size occupants, including those in child
restraints.
NOTE:These devices are not a substitute for proper seat
belt placement by the occupant. The seat belt still
must be worn snugly and positioned properly.
The pretensioners are triggered by the Occupant
Restraint Controller (ORC). Like the air bags, the
pretensioners are single use items. A deployed
pretensioner or a deployed air bag must be
replaced immediately.
Energy Management Feature
The front outboard seat belt system is equipped
with an Energy Management feature that may help
further reduce the risk of injury in the event of a
collision. The seat belt system has a retractor
assembly that is designed to release webbing in a
controlled manner.
Switchable Automatic Locking Retractors
(ALR)
The seat belts in the passenger seating positions
are equipped with a Switchable Automatic Locking
Retractor (ALR) which is used to secure a child
restraint system
Úpage 235.
The figure below illustrates the locking feature for
each seating position.
7 Passenger Bench Seat Automatic Locking Retractor
(ALR) Locations
7 Passenger Quad Seat Automatic Locking Retractor (ALR) Locations (Includes Stow ‘n Go)
ALR — Switchable Automatic Locking Retractor
ALR — Switchable Automatic Locking Retractor
21_RUV_OM_EN_USC_t.book Page 210
Page 214 of 348
212SAFETY
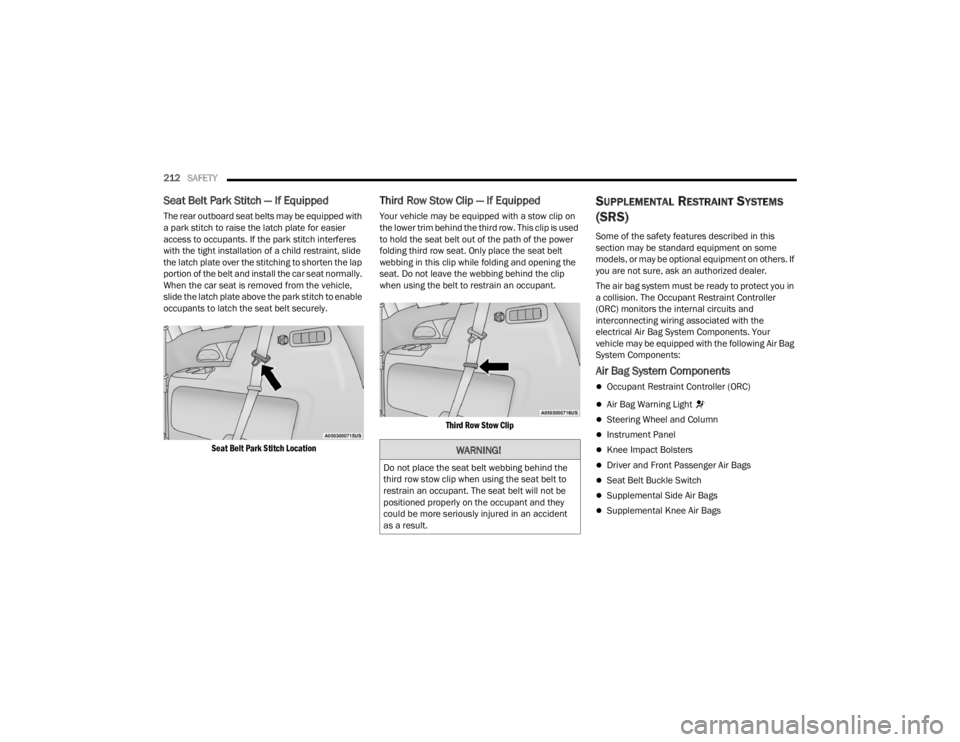
Seat Belt Park Stitch — If Equipped
The rear outboard seat belts may be equipped with
a park stitch to raise the latch plate for easier
access to occupants. If the park stitch interferes
with the tight installation of a child restraint, slide
the latch plate over the stitching to shorten the lap
portion of the belt and install the car seat normally.
When the car seat is removed from the vehicle,
slide the latch plate above the park stitch to enable
occupants to latch the seat belt securely.
Seat Belt Park Stitch Location
Third Row Stow Clip — If Equipped
Your vehicle may be equipped with a stow clip on
the lower trim behind the third row. This clip is used
to hold the seat belt out of the path of the power
folding third row seat. Only place the seat belt
webbing in this clip while folding and opening the
seat. Do not leave the webbing behind the clip
when using the belt to restrain an occupant.
Third Row Stow Clip
SUPPLEMENTAL RESTRAINT SYSTEMS
(SRS)
Some of the safety features described in this
section may be standard equipment on some
models, or may be optional equipment on others. If
you are not sure, ask an authorized dealer.
The air bag system must be ready to protect you in
a collision. The Occupant Restraint Controller
(ORC) monitors the internal circuits and
interconnecting wiring associated with the
electrical Air Bag System Components. Your
vehicle may be equipped with the following Air Bag
System Components:
Air Bag System Components
Occupant Restraint Controller (ORC)
Air Bag Warning Light
Steering Wheel and Column
Instrument Panel
Knee Impact Bolsters
Driver and Front Passenger Air Bags
Seat Belt Buckle Switch
Supplemental Side Air Bags
Supplemental Knee Air Bags
WARNING!
Do not place the seat belt webbing behind the
third row stow clip when using the seat belt to
restrain an occupant. The seat belt will not be
positioned properly on the occupant and they
could be more seriously injured in an accident
as a result.
21_RUV_OM_EN_USC_t.book Page 212
Page 226 of 348

224SAFETY
(Continued)
Cut off battery power to the:
Engine
Electric Motor (if equipped)
Electric power steering
Brake booster
Electric park brake
Automatic transmission gear selector
Horn
Front wiper
Headlamp washer pump
NOTE:After an accident, remember to cycle the ignition to
the STOP (OFF/LOCK) position and remove the key
from the ignition switch to avoid draining the
battery. Carefully check the vehicle for fuel leaks in
the engine compartment and on the ground near
the engine compartment and fuel tank before
resetting the system and starting the engine. If
there are no fuel leaks or damage to the vehicle
electrical devices (e.g. headlights) after an
accident, reset the system by following the
procedure described below. If you have any doubt,
contact an authorized dealer.
Enhanced Accident Response System
Reset Procedure
In order to reset the Enhanced Accident Response
System functions after an event, the ignition switch
must be changed from ignition START or ON/RUN
to ignition OFF. Carefully check the vehicle for fuel
leaks in the engine compartment and on the
ground near the engine compartment and fuel
tank before resetting the system and starting the
engine.
After an accident, if the vehicle will not start after
performing the reset procedure, the vehicle must
be towed to an authorized dealer to be inspected
and to have the Enhanced Accident Response
System reset.
Maintaining Your Air Bag System Event Data Recorder (EDR)
This vehicle is equipped with an event data
recorder (EDR). The main purpose of an EDR is to
record, in certain crash or near crash-like
situations, such as an air bag deployment or hitting
a road obstacle, data that will assist in
understanding how a vehicle’s systems performed.
WARNING!
Modifications to any part of the air bag system
could cause it to fail when you need it. You
could be injured if the air bag system is not
there to protect you. Do not modify the compo-
nents or wiring, including adding any kind of
badges or stickers to the steering wheel hub
trim cover or the upper passenger side of the
instrument panel. Do not modify the front
fascia/bumper, vehicle body structure, or add
aftermarket side steps or running boards.
It is dangerous to try to repair any part of the
air bag system yourself. Be sure to tell anyone
who works on your vehicle that it has an air
bag system.
Do not attempt to modify any part of your air
bag system. The air bag may inflate acciden -
tally or may not function properly if modifica -
tions are made. Take your vehicle to an
authorized dealer for any air bag system
service. If your seat, including your trim cover
and cushion, needs to be serviced in any way
(including removal or loosening/tightening of
seat attachment bolts), take the vehicle to an
authorized dealer. Only manufacturer
approved seat accessories may be used. If it is
necessary to modify the air bag system for
persons with disabilities, contact an autho -
rized dealer.
WARNING!
21_RUV_OM_EN_USC_t.book Page 224
Page 232 of 348
230SAFETY
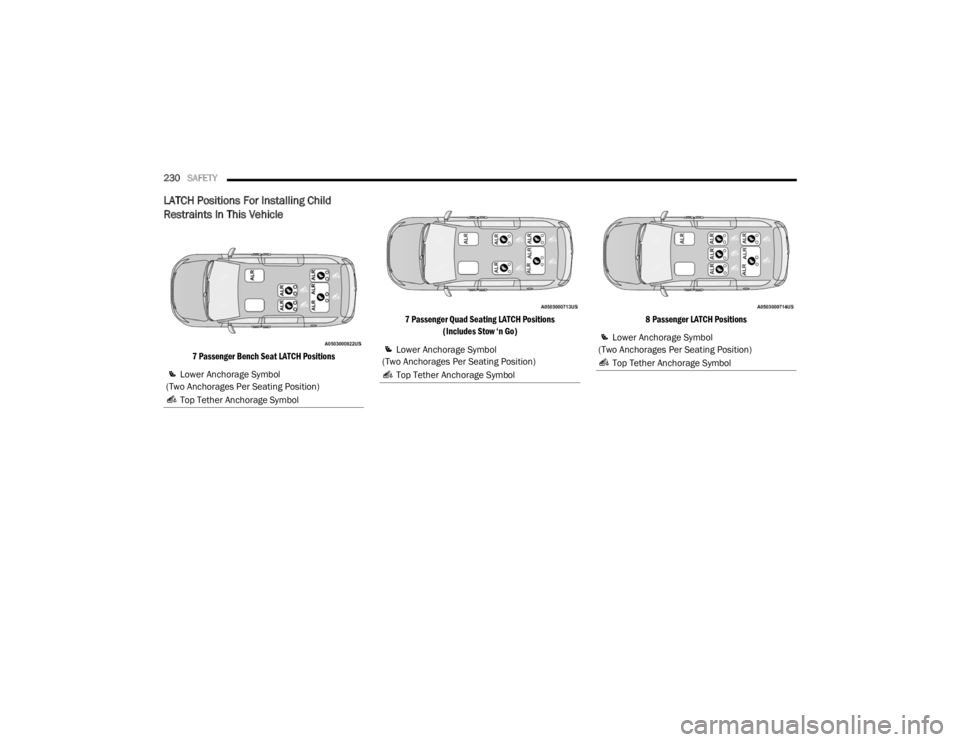
LATCH Positions For Installing Child
Restraints In This Vehicle
7 Passenger Bench Seat LATCH Positions 7 Passenger Quad Seating LATCH Positions
(Includes Stow ‘n Go) 8 Passenger LATCH Positions
Lower Anchorage Symbol
(Two Anchorages Per Seating Position)
Top Tether Anchorage Symbol Lower Anchorage Symbol
(Two Anchorages Per Seating Position)
Top Tether Anchorage Symbol Lower Anchorage Symbol
(Two Anchorages Per Seating Position)
Top Tether Anchorage Symbol
21_RUV_OM_EN_USC_t.book Page 230
Page 233 of 348
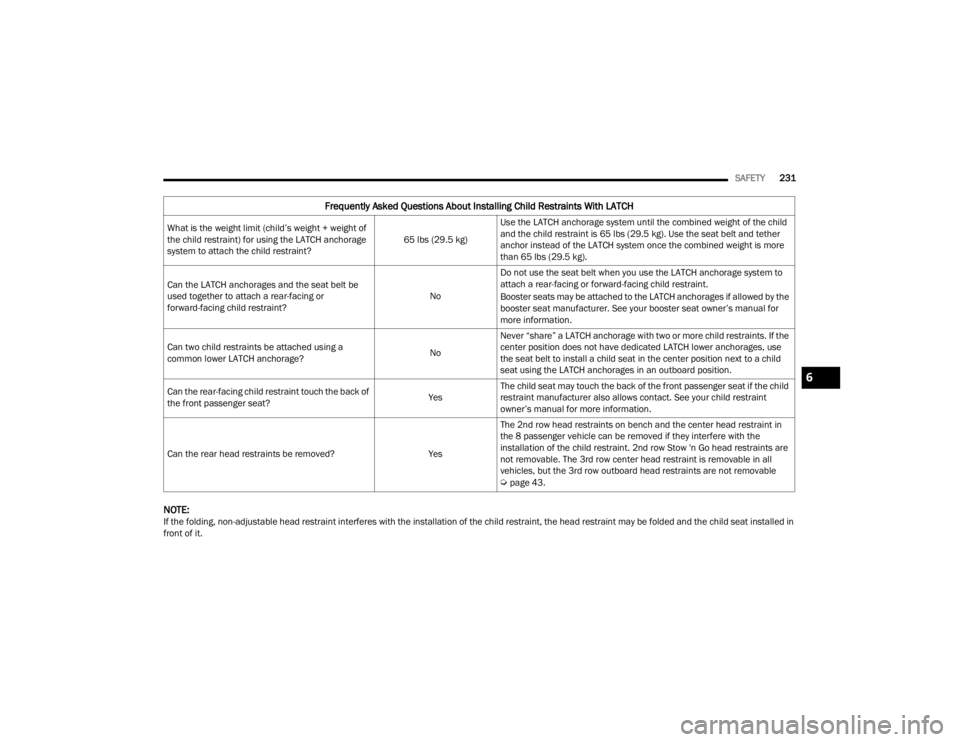
SAFETY231
NOTE:If the folding, non-adjustable head restraint interferes with the installation of the child restraint, the head restraint may be folded and the child seat installed in
front of it.
Frequently Asked Questions About Installing Child Restraints With LATCH
What is the weight limit (child’s weight + weight of
the child restraint) for using the LATCH anchorage
system to attach the child restraint? 65 lbs (29.5 kg)Use the LATCH anchorage system until the combined weight of the child
and the child restraint is 65 lbs (29.5 kg). Use the seat belt and tether
anchor instead of the LATCH system once the combined weight is more
than 65 lbs (29.5 kg).
Can the LATCH anchorages and the seat belt be
used together to attach a rear-facing or
forward-facing child restraint? NoDo not use the seat belt when you use the LATCH anchorage system to
attach a rear-facing or forward-facing child restraint.
Booster seats may be attached to the LATCH anchorages if allowed by the
booster seat manufacturer. See your booster seat owner’s manual for
more information.
Can two child restraints be attached using a
common lower LATCH anchorage? NoNever “share” a LATCH anchorage with two or more child restraints. If the
center position does not have dedicated LATCH lower anchorages, use
the seat belt to install a child seat in the center position next to a child
seat using the LATCH anchorages in an outboard position.
Can the rear-facing child restraint touch the back of
the front passenger seat? YesThe child seat may touch the back of the front passenger seat if the child
restraint manufacturer also allows contact. See your child restraint
owner’s manual for more information.
Can the rear head restraints be removed? YesThe 2nd row head restraints on bench and the center head restraint in
the 8 passenger vehicle can be removed if they interfere with the
installation of the child restraint. 2nd row Stow 'n Go head restraints are
not removable. The 3rd row center head restraint is removable in all
vehicles, but the 3rd row outboard head restraints are not removable
Úpage 43.
6
21_RUV_OM_EN_USC_t.book Page 231
Page 234 of 348

232SAFETY
Car Seat With Head Restraint Folded
Locating The LATCH Anchorages
The lower anchorages are round bars
that are found at the rear of the seat
cushion where it meets the seatback,
below the anchorage symbols on the
seatback. They are just visible when you lean into
the rear seat to install the child restraint. You will
easily feel them if you run your finger along the gap
between the seatback and seat cushion.
LATCH Anchorages (Second Row Anchorages Shown) 7 Passenger Stow ‘n Go Seating LATCH Anchorages (Second Row Anchorages Shown)
8 Passenger Seating
LATCH Anchorages
(Second Row Bench Anchorages Shown) 7 Passenger Bench Seating
WARNING!
Always make sure the head restraint is in its
upright position when the seat is to be used by
an occupant who is not in a child restraint.
Sitting in a seat with the head restraint in its
lowered position could result in serious injury or
death in a collision.
1 — Folded Headrest
2 — Child Restraint
21_RUV_OM_EN_USC_t.book Page 232