2021 CHRYSLER VOYAGER key
[x] Cancel search: keyPage 25 of 348

GETTING TO KNOW YOUR VEHICLE23
NOTE:The vehicle will only unlock the doors when a valid
Passive Entry key fob is detected inside the
vehicle, and no valid key fob is detected outside
the vehicle. The vehicle will not unlock the doors
when any of the following conditions are met:
The doors are manually locked using the door
lock knobs.
Three attempts are made to lock the doors
using the door panel switch and then the doors
are closed.
There is a valid Passive Entry key fob outside the
vehicle and within 5 ft (1.5 m) of either Passive
Entry door handle.
NOTE:On the third attempt ALL doors will lock and the key
fob can be locked in the vehicle.
To Unlock/Enter The Liftgate
With a valid key fob within 5 ft (1.5 m) of the
liftgate, cycle the handle to open the liftgate and
pull the liftgate open.
To Lock The Vehicle’s Doors And Liftgate
With one of the vehicle’s key fobs within 5 ft
(1.5 m) of the driver or passenger front door
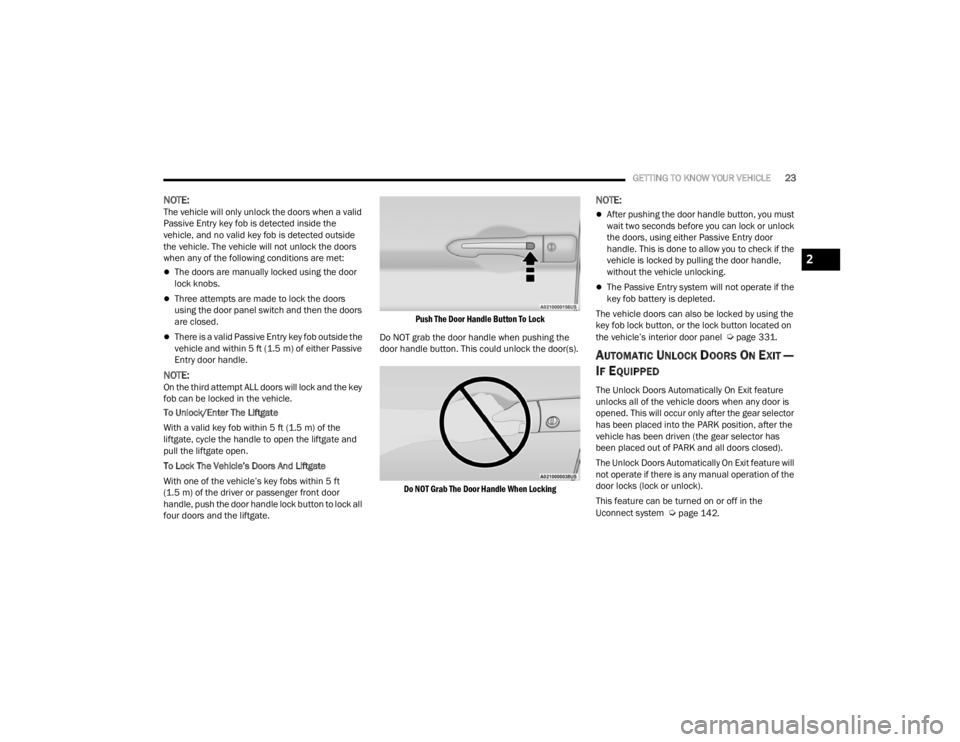
handle, push the door handle lock button to lock all
four doors and the liftgate.
Push The Door Handle Button To Lock
Do NOT grab the door handle when pushing the
door handle button. This could unlock the door(s).
Do NOT Grab The Door Handle When Locking
NOTE:
After pushing the door handle button, you must
wait two seconds before you can lock or unlock
the doors, using either Passive Entry door
handle. This is done to allow you to check if the
vehicle is locked by pulling the door handle,
without the vehicle unlocking.
The Passive Entry system will not operate if the
key fob battery is depleted.
The vehicle doors can also be locked by using the
key fob lock button, or the lock button located on
the vehicle’s interior door panel
Úpage 331.
AUTOMATIC UNLOCK DOORS ON EXIT —
I
F EQUIPPED
The Unlock Doors Automatically On Exit feature
unlocks all of the vehicle doors when any door is
opened. This will occur only after the gear selector
has been placed into the PARK position, after the
vehicle has been driven (the gear selector has
been placed out of PARK and all doors closed).
The Unlock Doors Automatically On Exit feature will
not operate if there is any manual operation of the
door locks (lock or unlock).
This feature can be turned on or off in the
Uconnect system
Úpage 142.
2
21_RUV_OM_EN_USC_t.book Page 23
Page 26 of 348

24GETTING TO KNOW YOUR VEHICLE
MANUAL SLIDING SIDE DOOR
The sliding door may be opened from the inside or
the outside. Pull outward on the exterior handle to
open the sliding door. The sliding door inside
handle functions by rocking forward and back.
Rocking the handle backwards opens the door and
rocking forward releases the hold open latch in
order to close the door.
Side Door Handle And Lock Functions
To keep your door operating properly, observe the
following guidelines:Always open the door smoothly.
Avoid high impacts against the door stop when
opening the door. This is very important when
your vehicle is parked on an incline as the door
will slide faster in the downhill direction.
There is a hold-open latch that is activated when
the sliding door is fully opened. This latch will
keep your sliding door open on any incline. To
close the sliding door after the hold-open latch
is activated, you must rock the inside handle
forward or pull outward on the exterior handle.
Always make sure that the sliding door is fully
latched anytime the vehicle is in motion.
NOTE:The left side sliding door cannot be opened while
the fuel door is open.
POWER SLIDING SIDE DOOR —
I
F EQUIPPED
The power sliding door may be power opened or
closed in several ways:
Key fob
Inside or outside handles
Buttons located:
In the overhead console
Just inside the sliding door
On the outside handle
Push the button on the key fob twice
within five seconds to open, close, or
reverse a power sliding door.
The key fob and the overhead console button will
operate the door when the door is locked. All other
ways require the sliding door to be unlocked. If the
vehicle is equipped with Passive Entry, pressing
the button on the outside handle will unlock and
open the sliding door, with a valid Passive Entry key
fob within 5 ft (1.5 m) of the door handle.
1 — Door Handle
2 — Door Lock
21_RUV_OM_EN_USC_t.book Page 24
Page 49 of 348

GETTING TO KNOW YOUR VEHICLE47
UCONNECT VOICE RECOGNITION
INTRODUCING VOICE RECOGNITION
Start using Uconnect Voice Recognition with these
helpful quick tips. It provides the key Voice
Commands and tips you need to know to control
your vehicle’s Voice Recognition (VR) system.
Uconnect 4 With 7-inch Display
BASIC VOICE COMMANDS
The basic Voice Commands below can be given at
any point while using your Uconnect system. Push the VR button . After the beep, say:
“
Cancel ” to stop a current voice session.
“Help ” to hear a list of suggested Voice
Commands.
“ Repeat ” to listen to the system prompts again.
Notice the visual cues that inform you of your Voice
Recognition system’s status.
GET STARTED
The VR button is used to activate /deactivate
your Voice Recognition system.
Helpful hints for using Voice Recognition:
Reduce background noise. Wind noise and
passenger conversations are examples of noise
that may impact recognition.
Speak clearly at a normal pace and volume
while facing straight ahead.
Each time you give a Voice Command, first push
the VR button, wait until after the beep, then say
your Voice Command.
You can interrupt the help message or system
prompts by pushing the VR button and saying a
Voice Command from the current category.
Uconnect Voice Command Buttons
ADDITIONAL INFORMATION
© 2021 FCA US LLC. All rights reserved. Mopar and
Uconnect are registered trademarks and Mopar
Owner Connect is a trademark of FCA US LLC.
Android™ is a trademark of Google Inc. SiriusXM®
and all related marks and logos are trademarks of
SiriusXM® Radio Inc.
Úpage 331.
For Uconnect system support, call
1-877-855-8400 (24 hours a day 7 days a week)
or visit
DriveUconnect.com (US) or DriveUconnect.ca (Canada).
1 — Push To Start Or Answer A Phone Call And
Send Or Receive A Text
2 — Push The Voice Recognition Button To Begin
Radio, Media, And Climate Functions
2
21_RUV_OM_EN_USC_t.book Page 47
Page 58 of 348

56GETTING TO KNOW YOUR VEHICLE
Rear Courtesy/Reading Lights —
If Equipped
Located above the rear passengers are
courtesy/reading lights. The lights turn on when a
front door, a sliding door or the liftgate is opened.
If your vehicle is equipped with Remote Keyless
Entry (RKE) the lights will also turn on when the
unlock button on the key fob is pushed.
The courtesy lights also function as reading lights.
Push the lens to turn these lights on while inside
the vehicle. Push the lens a second time to turn
each light off.
Ambient Light Control — If Equipped
Rotate the ambient dimmer control upward or
downward to increase or decrease the brightness
of the ambient light located in the door handle
lights, under instrument panel lights, door map
pocket lights, and cubby bin lights.
Ambient Light/Door Handle Light Dimmer
Interior Lighting Off
Rotate the dimmer control on the right to the off
position (extreme bottom). The interior lights will
remain off when the doors or liftgate are open.
Instrument Panel Dimmer Control
The instrument panel dimmer control is part of the
headlight switch, and is located on the driver’s side
of the instrument panel.
With the parking lights or headlights on, rotate the
instrument panel dimmer control upward or
downward to increase or decrease the brightness
of the instrument panel. At the top detent of the
instrument panel dimmer, all the interior lights will
also illuminate. At the bottom most setting
(extreme bottom) interior lights are turned off
(dome off), and the cluster, radio and instrument
lighting go to their lowest dimmable setting.Rotate the instrument panel dimmer control
upward to the first detent. This feature brightens
all text displays such as the odometer, instrument
cluster display, and radio when the position lights
or headlights are on.
Instrument Panel Dimmer
WINDSHIELD WIPER AND WASHERS
The windshield wiper/washer controls are located
on the right side of the steering column. The front
wipers are operated by rotating a switch, located
on the end of the lever.
21_RUV_OM_EN_USC_t.book Page 56
Page 78 of 348

76GETTING TO KNOW YOUR VEHICLE
USB Charging Port In The Floor Tray
NOTE:The USB outlet in the bottom of the instrument
panel can be switched from ignition only to
constant battery powered all the time. See an
authorized dealer for details.
Rear Seat USB Charging Port 3rd Row USB Charging Port
NOTE:The USB “Charge Only” ports will recharge battery
operated USB devices when connected.
Different scenarios are listed below when a
non-phone device is plugged into the smaller and
larger USB ports, and when a phone device is
plugged into the smaller and larger USB ports:
“A new device is now connected. Previous
connection was lost”.
“(Phone Name) now connected. Previous
connection was lost”.
“Another device is in use through the same USB
port. Please disconnect the first device to use
the second device”.
Plugging in a phone or another USB device may
cause the connection to a previous device to be
lost.
POWER OUTLETS
Your vehicle is equipped with 12 Volt (15 Amp)
power outlets, and 5 Volt (2.5 Amp) USB ports, that
can be used to power cellular phones, small
electronics and other low powered electrical
accessories. The power outlets can be labeled with
either a “key” or a “battery” symbol to indicate how
the outlet is powered. Power outlets labeled with a
“key” are powered when the ignition is in the ON or
ACC position, while the outlets labeled with a
“battery” are connected directly to the battery and
powered at all times.
NOTE:All accessories connected to the “battery” powered
outlets should be removed or turned off when the
vehicle is not in use to protect the battery against
discharge.
CAUTION!
Power outlets are designed for accessory plugs
only. Do not insert any other object in the power
outlets as this will damage the outlet and blow
the fuse. Improper use of the power outlet can
cause damage not covered by your New Vehicle
Limited Warranty.
21_RUV_OM_EN_USC_t.book Page 76
Page 83 of 348

GETTING TO KNOW YOUR VEHICLE81
LIFTGATE
TO UNLOCK/OPEN THE LIFTGATE
The liftgate may be released in several ways:
Key fob
Outside handle
Button on overhead console
Push the liftgate button on the key fob twice within
five seconds to release the liftgate.
The key fob and the overhead console button will
release the liftgate when the liftgate is locked. The
outside handle requires the liftgate to be unlocked.
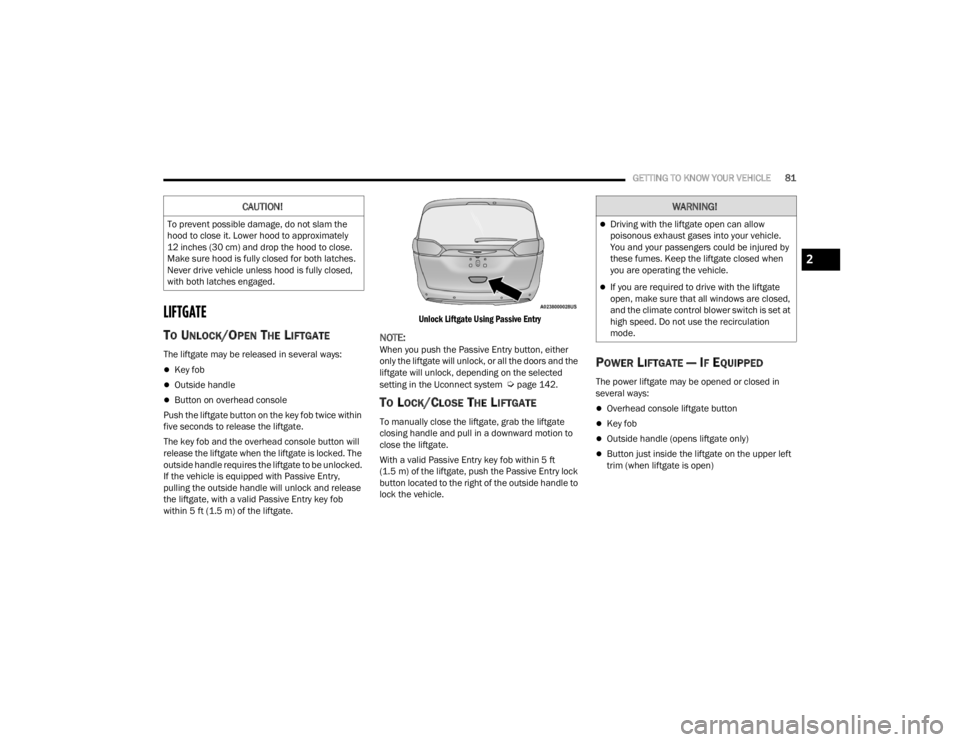
If the vehicle is equipped with Passive Entry,
pulling the outside handle will unlock and release
the liftgate, with a valid Passive Entry key fob
within 5 ft (1.5 m) of the liftgate.
Unlock Liftgate Using Passive Entry
NOTE:When you push the Passive Entry button, either
only the liftgate will unlock, or all the doors and the
liftgate will unlock, depending on the selected
setting in the Uconnect system
Úpage 142.
TO LOCK/CLOSE THE LIFTGATE
To manually close the liftgate, grab the liftgate
closing handle and pull in a downward motion to
close the liftgate.
With a valid Passive Entry key fob within 5 ft
(1.5 m) of the liftgate, push the Passive Entry lock
button located to the right of the outside handle to
lock the vehicle.
POWER LIFTGATE — IF EQUIPPED
The power liftgate may be opened or closed in
several ways:
Overhead console liftgate button
Key fob
Outside handle (opens liftgate only)
Button just inside the liftgate on the upper left
trim (when liftgate is open)
CAUTION!
To prevent possible damage, do not slam the
hood to close it. Lower hood to approximately
12 inches (30 cm) and drop the hood to close.
Make sure hood is fully closed for both latches.
Never drive vehicle unless hood is fully closed,
with both latches engaged.
WARNING!
Driving with the liftgate open can allow
poisonous exhaust gases into your vehicle.
You and your passengers could be injured by
these fumes. Keep the liftgate closed when
you are operating the vehicle.
If you are required to drive with the liftgate
open, make sure that all windows are closed,
and the climate control blower switch is set at
high speed. Do not use the recirculation
mode.
2
21_RUV_OM_EN_USC_t.book Page 81
Page 84 of 348

82GETTING TO KNOW YOUR VEHICLE
Using the above ways to open or close the liftgate:
When the liftgate is fully closed, the liftgate will
open
When the liftgate is fully open, the liftgate will
close
When the liftgate is moving, the liftgate will
reverse
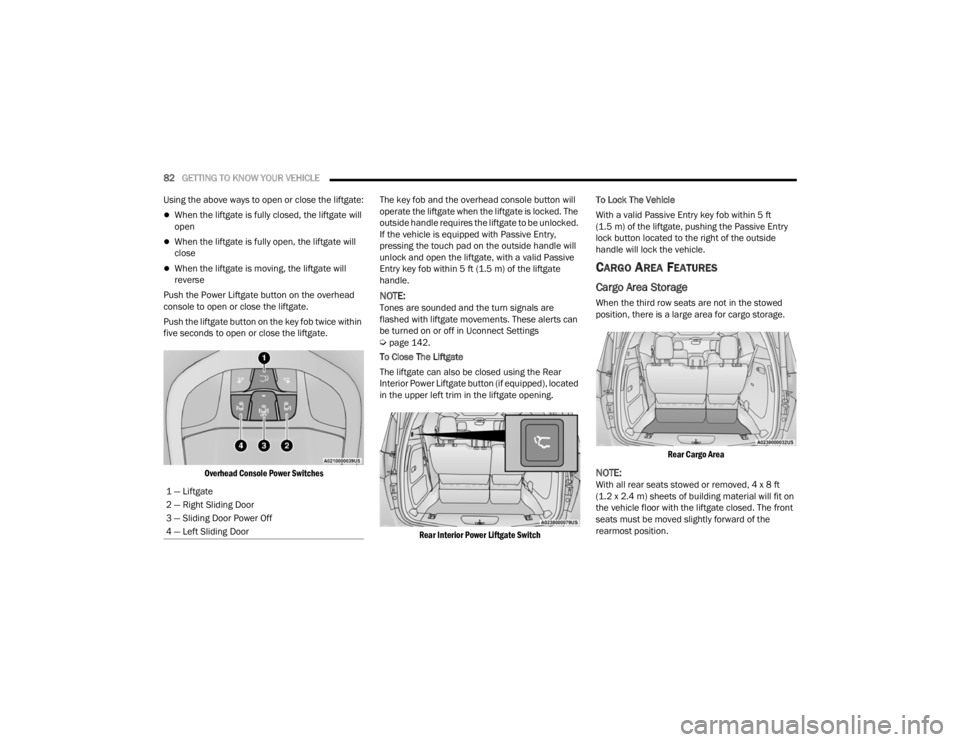
Push the Power Liftgate button on the overhead
console to open or close the liftgate.
Push the liftgate button on the key fob twice within
five seconds to open or close the liftgate.
Overhead Console Power Switches
The key fob and the overhead console button will
operate the liftgate when the liftgate is locked. The
outside handle requires the liftgate to be unlocked.
If the vehicle is equipped with Passive Entry,
pressing the touch pad on the outside handle will
unlock and open the liftgate, with a valid Passive
Entry key fob within 5 ft (1.5 m) of the liftgate
handle.
NOTE:Tones are sounded and the turn signals are
flashed with liftgate movements. These alerts can
be turned on or off in Uconnect Settings
Úpage 142.
To Close The Liftgate
The liftgate can also be closed using the Rear
Interior Power Liftgate button (if equipped), located
in the upper left trim in the liftgate opening.
Rear Interior Power Liftgate Switch
To Lock The Vehicle
With a valid Passive Entry key fob within 5 ft
(1.5 m) of the liftgate, pushing the Passive Entry
lock button located to the right of the outside
handle will lock the vehicle.
CARGO AREA FEATURES
Cargo Area Storage
When the third row seats are not in the stowed
position, there is a large area for cargo storage.
Rear Cargo Area
NOTE:With all rear seats stowed or removed, 4 x 8 ft
(1.2 x 2.4 m) sheets of building material will fit on
the vehicle floor with the liftgate closed. The front
seats must be moved slightly forward of the
rearmost position.
1 — Liftgate
2 — Right Sliding Door
3 — Sliding Door Power Off
4 — Left Sliding Door
21_RUV_OM_EN_USC_t.book Page 82
Page 90 of 348

88GETTING TO KNOW YOUR INSTRUMENT PANEL
INSTRUMENT CLUSTER DESCRIPTIONS
1. Tachometer
Indicates the engine speed in revolutions
per minute (RPM x 1000).
2. Instrument Cluster Display
When the appropriate conditions exist, this
display shows the instrument cluster
display messages
Úpage 89.
3. Speedometer
Indicates vehicle speed.
4. Temperature Gauge
The temperature gauge shows engine
coolant temperature. Any reading within the
normal range indicates that the engine
cooling system is operating satisfactorily.
The gauge can indicate a higher tempera -
ture when driving in hot weather or up
mountain grades. It should not be allowed
to exceed the upper limits of the normal
operating range. 5. Fuel Gauge
The gauge shows the level of fuel in the
fuel tank when the ignition switch is in the
ON/RUN position.
The fuel pump symbol points to
the side of the vehicle where the
fuel door is located.
NOTE:The hard telltales will illuminate for a bulb check
when the ignition is first cycled.
INSTRUMENT CLUSTER DISPLAY
Your vehicle is equipped with an instrument cluster
display, which offers useful information to the
driver. With the ignition in the OFF position (and the
key removed, for vehicles with mechanical key),
opening/closing of a door will activate the display
for viewing, and display the total miles or
kilometers in the odometer. Your instrument
cluster display is designed to display important
information about your vehicle’s systems and
features. Using a driver interactive display located
on the instrument panel, your instrument cluster
display can show you how systems are working and
give you warnings when they are not. The steering
wheel mounted controls allow you to scroll through
and enter the main menus and submenus. You can
access the specific information you want and
make selections and adjustments.
WARNING!
Driving with a hot engine cooling system could
damage your vehicle. If the temperature gauge
reaches “H” pull over and stop the vehicle. Idle
the vehicle with the air conditioner turned off
until the gauge drops back into the normal range
and is no longer red. If the gauge remains on the
“H”, turn the engine off immediately and call an
authorized dealer for service.
WARNING!
A hot engine cooling system is dangerous. You or
others could be badly burned by steam or boiling
coolant. You may want to call an authorized
dealer for service if your vehicle overheats
Úpage 286.
21_RUV_OM_EN_USC_t.book Page 88