2021 CHRYSLER 300 key
[x] Cancel search: keyPage 88 of 268
86 STARTING AND OPERATING
(Continued)
IGNITION PARK INTERLOCK
This vehicle is equipped with an Ignition Park
Interlock which requires the transmission to be in
PARK before the ignition can be turned to the OFF
mode. This helps the driver avoid inadvertently
leaving the vehicle without placing the
transmission in PARK. This system also locks the
transmission in PARK whenever the ignition is in
the OFF mode.
NOTE:
The transmission is NOT locked in PARK when the
i g
nition is in the ACC mode (even though the
engine will be off). Ensure that the transmission is
in PARK, and the ignition is OFF (not in ACC mode)
before exiting the vehicle.
Your vehicle could move and injure you and
others if it is not in PARK. Check by trying to
move the transmission gear selector out of
PARK with the brake pedal released. Make
sure the transmission is in PARK before
exiting the vehicle.
The transmission may not engage PARK if the
vehicle is moving. Always bring the vehicle to a
complete stop before shifting to PARK, and
verify that the transmission gear position indi -
cator solidly indicates PARK (P) without
b l
inking. Ensure that the vehicle is completely
stopped, and the PARK position is properly
indicated, before exiting the vehicle.
It is dangerous to shift out of PARK or
NEUTRAL if the engine speed is higher than
idle speed. If your foot is not firmly pressing
the brake pedal, the vehicle could accelerate
quickly forward or in reverse. You could lose
control of the vehicle and hit someone or
something. Only shift into gear when the
engine is idling normally and your foot is firmly
pressing the brake pedal.
WARNING!
Unintended movement of a vehicle could
injure those in or near the vehicle. As with all
vehicles, you should never exit a vehicle while
the engine is running. Before exiting a vehicle,
always come to a complete stop, then apply
the parking brake, shift the transmission into
PARK, and turn the ignition OFF. When the
ignition is in the OFF mode, the transmission
is locked in PARK, securing the vehicle against
unwanted movement.
When exiting the vehicle, always make sure
the ignition is in the OFF mode, remove the
key fob from the vehicle, and lock the vehicle.
Never leave children alone in a vehicle, or with
access to an unlocked vehicle. Allowing chil -
dren to be in a vehicle unattended is
da
ngerous for a number of reasons. A child or
others could be seriously or fatally injured.
Children should be warned not to touch the
parking brake, brake pedal or the transmis -
sion gear selector.
Do not leave the key fob in or near the vehicle
(or in a location accessible to children), and do
not leave the ignition in the ACC or ON/RUN
mode. A child could operate power windows,
other controls, or move the vehicle.
WARNING!CAUTION!
Shift into or out of PARK or REVERSE only after
the vehicle has come to a complete stop.
Do not shift between PARK, REVERSE,
NEUTRAL, or DRIVE when the engine is above
idle speed.
Before shifting into any gear, make sure your
foot is firmly pressing the brake pedal.
Page 90 of 268
88 STARTING AND OPERATING
(Continued)
(Continued)
PARK (P)
This range supplements the parking brake by
locking the transmission. The engine can be
started in this range. Never attempt to use PARK
while the vehicle is in motion. Apply the parking
brake when exiting the vehicle in this range.
When parking on a level surface, you may shift the
t r
ansmission into PARK first, and then apply the
parking brake.
When parking on a hill, apply the parking brake
b e
fore shifting the transmission to PARK. As an
added precaution, turn the front wheels toward the
curb on a downhill grade and away from the curb
on an uphill grade.
When exiting the vehicle, always:
Apply the parking brake.
Shift the transmission into PARK.
Turn the ignition OFF.
Remove the key fob from the vehicle.
WARNING!
Never use the PARK position as a substitute
for the parking brake. Always apply the
parking brake fully when exiting the vehicle to
guard against vehicle movement and possible
injury or damage.
Your vehicle could move and injure you and
others if it is not in PARK. Check by trying to
move the transmission gear selector out of
PARK with the brake pedal released. Make
sure the transmission is in PARK before
exiting the vehicle.
The transmission may not engage PARK if the
vehicle is moving. Always bring the vehicle to a
complete stop before shifting to PARK, and
verify that the transmission gear position indi -
cator solidly indicates PARK (P) without
b l
inking. Ensure that the vehicle is completely
stopped, and the PARK position is properly
indicated, before exiting the vehicle.
It is dangerous to shift out of PARK or
NEUTRAL if the engine speed is higher than
idle speed. If your foot is not firmly pressing
the brake pedal, the vehicle could accelerate
quickly forward or in reverse. You could lose
control of the vehicle and hit someone or
something. Only shift into gear when the
engine is idling normally and your foot is firmly
pressing the brake pedal.
WARNING!
Unintended movement of a vehicle could
injure those in or near the vehicle. As with all
vehicles, you should never exit a vehicle while
the engine is running. Before exiting a vehicle,
always come to a complete stop, then apply
the parking brake, shift the transmission into
PARK, and turn the ignition OFF. When the
ignition is in the OFF mode, the transmission
is locked in PARK, securing the vehicle against
unwanted movement.
When exiting the vehicle, always make sure
the ignition is in the OFF mode, remove the
key fob from the vehicle, and lock the vehicle.
Never leave children alone in a vehicle, or with
access to an unlocked vehicle. Allowing chil -
dren to be in a vehicle unattended is
da
ngerous for a number of reasons. A child or
others could be seriously or fatally injured.
Children should be warned not to touch the
parking brake, brake pedal or the transmis -
sion gear selector.
Do not leave the key fob in or near the vehicle
(or in a location accessible to children), and do
not leave the ignition in the ACC or ON/RUN
mode. A child could operate power windows,
other controls, or move the vehicle.
WARNING!
Page 131 of 268
MULTIMEDIA 129
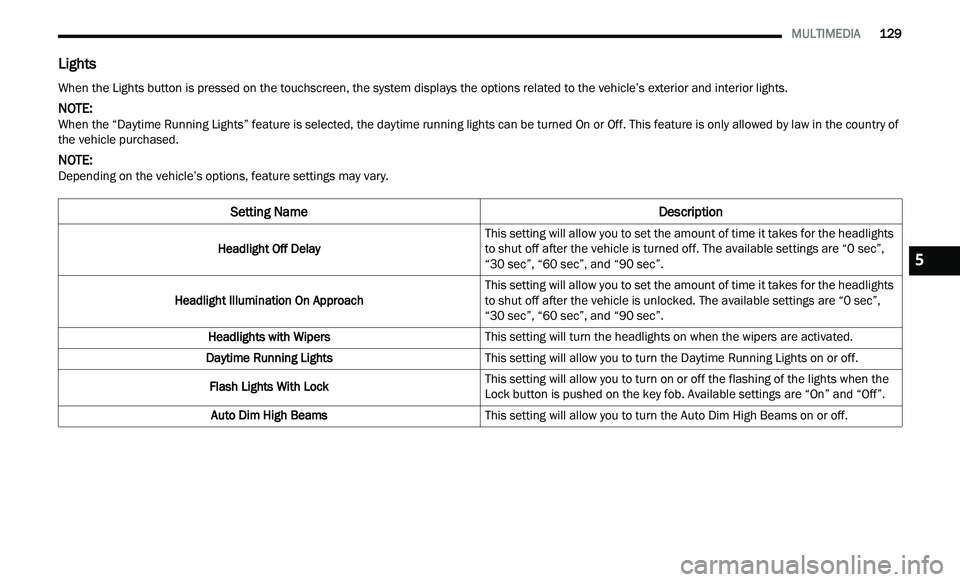
Lights
When the Lights button is pressed on the touchscreen, the system displays the options related to the vehicle’s exterior and interior lights.
NOTE:
When the “Daytime Running Lights” feature is selected, the daytime running lights can be turned On or Off. This feature is only allowed by law in the country of
t h
e vehicle purchased.
NOTE:
Depending on the vehicle’s options, feature settings may vary.
Setting Name Description
Headlight Off DelayThis setting will allow you to set the amount of time it takes for the headlights
t
o
shut off after the vehicle is turned off. The available settings are “0 sec”,
“30 sec”, “60 sec”, and “90 sec”.
Headlight Illumination On Approach This setting will allow you to set the amount of time it takes for the headlights
t
o
shut off after the vehicle is unlocked. The available settings are “0 sec”,
“30 sec”, “60 sec”, and “90 sec”.
Headlights with Wipers This setting will turn the headlights on when the wipers are activated.
Daytime Running Lights This setting will allow you to turn the Daytime Running Lights on or off.
Flash Lights With Lock This setting will allow you to turn on or off the flashing of the lights when the
Lock
button is pushed on the key fob. Available settings are “On” and “Off”.
Auto Dim High Beams This setting will allow you to turn the Auto Dim High Beams on or off.
5
Page 132 of 268
130 MULTIMEDIA
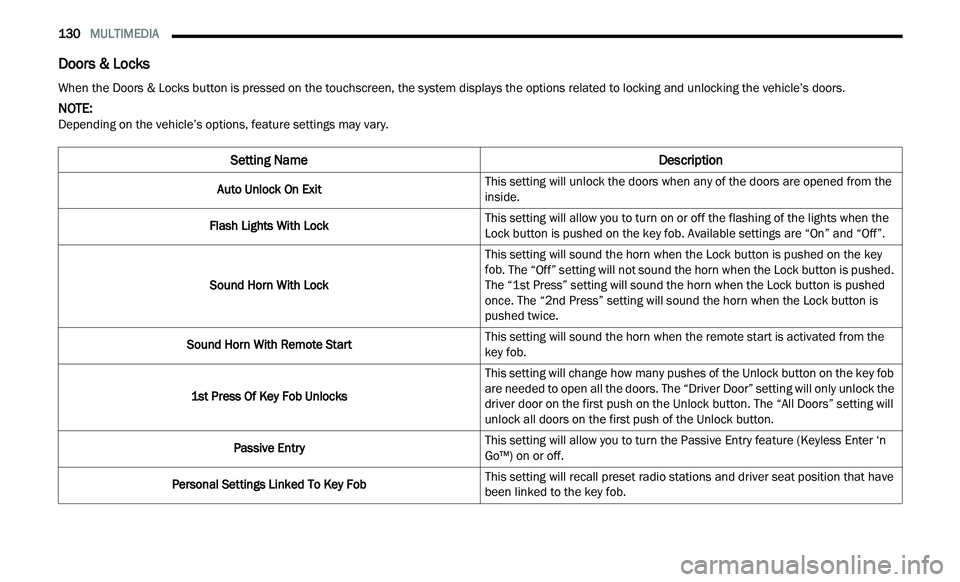
Doors & Locks
When the Doors & Locks button is pressed on the touchscreen, the system displays the options related to locking and unlocking the vehicle’s doors.
NOTE:
Depending on the vehicle’s options, feature settings may vary.
Setting Name Description
Auto Unlock On ExitThis setting will unlock the doors when any of the doors are opened from the
i
n
side.
Flash Lights With Lock This setting will allow you to turn on or off the flashing of the lights when the
Loc
k
button is pushed on the key fob. Available settings are “On” and “Off”.
Sound Horn With Lock This setting will sound the horn when the Lock button is pushed on the key
f
ob
. The “Off” setting will not sound the horn when the Lock button is pushed.
The “1st Press” setting will sound the horn when the Lock button is pushed
once. The “2nd Press” setting will sound the horn when the Lock button is
pushed twice.
Sound Horn With Remote Start This setting will sound the horn when the remote start is activated from the
ke
y fob.
1st Press Of Key Fob Unlocks This setting will change how many pushes of the Unlock button on the key fob
a
r
e needed to open all the doors. The “Driver Door” setting will only unlock the
driver door on the first push on the Unlock button. The “All Doors” setting will
unlock all doors on the first push of the Unlock button.
Passive Entry This setting will allow you to turn the Passive Entry feature (Keyless Enter ‘n
G
o™
) on or off.
Personal Settings Linked To Key Fob This setting will recall preset radio stations and driver seat position that have
b
e
en linked to the key fob.
Page 133 of 268
MULTIMEDIA 131
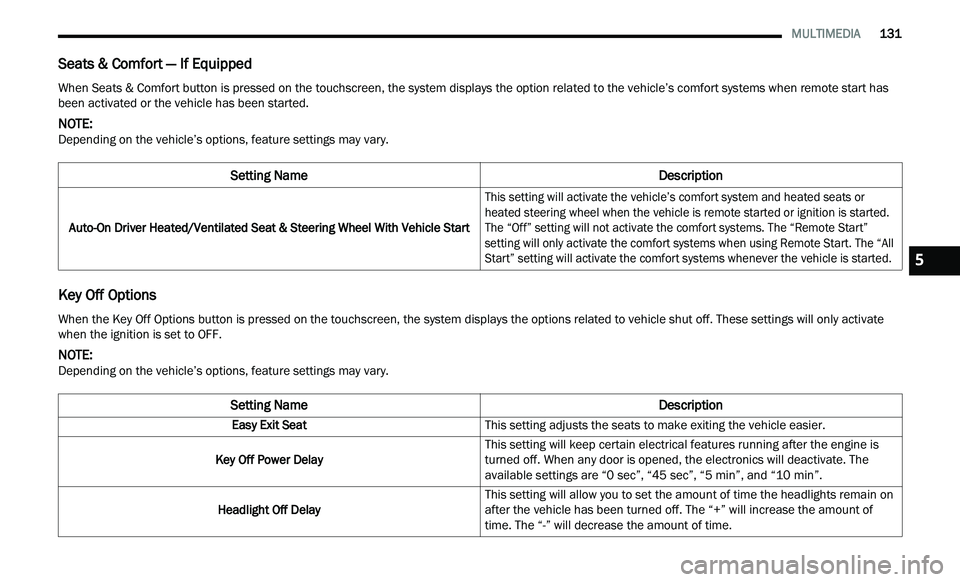
Seats & Comfort — If Equipped
Key Off Options
When Seats & Comfort button is pressed on the touchscreen, the system displays the option related to the vehicle’s comfort systems when remote start has
been activated or the vehicle has been started.
NOTE:
Depending on the vehicle’s options, feature settings may vary.
Setting Name Description
Auto-On Driver Heated/Ventilated Seat & Steering Wheel With Vehicle Start
This setting will activate the vehicle’s comfort system and heated seats or
he
ated steering wheel when the vehicle is remote started or ignition is started.
The “Off” setting will not activate the comfort systems. The “Remote Start”
setting will only activate the comfort systems when using Remote Start. The “All
Start” setting will activate the comfort systems whenever the vehicle is started.
When the Key Off Options button is pressed on the touchscreen, the system displays the options related to vehicle shut off. These settings will only activate
when the ignition is set to OFF.
NOTE:
Depending on the vehicle’s options, feature settings may vary.
Setting Name Description
Easy Exit SeatThis setting adjusts the seats to make exiting the vehicle easier.
Key Off Power Delay This setting will keep certain electrical features running after the engine is
tu
rned off. When any door is opened, the electronics will deactivate. The
available settings are “0 sec”, “45 sec”, “5 min”, and “10 min”.
Headlight Off Delay This setting will allow you to set the amount of time the headlights remain on
af
ter the vehicle has been turned off. The “+” will increase the amount of
time. The “-” will decrease the amount of time.
5
Page 152 of 268

150 SAFETY
Tire Pressure Monitoring System Display
Low Tire Pressure Monitoring System Display
Should this occur, you should stop as soon as
p os
sible and inflate the tires with a low pressure
condition (those shown in a different color in the
instrument cluster graphic) to the vehicle’s
recommended cold placard pressure inflation
value as shown in the “Inflate to XX” message.
Once the system receives the updated tire pressures, the system will automatically update,
the graphic display in the instrument cluster will
change color back to the original color, and the
TPMS Warning Light will turn off. The vehicle may
need to be driven for up to 20
minutes above
1 5
mph (24 km/h) in order for the TPMS to receive
t h
is information.
NOTE:
When filling warm tires, the tire pressure may need
t o
be increased up to an additional 4 psi (28 kPa)
above the recommended cold placard pressure in
order to turn the TPMS Warning Light off.
Service Tire Pressure System Warning
If a system fault is detected, the Tire Pressure
Monitoring System (TPMS) Warning Light will flash
on and off for 75 seconds and then remain on
solid. The system fault will also sound a chime. In
addition, the instrument cluster will display a
"Service Tire Pressure System" message for a
minimum of five seconds and then display dashes
(- -) in place of the pressure value to indicate which
sensor is not being received.
If the ignition switch is cycled, this sequence will
r e
peat, providing the system fault still exists. If the
system fault no longer exists, the TPMS Warning
Light will no longer flash, and the "Service Tire
Pressure System" message will no longer display,
and a pressure value will display in place of the
dashes. A system fault can occur due to any of the
following:
Signal interference due to electronic devices or
driving next to facilities emitting the same radio
frequencies as the TPMS sensors.
Accumulation of snow or ice around the wheels
or wheel housings.
Using tire chains on the vehicle.
Using wheels/tires not equipped with TPMS
sensors.
Vehicles With Compact Spare
1. T he compact spare tire or non-matching full
s
ize does not have a Tire Pressure Monitoring
System sensor. Therefore, the TPMS will not
monitor the pressure in the compact spare
tire.
2. I f you install the compact or non-matching full
s
ize spare tire in place of a road tire that has a
pressure below the low-pressure warning limit,
upon the next ignition key cycle, the TPMS
Warning Light will remain on and a chime will
sound. In addition, the graphic in the
instrument cluster will still display a different
color pressure value and an "Inflate to XX"
message.
Page 153 of 268

SAFETY 151
3. After driving the vehicle for up to 20 minutes
ab
ove 15 mph (24 km/h), the TPMS Warning
Li g
ht will flash on and off for 75 seconds and
then remain on solid. In addition, the
instrument cluster will display a “Service Tire
Pressure System” message for five seconds
and then display dashes (- -) in place of the
pressure value.
4. F or each subsequent ignition key cycle, a
c
hime will sound, the TPMS Warning Light will
flash on and off for 75 seconds and then
remain on solid, and the instrument cluster will
display a “Service Tire Pressure System”
message for five seconds and then display
dashes (- -) in place of the pressure value.
5. O nce you repair or replace the original road tire
a
nd reinstall it on the vehicle in place of the
compact spare or non-matching full size, the
TPMS will update automatically. In addition, the
TPMS Warning Light will turn off and the graphic
in the instrument cluster will display a new
pressure value instead of dashes (- -), as long as
no tire pressure is below the low-pressure
warning limit in any of the four active road tires.
The vehicle may need to be driven for up to
20 minutes above 15 mph (24 km/h) in order
f o
r the TPMS to receive this information.
TPMS Deactivation — If Equipped
The Tire Pressure Monitoring System (TPMS) can
be deactivated if replacing all four wheel and tire
assemblies (road tires) with wheel and tire
assemblies that do not have TPMS sensors, such
as when installing winter wheel and tire
assemblies on your vehicle.
To deactivate the TPMS, first replace all four wheel
a n
d tire assemblies (road tires) with tires not
equipped with Tire Pressure Monitoring System
(TPMS) sensors. Then, drive the vehicle for
20 minutes above 15 mph (24 km/h). The TPMS
wi
ll chime, the TPMS Warning Light will flash on
and off for 75 seconds and then remain on. The
instrument cluster will display the “Service Tire
Pressure System” message and then display
dashes (--) in place of the pressure values.
Beginning with the next ignition cycle, the TPMS
wi
ll no longer chime or display the “Service Tire
Pressure System” message in the instrument
cluster but dashes (--) will remain in place of the
pressure values. To reactivate the TPMS, replace all four wheel and
t
i
re assemblies (road tires) with tires equipped with
TPMS sensors. Then, drive the vehicle for up to
20 minutes above 15 mph (24 km/h). The TPMS
w i
ll chime, the TPMS Warning Light will flash on
and off for 75 seconds and then turn off. The
instrument cluster will display the “Service Tire
Pressure System” message and then display
pressure values in place of the dashes. On the next
ignition cycle the "Service Tire Pressure System"
message will no longer be displayed as long as no
system fault exists.
OCCUPANT RESTRAINT SYSTEMS
Some of the most important safety features in your
vehicle are the restraint systems:
OCCUPANT RESTRAINT SYSTEMS
F
EATURES
Seat Belt Systems
Supplemental Restraint Systems (SRS) Air Bags
Child Restraints
Some of the safety features described in this
s e
ction may be standard equipment on some
models, or may be optional equipment on others. If
you are not sure, ask an authorized dealer.
6
Page 167 of 268
SAFETY 165
NOTE:
After an accident, remember to cycle the ignition to
t h
e STOP (OFF/LOCK) position and remove the key
from the ignition switch to avoid draining the
battery. Carefully check the vehicle for fuel leaks in
the engine compartment and on the ground near
the engine compartment and fuel tank before
resetting the system and starting the engine. If
there are no fuel leaks or damage to the vehicle
electrical devices (e.g. headlights) after an
accident, reset the system by following the
procedure described below. If you have any doubt,
contact an authorized dealer.
Enhanced Accident Response System
Reset Procedure
In order to reset the Enhanced Accident Response
System functions after an event, the ignition switch
must be changed from ignition START or ON/RUN
to ignition OFF. Carefully check the vehicle for fuel
leaks in the engine compartment and on the
ground near the engine compartment and fuel
tank before resetting the system and starting the
engine.
After an accident, if the vehicle will not start after
p e
rforming the reset procedure, the vehicle must
be towed to an authorized dealer to be inspected
and to have the Enhanced Accident Response
System reset.
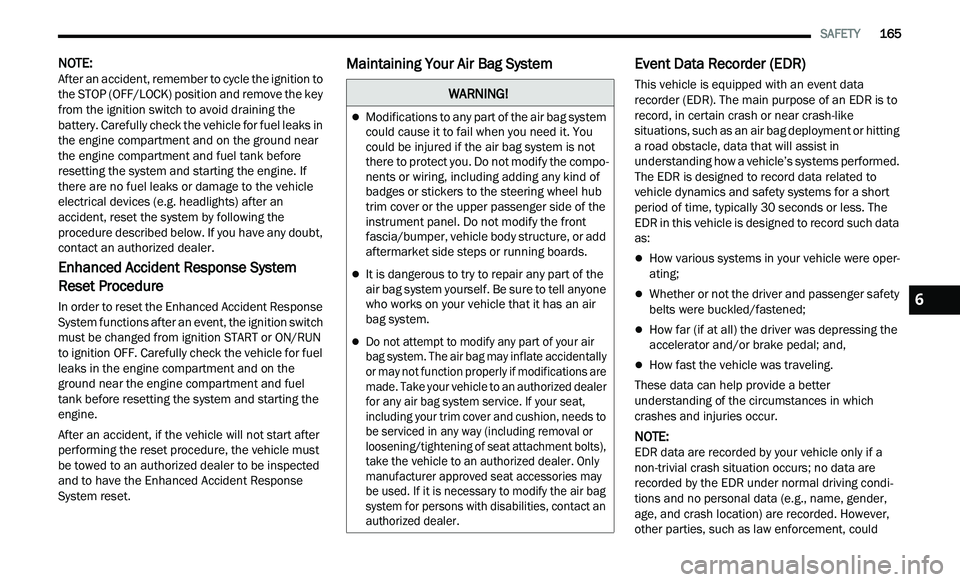
Maintaining Your Air Bag System Event Data Recorder (EDR)
This vehicle is equipped with an event data
recorder (EDR). The main purpose of an EDR is to
record, in certain crash or near crash-like
situations, such as an air bag deployment or hitting
a road obstacle, data that will assist in
understanding how a vehicle’s systems performed.
The EDR is designed to record data related to
vehicle dynamics and safety systems for a short
period of time, typically 30 seconds or less. The
EDR in this vehicle is designed to record such data
as:
How various systems in your vehicle were oper -
ating;
Whether or not the driver and passenger safety
belts were buckled/fastened;
How far (if at all) the driver was depressing the
accelerator and/or brake pedal; and,
How fast the vehicle was traveling.
These data can help provide a better
u n
derstanding of the circumstances in which
crashes and injuries occur.
NOTE:
EDR data are recorded by your vehicle only if a
n on
-trivial crash situation occurs; no data are
recorded by the EDR under normal driving condi -
tions and no personal data (e.g., name, gender,
a g
e, and crash location) are recorded. However,
other parties, such as law enforcement, could
WARNING!
Modifications to any part of the air bag system
could cause it to fail when you need it. You
could be injured if the air bag system is not
there to protect you. Do not modify the compo -
nents or wiring, including adding any kind of
ba
dges or stickers to the steering wheel hub
trim cover or the upper passenger side of the
instrument panel. Do not modify the front
fascia/bumper, vehicle body structure, or add
aftermarket side steps or running boards.
It is dangerous to try to repair any part of the
air bag system yourself. Be sure to tell anyone
who works on your vehicle that it has an air
bag system.
Do not attempt to modify any part of your air
bag system. The air bag may inflate accidentally
or may not function properly if modifications are
made. Take your vehicle to an authorized dealer
for any air bag system service. If your seat,
including your trim cover and cushion, needs to
be serviced in any way (including removal or
loosening/tightening of seat attachment bolts),
take the vehicle to an authorized dealer. Only
manufacturer approved seat accessories may
be used. If it is necessary to modify the air bag
system for persons with disabilities, contact an
authorized dealer.
6