2021 CHRYSLER 300 brake
[x] Cancel search: brakePage 103 of 268
STARTING AND OPERATING 101
OFFSET DRIVING
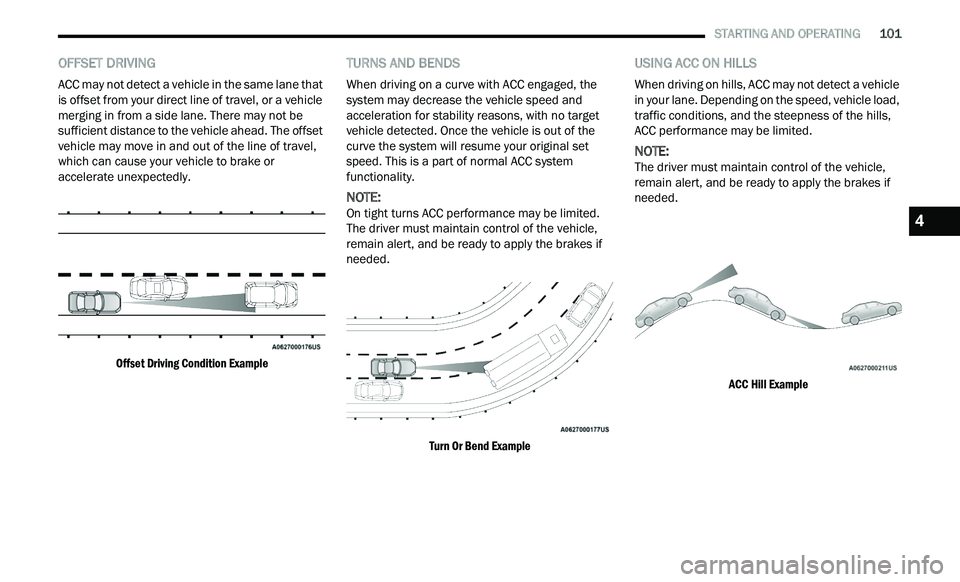
ACC may not detect a vehicle in the same lane that
is offset from your direct line of travel, or a vehicle
merging in from a side lane. There may not be
sufficient distance to the vehicle ahead. The offset
vehicle may move in and out of the line of travel,
which can cause your vehicle to brake or
accelerate unexpectedly.
Offset Driving Condition Example
TURNS AND BENDS
When driving on a curve with ACC engaged, the
system may decrease the vehicle speed and
acceleration for stability reasons, with no target
vehicle detected. Once the vehicle is out of the
curve the system will resume your original set
speed. This is a part of normal ACC system
functionality.
NOTE:
On tight turns ACC performance may be limited.
T h
e driver must maintain control of the vehicle,
remain alert, and be ready to apply the brakes if
needed.
Turn Or Bend Example
USING ACC ON HILLS
When driving on hills, ACC may not detect a vehicle
in your lane. Depending on the speed, vehicle load,
traffic conditions, and the steepness of the hills,
ACC performance may be limited.
NOTE:
The driver must maintain control of the vehicle,
r e
main alert, and be ready to apply the brakes if
needed.
ACC Hill Example
4
Page 104 of 268
102 STARTING AND OPERATING
LANE CHANGING
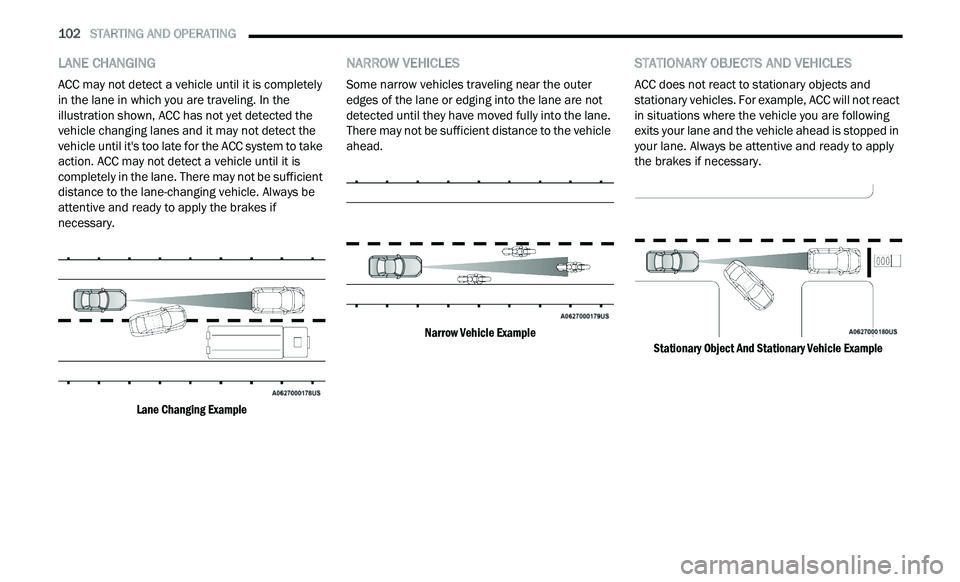
ACC may not detect a vehicle until it is completely
in the lane in which you are traveling. In the
illustration shown, ACC has not yet detected the
vehicle changing lanes and it may not detect the
vehicle until it's too late for the ACC system to take
action. ACC may not detect a vehicle until it is
completely in the lane. There may not be sufficient
distance to the lane-changing vehicle. Always be
attentive and ready to apply the brakes if
necessary.
Lane Changing Example
NARROW VEHICLES
Some narrow vehicles traveling near the outer
edges of the lane or edging into the lane are not
detected until they have moved fully into the lane.
There may not be sufficient distance to the vehicle
ahead.
Narrow Vehicle Example
STATIONARY OBJECTS AND VEHICLES
ACC does not react to stationary objects and
stationary vehicles. For example, ACC will not react
in situations where the vehicle you are following
exits your lane and the vehicle ahead is stopped in
your lane. Always be attentive and ready to apply
the brakes if necessary.
Stationary Object And Stationary Vehicle Example
Page 108 of 268

106 STARTING AND OPERATING
Front Park Assist Audible Alerts
ParkSense will turn off the Front Park Assist
au
dible alert (chime) after approximately three
seconds when an obstacle has been detected, the
vehicle is stationary, and brake pedal is applied.
Adjustable Chime Volume Settings
Front and Rear chime volume settings can be
s e
lected in the Uconnect system Ú page 122.
The chime volume settings include low, medium,
a n
d high.
ParkSense will retain its last known configuration
st
ate through ignition cycles.
PARKSENSE WARNING DISPLAY
The ParkSense Warning screen will only be
displayed if Sound and Display is selected from
within the Uconnect system
Ú page 122.
The ParkSense Warning screen is located within
t h
e instrument cluster display Ú page 66. It
provides visual warnings to indicate the distance
b e
tween the rear fascia/bumper and/or front
fascia/bumper and the detected obstacle.
ENABLING AND DISABLING PARKSENSE
ParkSense can be enabled and disabled
with the ParkSense switch. When the ParkSense switch is pushed to disable
t
h
e system, the instrument cluster will display the
“ParkSense Off” message for approximately five
seconds. When the gear selector is moved to
REVERSE and the system is disabled, the
instrument cluster will display the “ParkSense Off”
message for as long as the vehicle is in REVERSE.
The ParkSense switch LED will be on when
P a
rkSense is disabled or requires service. The
ParkSense switch LED will be off when the system
is enabled. If the ParkSense switch is pushed and
the system requires service, the ParkSense switch
LED will blink momentarily and then the LED will be
on.
SERVICE THE PARKSENSE PARK ASSIST
S
YSTEM
During vehicle start up, when the ParkSense
System has detected a faulted condition, the
instrument cluster will actuate a single chime,
once per ignition cycle, and it will display the
"PARKSENSE UNAVAILABLE WIPE REAR
SENSORS", "PARKSENSE UNAVAILABLE WIPE
FRONT SENSORS", or the "PARKSENSE
UNAVAILABLE SERVICE REQUIRED" message for
five seconds. When the gear selector is moved to
REVERSE and the system has detected a faulted
condition, the instrument cluster display will
display a "PARKSENSE UNAVAILABLE WIPE REAR
SENSORS", "PARKSENSE UNAVAILABLE WIPE FRONT SENSORS" or "PARKSENSE UNAVAILABLE
SERVICE REQUIRED" pop-up message for five
seconds. After five seconds, a vehicle graphic will
be displayed with "UNAVAILABLE" at either the
front or rear sensor location depending on where
the fault is detected. The system will continue to
provide arc alerts for the side that is functioning
properly. These arc alerts will interrupt the
"PARKSENSE UNAVAILABLE WIPE REAR
SENSORS", "PARKSENSE UNAVAILABLE WIPE
FRONT SENSORS", or "PARKSENSE UNAVAILABLE
SERVICE REQUIRED" messages if an object is
detected within the five second pop-up duration.
The vehicle graphic will remain displayed for as
long as the vehicle is in REVERSE.
If "PARKSENSE UNAVAILABLE WIPE REAR
S
E
NSORS" or "PARKSENSE UNAVAILABLE WIPE
FRONT SENSORS" appears in the instrument
cluster display make sure the outer surface and
the underside of the rear fascia/bumper and/or
front fascia/bumper is clean and clear of snow,
ice, mud, dirt or other obstruction and then cycle
the ignition. If the message continues to appear
see an authorized dealer.
If the "PARKSENSE UNAVAILABLE SERVICE
R E
QUIRED" message appears in the instrument
cluster display, see an authorized dealer.
Page 112 of 268
110 STARTING AND OPERATING
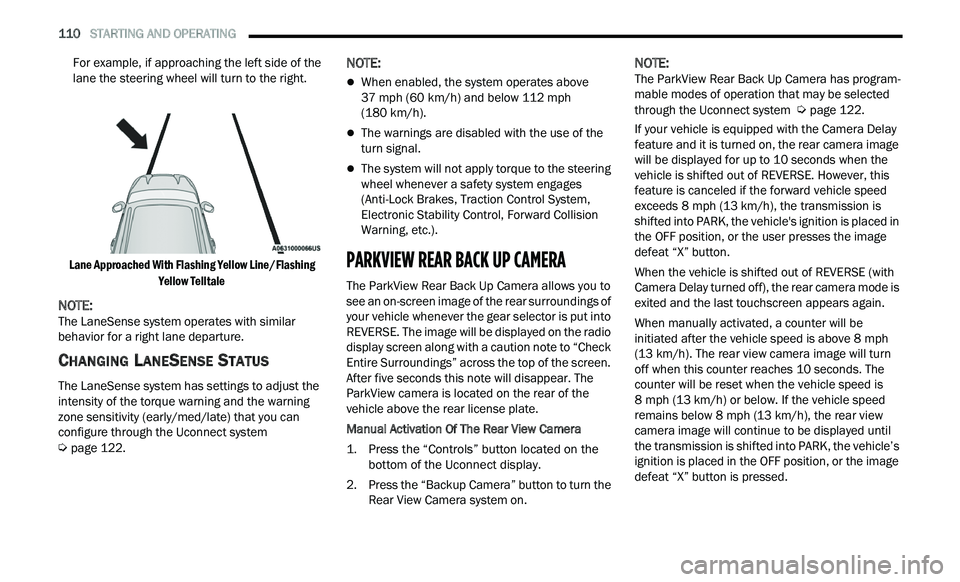
For example, if approaching the left side of the
lane the steering wheel will turn to the right.
Lane Approached With Flashing Yellow Line/Flashing Ye
llow Telltale
NOTE:
The LaneSense system operates with similar
b e
havior for a right lane departure.
CHANGING LANESENSE STATUS
The LaneSense system has settings to adjust the
intensity of the torque warning and the warning
zone sensitivity (early/med/late) that you can
configure through the Uconnect system
Ú page 122.
NOTE:
When enabled, the system operates above
37
mph (60 km/h) and below 112 mph
( 1
80 km/h).
The warnings are disabled with the use of the
turn signal.
The system will not apply torque to the steering
wheel whenever a safety system engages
(Anti-Lock Brakes, Traction Control System,
Electronic Stability Control, Forward Collision
Warning, etc.).
PARKVIEW REAR BACK UP CAMERA
The ParkView Rear Back Up Camera allows you to
see an on-screen image of the rear surroundings of
your vehicle whenever the gear selector is put into
REVERSE. The image will be displayed on the radio
display screen along with a caution note to “Check
Entire Surroundings” across the top of the screen.
After five seconds this note will disappear. The
ParkView camera is located on the rear of the
vehicle above the rear license plate.
Manual Activation Of The Rear View Camera
1. P
ress the “Controls” button located on the
b
ottom of the Uconnect display.
2. Press the “Backup Camera” button to turn the R
ear View Camera system on.
NOTE:
The ParkView Rear Back Up Camera has program -
mable modes of operation that may be selected
t h
rough the Uconnect system Ú page 122.
If your vehicle is equipped with the Camera Delay
f e
ature and it is turned on, the rear camera image
will be displayed for up to 10 seconds when the
vehicle is shifted out of REVERSE. However, this
feature is canceled if the forward vehicle speed
exceeds 8 mph (13 km/h), the transmission is
s h
ifted into PARK, the vehicle's ignition is placed in
the OFF position, or the user presses the image
defeat “X” button.
When the vehicle is shifted out of REVERSE (with
Ca
mera Delay turned off), the rear camera mode is
exited and the last touchscreen appears again.
When manually activated, a counter will be
i n
itiated after the vehicle speed is above 8 mph
( 1
3 km/h). The rear view camera image will turn
of f
when this counter reaches 10 seconds. The
counter will be reset when the vehicle speed is
8 mph (13 km/h) or below. If the vehicle speed
r e
mains below 8 mph (13 km/h), the rear view
c a
mera image will continue to be displayed until
the transmission is shifted into PARK, the vehicle’s
ignition is placed in the OFF position, or the image
defeat “X” button is pressed.
Page 115 of 268
STARTING AND OPERATING 113
VEHICLE LOADING
The load carrying capacity of your vehicle is shown
on the “Vehicle Certification Label”. This
information should be used for passenger and
luggage loading as indicated.
Do not exceed the specified Gross Vehicle Weight
Ra
ting (GVWR) or the Gross Axle Weight Rating
(GAWR).
VEHICLE CERTIFICATION LABEL
Your vehicle has a Vehicle Certification Label
affixed to the drivers side B-pillar or the rear of the
driver’s door.
The label contains the following information:
Name of manufacturer
Month and year of manufacture
Gross Vehicle Weight Rating (GVWR)
Gross Axle Weight Rating (GAWR) front
Gross Axle Weight Rating (GAWR) rear
Vehicle Identification Number (VIN)
Type of vehicle
Month, Day, and Hour of manufacture (MDH)
The bar code allows a computer scanner to read
t h
e VIN.
GROSS VEHICLE WEIGHT RATING
(GVWR)
The GVWR is the total allowable weight of your
vehicle. This includes driver, passengers, and
cargo. The total load must be limited so that you do
not exceed the GVWR.
GROSS AXLE WEIGHT RATING (GAWR)
The GAWR is the maximum capacity of the front
and rear axles. Distribute the load over the front
and rear axles evenly. Make sure that you do not
exceed either front or rear GAWR.
OVERLOADING
The load carrying components (axle, springs, tires,
wheels, etc.) of your vehicle will provide
satisfactory service as long as you do not exceed
the GVWR and the front and rear GAWR.
The best way to figure out the total weight of your
ve
hicle is to weigh it when it is fully loaded and ready for operation. Weigh it on a commercial scale
to ensure that it is not over the GVWR.
Figure out the weight on the front and rear of the
v
e
hicle separately. It is important that you
distribute the load evenly over the front and rear
axles.
Overloading can cause potential safety hazards
an
d shorten useful service life. Heavier axles or
suspension components do not necessarily
increase the vehicle's GVWR.
LOADING
To load your vehicle properly, first figure out its
empty weight, axle-by-axle and side-by-side. Store
heavier items down low and be sure you distribute
their weight as evenly as possible. Stow all loose
items securely before driving. If weighing the
loaded vehicle shows that you have exceeded
either GAWR, but the total load is within the
specified GVWR, you must redistribute the weight.
Improper weight distribution can have an adverse
effect on the way your vehicle steers and handles
and the way the brakes operate.
NOTE:
Refer to the “Vehicle Certification Label” affixed
to the rear of the driver's door for your vehicle's
GVWR and GAWRs
Ú page 113.
Refer to the “Tire Placard” for your vehicle's
proper tire pressure.
WARNING!
Because the front wheels steer the vehicle, it is
important that you do not exceed the maximum
front or rear GAWR. A dangerous driving
condition can result if either rating is exceeded.
You could lose control of the vehicle and have a
collision.
4
Page 116 of 268

114 STARTING AND OPERATING
TRAILER TOWING
In this section you will find safety tips and
information on limits to the type of towing you can
reasonably do with your vehicle. Before towing a
trailer, carefully review this information to tow your
load as efficiently and safely as possible.
To maintain the New Vehicle Limited Warranty
cov
erage, follow the requirements and
recommendations in this manual concerning
vehicles used for trailer towing.
COMMON TOWING DEFINITIONS
The following trailer towing related definitions will
assist you in understanding the following
information:
Gross Vehicle Weight Rating (GVWR)
The GVWR is the total allowable weight of your
vehicle. This includes driver, passengers, cargo
and tongue weight. The total load must be limited
so that you do not exceed the GVWR
Ú page 113.
Gross Trailer Weight (GTW)
The GTW is the weight of the trailer plus the weight
of all cargo, consumables, and equipment
(permanent or temporary) loaded in or on the
trailer in its "loaded and ready for operation"
condition. The recommended way to measure GTW is to put
y
ou
r fully loaded trailer on a vehicle scale. The
entire weight of the trailer must be supported by
the scale.
Gross Combination Weight Rating (GCWR)
The GCWR is the total allowable weight of your
vehicle and trailer when weighed in combination.
Gross Axle Weight Rating (GAWR)
The GAWR is the maximum capacity of the front
and rear axles. Distribute the load over the front
and rear axles evenly. Make sure that you do not
exceed either front or rear GAWR
Ú page 113.
Tongue Weight (TW)
The tongue weight is the downward force exerted
on the hitch ball by the trailer. You must consider
this as part of the load on your vehicle.
Trailer Frontal Area
The frontal area is the maximum height multiplied
by the maximum width of the front of a trailer.
Trailer Sway Control
The Trailer Sway Control (TSC) can be a mechanical
telescoping link that can be installed between the
hitch receiver and the trailer tongue that typically
provides adjustable friction associated with the
telescoping motion to dampen any unwanted
trailer swaying motions while traveling.
If equipped, the electronic TSC recognizes a
sw
aying trailer and automatically applies individual
wheel brakes and/or reduces engine power to
attempt to eliminate the trailer sway.
Weight-Carrying Hitch
A weight-carrying hitch supports the trailer tongue
weight, just as if it were luggage located at a hitch
ball or some other connecting point of the vehicle.
These kinds of hitches are the most popular on the
market today and they are commonly used to tow
small and medium sized trailers.
WARNING!
It is important that you do not exceed the
maximum front or rear GAWR. A dangerous
driving condition can result if either rating is
exceeded. You could lose control of the vehicle
and have a collision.
Page 117 of 268
STARTING AND OPERATING 115
Weight-Distributing Hitch
A weight-distributing system works by applying
leverage through spring (load) bars. They are
typically used for heavier loads to distribute trailer
tongue weight to the tow vehicle's front axle and
the trailer axle(s). When used in accordance with
the manufacturer's directions, it provides for a
more level ride, offering more consistent steering
and brake control thereby enhancing towing
safety. The addition of a friction/hydraulic sway
control also dampens sway caused by traffic and
crosswinds and contributes positively to tow
vehicle and trailer stability. Trailer sway control and
a weight distributing (load equalizing) hitch are
recommended for heavier Tongue Weights (TW) and may be required depending on vehicle and
trailer configuration/loading to comply with Gross
Axle Weight Rating (GAWR) requirements.
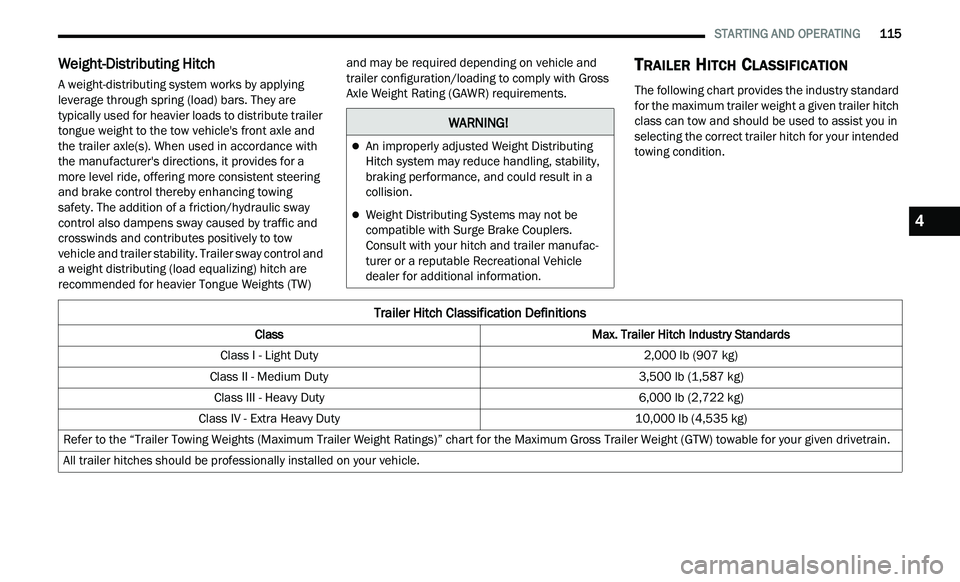
TRAILER HITCH CLASSIFICATION
The following chart provides the industry standard
for the maximum trailer weight a given trailer hitch
class can tow and should be used to assist you in
selecting the correct trailer hitch for your intended
towing condition.
WARNING!
An improperly adjusted Weight Distributing
Hitch system may reduce handling, stability,
braking performance, and could result in a
collision.
Weight Distributing Systems may not be
compatible with Surge Brake Couplers.
Consult with your hitch and trailer manufac
-
turer or a reputable Recreational Vehicle
d e
aler for additional information.
Trailer Hitch Classification Definitions
Class Max. Trailer Hitch Industry Standards
Class I - Light Duty 2,000 lb (907 kg)
Class II - Medium Duty 3,500 lb (1,587 kg)
Class III - Heavy Duty 6,000 lb (2,722 kg)
Class IV - Extra Heavy Duty 10,000 lb (4,535 kg)
Refer to the “Trailer Towing Weights (Maximum Trailer Weight Ratings)” chart for the Maximum Gross Trailer Weight (GTW) towable for your given drivetrain.
All trailer hitches should be professionally installed on your vehicle.
4
Page 118 of 268
116 STARTING AND OPERATING
(Continued)
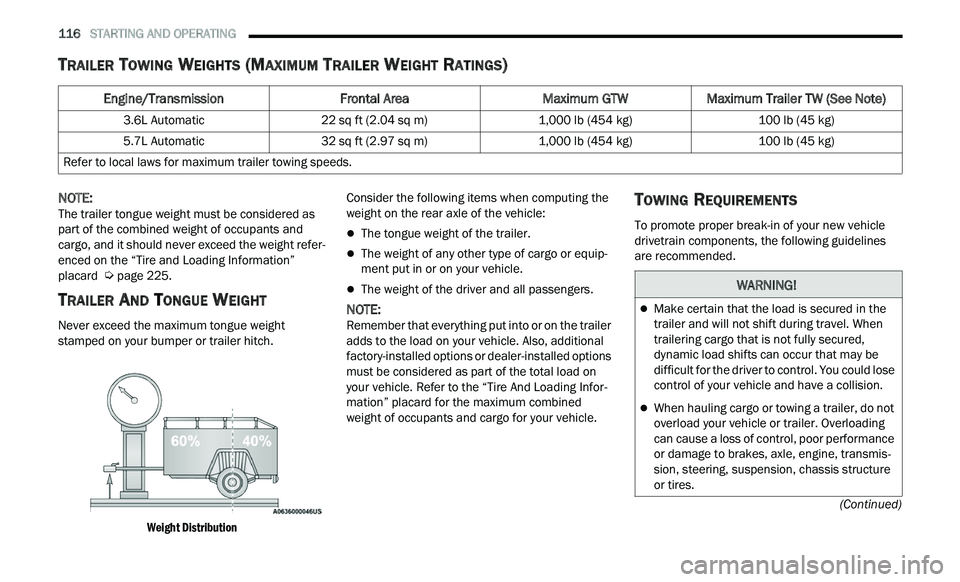
TRAILER TOWING WEIGHTS (MAXIMUM TRAILER WEIGHT RATINGS)
NOTE:
The trailer tongue weight must be considered as
p a
rt of the combined weight of occupants and
cargo, and it should never exceed the weight refer -
enced on the “Tire and Loading Information”
p l
acard Ú page 225.
TRAILER AND TONGUE WEIGHT
Never exceed the maximum tongue weight
stamped on your bumper or trailer hitch.
Weight Distribution
Consider the following items when computing the
w
e
ight on the rear axle of the vehicle:
The tongue weight of the trailer.
The weight of any other type of cargo or equip -
ment put in or on your vehicle.
The weight of the driver and all passengers.
NOTE:
Remember that everything put into or on the trailer
a d
ds to the load on your vehicle. Also, additional
factory-installed options or dealer-installed options
must be considered as part of the total load on
your vehicle. Refer to the “Tire And Loading Infor -
mation” placard for the maximum combined
w e
ight of occupants and cargo for your vehicle.
TOWING REQUIREMENTS
To promote proper break-in of your new vehicle
drivetrain components, the following guidelines
are recommended.
Engine/Transmission Frontal AreaMaximum GTWMaximum Trailer TW (See Note)
3.6L Automatic 22 sq ft (2.04 sq m) 1,000 lb (454 kg) 100 lb (45 kg)
5.7L Automatic 32 sq ft (2.97 sq m) 1,000 lb (454 kg) 100 lb (45 kg)
Refer to local laws for maximum trailer towing speeds.
WARNING!
Make certain that the load is secured in the
trailer and will not shift during travel. When
trailering cargo that is not fully secured,
dynamic load shifts can occur that may be
difficult for the driver to control. You could lose
control of your vehicle and have a collision.
When hauling cargo or towing a trailer, do not
overload your vehicle or trailer. Overloading
can cause a loss of control, poor performance
or damage to brakes, axle, engine, transmis -
sion, steering, suspension, chassis structure
or
tires.