2021 CHRYSLER 300 stop start
[x] Cancel search: stop startPage 70 of 268

68 GETTING TO KNOW YOUR INSTRUMENT PANEL
2. Push and release the down arrow button to
scroll downward through the main menu to
“ V
ehicle Info.”
3. P ush and release the right
arrow button to
access the ”Oil Life” screen.
4. P ush and hold the O
K button to reset oil life. If
conditions are met, the gauge and numeric
display will update to show 100%. If conditions
are not met a pop-up message of "To reset oil
life engine must be off with ignition in run" will
be displayed (for five seconds), and the user
will remain at the Oil Life screen.
5. P ush and release the u
p or down arrow
button to exit the submenu screen.
NOTE:
If the indicator message illuminates when you start
t h
e vehicle, the oil change indicator system did not
reset. If necessary, repeat this procedure.
Secondary Method Of Resetting Engine Oil Life
1. W ithout pressing the brake pedal, push the
E
NGINE START/STOP button and place the
ignition to the ON/RUN position (do not start
the engine).
2. Fully press the accelerator pedal, slowly, three t
imes within ten seconds.
3. Without pushing the brake pedal, push the E
NGINE START/STOP button once to return the
ignition to the OFF position.
NOTE:
If the indicator message illuminates when you start
t h
e vehicle, the oil change indicator system did not
reset. If necessary, repeat this procedure.
INSTRUMENT CLUSTER DISPLAY
S
ELECTABLE MENU ITEMS
Push and release the up or down arrow
button until the desired Selectable Menu item is
d i
splayed in the instrument cluster display.
Follow the Menu or submenu prompts as desired.
Speedometer
Push and release the OK button to toggle between
mph and km/h.
Vehicle Info
The Vehicle Info consists of the following submenu
(pushing the left or right arrow button will
allow you to scroll through the submenu):
Tire Pressure Monitor
Coolant Temperature
Transmission Temperature
Oil Temperature
Oil Pressure
Oil Life
AWD Status — If Equipped
Battery Voltage
Driver Assist — If Equipped
The Driver Assist menu provides the status and a
visual about the Adaptive Cruise Control and
LaneSense features. When they are both off the
screen, the display will read "Adaptive Cruise
Control (ACC) and LaneSense Off."
Adaptive Cruise Control (ACC) Feature —
If Equipped
The instrument cluster display displays the current
A C
C system settings Ú page 94. The information
displayed depends on ACC system status.
Push the ACC ON/OFF button (located on the
s t
eering wheel) until one of the following displays
in the instrument cluster display:
Adaptive Cruise Control Off
When ACC is deactivated, the display will read
“ A
daptive Cruise Control Off.”
Adaptive Cruise Control Ready
When ACC is activated but the vehicle speed
s e
tting has not been selected, the display will read
“Adaptive Cruise Control Ready.”
Push the SET + or the SET- button (located on the
s t
eering wheel) and the following will display in the
instrument cluster display:
ACC Set
When ACC is set, the set speed will display in the
i n
strument cluster.
Page 74 of 268
72 GETTING TO KNOW YOUR INSTRUMENT PANEL
and as such must not be considered as exhaustive
and/or alternative to the information contained in
the Owner’s Manual, which you are advised to read
carefully in all cases. Always refer to the
information in this chapter in the event of a failure
indication. All active warning lights will display first
if applicable. The system check menu may appear
different based upon equipment options and
current vehicle status. Some warning lights are
optional and may not appear.
RED WARNING LIGHTS
Air Bag Warning Light
This warning light will illuminate to
indicate a fault with the air bag, and will
t
u
rn on for four to eight seconds as a bulb
check when the ignition is placed in the
ON/RUN or ACC/ON/RUN position. This light will
illuminate with a single chime when a fault with the
air bag has been detected, it will stay on until the
fault is cleared. If the light is either not on during
startup, stays on, or turns on while driving, have
the system inspected at an authorized dealer as
soon as possible.
Brake Warning Light
This warning light monitors various brake
functions, including brake fluid level and
p a
rking brake application. If the brake
light turns on it may indicate that the
parking brake is applied, that the brake fluid level is low, or that there is a problem with the Anti-Lock
Brake System reservoir.
If the light remains on when the parking brake has
b
e
en disengaged, and the fluid level is at the full
mark on the master cylinder reservoir, it indicates
a possible brake hydraulic system malfunction or
that a problem with the Brake Booster has been
detected by the Anti-Lock Brake System (ABS) /
Electronic Stability Control (ESC) system. In this
case, the light will remain on until the condition has
been corrected. If the problem is related to the
brake booster, the ABS pump will run when
applying the brake, and a brake pedal pulsation
may be felt during each stop.
The dual brake system provides a reserve braking
c a
pacity in the event of a failure to a portion of the
hydraulic system. A leak in either half of the dual
brake system is indicated by the Brake Warning
Light, which will turn on when the brake fluid level
in the master cylinder has dropped below a
specified level.
The light will remain on until the cause is corrected.
NOTE:
The light may flash momentarily during sharp
c or
nering maneuvers, which change fluid level
conditions. The vehicle should have service
performed, and the brake fluid level checked.
If brake failure is indicated, immediate repair is
ne
cessary. Vehicles equipped with the Anti-Lock Brake System
(
A
BS) are also equipped with Electronic Brake
Force Distribution (EBD). In the event of an EBD
failure, the Brake Warning Light will turn on along
with the ABS Light. Immediate repair to the ABS
system is required.
Operation of the Brake Warning Light can be
c h
ecked by turning the ignition switch from the OFF
position to the ON/RUN position. The light should
illuminate for approximately two seconds. The light
should then turn off unless the parking brake is
applied or a brake fault is detected. If the light does
not illuminate, have the light inspected by an
authorized dealer.
The light also will turn on when the parking brake
i s
applied with the ignition switch in the ON/RUN
position.
NOTE:
This light shows only that the parking brake is
a p
plied. It does not show the degree of brake appli -
cation.
WARNING!
Driving a vehicle with the red brake light on is
dangerous. Part of the brake system may have
failed. It will take longer to stop the vehicle. You
could have a collision. Have the vehicle checked
immediately.
Page 75 of 268
GETTING TO KNOW YOUR INSTRUMENT PANEL 73
Seat Belt Reminder Warning Light
This warning light indicates when the
driver or passenger seat belt is
un
buckled. When the ignition is first
placed in the ON/RUN or ACC/ON/RUN
position and if the driver’s seat belt is unbuckled,
a chime will sound and the light will turn on. When
driving, if the driver or front passenger seat belt
remains unbuckled, the Seat Belt Reminder Light
will flash or remain on continuously and a chime
will sound
Ú page 151.
Battery Charge Warning Light
This warning light will illuminate when the
battery is not charging properly. If it stays
on
while the engine is running, there may
be a malfunction with the charging
system. Contact an authorized dealer as soon as
possible.
This indicates a possible problem with the
e l
ectrical system or a related component.
Door Open Warning Light
This indicator will illuminate when a door
is ajar/open and not fully closed.
NOTE:
If the vehicle is moving, there will also be a single
c h
ime.
Electric Power Steering Fault Warning
Light
This warning light will turn on when
there's a fault with the Electric Power
St
eering (EPS) system Ú page 92.
Electronic Throttle Control (ETC) Warning
Light
This warning light will illuminate to
indicate a problem with the ETC system.
I
f
a problem is detected while the vehicle
is running, the light will either stay on or
flash depending on the nature of the problem.
Cycle the ignition when the vehicle is safely and
completely stopped and the transmission is placed
in the PARK position. The light should turn off. If
the light remains on with the vehicle running, your
vehicle will usually be drivable; however, see an
authorized dealer for service as soon as possible.
NOTE:
This light may turn on if the accelerator and brake
p e
dals are pressed at the same time. If the light continues to flash when the vehicle is
r
u
nning, immediate service is required and you
may experience reduced performance, an
elevated/rough idle, or engine stall and your
vehicle may require towing. The light will come on
when the ignition is placed in the ON/RUN or ACC/
ON/RUN position and remain on briefly as a bulb
check. If the light does not come on during starting,
have the system checked by an authorized dealer.
Engine Coolant Temperature Warning
Light
This warning light warns of an
overheated engine condition. If the
e n
gine coolant temperature is too high,
this indicator will illuminate and a single
chime will sound. If the temperature reaches the
upper limit, a continuous chime will sound for four
minutes or until the engine is able to cool,
whichever comes first.
If the light turns on while driving, safely pull over
a n
d stop the vehicle. If the Air Conditioning (A/C)
system is on, turn it off. Also, shift the transmission
into NEUTRAL and idle the vehicle. If the
temperature reading does not return to normal,
turn the engine off immediately and call for service
Ú page 190.
WARNING!
Continued operation with reduced assist could
pose a safety risk to yourself and others. Service
should be obtained as soon as possible.3
Page 77 of 268
GETTING TO KNOW YOUR INSTRUMENT PANEL 75
If the ABS light does not turn on when the ignition
is placed in the ON/RUN or ACC/ON/RUN position,
have the brake system inspected by an authorized
dealer.
Electronic Stability Control (ESC) Active
Warning Light — If Equipped
This warning light will indicate when the
Electronic Stability Control system is
Ac
tive. The ESC Indicator Light in the
instrument cluster will come on when the
ignition is placed in the ON/RUN or ACC/ON/RUN
position, and when ESC is activated. It should go
out with the engine running. If the ESC Indicator
Light comes on continuously with the engine
running, a malfunction has been detected in the
ESC system. If this warning light remains on after
several ignition cycles, and the vehicle has been
driven several miles (kilometers) at speeds greater
than 30 mph (48 km/h), see an authorized dealer
a s
soon as possible to have the problem
diagnosed and corrected.
The ESC OFF Indicator Light and the ESC Indi -
cator Light come on momentarily each time the
ig nition is placed in the ON/RUN or ACC/ON/
RUN position.
The ESC system will make buzzing or clicking
sounds when it is active. This is normal; the
sounds will stop when ESC becomes inactive.
This light will come on when the vehicle is in an
ESC event.
Electronic Stability Control (ESC) OFF
Warning Light — If Equipped
This warning light indicates the ESC is off.
Each time the ignition is turned to ON/
R U
N or ACC/ON/RUN, the ESC system
will be on, even if it was turned off previously.
Service LaneSense Warning Light —
If Equipped
This warning light will illuminate when the
LaneSense system is not operating and
r e
quires service. Please see an
authorized dealer.
LaneSense Warning Light — If Equipped
The LaneSense system provides the
driver with visual and steering torque
w a
rnings when the vehicle starts to drift
out of its lane unintentionally without the
use of a turn signal.
When the LaneSense system senses a lane drift
situation, the LaneSense indicator changes
from solid green to solid yellow.
When the LaneSense system senses the lane
has been approached and is in a lane departure
situation, the LaneSense indicator changes
from solid white/green to flashing yellow
Ú page 108.
Low Fuel Warning Light
When the fuel level reaches
approximately 1.9 gal (7.13 L), this light
wi
ll turn on and a single chime will sound.
Low Washer Fluid Warning Light —
If Equipped
This warning light will illuminate when the
windshield washer fluid is low
Ú page 201.
Engine Check/Malfunction Indicator
Warning Light (MIL)
The Engine Check/Malfunction Indicator
Light (MIL) is a part of an Onboard
Di
agnostic System called OBD II that
monitors engine and automatic
transmission control systems. This warning light
will illuminate when the ignition is in the ON/RUN
position before engine start. If the bulb does not
come on when turning the ignition switch from OFF
to ON/RUN, have the condition checked promptly.
Certain conditions, such as a loose or missing gas
c a
p, poor quality fuel, etc., may illuminate the light
after engine start. The vehicle should be serviced if
the light stays on through several typical driving
styles. In most situations, the vehicle will drive
normally and will not require towing.
3
Page 83 of 268
81
(Continued)
STARTING AND OPERATING
STARTING THE ENGINE
Before starting your vehicle, adjust your seat,
adjust the inside and outside mirrors, fasten your
seat belt, and if present, instruct all other
occupants to buckle their seat belts.
AUTOMATIC TRANSMISSION
The gear selector must be in the PARK position
before you can start the engine. Apply the brakes
before shifting into any driving gear.
KEYLESS ENTER ‘N GO™ — IGNITION
This feature allows the driver to operate the
ignition switch with the push of a button, as long as
the Remote Start/Keyless Enter ‘n Go™ key fob is
in the passenger compartment.
NORMAL STARTING
To Turn On The Engine Using The ENGINE START/
STOP Button
1. The transmission must be in PARK.
2
. P ress and hold the brake pedal while pushing
t
he ENGINE START/STOP button once.
3. The system takes over and attempts to start t
he vehicle. If the vehicle fails to start, the
starter will disengage automatically after
10 seconds.
4. I f you wish to stop the cranking of the engine
p
rior to the engine starting, push the ENGINE
START/STOP button again.
NOTE:
Normal starting of either a cold or a warm engine is
ob t
ained without pumping or pressing the accel -
erator pedal.
WARNING!
When exiting the vehicle, always make sure
the ignition is in OFF mode, remove the key
fob from the vehicle and lock the vehicle.
Never leave children alone in a vehicle, or with
access to an unlocked vehicle. Leaving chil -
dren in a vehicle unattended is dangerous for
a
number of reasons. A child or others could
be seriously or fatally injured. Children should
be warned not to touch the parking brake,
brake pedal or the transmission gear selector.
Do not leave the key fob in or near the vehicle
(or in a location accessible to children), and do
not leave the ignition (of a vehicle equipped
with Keyless Enter ‘n Go™) in the ACC or ON/
RUN mode. A child could operate power
windows, other controls, or move the vehicle.
Do not leave children or animals inside parked
vehicles in hot weather. Interior heat build-up
may cause serious injury or death.
CAUTION!
Shift into or out of PARK or REVERSE only after
the vehicle has come to a complete stop.
Do not shift between PARK, REVERSE,
NEUTRAL, or DRIVE when the engine is above
idle speed.
Before shifting into any gear, make sure your
foot is firmly pressing the brake pedal.
WARNING!
4
Page 84 of 268
82 STARTING AND OPERATING
To Turn Off The Engine Using ENGINE START/STOP
Button
1. Place the gear selector in PARK, then push
a
nd release the ENGINE START/STOP button.
2. The ignition will return to the OFF mode.
3
. I f the gear selector is not in PARK, the ENGINE
S
TART/STOP button must be held for two
seconds or three short pushes in a row with
the vehicle speed above 5 mph (8 km/h)
b e
fore the engine will shut off. The ignition will
remain in the ACC mode until the gear selector
is in PARK and the button is pushed twice to
the OFF mode.
4. I f the gear selector is not in PARK and the
E
NGINE START/STOP button is pushed once
with the vehicle speed above 5 mph (8 km/h),
th
e instrument cluster will display a “ Vehicle
Not In Park ” message and the engine will
remain running. Never leave a vehicle out of
the PARK position, or it could roll.
NOTE:
If the gear selector is not in PARK, and the ENGINE
S T
ART/STOP button is pushed once with the
vehicle speed below 5 mph (8 km/h), the engine
wi
ll shut off and the ignition will remain in the ACC
position. If vehicle speed drops below 1.2 mph
(1
.9 km/h), the vehicle will AutoPark Ú page 82. ENGINE START/STOP Button Functions — With
Dr
iver’s Foot OFF The Brake Pedal (In PARK Or
NEUTRAL Position)
The ENGINE START/STOP button operates similar
t o
an ignition switch. It has three modes: OFF, ACC,
and RUN. To change the ignition modes without
starting the vehicle and use the accessories, follow
these directions:
1. S tart with the ignition in the OFF mode.
2
. P ush the ENGINE START/STOP button once to
p
lace the ignition to the ACC mode.
3. Push the ENGINE START/STOP button a s
econd time to place the ignition to the RUN
mode.
4. P ush the ENGINE START/STOP button a third
t
ime to return the ignition to the OFF mode.
AUTOPARK
AutoPark is a supplemental feature to assist in
placing the vehicle in PARK should the situations
on the following pages occur. It is a back up system
and should not be relied upon as the primary
method by which the driver shifts the vehicle into
PARK.
The conditions under which AutoPark will engage
ar
e outlined on the following pages. If the vehicle is not in PARK and the driver turns off
t
h
e engine, the vehicle may AutoPark.
AutoPark will engage when all of these conditions
ar
e met:
Vehicle is equipped with a rotary selector and an
eight speed transmission
Vehicle is not in PARK
Vehicle speed is 1.2 mph (1.9 km/h) or less
Ignition switched from RUN to ACC
WARNING!
Driver inattention could lead to failure to place
the vehicle in PARK. ALWAYS DO A VISUAL
CHECK that your vehicle is in PARK by verifying
that a solid (not blinking) “P” is indicated in
the instrument cluster display and near the
gear selector. If the “P” indicator is blinking,
your vehicle is not in PARK. As an added
precaution, always apply the parking brake
when exiting the vehicle.
AutoPark is a supplemental feature. It is not
designed to replace the need to shift your
vehicle into PARK. It is a back up system and
should not be relied upon as the primary
method by which the driver shifts the vehicle
into PARK.
Page 88 of 268
86 STARTING AND OPERATING
(Continued)
IGNITION PARK INTERLOCK
This vehicle is equipped with an Ignition Park
Interlock which requires the transmission to be in
PARK before the ignition can be turned to the OFF
mode. This helps the driver avoid inadvertently
leaving the vehicle without placing the
transmission in PARK. This system also locks the
transmission in PARK whenever the ignition is in
the OFF mode.
NOTE:
The transmission is NOT locked in PARK when the
i g
nition is in the ACC mode (even though the
engine will be off). Ensure that the transmission is
in PARK, and the ignition is OFF (not in ACC mode)
before exiting the vehicle.
Your vehicle could move and injure you and
others if it is not in PARK. Check by trying to
move the transmission gear selector out of
PARK with the brake pedal released. Make
sure the transmission is in PARK before
exiting the vehicle.
The transmission may not engage PARK if the
vehicle is moving. Always bring the vehicle to a
complete stop before shifting to PARK, and
verify that the transmission gear position indi -
cator solidly indicates PARK (P) without
b l
inking. Ensure that the vehicle is completely
stopped, and the PARK position is properly
indicated, before exiting the vehicle.
It is dangerous to shift out of PARK or
NEUTRAL if the engine speed is higher than
idle speed. If your foot is not firmly pressing
the brake pedal, the vehicle could accelerate
quickly forward or in reverse. You could lose
control of the vehicle and hit someone or
something. Only shift into gear when the
engine is idling normally and your foot is firmly
pressing the brake pedal.
WARNING!
Unintended movement of a vehicle could
injure those in or near the vehicle. As with all
vehicles, you should never exit a vehicle while
the engine is running. Before exiting a vehicle,
always come to a complete stop, then apply
the parking brake, shift the transmission into
PARK, and turn the ignition OFF. When the
ignition is in the OFF mode, the transmission
is locked in PARK, securing the vehicle against
unwanted movement.
When exiting the vehicle, always make sure
the ignition is in the OFF mode, remove the
key fob from the vehicle, and lock the vehicle.
Never leave children alone in a vehicle, or with
access to an unlocked vehicle. Allowing chil -
dren to be in a vehicle unattended is
da
ngerous for a number of reasons. A child or
others could be seriously or fatally injured.
Children should be warned not to touch the
parking brake, brake pedal or the transmis -
sion gear selector.
Do not leave the key fob in or near the vehicle
(or in a location accessible to children), and do
not leave the ignition in the ACC or ON/RUN
mode. A child could operate power windows,
other controls, or move the vehicle.
WARNING!CAUTION!
Shift into or out of PARK or REVERSE only after
the vehicle has come to a complete stop.
Do not shift between PARK, REVERSE,
NEUTRAL, or DRIVE when the engine is above
idle speed.
Before shifting into any gear, make sure your
foot is firmly pressing the brake pedal.
Page 89 of 268
STARTING AND OPERATING 87
BRAKE TRANSMISSION SHIFT
I
NTERLOCK (BTSI) SYSTEM
This vehicle is equipped with BTSI that holds the
transmission gear selector in PARK unless the
brakes are applied. To shift the transmission out of
PARK, the engine must be running and the brake
pedal must be pressed. The brake pedal must also
be pressed to shift from NEUTRAL into DRIVE or
REVERSE when the vehicle is stopped or moving at
low speeds.
8-SPEED AUTOMATIC TRANSMISSION
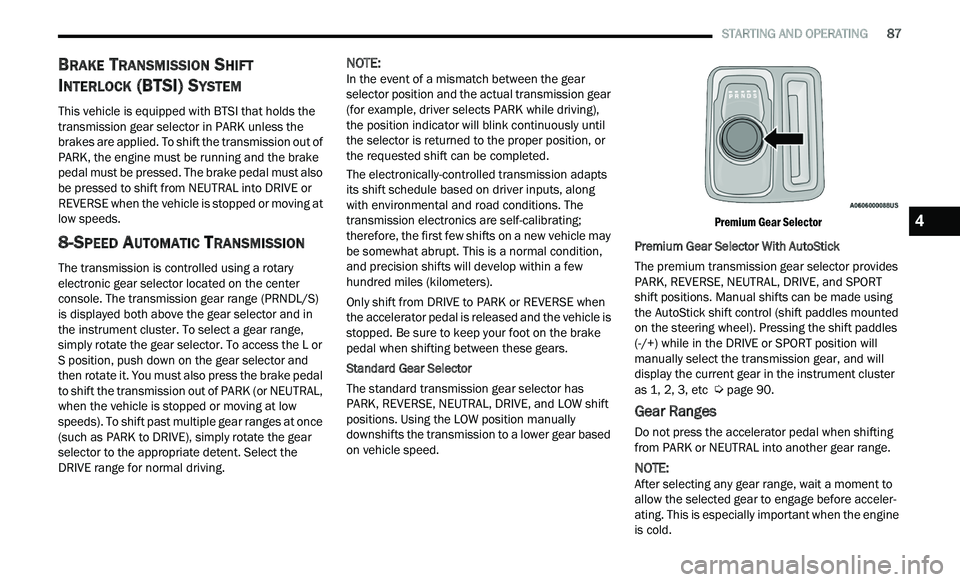
The transmission is controlled using a rotary
electronic gear selector located on the center
console. The transmission gear range (PRNDL/S)
is displayed both above the gear selector and in
the instrument cluster. To select a gear range,
simply rotate the gear selector. To access the L or
S position, push down on the gear selector and
then rotate it. You must also press the brake pedal
to shift the transmission out of PARK (or NEUTRAL,
when the vehicle is stopped or moving at low
speeds). To shift past multiple gear ranges at once
(such as PARK to DRIVE), simply rotate the gear
selector to the appropriate detent. Select the
DRIVE range for normal driving.
NOTE:
In the event of a mismatch between the gear
s e
lector position and the actual transmission gear
(for example, driver selects PARK while driving),
the position indicator will blink continuously until
the selector is returned to the proper position, or
the requested shift can be completed.
The electronically-controlled transmission adapts
it
s shift schedule based on driver inputs, along
with environmental and road conditions. The
transmission electronics are self-calibrating;
therefore, the first few shifts on a new vehicle may
be somewhat abrupt. This is a normal condition,
and precision shifts will develop within a few
hundred miles (kilometers).
Only shift from DRIVE to PARK or REVERSE when
t h
e accelerator pedal is released and the vehicle is
stopped. Be sure to keep your foot on the brake
pedal when shifting between these gears.
Standard Gear Selector
The standard transmission gear selector has
P A
RK, REVERSE, NEUTRAL, DRIVE, and LOW shift
positions. Using the LOW position manually
downshifts the transmission to a lower gear based
on vehicle speed.
Premium Gear Selector
Premium Gear Selector With AutoStick
The premium transmission gear selector provides
P A
RK, REVERSE, NEUTRAL, DRIVE, and SPORT
shift positions. Manual shifts can be made using
the AutoStick shift control (shift paddles mounted
on the steering wheel). Pressing the shift paddles
(-/+) while in the DRIVE or SPORT position will
manually select the transmission gear, and will
display the current gear in the instrument cluster
as 1, 2, 3, etc
Ú page 90.
Gear Ranges
Do not press the accelerator pedal when shifting
from PARK or NEUTRAL into another gear range.
NOTE:
After selecting any gear range, wait a moment to
a l
low the selected gear to engage before acceler -
ating. This is especially important when the engine
i s
cold.
4