2021 CHEVROLET SILVERADO 2500HD jump start
[x] Cancel search: jump startPage 232 of 433
Chevrolet Silverado 2500 HD/3500 HD Owner Manual (GMNA-Localizing-U.
S./Canada/Mexico-14632154) - 2021 - CRC - 11/20/20
Driving and Operating 231
When you are ready to drive, move the
shift lever out of P (Park) before you release
the parking brake.
If torque lock does occur, you may need to
have another vehicle push yours a little
uphill to take some of the pressure from the
parking pawl in the transmission. You will
then be able to pull the shift lever out of
P (Park).
Shifting out of Park
This vehicle is equipped with an electronic
shift lock release system. The system is
designed to prevent movement of the shift
lever out of P (Park), unless the brake pedal
is applied and the ignition is on or in
Service Mode.
The shift lock release is always functional
except in the case of an uncharged or low
voltage–less than 9 volt –battery.
If the vehicle has an uncharged or low
voltage battery, try charging or jump
starting the battery. See Jump Starting -
North America 0367.
To shift out of P (Park): 1. Apply the brake pedal.
2. Release the parking brake if it is applied. See Electric Parking Brake 0240. 3. Pull the shift lever toward you, then
move it to the desired position, and
release.
If the vehicle still cannot be shifted out of
P (Park): 1. Ease the pressure on, or release the shift lever.
2. While holding the brake pedal, push the shift lever all the way into P (Park).
3. Pull the shift lever toward you, then move it to the desired position, and
release.
If there is still a problem shifting, have the
vehicle serviced soon.
Parking over Things That Burn
{Warning
Things that can burn could touch hot
exhaust parts under the vehicle and
ignite. Do not park over papers, leaves,
dry grass, or other things that can burn.
Extended Parking
It is best not to park with the vehicle
running. If the vehicle is left running, be
sure it will not move and there is adequate
ventilation.
See Shifting Into Park 0230 and
Engine Exhaust 0232.
If the vehicle is left parked and running with
the RKE transmitter outside the vehicle, it
will continue to run for up to half an hour.
If the vehicle is left parked and running with
the RKE transmitter inside the vehicle, it will
continue to run for up to an hour.
The vehicle could turn off sooner if it is
parked on a hill, due to lack of
available fuel.
The timer will reset if the vehicle is taken
out of P (Park) while it is running.
Page 301 of 433

Chevrolet Silverado 2500 HD/3500 HD Owner Manual (GMNA-Localizing-U.
S./Canada/Mexico-14632154) - 2021 - CRC - 11/20/20
300 Vehicle Care
Vehicle Care
General Information
General Information . . . . . . . . . . . . . . . . . . . 301
California Proposition 65 Warning . . . . . 301
California Perchlorate MaterialsRequirements . . . . . . . . . . . . . . . . . . . . . . . . 301
Accessories and Modifications . . . . . . . . . 302
Vehicle Checks
Doing Your Own Service Work . . . . . . . . 302
Hood . . . . . . . . . . . . . . . . . . . . . . . . . . . . . . . . . . 302
Engine Compartment Overview . . . . . . . 304
Engine Oil . . . . . . . . . . . . . . . . . . . . . . . . . . . . . 305
Engine Oil Life System . . . . . . . . . . . . . . . . 307
Automatic Transmission Fluid . . . . . . . . . 308
Engine Air Filter Life System . . . . . . . . . . 308
Engine Air Cleaner/Filter . . . . . . . . . . . . . . 309
Cooling System . . . . . . . . . . . . . . . . . . . . . . . . 310
Engine Overheating . . . . . . . . . . . . . . . . . . . . 312
Overheated Engine Protection Operating Mode . . . . . . . . . . . . . . . . . . . . . 314
Engine Fan . . . . . . . . . . . . . . . . . . . . . . . . . . . . 314
Power Steering Fluid . . . . . . . . . . . . . . . . . . . 314
Washer Fluid . . . . . . . . . . . . . . . . . . . . . . . . . . 315
Brakes . . . . . . . . . . . . . . . . . . . . . . . . . . . . . . . . . 316
Brake Pad Life System . . . . . . . . . . . . . . . . . 316
Brake Fluid . . . . . . . . . . . . . . . . . . . . . . . . . . . . . 317
Battery - North America . . . . . . . . . . . . . . . 318
Four-Wheel Drive . . . . . . . . . . . . . . . . . . . . . . 320 Front Axle . . . . . . . . . . . . . . . . . . . . . . . . . . . . . 320
Rear Axle . . . . . . . . . . . . . . . . . . . . . . . . . . . . . . 320
Noise Control System . . . . . . . . . . . . . . . . . 320
Starter Switch Check . . . . . . . . . . . . . . . . . . . 321
Automatic Transmission Shift Lock
Control Function Check . . . . . . . . . . . . . . 322
Ignition Transmission Lock Check . . . . . . 322
Park Brake and P (Park) Mechanism Check . . . . . . . . . . . . . . . . . . . . . . . . . . . . . . . . 322
Wiper Blade Replacement . . . . . . . . . . . . . 322
Glass Replacement . . . . . . . . . . . . . . . . . . . . . 323
Windshield Replacement . . . . . . . . . . . . . . . 323
Gas Strut(s) . . . . . . . . . . . . . . . . . . . . . . . . . . . . 323
Headlamp Aiming
Front Headlamp Aiming . . . . . . . . . . . . . . . 324
Bulb Replacement
Bulb Replacement . . . . . . . . . . . . . . . . . . . . . 324
Halogen Bulbs . . . . . . . . . . . . . . . . . . . . . . . . . 325
LED Lighting . . . . . . . . . . . . . . . . . . . . . . . . . . . 325
Headlamps, Front Turn Signal, Sidemarker, and Parking Lamps . . . . . . 325
Taillamps, Turn Signal, Stoplamps, and Back-Up Lamps . . . . . . . . . . . . . . . . . . . . . . 326
Center High-Mounted Stoplamp (CHMSL) and Cargo Lamp . . . . . . . . . . . . 327
License Plate Lamp . . . . . . . . . . . . . . . . . . . . 328
Electrical System
Electrical System Overload . . . . . . . . . . . . 328 Fuses and Circuit Breakers . . . . . . . . . . . . . 329
Engine Compartment Fuse Block . . . . . . 329
Instrument Panel Fuse Block (Left) . . . . . 332
Instrument Panel Fuse Block (Right) . . . 334
Wheels and Tires
Tires . . . . . . . . . . . . . . . . . . . . . . . . . . . . . . . . . . 336
All-Season Tires . . . . . . . . . . . . . . . . . . . . . . . . 337
Winter Tires . . . . . . . . . . . . . . . . . . . . . . . . . . . 337
All-Terrain Tires . . . . . . . . . . . . . . . . . . . . . . . . 337
Tire Sidewall Labeling . . . . . . . . . . . . . . . . . 338
Tire Designations . . . . . . . . . . . . . . . . . . . . . . 339
Tire Terminology and Definitions . . . . . . 339
Tire Pressure . . . . . . . . . . . . . . . . . . . . . . . . . . . 341
Tire Pressure Monitor System . . . . . . . . . 342
Tire Pressure Monitor Operation . . . . . . 343
Tire Inspection . . . . . . . . . . . . . . . . . . . . . . . . 348
Tire Rotation . . . . . . . . . . . . . . . . . . . . . . . . . . 348
When It Is Time for New Tires . . . . . . . . 350
Buying New Tires . . . . . . . . . . . . . . . . . . . . . . 351
Different Size Tires and Wheels . . . . . . . . 352
Uniform Tire Quality Grading . . . . . . . . . . 352
Wheel Alignment and Tire Balance . . . . 354
Wheel Replacement . . . . . . . . . . . . . . . . . . . 354
Tire Chains . . . . . . . . . . . . . . . . . . . . . . . . . . . . 354
If a Tire Goes Flat . . . . . . . . . . . . . . . . . . . . . 355
Tire Changing . . . . . . . . . . . . . . . . . . . . . . . . . 356
Full-Size Spare Tire . . . . . . . . . . . . . . . . . . . . 366
Jump Starting
Jump Starting - North America . . . . . . . . 367
Page 302 of 433
Chevrolet Silverado 2500 HD/3500 HD Owner Manual (GMNA-Localizing-U.
S./Canada/Mexico-14632154) - 2021 - CRC - 11/20/20
Vehicle Care 301
Towing the Vehicle
Towing the Vehicle . . . . . . . . . . . . . . . . . . . 369
Recreational Vehicle Towing . . . . . . . . . . . 370
Appearance Care
Exterior Care . . . . . . . . . . . . . . . . . . . . . . . . . . . 373
Interior Care . . . . . . . . . . . . . . . . . . . . . . . . . . . 378
Floor Mats . . . . . . . . . . . . . . . . . . . . . . . . . . . . . 381
General Information
For service and parts needs, visit your
dealer. You will receive genuine GM parts
and GM-trained and supported service
people.
Genuine GM parts have one of these marks:
California Proposition 65 Warning
{Warning
Most motor vehicles, including this one,
as well as many of its service parts and
fluids, contain and/or emit chemicals
known to the State of California to cause(Continued)
Warning (Continued)
cancer and birth defects or other
reproductive harm. Engine exhaust, many
parts and systems, many fluids, and
some component wear by-products
contain and/or emit these chemicals. For
more information go to
www.P65Warnings.ca.gov/
passenger-vehicle.
See Battery - North America 0318 and
Jump Starting - North America 0367 and
the back cover.
California Perchlorate Materials
Requirements
Certain types of automotive applications,
such as airbag initiators, seat belt
pretensioners, and lithium batteries
contained in electronic keys, may contain
perchlorate materials. Perchlorate Material –
special handling may apply. See
www.dtsc.ca.gov/hazardouswaste/
perchlorate.
Page 306 of 433
Chevrolet Silverado 2500 HD/3500 HD Owner Manual (GMNA-Localizing-U.
S./Canada/Mexico-14632154) - 2021 - CRC - 11/20/20
Vehicle Care 305
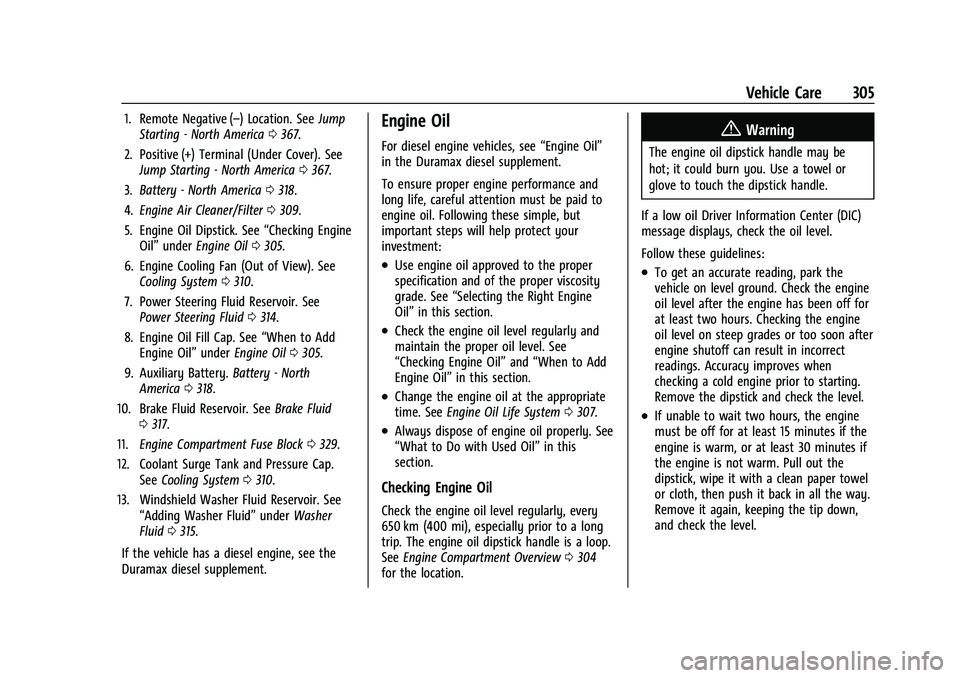
1. Remote Negative (–) Location. SeeJump
Starting - North America 0367.
2. Positive (+) Terminal (Under Cover). See Jump Starting - North America 0367.
3. Battery - North America 0318.
4. Engine Air Cleaner/Filter 0309.
5. Engine Oil Dipstick. See “Checking Engine
Oil” under Engine Oil 0305.
6. Engine Cooling Fan (Out of View). See Cooling System 0310.
7. Power Steering Fluid Reservoir. See Power Steering Fluid 0314.
8. Engine Oil Fill Cap. See “When to Add
Engine Oil” underEngine Oil 0305.
9. Auxiliary Battery. Battery - North
America 0318.
10. Brake Fluid Reservoir. See Brake Fluid
0 317.
11. Engine Compartment Fuse Block 0329.
12. Coolant Surge Tank and Pressure Cap. SeeCooling System 0310.
13. Windshield Washer Fluid Reservoir. See “Adding Washer Fluid” underWasher
Fluid 0315.
If the vehicle has a diesel engine, see the
Duramax diesel supplement.Engine Oil
For diesel engine vehicles, see “Engine Oil”
in the Duramax diesel supplement.
To ensure proper engine performance and
long life, careful attention must be paid to
engine oil. Following these simple, but
important steps will help protect your
investment:
.Use engine oil approved to the proper
specification and of the proper viscosity
grade. See “Selecting the Right Engine
Oil” in this section.
.Check the engine oil level regularly and
maintain the proper oil level. See
“Checking Engine Oil” and“When to Add
Engine Oil” in this section.
.Change the engine oil at the appropriate
time. SeeEngine Oil Life System 0307.
.Always dispose of engine oil properly. See
“What to Do with Used Oil” in this
section.
Checking Engine Oil
Check the engine oil level regularly, every
650 km (400 mi), especially prior to a long
trip. The engine oil dipstick handle is a loop.
See Engine Compartment Overview 0304
for the location.
{Warning
The engine oil dipstick handle may be
hot; it could burn you. Use a towel or
glove to touch the dipstick handle.
If a low oil Driver Information Center (DIC)
message displays, check the oil level.
Follow these guidelines:
.To get an accurate reading, park the
vehicle on level ground. Check the engine
oil level after the engine has been off for
at least two hours. Checking the engine
oil level on steep grades or too soon after
engine shutoff can result in incorrect
readings. Accuracy improves when
checking a cold engine prior to starting.
Remove the dipstick and check the level.
.If unable to wait two hours, the engine
must be off for at least 15 minutes if the
engine is warm, or at least 30 minutes if
the engine is not warm. Pull out the
dipstick, wipe it with a clean paper towel
or cloth, then push it back in all the way.
Remove it again, keeping the tip down,
and check the level.
Page 319 of 433

Chevrolet Silverado 2500 HD/3500 HD Owner Manual (GMNA-Localizing-U.
S./Canada/Mexico-14632154) - 2021 - CRC - 11/20/20
318 Vehicle Care
Always clean the brake fluid reservoir cap
and the area around the cap before
removing it.
Do not top off the brake fluid. Adding fluid
does not correct a leak. If fluid is added
when the linings are worn, there will be too
much fluid when new brake linings are
installed. Add or remove fluid, as necessary,
only when work is done on the brake
hydraulic system.
{Warning
If too much brake fluid is added, it can
spill on the engine and burn, if the
engine is hot enough. You or others could
be burned, and the vehicle could be
damaged. Add brake fluid only when
work is done on the brake hydraulic
system.
When the brake fluid falls to a low level,
the brake warning light comes on. See Brake
System Warning Light 0113.
Brake fluid absorbs water over time which
degrades the effectiveness of the brake fluid.
Replace brake fluid at the specified intervals
to prevent increased stopping distance. See
Maintenance Schedule 0384. What to Add
Use only GM approved DOT 3 brake fluid
from a clean, sealed container. See
Recommended Fluids and Lubricants
0393.
{Warning
The wrong or contaminated brake fluid
could result in damage to the brake
system. This could result in the loss of
braking leading to a possible injury.
Always use the proper GM approved
brake fluid.
Caution
If brake fluid is spilled on the vehicle's
painted surfaces, the paint finish can be
damaged. Immediately wash off any
painted surface.
Battery - North America
The original equipment battery is
maintenance free. Do not remove the cap
and do not add fluid.
Refer to the replacement number shown on
the original battery label when a new
battery is needed. See Engine Compartment
Overview 0304 for battery location.
{Warning
WARNING: Battery posts, terminals, and
related accessories contain lead and lead
compounds, chemicals known to the
State of California to cause cancer and
birth defects or other reproductive harm.
Batteries also contain other chemicals
known to the State of California to cause
cancer. WASH HANDS AFTER HANDLING.
For more information go to
www.P65Warnings.ca.gov/
passenger-vehicle.
See California Proposition 65 Warning 0301
and the back cover.
Vehicle Storage
{Warning
Batteries have acid that can burn you and
gas that can explode. You can be badly
hurt if you are not careful. See Jump
Starting - North America 0367 for tips on
working around a battery without
getting hurt.
Page 368 of 433
Chevrolet Silverado 2500 HD/3500 HD Owner Manual (GMNA-Localizing-U.
S./Canada/Mexico-14632154) - 2021 - CRC - 11/20/20
Vehicle Care 367
Jump Starting
Jump Starting - North America
For more information about the vehicle
battery, seeBattery - North America 0318.
If the vehicle's battery (or batteries) has run
down, you may want to use another vehicle
and some jumper cables to start your
vehicle. Be sure to use the following steps
to do it safely.
{Warning
WARNING: Battery posts, terminals, and
related accessories contain lead and lead
compounds, chemicals known to the
State of California to cause cancer and
birth defects or other reproductive harm.
Batteries also contain other chemicals
known to the State of California to cause
cancer. WASH HANDS AFTER HANDLING.
For more information go to
www.P65Warnings.ca.gov/
passenger-vehicle.
See California Proposition 65 Warning 0301
and the back cover.
{Warning
Batteries can hurt you. They can be
dangerous because:
.They contain acid that can burn you.
.They contain gas that can explode or
ignite.
.They contain enough electricity to
burn you.
If you do not follow these steps exactly,
some or all of these things can hurt you.
Caution
Ignoring these steps could result in costly
damage to the vehicle that would not be
covered by the vehicle warranty. Trying
to start the vehicle by pushing or pulling
it will not work, and it could damage the
vehicle.
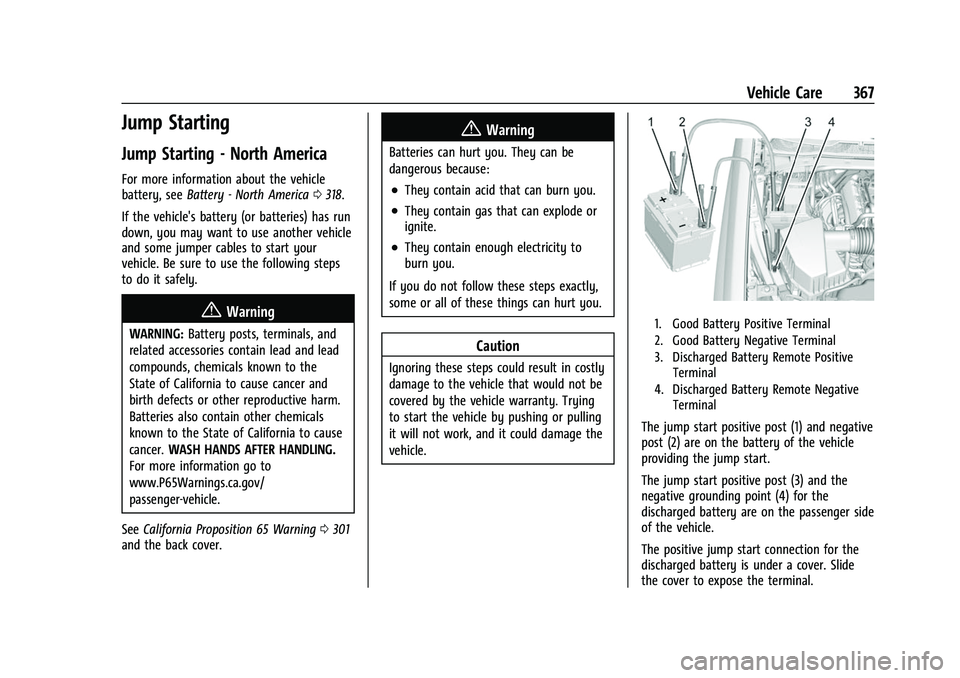
1. Good Battery Positive Terminal
2. Good Battery Negative Terminal
3. Discharged Battery Remote Positive Terminal
4. Discharged Battery Remote Negative Terminal
The jump start positive post (1) and negative
post (2) are on the battery of the vehicle
providing the jump start.
The jump start positive post (3) and the
negative grounding point (4) for the
discharged battery are on the passenger side
of the vehicle.
The positive jump start connection for the
discharged battery is under a cover. Slide
the cover to expose the terminal.
Page 369 of 433
Chevrolet Silverado 2500 HD/3500 HD Owner Manual (GMNA-Localizing-U.
S./Canada/Mexico-14632154) - 2021 - CRC - 11/20/20
368 Vehicle Care
1. Check the other vehicle. It must have a12-volt battery with a negative ground
system.
Caution
If the other vehicle does not have a
12-volt system with a negative ground,
both vehicles can be damaged. Only use
a vehicle that has a 12-volt system with a
negative ground for jump starting.
2. If you have a vehicle with a diesel engine with two batteries, you should
know before you begin that, especially in
cold weather, you may not be able to
get enough power from a single battery
in another vehicle to start your diesel
engine. If your vehicle has more than
one battery, using the battery that is
closer to the starter will reduce electrical
resistance. This is located on the
passenger side, in the rear of the engine
compartment.
3. Get the vehicles close enough so the jumper cables can reach, but be sure the
vehicles are not touching each other.
If they are, it could cause an unwanted
ground connection. You would not be able to start your vehicle, and the bad
grounding could damage the electrical
systems.
To avoid the possibility of the vehicles
rolling, set the parking brake firmly on
both vehicles involved in the jump start
procedure. Put the automatic
transmission in P (Park) before setting
the parking brake. If you have a
four-wheel-drive vehicle, be sure the
transfer case is in a drive gear, not in
N (Neutral).
Caution
If any accessories are left on or plugged
in during the jump starting procedure,
they could be damaged. The repairs
would not be covered by the vehicle
warranty. Whenever possible, turn off or
unplug all accessories on either vehicle
when jump starting.
4. Turn the ignition off on both vehicles. Unplug unnecessary accessories plugged
into the accessory power outlets. Turn
off the radio and all the lamps that are
not needed. This will avoid sparks and
help save both batteries. And it could
save the radio! 5. Open the hood on the other vehicle and
locate the positive (+) and negative (−)
terminal locations on that vehicle.
The positive (+) terminal is under a red
plastic cover at the positive battery post.
To uncover the positive (+) terminal,
open the red plastic cover.
For more information on the location of
the remote positive (+) and remote
negative (−) terminals, see Engine
Compartment Overview 0304.
{Warning
An electric fan can start up even when
the engine is not running and can injure
you. Keep hands, clothing, and tools
away from any underhood electric fan.
{Warning
Using a match near a battery can cause
battery gas to explode. People have been
hurt doing this, and some have been
blinded. Use a flashlight if you need
more light.
(Continued)
Page 370 of 433
Chevrolet Silverado 2500 HD/3500 HD Owner Manual (GMNA-Localizing-U.
S./Canada/Mexico-14632154) - 2021 - CRC - 11/20/20
Vehicle Care 369
Warning (Continued)
Battery fluid contains acid that can burn
you. Do not get it on you. If you
accidentally get it in your eyes or on
your skin, flush the place with water and
get medical help immediately.
{Warning
Fans or other moving engine parts can
injure you badly. Keep your hands away
from moving parts once the engine is
running.
6. Check that the jumper cables do not have loose or missing insulation. If they
do, you could get a shock. The vehicles
could be damaged too.
Before you connect the cables, here are
some basic things you should know.
Positive (+) will go to positive (+) or to a
remote positive (+) terminal if the
vehicle has one. Negative (−) will go to a
heavy, unpainted metal engine part or to
a remote negative (−) terminal if the
vehicle has one. Do not connect positive (+) to negative
(−) or you will get a short that would
damage the battery and maybe other
parts too. And do not connect the
negative (−) cable to the negative (−)
terminal on the dead battery because
this can cause sparks.
7. Connect one end of the red positive (+) cable to the remote positive (+) terminal
of the vehicle with the discharged
battery.
8. Do not let the other end touch metal. Connect it to the positive (+) terminal of
the good battery. Use a remote
positive (+) terminal if the vehicle
has one.
9. Connect one end of the black negative (−) cable to the negative (−) terminal of
the good battery. Use a remote negative
(−) terminal if the vehicle has one.
Do not let the other end touch anything
until the next step.
10. Connect the other end of the negative (−) cable to the remote negative (−)
terminal to the discharged battery.
11. Start the vehicle with the good battery and run the engine for a while. 12. Try to start the vehicle that had the
dead battery. If it will not start after a
few tries, it probably needs service.
Caution
If the jumper cables are connected or
removed in the wrong order, electrical
shorting may occur and damage the
vehicle. The repairs would not be covered
by the vehicle warranty. Always connect
and remove the jumper cables in the
correct order, making sure that the cables
do not touch each other or other metal.
Jumper Cable Removal
Reverse the sequence exactly when
removing the jumper cables.
After starting the disabled vehicle and
removing the jumper cables, allow it to idle
for several minutes.
Towing the Vehicle
Caution
Incorrectly towing a disabled vehicle may
cause damage. The damage would not be
covered by the vehicle warranty. Do not
(Continued)