2021 CHEVROLET SILVERADO 2500HD Under hood
[x] Cancel search: Under hoodPage 6 of 433

Chevrolet Silverado 2500 HD/3500 HD Owner Manual (GMNA-Localizing-U.
S./Canada/Mexico-14632154) - 2021 - CRC - 11/20/20
Introduction 5
1. Tow/Haul Mode (On Some Models). SeeDriver Mode Control 0244.
Automatic Transfer Case Control (If
Equipped). See Four-Wheel Drive 0236.
Driver Mode Control 0244 (If Equipped).
2. Air Vents 0204.
3. Turn Signal Lever. See Turn and
Lane-Change Signals 0138.
Windshield Wiper/Washer 097.
4. Head-Up Display (HUD) 0123 (If
Equipped).
5. Instrument Cluster 0102.
6. Shift Lever. See Automatic Transmission
0 232.
Range Selection Mode. See Manual Mode
0 235.
7. Light Sensor. See Automatic Headlamp
System 0136.
8. Infotainment Controls. See Overview
0 144.
9. Climate Control Systems 0199 (If
Equipped).
Dual Automatic Climate Control System
0 201 (If Equipped).
10. Heated and Ventilated Front Seats 049
(If Equipped). 11.XPark Assist Switch (If Equipped). See
Assistance Systems for Parking or Backing
0 249.
gTraction Control/Electronic Stability
Control 0242.
|Hazard Warning Flashers 0137.
@Lane Departure Warning (LDW) 0262
(If Equipped).
5Hill Descent Control Switch (If
Equipped). See Hill Descent Control (HDC)
0 244.
jPower Assist Steps 026 (If
Equipped).
5Power Release Tailgate (If
Equipped). See Tailgate023.
ADC/AC Switch. See Power Outlets
0 98.
LExpress Window Down Button (If
Equipped). See Power Windows 038.
Tow/Haul Mode 0235 (On Some
Models).
Exhaust Brake (If Equipped). See Duramax
Diesel Supplement.
Power Take-Off (PTO) (If Equipped). See
Duramax Diesel Supplement. 12. Power Outlet (Alternating Current) (If
Equipped). See Power Outlets098.
13. Power Outlets 098.
14. USB Port 0153.
15. Wireless Charging 099 (If Equipped).
16. Trailer Brake Control Panel (If Equipped). See“Integrated Trailer Brake Control
System” underTowing Equipment 0276.
17. ENGINE START/STOP. See Ignition
Positions (Keyless Access) 0226 or
Ignition Positions (Key Access) 0224.
18. Steering Wheel Controls 096 (If
Equipped).
Driver Information Center (DIC) Controls.
See Driver Information Center (DIC) (Base
Level) 0119 or
Driver Information Center (DIC) (Midlevel
and Uplevel) 0120.
19. Horn 097.
20. Hood Release. See Hood0302.
21. Steering Wheel Adjustment 096 (Out
of View).
22. Cruise Control 0246.
Forward Collision Alert (FCA) System
0 257 (If Equipped).
Heated Steering Wheel 096 (If
Equipped).
Page 28 of 433

Chevrolet Silverado 2500 HD/3500 HD Owner Manual (GMNA-Localizing-U.
S./Canada/Mexico-14632154) - 2021 - CRC - 11/20/20
Keys, Doors, and Windows 27
Warning (Continued)
hands or other body parts between the
extended power assist step and the
vehicle.
If equipped, the power assist steps will
deploy when the door is opened and
automatically retract three seconds after the
door is closed. The power assist steps will
retract immediately if the vehicle starts
moving.
Disable the power assist steps before jacking
or placing any object under the vehicle. Too
much ice buildup may prevent deployment
of the power assist steps. Check the step
position before exiting the vehicle. If this
happens, disable the power assist steps,
clear the ice, then enable the assist steps
and confirm normal function prior to use.
Keep hands, children, pets, objects, and
clothing clear of the power assist steps
when in motion. The steps will reverse
direction if they encounter an obstruction
when opening or closing. Remove the
obstruction, then open and close the door
on the same side to complete the motion of the assist steps. If the obstruction is not
cleared. the assist steps remain extended
while driving.
To extend both power assist steps
for cleaning, press
jwhile the vehicle is
in P (Park) or N (Neutral). Press
jagain
to retract them. The Driver Information
Center (DIC) will display a message.
Enable/Disable
Press and hold
jfor four seconds to lock
and disable the power assist steps. Press
and hold
jfor four seconds again to
enable them. The DIC will display a
message.
Vehicle Security
This vehicle has theft-deterrent features;
however, they do not make the vehicle
impossible to steal.
Vehicle Alarm System
The indicator light, on the instrument panel
near the windshield, indicates the status of
the system.
Off : Alarm system is disarmed.
On Solid : Vehicle is secured during the
delay to arm the system.
Fast Flash : Vehicle is unsecured. A door or
the hood is open.
Page 205 of 433

Chevrolet Silverado 2500 HD/3500 HD Owner Manual (GMNA-Localizing-U.
S./Canada/Mexico-14632154) - 2021 - CRC - 11/20/20
204 Climate Controls
The solar sensor, on top of the instrument
panel near the windshield, monitors the
solar heat.
The climate control system uses the sensor
information to adjust the temperature, fan
speed, recirculation, and air delivery mode
for best comfort.
Do not cover the sensor; otherwise the
automatic climate control system may not
work properly.
Air Vents
Use the sliding knobs on the center and side
air vents to change the direction of the
airflow.
Air vents blow warm air on the side
windows in cold weather. If Floor, Defog,
or Defrost modes are selected, a small
amount of air will come from the vents
close to the window.
To close the front a/c vents, move the
sliding knobs to the full down position.
To close the rear a/c vents, move the sliding
knobs to the full inboard position.Operation Tips
.Clear away any ice, snow, or leaves from
air inlets at the base of the windshield
that could block the flow of air into the
vehicle.
.Clear snow off the hood to improve
visibility and help decrease moisture
drawn into the vehicle.
.Keep the path under the front seats clear
of objects to help circulate the air inside
of the vehicle more effectively.
.Use of non-GM approved hood deflectors
can adversely affect the performance of
the system. Check with your dealer
before adding equipment to the outside
of the vehicle.
.Do not attach any devices to the air vent
slats. This will restrict airflow and may
cause damage to the air vents.
Maintenance
Passenger Compartment Air Filter
The filter reduces the dust, pollen, and other
airborne irritants from outside air that is
pulled into the vehicle.The filter should be replaced as part of
routine scheduled maintenance. See
Maintenance Schedule
0384. To find out
what type of filter to use, see Maintenance
Replacement Parts 0394.
1. Open the lower glove box door
completely.
Page 206 of 433

Chevrolet Silverado 2500 HD/3500 HD Owner Manual (GMNA-Localizing-U.
S./Canada/Mexico-14632154) - 2021 - CRC - 11/20/20
Climate Controls 205
2. Push the dampener arm to the left untilit releases the glovebox.
3. Press the sides of the glove box doorinward and rotate the door downward to
remove.
4. Pull lever on left side of the filter doorand slide left, then remove the door.
Remove the old filter.
5. Install the new air filter.
6. Reinstall the filter door.
7. Reverse the steps to reinstall the glove box.
See your dealer if additional assistance is
needed.
Service
All vehicles have a label underhood that
identifies the refrigerant used in the vehicle.
The refrigerant system should only be
serviced by trained and certified technicians.
The air conditioning evaporator should never
be repaired or replaced by one from a
salvage vehicle. It should only be replaced
by a new evaporator to ensure proper and
safe operation.
During service, all refrigerants should be
reclaimed with proper equipment. Venting
refrigerants directly to the atmosphere is
harmful to the environment and may also
create unsafe conditions based on
inhalation, combustion, frostbite, or other
health-based concerns.
The air conditioning system requires periodic
maintenance. See Maintenance Schedule
0 384.
Page 215 of 433

Chevrolet Silverado 2500 HD/3500 HD Owner Manual (GMNA-Localizing-U.
S./Canada/Mexico-14632154) - 2021 - CRC - 11/20/20
214 Driving and Operating
Warning (Continued)
the ice; you and your passengers could
drown. Drive your vehicle on safe
surfaces only.
Driving in Water
{Warning
Driving through rushing water can be
dangerous. Deep water can sweep your
vehicle downstream and you and your
passengers could drown. If it is only
shallow water, it can still wash away the
ground from under your tires. Traction
could be lost, and the vehicle could roll
over. Do not drive through rushing water.
Caution
Do not drive through standing water if it
is deep enough to cover the wheel hubs,
axles, or exhaust pipe. Deep water can
damage the axle and other vehicle parts.
If the standing water is not too deep, drive
through it slowly. At faster speeds, water
can get into the engine and cause it to stall.
Stalling can occur if the exhaust pipe is under water. Do not turn off the ignition
when driving through water. If the exhaust
pipe is under water, the engine will not
start. When going through water, the brakes
get wet and it may take longer to stop. See
“Driving on Wet Roads”
later in this section.
After Off-Road Driving
Remove any brush or debris that has
collected on the underbody or chassis,
or under the hood. These accumulations can
be a fire hazard. Re-install underbody air
deflector and air dam if removed.
After operation in mud or sand, have the
brake linings cleaned and checked. These
substances can cause glazing and uneven
braking. Check the body structure, driveline,
steering, suspension, wheels, tires, and
exhaust system for damage and check the
fuel lines and cooling system for any
leakage.
More frequent maintenance service is
required. See theMaintenance Schedule
0 384.
Driving on Wet Roads
Rain and wet roads can reduce vehicle
traction and affect your ability to stop and
accelerate. Always drive slower in these types of driving conditions and avoid driving
through large puddles and deep-standing or
flowing water.
{Warning
Wet brakes can cause crashes. They
might not work as well in a quick stop
and could cause pulling to one side. You
could lose control of the vehicle.
After driving through a large puddle of
water or a car/vehicle wash, lightly apply
the brake pedal until the brakes work
normally.
Flowing or rushing water creates strong
forces. Driving through flowing water
could cause the vehicle to be carried
away. If this happens, you and other
vehicle occupants could drown. Do not
ignore police warnings and be very
cautious about trying to drive through
flowing water.
Hydroplaning
Hydroplaning is dangerous. Water can build
up under the vehicle's tires so they actually
ride on the water. This can happen if the
Page 280 of 433

Chevrolet Silverado 2500 HD/3500 HD Owner Manual (GMNA-Localizing-U.
S./Canada/Mexico-14632154) - 2021 - CRC - 11/20/20
Driving and Operating 279
to the attaching points on the bumper;
otherwise, safety chains should be attached
to holes on the trailer hitch.
Cross the safety chains under the tongue of
the trailer to help prevent the tongue from
contacting the road if it becomes separated
from the hitch. Always leave enough slack in
the safety chains to allow the combination
to turn. Never allow safety chains to drag
on the ground.
Trailer Brakes
Loaded trailers over 900 kg (2,000 lb) must
be equipped with brake systems and with
brakes for each axle. Trailer braking
equipment conforming to Canadian
Standards Association (CSA) requirement
CAN3-D313, or its equivalent, is
recommended.
State or local regulations may require
trailers to have their own braking system if
the loaded weight of the trailer exceeds
certain minimums that can vary from state
to state. Read and follow the instructions for
the trailer brakes so they are installed,
adjusted, and maintained properly. Never
attempt to tap into your vehicle's hydraulicbrake system. If you do, both the vehicle
antilock brakes and the trailer brakes may
not function, which could result in a crash.
Auxiliary Battery
If equipped, the vehicle's auxiliary battery
can be used to supply electrical power to
additional equipment that may be added,
such as a slide-in camper.
Locate the auxiliary battery connector under
the hood on the driver side of the vehicle,
next to the engine compartment fuse block.
Follow the proper installation instructions
included with any electrical equipment that
is installed.
Caution
To prevent draining the auxiliary battery,
always turn off electrical equipment
when not in use and do not use any
equipment that may exceed the
maximum amperage rating of 30 amps.
Trailer Wiring Harness
Basic Trailer Wiring
If the vehicle is not equipped with a trailer
connector on the rear bumper, a 7-wire
trailering harness is tied to the vehiclesframe. The harness requires the installation
of a trailer connector, which is available
through your dealer.
Use only a round, seven-wire connector with
flat blade terminals meeting SAE J2863
specifications for proper electrical
connectivity.
The seven-wire harness contains the
following trailer circuits:
Stop/Turn
Signal Left Yellow/Blue
Stop/Turn Signal
Right Green/Violet
Tail/Parking Lamps Gray/Brown
Reverse Lamps White/Green
Battery Feed Red/Green
Ground White
Electric Trailer Brake Blue
Heavy-Duty Trailer Wiring Harness Package
If equipped, the trailer wiring harness, with
a 7-pin connector and a 4-pin connector, is
mounted on the vehicle's rear bumper.
Page 303 of 433

Chevrolet Silverado 2500 HD/3500 HD Owner Manual (GMNA-Localizing-U.
S./Canada/Mexico-14632154) - 2021 - CRC - 11/20/20
302 Vehicle Care
Accessories and Modifications
Adding non-dealer accessories or making
modifications to the vehicle can affect
vehicle performance and safety, including
such things as airbags, braking, stability,
ride and handling, emissions systems,
aerodynamics, durability, and electronic
systems like antilock brakes, traction control,
and stability control. These accessories or
modifications could even cause malfunction
or damage not covered by the vehicle
warranty.
Damage to suspension components caused
by modifying vehicle height outside of
factory settings will not be covered by the
vehicle warranty.
Damage to vehicle components resulting
from modifications or the installation or use
of non-GM certified parts, including control
module or software modifications, is not
covered under the terms of the vehicle
warranty and may affect remaining
warranty coverage for affected parts.
GM Accessories are designed to complement
and function with other systems on the
vehicle. See your dealer to accessorize the
vehicle using genuine GM Accessories
installed by a dealer technician.Also, see
Adding Equipment to the
Airbag-Equipped Vehicle 066.
Vehicle Checks
Doing Your Own Service Work
{Warning
It can be dangerous to work on your
vehicle if you do not have the proper
knowledge, service manual, tools,
or parts. Always follow owner’s manual
procedures and consult the service
manual for your vehicle before doing any
service work.
If doing some of your own service work, use
the proper service manual. It tells you much
more about how to service the vehicle than
this manual can. To order the proper service
manual, see Publication Ordering
Information 0408.
This vehicle has an airbag system. Before
attempting to do your own service work,
see Servicing the Airbag-Equipped Vehicle
0 66. If equipped with remote vehicle start, open
the hood before performing any service
work to prevent remote starting the vehicle
accidentally. See
Remote Vehicle Start 020.
Keep a record with all parts receipts and list
the mileage and the date of any service
work performed. See Maintenance Records
0 396.Caution
Even small amounts of contamination can
cause damage to vehicle systems. Do not
allow contaminants to contact the fluids,
reservoir caps, or dipsticks.
Hood
{Warning
Turn the vehicle off before opening the
hood. If the engine is running with the
hood open, you or others could be
injured.
Page 304 of 433

Chevrolet Silverado 2500 HD/3500 HD Owner Manual (GMNA-Localizing-U.
S./Canada/Mexico-14632154) - 2021 - CRC - 11/20/20
Vehicle Care 303
{Warning
Components under the hood can get hot
from running the engine. To help avoid
the risk of burning unprotected skin,
never touch these components until they
have cooled, and always use a glove or
towel to avoid direct skin contact.
Clear any snow from the hood before
opening.
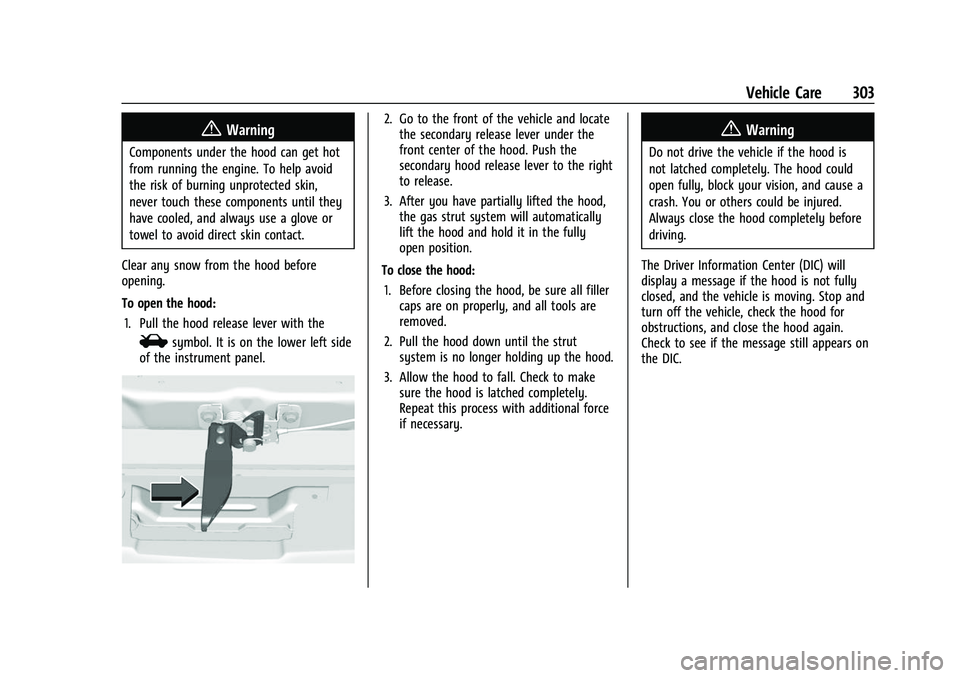
To open the hood: 1. Pull the hood release lever with the
isymbol. It is on the lower left side
of the instrument panel.
2. Go to the front of the vehicle and locate the secondary release lever under the
front center of the hood. Push the
secondary hood release lever to the right
to release.
3. After you have partially lifted the hood, the gas strut system will automatically
lift the hood and hold it in the fully
open position.
To close the hood: 1. Before closing the hood, be sure all filler caps are on properly, and all tools are
removed.
2. Pull the hood down until the strut system is no longer holding up the hood.
3. Allow the hood to fall. Check to make sure the hood is latched completely.
Repeat this process with additional force
if necessary.{Warning
Do not drive the vehicle if the hood is
not latched completely. The hood could
open fully, block your vision, and cause a
crash. You or others could be injured.
Always close the hood completely before
driving.
The Driver Information Center (DIC) will
display a message if the hood is not fully
closed, and the vehicle is moving. Stop and
turn off the vehicle, check the hood for
obstructions, and close the hood again.
Check to see if the message still appears on
the DIC.