2021 CHEVROLET SILVERADO 2500HD stop start
[x] Cancel search: stop startPage 6 of 433

Chevrolet Silverado 2500 HD/3500 HD Owner Manual (GMNA-Localizing-U.
S./Canada/Mexico-14632154) - 2021 - CRC - 11/20/20
Introduction 5
1. Tow/Haul Mode (On Some Models). SeeDriver Mode Control 0244.
Automatic Transfer Case Control (If
Equipped). See Four-Wheel Drive 0236.
Driver Mode Control 0244 (If Equipped).
2. Air Vents 0204.
3. Turn Signal Lever. See Turn and
Lane-Change Signals 0138.
Windshield Wiper/Washer 097.
4. Head-Up Display (HUD) 0123 (If
Equipped).
5. Instrument Cluster 0102.
6. Shift Lever. See Automatic Transmission
0 232.
Range Selection Mode. See Manual Mode
0 235.
7. Light Sensor. See Automatic Headlamp
System 0136.
8. Infotainment Controls. See Overview
0 144.
9. Climate Control Systems 0199 (If
Equipped).
Dual Automatic Climate Control System
0 201 (If Equipped).
10. Heated and Ventilated Front Seats 049
(If Equipped). 11.XPark Assist Switch (If Equipped). See
Assistance Systems for Parking or Backing
0 249.
gTraction Control/Electronic Stability
Control 0242.
|Hazard Warning Flashers 0137.
@Lane Departure Warning (LDW) 0262
(If Equipped).
5Hill Descent Control Switch (If
Equipped). See Hill Descent Control (HDC)
0 244.
jPower Assist Steps 026 (If
Equipped).
5Power Release Tailgate (If
Equipped). See Tailgate023.
ADC/AC Switch. See Power Outlets
0 98.
LExpress Window Down Button (If
Equipped). See Power Windows 038.
Tow/Haul Mode 0235 (On Some
Models).
Exhaust Brake (If Equipped). See Duramax
Diesel Supplement.
Power Take-Off (PTO) (If Equipped). See
Duramax Diesel Supplement. 12. Power Outlet (Alternating Current) (If
Equipped). See Power Outlets098.
13. Power Outlets 098.
14. USB Port 0153.
15. Wireless Charging 099 (If Equipped).
16. Trailer Brake Control Panel (If Equipped). See“Integrated Trailer Brake Control
System” underTowing Equipment 0276.
17. ENGINE START/STOP. See Ignition
Positions (Keyless Access) 0226 or
Ignition Positions (Key Access) 0224.
18. Steering Wheel Controls 096 (If
Equipped).
Driver Information Center (DIC) Controls.
See Driver Information Center (DIC) (Base
Level) 0119 or
Driver Information Center (DIC) (Midlevel
and Uplevel) 0120.
19. Horn 097.
20. Hood Release. See Hood0302.
21. Steering Wheel Adjustment 096 (Out
of View).
22. Cruise Control 0246.
Forward Collision Alert (FCA) System
0 257 (If Equipped).
Heated Steering Wheel 096 (If
Equipped).
Page 18 of 433
Chevrolet Silverado 2500 HD/3500 HD Owner Manual (GMNA-Localizing-U.
S./Canada/Mexico-14632154) - 2021 - CRC - 11/20/20
Keys, Doors, and Windows 17
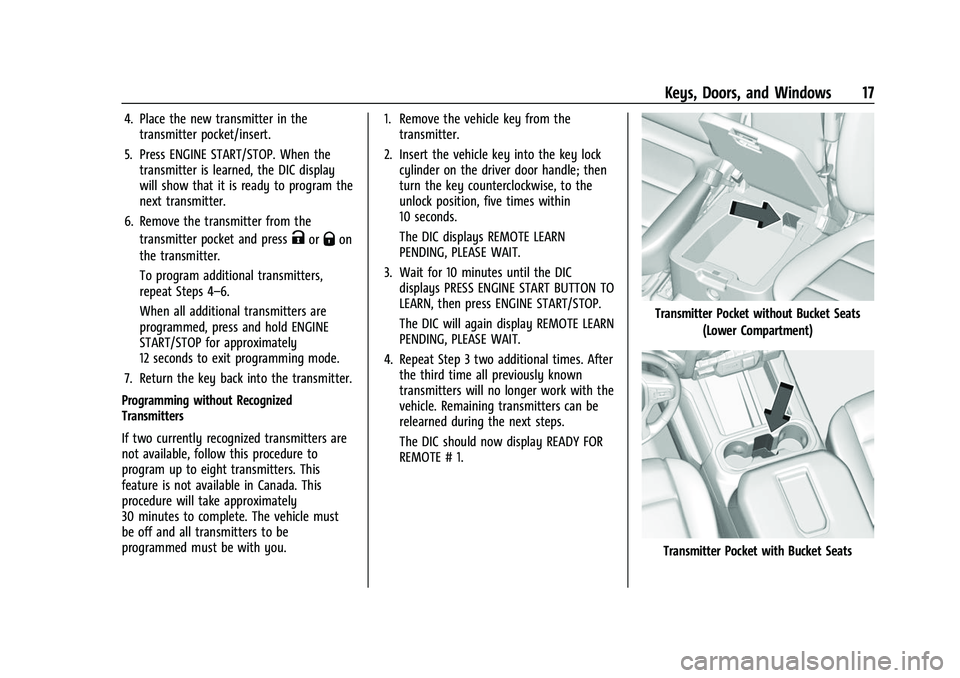
4. Place the new transmitter in thetransmitter pocket/insert.
5. Press ENGINE START/STOP. When the transmitter is learned, the DIC display
will show that it is ready to program the
next transmitter.
6. Remove the transmitter from the transmitter pocket and press
KorQon
the transmitter.
To program additional transmitters,
repeat Steps 4–6.
When all additional transmitters are
programmed, press and hold ENGINE
START/STOP for approximately
12 seconds to exit programming mode.
7. Return the key back into the transmitter.
Programming without Recognized
Transmitters
If two currently recognized transmitters are
not available, follow this procedure to
program up to eight transmitters. This
feature is not available in Canada. This
procedure will take approximately
30 minutes to complete. The vehicle must
be off and all transmitters to be
programmed must be with you. 1. Remove the vehicle key from the
transmitter.
2. Insert the vehicle key into the key lock cylinder on the driver door handle; then
turn the key counterclockwise, to the
unlock position, five times within
10 seconds.
The DIC displays REMOTE LEARN
PENDING, PLEASE WAIT.
3. Wait for 10 minutes until the DIC displays PRESS ENGINE START BUTTON TO
LEARN, then press ENGINE START/STOP.
The DIC will again display REMOTE LEARN
PENDING, PLEASE WAIT.
4. Repeat Step 3 two additional times. After the third time all previously known
transmitters will no longer work with the
vehicle. Remaining transmitters can be
relearned during the next steps.
The DIC should now display READY FOR
REMOTE # 1.
Transmitter Pocket without Bucket Seats
(Lower Compartment)
Transmitter Pocket with Bucket Seats
Page 19 of 433
Chevrolet Silverado 2500 HD/3500 HD Owner Manual (GMNA-Localizing-U.
S./Canada/Mexico-14632154) - 2021 - CRC - 11/20/20
18 Keys, Doors, and Windows
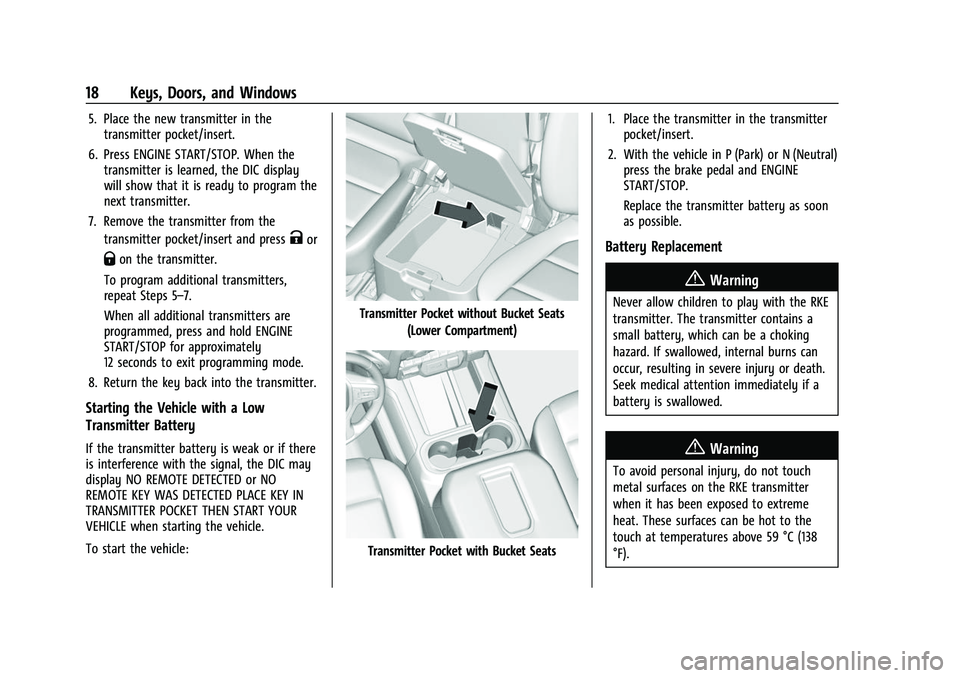
5. Place the new transmitter in thetransmitter pocket/insert.
6. Press ENGINE START/STOP. When the transmitter is learned, the DIC display
will show that it is ready to program the
next transmitter.
7. Remove the transmitter from the transmitter pocket/insert and press
Kor
Qon the transmitter.
To program additional transmitters,
repeat Steps 5–7.
When all additional transmitters are
programmed, press and hold ENGINE
START/STOP for approximately
12 seconds to exit programming mode.
8. Return the key back into the transmitter.
Starting the Vehicle with a Low
Transmitter Battery
If the transmitter battery is weak or if there
is interference with the signal, the DIC may
display NO REMOTE DETECTED or NO
REMOTE KEY WAS DETECTED PLACE KEY IN
TRANSMITTER POCKET THEN START YOUR
VEHICLE when starting the vehicle.
To start the vehicle:
Transmitter Pocket without Bucket Seats (Lower Compartment)
Transmitter Pocket with Bucket Seats 1. Place the transmitter in the transmitter
pocket/insert.
2. With the vehicle in P (Park) or N (Neutral) press the brake pedal and ENGINE
START/STOP.
Replace the transmitter battery as soon
as possible.
Battery Replacement
{Warning
Never allow children to play with the RKE
transmitter. The transmitter contains a
small battery, which can be a choking
hazard. If swallowed, internal burns can
occur, resulting in severe injury or death.
Seek medical attention immediately if a
battery is swallowed.
{Warning
To avoid personal injury, do not touch
metal surfaces on the RKE transmitter
when it has been exposed to extreme
heat. These surfaces can be hot to the
touch at temperatures above 59 °C (138
°F).
Page 27 of 433
Chevrolet Silverado 2500 HD/3500 HD Owner Manual (GMNA-Localizing-U.
S./Canada/Mexico-14632154) - 2021 - CRC - 11/20/20
26 Keys, Doors, and Windows
.Press the touch pad on the tailgate
handle.
A chime sounds and the taillamps flash
during the closing operation. If the warning
chime is not functioning, the tailgate will
not power close. Power opening is still
enabled. See your dealer for service.
The power tailgate may be temporarily
disabled after repeated power cycling over a
short period of time. If this occurs, the
tailgate can still be operated manually.
The vehicle must be in P (Park) to operate
the power tailgate. If the vehicle is shifted
out of P (Park) while the power function is
in progress, the tailgate will continue to
completion. If the vehicle is accelerated
while the tailgate is still closing, the tailgate
may stop and reverse direction. Make sure
the tailgate is closed and latched before
driving. Lift-to-Close Operation
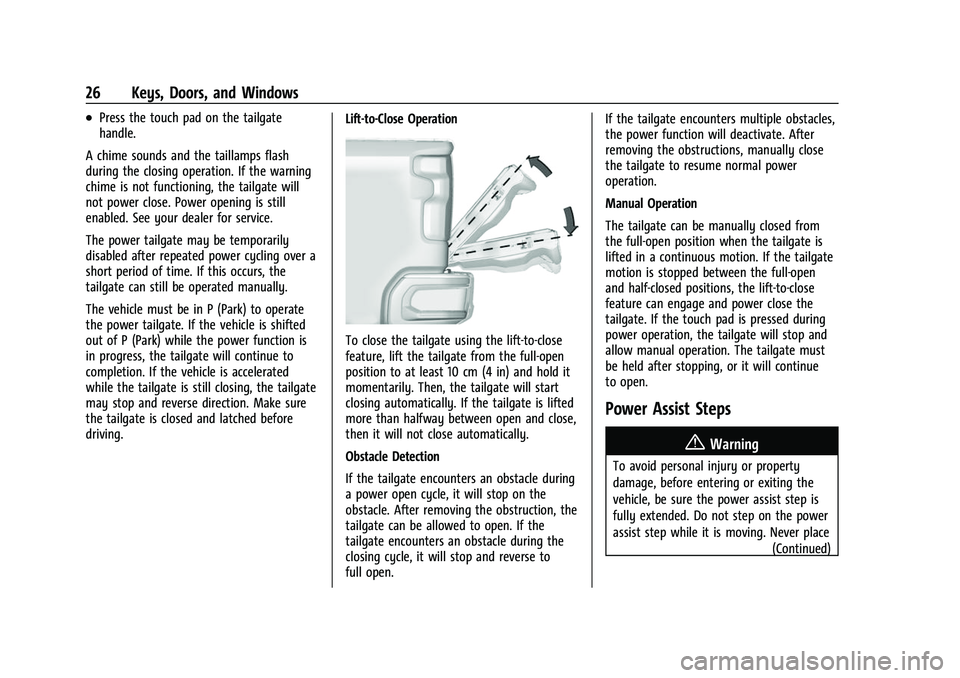
To close the tailgate using the lift-to-close
feature, lift the tailgate from the full-open
position to at least 10 cm (4 in) and hold it
momentarily. Then, the tailgate will start
closing automatically. If the tailgate is lifted
more than halfway between open and close,
then it will not close automatically.
Obstacle Detection
If the tailgate encounters an obstacle during
a power open cycle, it will stop on the
obstacle. After removing the obstruction, the
tailgate can be allowed to open. If the
tailgate encounters an obstacle during the
closing cycle, it will stop and reverse to
full open.If the tailgate encounters multiple obstacles,
the power function will deactivate. After
removing the obstructions, manually close
the tailgate to resume normal power
operation.
Manual Operation
The tailgate can be manually closed from
the full-open position when the tailgate is
lifted in a continuous motion. If the tailgate
motion is stopped between the full-open
and half-closed positions, the lift-to-close
feature can engage and power close the
tailgate. If the touch pad is pressed during
power operation, the tailgate will stop and
allow manual operation. The tailgate must
be held after stopping, or it will continue
to open.
Power Assist Steps
{Warning
To avoid personal injury or property
damage, before entering or exiting the
vehicle, be sure the power assist step is
fully extended. Do not step on the power
assist step while it is moving. Never place
(Continued)
Page 49 of 433
Chevrolet Silverado 2500 HD/3500 HD Owner Manual (GMNA-Localizing-U.
S./Canada/Mexico-14632154) - 2021 - CRC - 11/20/20
48 Seats and Restraints
Save preferred memory feature positions to
both 1 and 2 if you are the only driver.
Manually Recalling Memory Positions
Press and hold 1, 2, or
Bto recall the
previously saved memory positions if you
are driver 1 or 2 identified in the DIC
welcome message.
To stop Manual Memory recall movement,
release 1, 2, or
Bor press any of the
following controls:
.Power seat
.Memory SET
.Power mirror, with the driver or
passenger side mirror selected
Manual Memory recall movement for 1, 2,
or
Bbuttons may be initiated and may
complete to the saved memory position if
the vehicle is in or out of P (Park).
Seat Entry Memory
The vehicle identifies the number of the
current driver’s RKE transmitter (1–8). See
Remote Keyless Entry (RKE) System
Operation (Key Access) 010 or
Remote Keyless Entry (RKE) System
Operation (Keyless Access) 013. If the RKE
transmitter is 1 or 2, and Seat Entry Memory
is enabled in vehicle personalization, the positions saved to the same memory button
number 1 or 2 are automatically recalled
when the vehicle is turned on, or turned
from off to ACC/ACCESSORY. RKE
transmitters 3–8 will not provide automatic
memory recalls.
To turn Seat Entry Memory on or off, see
“Vehicle Personalization Settings”
previously
in this section and Vehicle Personalization
0 126.
The shift lever must be in P (Park) to start
Seat Entry Memory. Seat Entry Memory
recall will complete if the vehicle is shifted
out of P (Park) prior to reaching the saved
memory position.
To stop Seat Entry Memory recall
movement, turn the vehicle off or press any
of the following controls:
.Power seat
.Memory SET, 1, 2, orB
.Power mirror, with the driver or
passenger side mirror selected
If the saved memory seat position does not
automatically recall or recalls to the wrong
positions, the driver’s RKE transmitter
number (1 or 2) may not match the memory
button number that positions were saved to. Try storing the position to the other
memory button or try the other RKE
transmitter.
Seat Exit Memory
Seat Exit Memory is not linked to an RKE
transmitter. The position saved to
Bis
used for all drivers. To turn Seat Exit
Memory on or off, see "Vehicle
Personalization Settings" previously in this
section and Vehicle Personalization 0126.
If turned on, the position saved to
Bis
automatically recalled when one of the
following occurs:
.The vehicle is turned off and the driver
door is opened within a short time.
.The vehicle is turned off with the driver
door open.
To stop Seat Exit Memory movement, press
any of the following memory controls:
.Power seat
.Memory SET, 1, 2, orB
.Power mirror, with the driver or
passenger side mirror selected
Page 50 of 433
Chevrolet Silverado 2500 HD/3500 HD Owner Manual (GMNA-Localizing-U.
S./Canada/Mexico-14632154) - 2021 - CRC - 11/20/20
Seats and Restraints 49
Obstructions
If something has blocked the driver seat
while recalling a memory position, the recall
may stop. Remove the obstruction and try
the recall again. If the memory position still
does not recall, see your dealer.
Heated and Ventilated Front
Seats
{Warning
If temperature change or pain to the skin
cannot be felt, the seat heater may cause
burns. To reduce the risk of burns, use
care when using the seat heater,
especially for long periods of time. Do
not place anything on the seat that
insulates against heat, such as a blanket,
cushion, cover, or similar item. This may
cause the seat heater to overheat. An
overheated seat heater may cause a burn
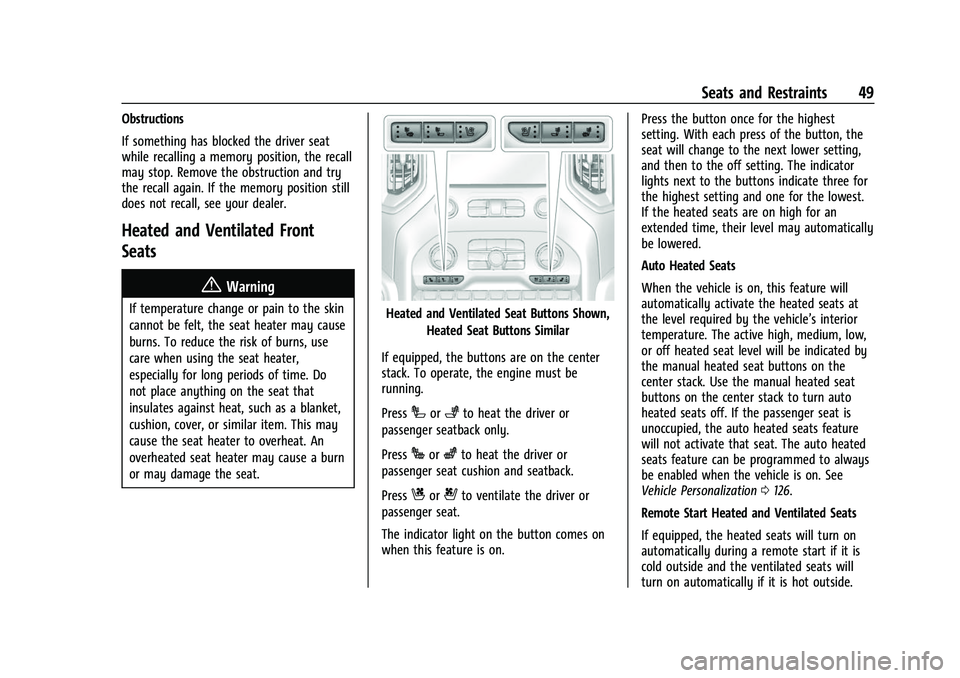
or may damage the seat.Heated and Ventilated Seat Buttons Shown,Heated Seat Buttons Similar
If equipped, the buttons are on the center
stack. To operate, the engine must be
running.
Press
Ior+to heat the driver or
passenger seatback only.
Press
Jorzto heat the driver or
passenger seat cushion and seatback.
Press
Cor{to ventilate the driver or
passenger seat.
The indicator light on the button comes on
when this feature is on. Press the button once for the highest
setting. With each press of the button, the
seat will change to the next lower setting,
and then to the off setting. The indicator
lights next to the buttons indicate three for
the highest setting and one for the lowest.
If the heated seats are on high for an
extended time, their level may automatically
be lowered.
Auto Heated Seats
When the vehicle is on, this feature will
automatically activate the heated seats at
the level required by the vehicle’s interior
temperature. The active high, medium, low,
or off heated seat level will be indicated by
the manual heated seat buttons on the
center stack. Use the manual heated seat
buttons on the center stack to turn auto
heated seats off. If the passenger seat is
unoccupied, the auto heated seats feature
will not activate that seat. The auto heated
seats feature can be programmed to always
be enabled when the vehicle is on. See
Vehicle Personalization
0126.
Remote Start Heated and Ventilated Seats
If equipped, the heated seats will turn on
automatically during a remote start if it is
cold outside and the ventilated seats will
turn on automatically if it is hot outside.
Page 98 of 433
Chevrolet Silverado 2500 HD/3500 HD Owner Manual (GMNA-Localizing-U.
S./Canada/Mexico-14632154) - 2021 - CRC - 11/20/20
Instruments and Controls 97
seats when it is cold outside. The heated
steering wheel indicator light may not
come on.
SeeHeated and Ventilated Front Seats 049.
Horn
To sound the horn, pressaon the
steering wheel.
Windshield Wiper/Washer
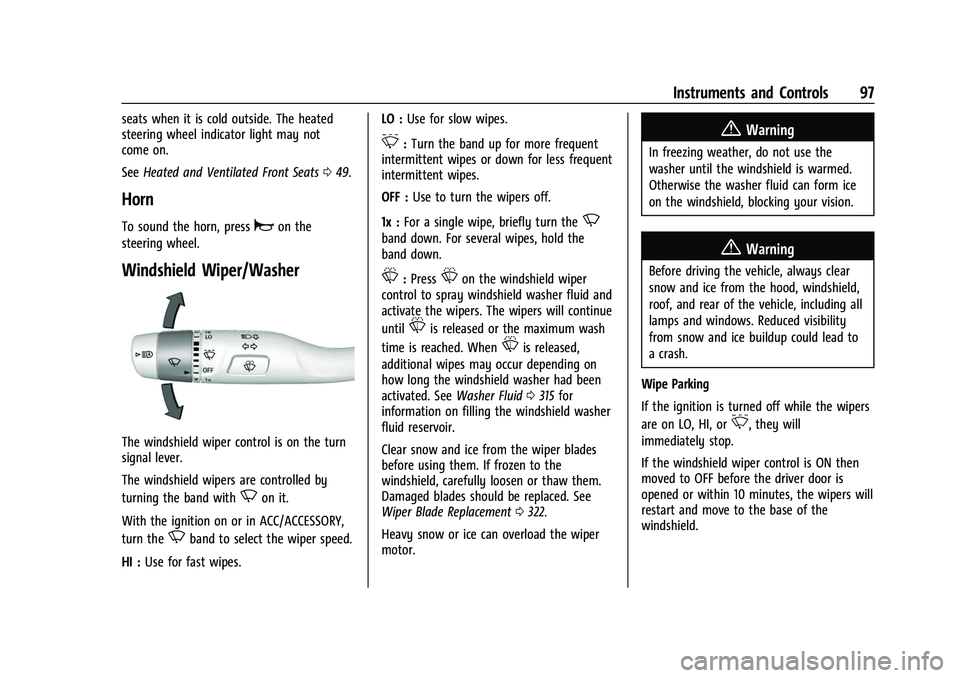
The windshield wiper control is on the turn
signal lever.
The windshield wipers are controlled by
turning the band with
Non it.
With the ignition on or in ACC/ACCESSORY,
turn the
Nband to select the wiper speed.
HI : Use for fast wipes. LO :
Use for slow wipes.
3:Turn the band up for more frequent
intermittent wipes or down for less frequent
intermittent wipes.
OFF : Use to turn the wipers off.
1x : For a single wipe, briefly turn the
N
band down. For several wipes, hold the
band down.
L:PressLon the windshield wiper
control to spray windshield washer fluid and
activate the wipers. The wipers will continue
until
Lis released or the maximum wash
time is reached. When
Lis released,
additional wipes may occur depending on
how long the windshield washer had been
activated. See Washer Fluid0315 for
information on filling the windshield washer
fluid reservoir.
Clear snow and ice from the wiper blades
before using them. If frozen to the
windshield, carefully loosen or thaw them.
Damaged blades should be replaced. See
Wiper Blade Replacement 0322.
Heavy snow or ice can overload the wiper
motor.
{Warning
In freezing weather, do not use the
washer until the windshield is warmed.
Otherwise the washer fluid can form ice
on the windshield, blocking your vision.
{Warning
Before driving the vehicle, always clear
snow and ice from the hood, windshield,
roof, and rear of the vehicle, including all
lamps and windows. Reduced visibility
from snow and ice buildup could lead to
a crash.
Wipe Parking
If the ignition is turned off while the wipers
are on LO, HI, or
3, they will
immediately stop.
If the windshield wiper control is ON then
moved to OFF before the driver door is
opened or within 10 minutes, the wipers will
restart and move to the base of the
windshield.
Page 112 of 433

Chevrolet Silverado 2500 HD/3500 HD Owner Manual (GMNA-Localizing-U.
S./Canada/Mexico-14632154) - 2021 - CRC - 11/20/20
Instruments and Controls 111
will light either ON or OFF, or either the on
or off symbol, to let you know the status of
the front outboard passenger frontal airbag.
If the word ON or the on symbol is lit on
the passenger airbag status indicator, it
means that the front outboard passenger
frontal airbag is allowed to inflate.
If the word OFF or the off symbol is lit on
the passenger airbag status indicator, it
means that the passenger sensing system
has turned off the front outboard passenger
frontal airbag.
If, after several seconds, both status
indicator lights remain on, or if there are no
lights at all, there may be a problem with
the lights or the passenger sensing system.
See your dealer for service.
{Warning
If the airbag readiness light ever comes
on and stays on, it means that
something may be wrong with the airbag
system. To help avoid injury to yourself
or others, have the vehicle serviced right
away. SeeAirbag Readiness Light 0110
for more information, including important
safety information.
Charging System Light
The charging system light comes on briefly
when the ignition is turned on, but the
engine is not running, as a check to show
the light is working. It should go out when
the engine is started.
If the light stays on, or comes on while
driving, there may be a problem with the
electrical charging system. Have it checked
by your dealer. Driving while this light is on
could drain the battery.
When this light comes on, or is flashing, the
Driver Information Center (DIC) also displays
a message.
If a short distance must be driven with the
light on, be sure to turn off all accessories,
such as the radio and air conditioner. Find a
safe place to stop the vehicle.
Malfunction Indicator Lamp
(Check Engine Light)
This light is part of the vehicle’s emission
control on-board diagnostic system. If this
light is on while the engine is running, a
malfunction has been detected and the
vehicle may require service. The light should
come on to show that it is working when
the ignition is on and the engine is not
running. See Ignition Positions (Keyless
Access) 0226 or
Ignition Positions (Key Access) 0224.
Malfunctions are often indicated by the
system before any problem is noticeable.
Being aware of the light and seeking service
promptly when it comes on may prevent
damage.