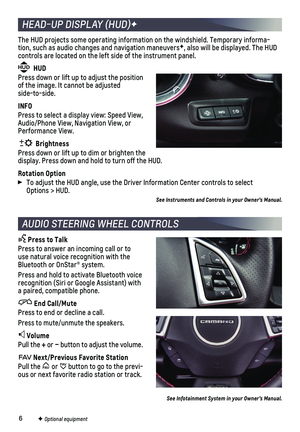
Page 9 of 16

9
APPSF
In-vehicle apps — connecting to music, news, weather, travel informat\
ion, sports,
entertainment and more — are available for download to the infotainment system through the Apps icon on the Home page. Downloading and using the apps requires \
internet connectivity and may require a data plan, accessed through the vehicle’\
s 4G LTE Wi-Fi hotspot, if active, or a mobile device hotspot.
PORTABLE AUDIO DEVICES
An iPod®, iPhone®, MP3 Player, a USB flash drive or a portable USB hard drive can be connected to the USB data ports located inside the center console storage compartment.
Touch Audio and then touch USB from the sources list, or touch More to view the USB option.
See Infotainment System in your Owner’s Manual.
INFOTAINMENT SYSTEMF
BLUETOOTH® SYSTEM
Read your Owner’s Manual for important information about using the Bluetooth system while driving.
Before using a Bluetooth-enabled device in the vehicle, it must be paire\
d with the
in-vehicle Bluetooth system. The vehicle must be stopped to pair a devic\
e. Not all devices support all functions.
PAIR A PHONE
1. To use the infotainment screen, select the Phone icon > Connect Phone > \
Add Phone; or to use voice recognition, press the Press to Talk button and say “Pair phone.”
2. Start the pairing process on the phone. From your phone’s Bluetooth s\
ettings, select the name shown on the infotainment screen.
3. Follow the pairing instructions.
4. When pairing is complete, the phone screen is displayed. Your phone book\
may be downloaded depending on the phone.
SECONDARY PHONE
Multiple phones can be paired to the Bluetooth system. The system connec\
ts to the phone that is set to First to Connect. The secondary phone can only rece\
ive calls.
To set the first and secondary phones, select the Phone icon > Phones \
>
Information.
STREAMING AUDIO
With a paired device connected via Bluetooth, select Audio and then touc\
h Bluetooth from the sources list, or touch More to view the Bluetooth option.
See Infotainment System in your Owner’s Manual.
F Optional equipment
Page 10 of 16

10
The Wireless Charging system for smartphones is located at the back of t\
he center
console. To check device compatibility, visit my.chevrolet.com/how-to-support. See your phone retailer for details on required phone accessories or chargin\
g adapters.
1. The vehicle must be on, or Retained Accessory Power must be active.
2. Remove all objects from the charging pad.
3. Place the smartphone, face up, on the
charging pad.
4. The charging symbol will display on the infotainment screen. If not charg-ing, remove the device for 3 seconds and rotate it 180 degrees.
See Instruments and Controls in your Owner’s Manual.
Some vehicle features can be turned on/off or customized using the Settings menus on the infotainment system. The Settings menus include System, Apps, and Vehicle.
1. Select Settings on the Home page.
2. Select the desired menu item.
3. Select the desired feature and setting.
4. Select
WIRELESS CHARGINGF
VEHICLE CUSTOMIZATION
F Optional equipment
See Instruments and Controls in your Owner’s Manual.
4G LTE WI-FI® HOTSPOTF
With the vehicle’s available 4G LTE Wi-Fi hotspot, up to 7 devices (\
smartphones, tablets and laptops) can be connected to high-speed internet. For more informat\
ion on use and system limitations, visit my.chevrolet.com/how-to-support.
To retrieve the name and password for the hotspot, select the Wi-Fi Hots\
pot icon or go to Settings > System > Wi-Fi Hotspot.
See Infotainment System in your Owner’s Manual.
Page 11 of 16

11
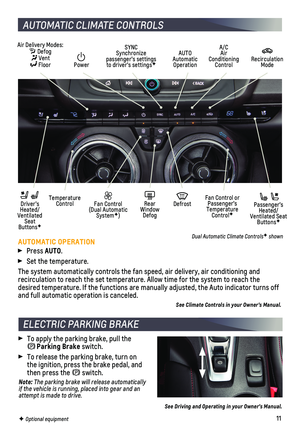
AUTOMATIC CLIMATE CONTROLS
F Optional equipment
Air Delivery Modes: Defog Vent Floor
AUTO Automatic Operation
A/C Air Conditioning Control
Recirculation Mode
Temperature Control Driver’s Heated/Ventilated Seat ButtonsF
Passenger’s Heated/Ventilated Seat ButtonsF
Fan Control (Dual Automatic SystemF)
Fan Control or Passenger’s Temperature ControlF
Rear Window Defog
Defrost
SYNC Synchronize passenger’s settings to driver’s settingsF Power
AUTOMATIC OPERATION
Press AUTO.
Set the temperature.
The system automatically controls the fan speed, air delivery, air condi\
tioning and recirculation to reach the set temperature. Allow time for the system to\
reach the desired temperature. If the functions are manually adjusted, the Auto in\
dicator turns off and full automatic operation is canceled.
See Climate Controls in your Owner’s Manual.
Dual Automatic Climate ControlsF shown
To apply the parking brake, pull the Parking Brake switch.
To release the parking brake, turn on the ignition, press the brake pedal, and then press the switch.
Note: The parking brake will release automatically if the vehicle is running, placed into gear and an attempt is made to drive.
See Driving and Operating in your Owner’s Manual.
ELECTRIC PARKING BRAKE
Page 12 of 16

12
TRACTION CONTROL AND STABILITY CONTROL SYSTEMS
The traction control system limits wheelspin and the StabiliTrak® sta\
bility control system assists with directional control of the vehicle in difficult driving c\
onditions. Both systems turn on automatically every time the vehicle is started.
Press the Traction Control/StabiliTrak Off button on the center console to turn off traction control.
Press and hold the button to turn off both traction control and StabiliTrak.
Press the button again to turn on traction control and StabiliTrak.
DRIVER MODE CONTROL
Up to four selectable driver modes are available that adjust various veh\
icle control sys-tems based on driving preferences, weather or road conditions. The modes\
are displayed on the instrument cluster: Tour (default mode), Sport (will remain ac\
tive at next ignition cycle if selected), Snow/Ice (automatic transmission), and TrackF.
1. Press the MODE button on the center console to view the current mode.
2. Press the MODE button again to scroll through the four modes.
COMPETITIVE MODE AND LAUNCH CONTROLF
Note: Competitive Mode and Launch Control are recommended only for use on closed course tracks.
Competitive Mode
Competitive Mode is an optional handling mode that allows increased perf\
ormance while
accelerating and cornering.
To turn on Competitive Mode, press the Traction Control/StabiliTrak Off button twice quickly while in the Sport or Track Mode. Competitive Mode will di\
splay on the instrument cluster.
Press the button again to return to normal traction control/StabiliTrak operation\
.
Launch Control
Launch Control is a form of traction control that optimizes wheelspin wh\
ile launching the vehicle. It is activated when the vehicle is at a standstill on level gr\
ound, with the front wheels straight, while in Competitive Mode.
Press the accelerator pedal to the floor with the clutch engaged (man\
ual transmis-sion in 1st gear) or the brake pedal firmly applied (automatic trans\
mission); release the clutch or brake while keeping the accelerator pedal pressed to the fl\
oor for
controlled wheelspin and acceleration.
Note: The brake cooling deflectors should be installed on SS models before closed course track events. The brake cooling deflectors should be removed once the track event is\
completed.
SUMMER PERFORMANCE TIRESF
Your vehicle may be equipped with high-performance summer tires that are\
optimized for maximum dry and wet road performance. It is recommended to install w\
inter tires in cold temperatures. See your Chevrolet dealer for information about winte\
r tires.
HIGH-PERFORMANCE DRIVING FEATURES
F Optional equipment
Page 13 of 16
, pull either paddle on the back of the steering wheel. Automatic shifting retur")
13
AUTOMATIC TRANSMISSION PERFORMANCE
Paddle ShiftingF
To temporarily take control of gear selection while in Drive (D), pull either paddle on the back of the steering wheel. Automatic shifting returns after 7 seconds of cruising at a steady speed without any manual shifts, or when the vehicle stops.
To use Manual Mode, move the shift lever to the left from Drive (D) into the gate marked +/– and use the paddles to manually upshift or downshift the transmission. If the current vehicle s\
peed is too fast or too slow for the requested gear, the shift will not occur.
Pull the right paddle to upshift and the left paddle to downshift. The c\
urrent gear will be displayed on the instrument cluster or HUDF.
Performance Shifting
While driving in Sport Mode or Track Mode (V8 models), the transmissio\
n may hold the current gear during high cornering loads. When braking, the transmission\
will downshift to keep up engine speed for exiting the corner. When driving at a steady\
speed, the transmission will upshift to the appropriate gear.
Powertrain Braking
With the shift lever in Drive (D) when driving on steep grades where f\
requent braking is required, the transmission may downshift to help hold vehicle speed and \
reduce brake wear. Continuing to apply the brake pedal will cause the transmission to\
downshift until 3rd gear is reached. When the road levels out and the accelerator pedal \
is applied, the transmission will upshift to the appropriate gear.
MANUAL TRANSMISSION SHIFTING (V8 MODELS ONLYF)
1-to-4 Shift
The 1st to 4th shift feature helps achieve the best possible fuel econom\
y. The 1-to-4 shift message will display on the instrument cluster when, from a stop, \
acceleration and vehicle qualifications are met. When the shift message is displayed, t\
he transmission can be shifted only from 1st to 4th gear. Forcing the shift lever into a\
ny other gear may
damage the transmission.
Active Rev Match
Active Rev Match aids in smoother shifting by matching engine speed to t\
he next selected gear.
Pull either REV MATCH paddle on the back of the steering wheel to activa\
te or
deactivate the system. When active, the current gear is displayed in amb\
er on the instrument cluster.
See Driving and Operating in your Owner’s Manual.
HIGH-PERFORMANCE DRIVING FEATURES
F Optional equipment
Page 14 of 16

14
REAR CAMERA MIRRORF
DRIVER ASSISTANCE SYSTEMS
TIRE PRESSURE MONITOR
The Low Tire Pressure warning light on the instrument cluster illuminates when one or more of the vehicle’s tires is significantly underinflated. Fi\
ll the tires to the proper tire pressures listed on the Tire and Loading Information label, located belo\
w the driver’s door latch. Current tire pressures can be viewed on the Driver Informati\
on Center (DIC).
F Optional equipment
Safety or driver assistance features are no substitute for the driver’\
s responsibility to operate the vehicle in a safe manner. The driver should remain attentive to traffic, surroundings and road conditions at all times. Read your Owner’s Manual for important feature limitations and information.
To turn the following driver assistance systems on/off or to change the \
system settings, go to Settings > Vehicle > Collision/Detection Systems on the infotainme\
nt screen.
LANE CHANGE ALERT WITH SIDE BLIND ZONE ALERTF – While driving, the system dis plays a warning symbol on the left or right side mirror when a moving vehicle i\
s detected rapidly approaching or is in a side blind zone. The warning sym\
bol flashes if a turn signal is activated when a vehicle has been detected on the same si\
de.
REAR PARK ASSISTF – During low-speed parking maneuvers when in Reverse, the system provides “distance to closest object” information on the instrument cluster and sounds a beep. Five beeps sound when an object is very close.
REAR CROSS TRAFFIC ALERTF – During low-speed maneuvers when in Reverse, the system warns of cross-traffic approaching in either direction by displ\
aying a red alert on the infotainment screen and sounding several beeps.
FORWARD COLLISION ALERTF – The Vehicle Ahead Indicator is green on the instru-ment cluster when a vehicle is detected and is amber when following a ve\
hicle ahead much too closely. When approaching a detected vehicle directly ahead too\
rapidly, a red alert flashes on the windshield and rapid beeps sound.
Press the Forward Collision Alert button on the steering wheel to set the alert timing to Far, Medium, or Near.See Driving and Operating in your Owner’s Manual.
The rear camera mirror provides a wider, less obstructed field of view\
to assist when driving, changing lanes and checking traffic conditions.
A. On/Off
Pull or push the lever at the bottom of the mirror to turn the video dis\
play on or off.
B. Selection Control
Press and release the button to select the brightness, tilt or zoom feature.
C. Adjustment
Press and release either button to adjust the selected feature.
See Keys, Doors and Windows in your Owner’s Manual.
See Vehicle Care in your Owner’s Manual.
CBA
Page 15 of 16
 must be in the fastened position with no objects forward of the partition and the trunk must be closed. The top can be operated at vehi")
15
Before operating the convertible top, the cargo partition (A) must be in the fastened position with no objects forward of the partition and the trunk must be closed. The top can be operated at vehicle speeds up to 30 mph.
OPERATING THE POWER TOP
Press and hold the Open/Close switch (B) on the overhead console, or use the Convertible Top button on the Remote Keyless Entry transmitter (key fob) to lower the top only. The
windows will lower automatically when
operating the top. A message will display on the Driver Information Center when top operation is completed.
Note: The top will not operate in cold weather below 32°F (0°C).
POWER WINDOWS
Press the front (C) or rear window button (D) to operate the desired window. The
indicator light on the selected button will illuminate.
Fully press/pull the desired window switch (E) to express open/close the window.
Note: Raise the rear windows before the front windows to help ensure proper sealing.
LOSS OF VEHICLE POWER
If the vehicle has lost power, the convertible top can be raised manuall\
y by releasing pressure on the hydraulic pump. Refer to your Owner’s Manual.
See Keys, Doors and Windows in your Owner’s Manual.
CONVERTIBLE TOP OPERATIONF
TIRES
F Optional equipment
TIRE SEALANT AND COMPRESSOR KITF
The kit, located under the trunk floor, can be used to temporarily sea\
l small punctures in the tread area of a tire. Refer to the kit instructions for operating in\
formation.
RUN-FLAT TIRESF
The run-flat tires eliminate the need for a spare tire. The tire desig\
n enables safe driving function during and after loss of pressure for 50 miles at a moderate sp\
eed. A tire pres-sure of 0 will display on the Driver Information Center (DIC). Driving\
only a short distance with a loss of pressure increases the chance that the tire can be repair\
ed. Contact Roadside Assistance for the nearest run-flat tire servicing facility.
See Vehicle Care in your Owner’s Manual.
B
D
C
A
E
Page 16 of 16

16
Certain restrictions, precautions and safety procedures apply to your ve\
hicle. Please read your Owner’s Manual for complete instructions. All information contained in this guide is ba\
sed on the latest information available at the time of printing and is subject to change without notice. Copyright 2020 General Motors. All rights reserved.
We recommend always using ACDelco or GM Genuine Parts.
84512286 A!84512286=A!
ROADSIDE ASSISTANCE
1-800-CHEV-USA (1-800-243-8872) \
TTY Users: 1-888-889-2438
As the owner of a new Chevrolet, you are automatically enrolled in the C\
hevrolet Roadside Assistance program for up to 5 years/60,000 miles, whichever oc\
curs first, at no expense to you. Chevrolet’s Roadside Assistance toll-free numbe\
r is staffed by a team of trained advisors who are available 24 hours a day, 365 days a ye\
ar, to contact a
service provider for light services (fuel delivery, jump-starts, flat\
tire and lock-outs) or make arrangements to tow your vehicle to the nearest Chevrolet dealer fo\
r any repairs.
ONSTAR® ROADSIDE ASSISTANCE
If you have a current OnStar Safety & Security plan, push the blue OnStar button or red Emergency button to get the help you need. An OnStar advisor will use GPS technol\
ogy to pinpoint your vehicle location and contact the nearest service provid\
er.
To learn more about OnStar services, push the blue OnStar button, visit onstar.com, call 1-888-4-ONSTAR (1-888-466-7827), or refer to your Owner’s Manual.
CHEVROLET OWNER CENTER
Get to know your vehicle inside and out with the Chevrolet Owner Center.\
Check out personalized information, including an online Owner’s Manual and help\
ful how-to videos, track your service history and warranty status, manage your OnStar and C\
onnected Services vehicle plans, review your current Vehicle Diagnostics report (\
active service required) and more. Create an account today at my.chevrolet.com.
MYCHEVROLET MOBILE APP
Download the myChevrolet app to your compatible smartphone (or device)\
and, if your vehicle is properly equipped, you can start or turn off your engine, loc\
k or unlock your doors, view key diagnostic information, set parking information and more\
.
The app is available on select Apple and Android devices. Service availa\
bility, features and functionality vary by vehicle, device and data plan. Device data con\
nection required. Visit onstar.com for more details. Download the mobile app from your compatible mobile device’s app store.