Page 1 of 20
1
XT6
Convenience &
Personalization Guide
2021
cadillac.com
Page 2 of 20
2
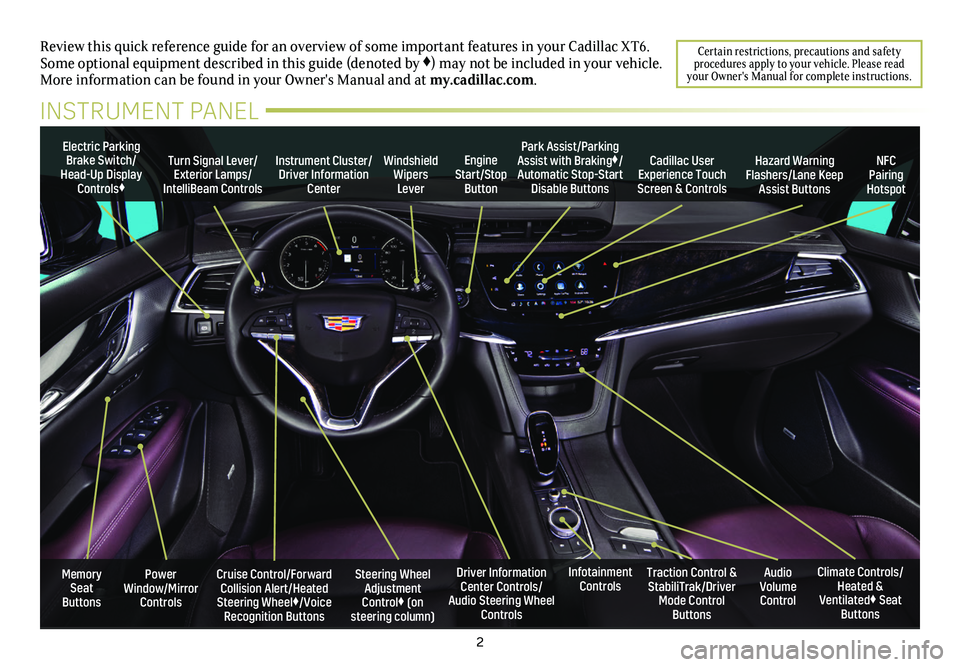
Power Window/Mirror Controls
Electric Parking Brake Switch/Head-Up Display Controls♦
Instrument Cluster/Driver Information Center
Engine Start/Stop Button
Steering Wheel Adjustment Control♦ (on steering column)
Cruise Control/Forward Collision Alert/Heated Steering Wheel♦/Voice Recognition Buttons
Windshield Wipers Lever
Driver Information Center Controls/Audio Steering Wheel Controls
Turn Signal Lever/Exterior Lamps/ IntelliBeam Controls
Review this quick reference guide for an overview of some important feat\
ures in your Cadillac XT6. Some optional equipment described in this guide (denoted by ♦) may not be included in your vehicle. More information can be found in your Owner's Manual and at my.cadillac.com.
INSTRUMENT PANEL
Cadillac User Experience Touch Screen & Controls
Climate Controls/Heated & Ventilated♦ Seat Buttons
Traction Control & StabiliTrak/Driver Mode Control Buttons
Infotainment ControlsAudio Volume Control
Park Assist/Parking Assist with Braking♦/Automatic Stop-Start Disable Buttons
NFC Pairing Hotspot
Hazard Warning Flashers/Lane Keep Assist Buttons
Memory Seat Buttons
Certain restrictions, precautions and safety procedures apply to your vehicle. Please read your Owner's Manual for complete instructions.
Page 3 of 20
3
KEYLESS ACCESS SYSTEM
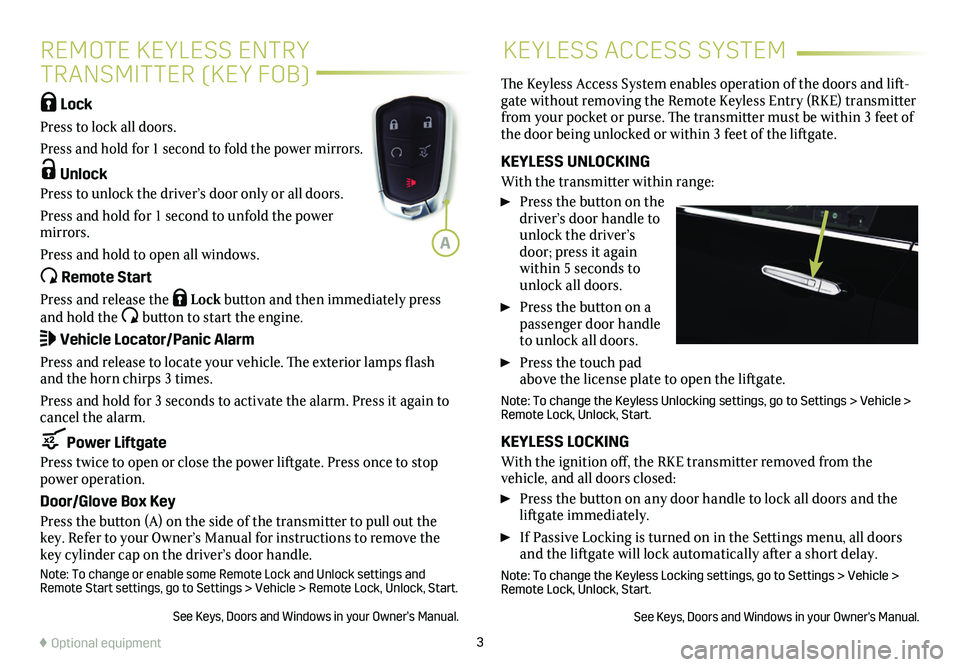
Lock
Press to lock all doors.
Press and hold for 1 second to fold the power mirrors.
Unlock
Press to unlock the driver’s door only or all doors.
Press and hold for 1 second to unfold the power mirrors.
Press and hold to open all windows.
Remote Start
Press and release the Lock button and then immediately press and hold the button to start the engine.
Vehicle Locator/Panic Alarm
Press and release to locate your vehicle. The exterior lamps flash and the horn chirps 3 times.
Press and hold for 3 seconds to activate the alarm. Press it again to cancel the alarm.
Power Liftgate
Press twice to open or close the power liftgate. Press once to stop power operation.
Door/Glove Box Key
Press the button (A) on the side of the transmitter to pull out the key. Refer to your Owner’s Manual for instructions to remove the key cylinder cap on the driver’s door handle.
Note: To change or enable some Remote Lock and Unlock settings and Remote Start settings, go to Settings > Vehicle > Remote Lock, Unlock, S\
tart.
See Keys, Doors and Windows in your Owner’s Manual.
The Keyless Access System enables operation of the doors and lift-gate without removing the Remote Keyless Entry (RKE) transmitter from your pocket or purse. The transmitter must be within 3 feet of the door being unlocked or within 3 feet of the liftgate.
KEYLESS UNLOCKING
With the transmitter within range:
Press the button on the driver’s door handle to unlock the driver’s door; press it again within 5 seconds to unlock all doors.
Press the button on a passenger door handle to unlock all doors.
Press the touch pad above the license plate to open the liftgate.
Note: To change the Keyless Unlocking settings, go to Settings > Vehicle\
> Remote Lock, Unlock, Start.
KEYLESS LOCKING
With the ignition off, the RKE transmitter removed from the
vehicle, and all doors closed:
Press the button on any door handle to lock all doors and the liftgate immediately.
If Passive Locking is turned on in the Settings menu, all doors and the liftgate will lock automatically after a short delay.
Note: To change the Keyless Locking settings, go to Settings > Vehicle > Remote Lock, Unlock, Start.
See Keys, Doors and Windows in your Owner's Manual.
♦ Optional equipment
A
REMOTE KEYLESS ENTRY
TRANSMITTER (KEY FOB)
Page 4 of 20
4
KEYLESS STARTAUTO ENGINE STOP/START
The Remote Keyless Entry (RKE) transmitter must be in the vehicle to turn on the ignition.
START With the vehicle in Park or Neutral, press the brake pedal and then press the ENGINE START/STOP button to start the engine. The green indicator on the
button will illuminate.
Note: If the RKE transmitter battery is weak, place the transmitter in t\
he pocket in the center console storage compartment to enable the engine to\
start. Replace the transmitter battery as soon as possible.
STOP/OFF Shift to Park and press the ENGINE START/STOP button to turn off the engine.
Power will be available for 10 minutes to operate the audio system until the driver’s door is opened and to operate the windows and sunroof♦ until any door is opened.
ACCESSORY With the engine off and the brake pedal NOT depressed, press the ENGINE START/STOP button to place the ignition system in the Accessory mode. The amber indicator on the button will illuminate.
See Driving and Operating in your Owner’s Manual.
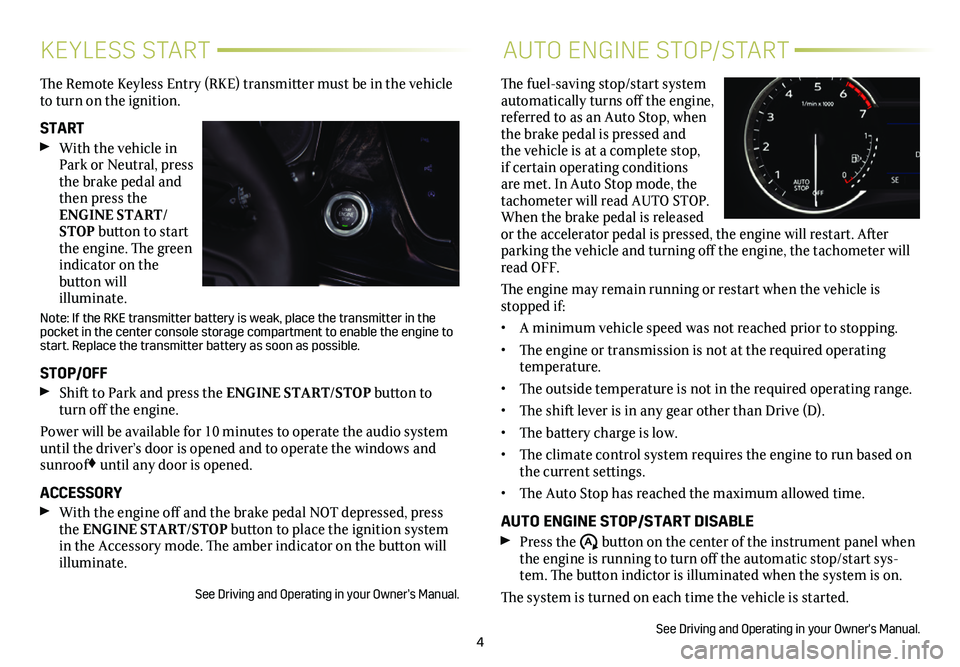
The fuel-saving stop/start system automatically turns off the engine, referred to as an Auto Stop, when the brake pedal is pressed and the vehicle is at a complete stop, if certain operating conditions are met. In Auto Stop mode, the tachometer will read AUTO STOP. When the brake pedal is released or the accelerator pedal is pressed, the engine will restart. After parking the vehicle and turning off the engine, the tachometer will read OFF.
The engine may remain running or restart when the vehicle is stopped if:
• A minimum vehicle speed was not reached prior to stopping.
• The engine or transmission is not at the required operating temperature.
• The outside temperature is not in the required operating range.
• The shift lever is in any gear other than Drive (D).
• The battery charge is low.
• The climate control system requires the engine to run based on the current settings.
• The Auto Stop has reached the maximum allowed time.
AUTO ENGINE STOP/START DISABLE Press the �$ button on the center of the instrument panel when the engine is running to turn off the automatic stop/start sys-tem. The button indictor is illuminated when the system is on.
The system is turned on each time the vehicle is started.
See Driving and Operating in your Owner's Manual.
Page 5 of 20
5
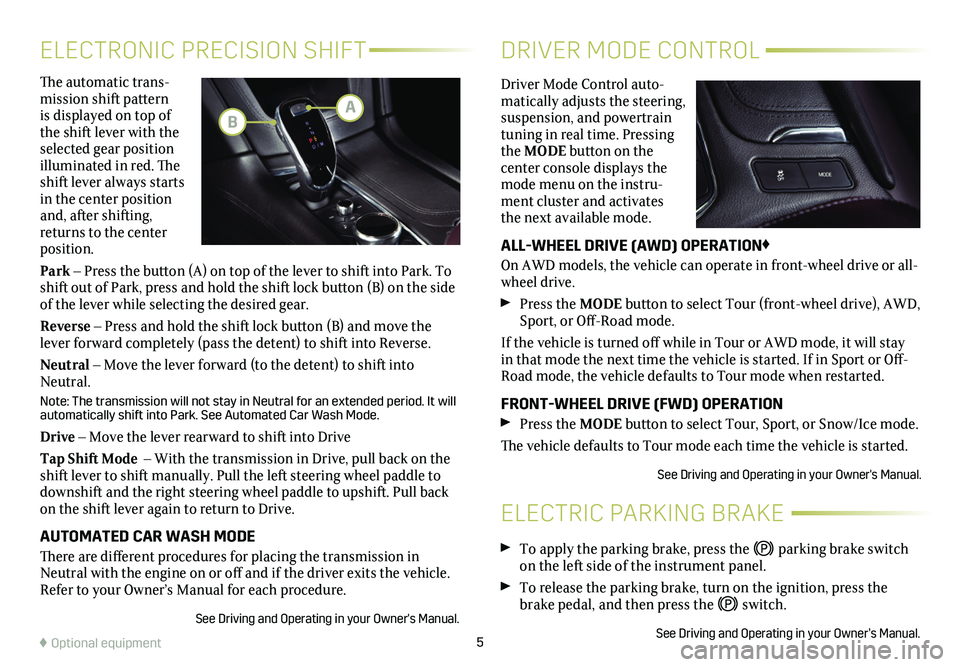
The automatic trans-mission shift pattern is displayed on top of the shift lever with the selected gear position illuminated in red. The shift lever always starts in the center position and, after shifting, returns to the center position.
Park – Press the button (A) on top of the lever to shift into Park. To shift out of Park, press and hold the shift lock button (B) on the side of the lever while selecting the desired gear.
Reverse – Press and hold the shift lock button (B) and move the lever forward completely (pass the detent) to shift into Reverse.
Neutral – Move the lever forward (to the detent) to shift into Neutral.
Note: The transmission will not stay in Neutral for an extended period. It will automatically shift into Park. See Automated Car Wash Mode.
Drive – Move the lever rearward to shift into Drive
Tap Shift Mode – With the transmission in Drive, pull back on the shift lever to shift manually. Pull the left steering wheel paddle to downshift and the right steering wheel paddle to upshift. Pull back on the shift lever again to return to Drive.
AUTOMATED CAR WASH MODE
There are different procedures for placing the transmission in Neutral with the engine on or off and if the driver exits the vehicle. Refer to your Owner’s Manual for each procedure.
See Driving and Operating in your Owner's Manual.
ELECTRONIC PRECISION SHIFT
ELECTRIC PARKING BRAKE
DRIVER MODE CONTROL
Driver Mode Control auto-matically adjusts the steering, suspension, and powertrain tuning in real time. Pressing the MODE button on the
center console displays the mode menu on the instru-ment cluster and activates the next available mode.
ALL-WHEEL DRIVE (AWD) OPERATION♦
On AWD models, the vehicle can operate in front-wheel drive or all-wheel drive.
Press the MODE button to select Tour (front-wheel drive), AWD, Sport, or Off-Road mode.
If the vehicle is turned off while in Tour or AWD mode, it will stay in that mode the next time the vehicle is started. If in Sport or Off-Road mode, the vehicle defaults to Tour mode when restarted.
FRONT-WHEEL DRIVE (FWD) OPERATION Press the MODE button to select Tour, Sport, or Snow/Ice mode.
The vehicle defaults to Tour mode each time the vehicle is started.
See Driving and Operating in your Owner's Manual.
♦ Optional equipment
To apply the parking brake, press the parking brake switch on the left side of the instrument panel.
To release the parking brake, turn on the ignition, press the brake pedal, and then press the switch.
See Driving and Operating in your Owner’s Manual.
AB
Page 6 of 20
6
STEERING WHEEL CONTROLS
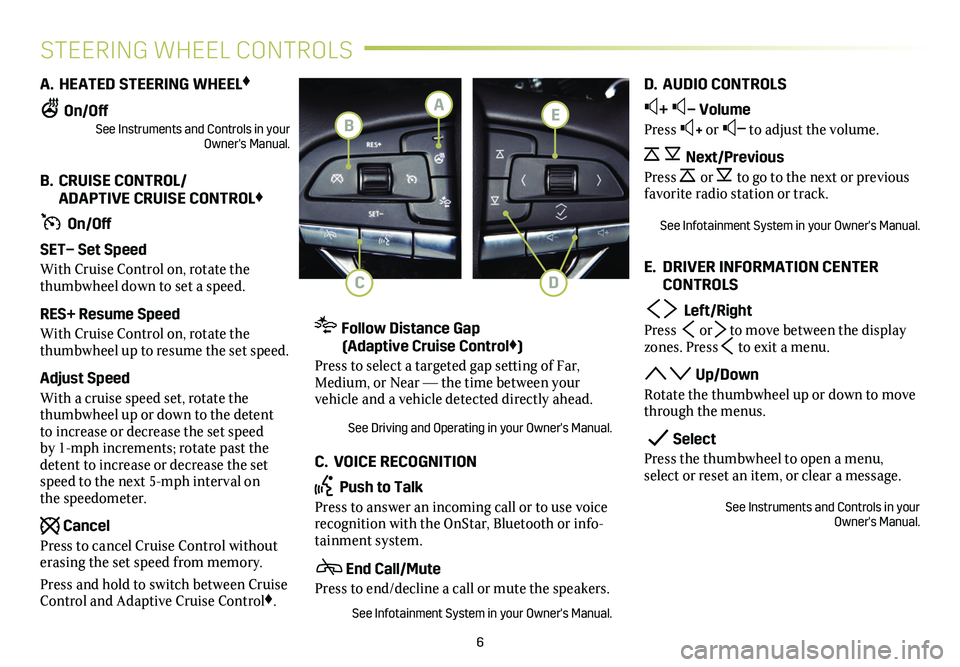
A. HEATED STEERING WHEEL♦
On/OffSee Instruments and Controls in your Owner's Manual.
B. CRUISE CONTROL/ ADAPTIVE CRUISE CONTROL♦
On/Off
SET– Set Speed
With Cruise Control on, rotate the thumbwheel down to set a speed.
RES+ Resume Speed
With Cruise Control on, rotate the thumbwheel up to resume the set speed.
Adjust Speed
With a cruise speed set, rotate the thumbwheel up or down to the detent to increase or decrease the set speed by 1-mph increments; rotate past the detent to increase or decrease the set speed to the next 5-mph interval on the speedometer.
Cancel
Press to cancel Cruise Control without erasing the set speed from memory.
Press and hold to switch between Cruise Control and Adaptive Cruise Control♦.
Follow Distance Gap (Adaptive Cruise Control♦)
Press to select a targeted gap setting of Far, Medium, or Near — the time between your vehicle and a vehicle detected directly ahead.
See Driving and Operating in your Owner's Manual.
C. VOICE RECOGNITION
Push to Talk
Press to answer an incoming call or to use voice
recognition with the OnStar, Bluetooth or info-tainment system.
End Call/Mute
Press to end/decline a call or mute the speakers.
See Infotainment System in your Owner's Manual.
D. AUDIO CONTROLS
+ – Volume
Press + or – to adjust the volume.
Next/Previous
Press or to go to the next or previous favorite radio station or track.
See Infotainment System in your Owner's Manual.
E. DRIVER INFORMATION CENTER CONTROLS
Left/Right
Press or to move between the display zones. Press to exit a menu.
Up/Down
Rotate the thumbwheel up or down to move through the menus.
Select
Press the thumbwheel to open a menu, select or reset an item, or clear a message.
See Instruments and Controls in your Owner's Manual.
E
DC
A
B
Page 7 of 20
7
DRIVER INFORMATION CENTERMULTI-COLOR HEAD-UP DISPLAY♦
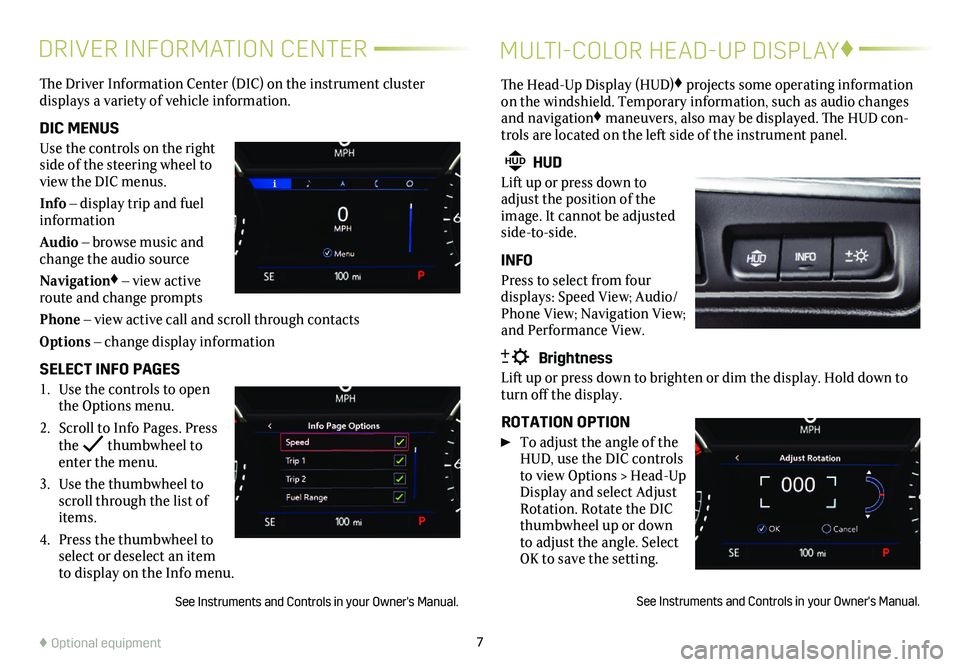
The Driver Information Center (DIC) on the instrument cluster
displays a variety of vehicle information.
DIC MENUS
Use the controls on the right side of the steering wheel to view the DIC menus.
Info – display trip and fuel information
Audio – browse music and change the audio source
Navigation♦ – view active route and change prompts
Phone – view active call and scroll through contacts
Options – change display information
SELECT INFO PAGES
1. Use the controls to open the Options menu.
2. Scroll to Info Pages. Press the thumbwheel to enter the menu.
3. Use the thumbwheel to scroll through the list of items.
4. Press the thumbwheel to select or deselect an item to display on the Info menu.
See Instruments and Controls in your Owner's Manual.
The Head-Up Display (HUD)♦ projects some operating information on the windshield. Temporary information, such as audio changes and navigation♦ maneuvers, also may be displayed. The HUD con-trols are located on the left side of the instrument panel.
HUD HUD
Lift up or press down to adjust the position of the image. It cannot be adjusted side-to-side.
INFO
Press to select from four displays: Speed View; Audio/Phone View; Navigation View; and Performance View.
Brightness
Lift up or press down to brighten or dim the display. Hold down to turn off the display.
ROTATION OPTION
To adjust the angle of the HUD, use the DIC controls to view Options > Head-Up Display and select Adjust Rotation. Rotate the DIC thumbwheel up or down to adjust the angle. Select OK to save the setting.
See Instruments and Controls in your Owner's Manual.
♦ Optional equipment
Page 8 of 20
8
CADILLAC USER EXPERIENCE CONTROLS
Read your Owner's Manual for important information about using the infot\
ainment system while driving.
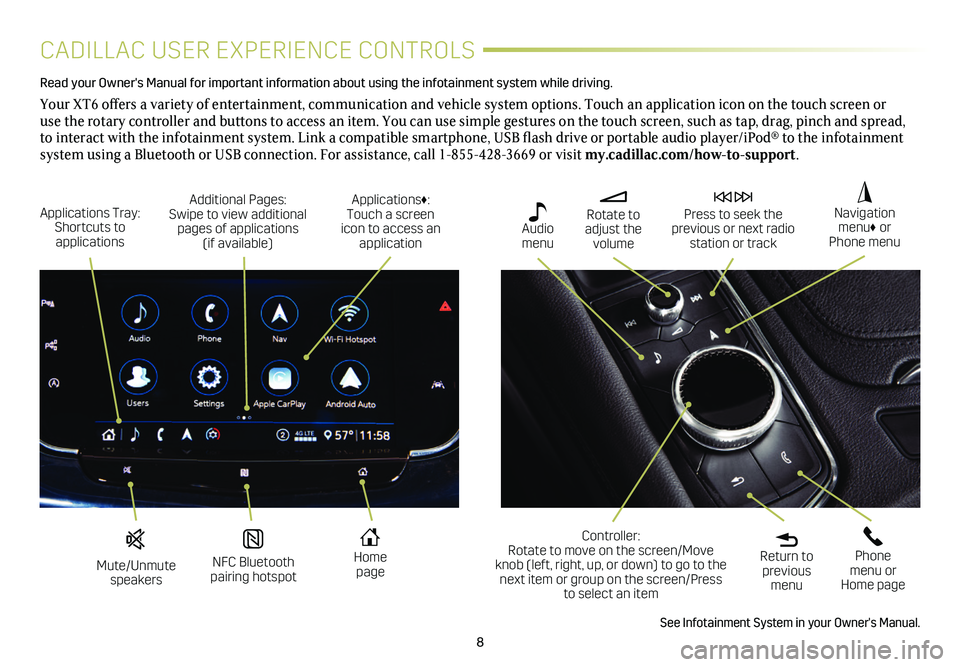
Your XT6 offers a variety of entertainment, communication and vehicle system options. Touch an application icon on the touch screen or use the rotary controller and buttons to access an item. You can use simple gestures on the touch screen, such as tap, drag, pinch and spread, to interact with the infotainment system. Link a compatible smartphone, USB flash drive or portable audio player/iPod® to the infotainment
system using a Bluetooth or USB connection. For assistance, call 1-855-428-3669 or visit my.cadillac.com/how-to-support.
Mute/Unmute speakers
NFC Bluetooth pairing hotspot
Home page
Additional Pages: Swipe to view additional pages of applications (if available)
Applications Tray: Shortcuts to applications
Applications♦: Touch a screen icon to access an application
Rotate to adjust the volume
Press to seek the previous or next radio station or track
Return to previous menu
Controller: Rotate to move on the screen/Move knob (left, right, up, or down) to go to the next item or group on the screen/Press to select an item
Phone menu or Home page
Navigation menu♦ or Phone menu
Audio menu
See Infotainment System in your Owner's Manual.