2021 AUDI Q8 horn
[x] Cancel search: hornPage 8 of 332

Quick access
Quick access
Cockpit
©
©O®OOO
OOOO
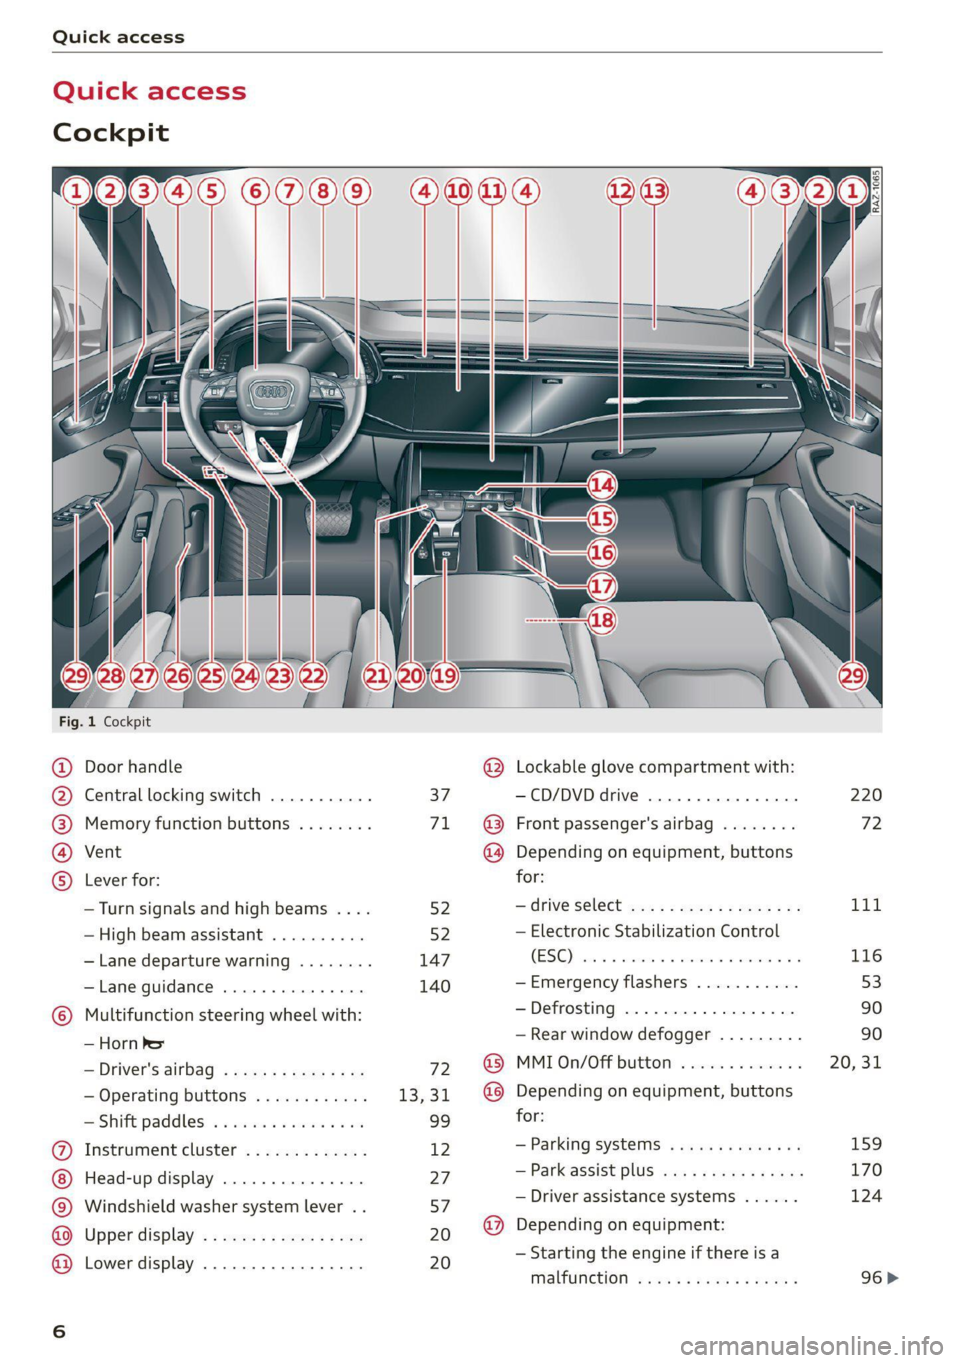
Fig. 1 Cockpit
&
Door handle
Central locking switch
Memory function buttons
Vent
Lever for:
—Turn signals and high beams ....
—High beam assistant ..........
— Lane departure warning
— Lane guidance
Multifunction steering wheel with:
— Horn be
— Driver's airbag
— Operating buttons
= Shift paddles: « « coi e ewes sv ove
Instrument cluster .............
Head-up display ...............
Windshield washer system lever . .
Upper display .................
Lower display .................
® @ @
@®
Lockable glove compartment with:
—CD/DVD drive ...........0005.
Front passenger's airbag
Depending on equipment, buttons
for:
—drive select ...............00.
— Electronic Stabilization Control
(ESC)
— Emergency flashers
— Defrosting
— Rear window defogger .........
MMI On/Off button
Depending on equipment, buttons
for:
— Parking systems
— Park assist plus ...............
— Driver assistance systems ......
Depending on equipment:
— Starting the engine if there is a
malfunction
220
72
01,
116
53
90 90
20, 31
159 170
124
96>
Page 41 of 332

4M8012721BF
Opening and closing
Interior/towing protection monitor
The alarm will be triggered if there are move-
ments detected in the vehicle interior (for exam-
ple, by animals) or if there is a change in the vehi-
cle angle (for example, when the vehicle is being
towed).
You can prevent the alarm from being triggered
by deactivating the interior/towing protection
monitor.
Deactivating the interior/towing protection
monitor
There are the following options for deactivating
the interior/towing protection monitor:
> Press the @ button on the vehicle key a second
time within two seconds. Or
» Applies to: vehicles with convenience key:
Touch the sensor on the door handle a second
time within two seconds. Or
> Turn the mechanical key in the door lock to the
close position a second time within two sec-
onds.
> Applies to: vehicles with MMI: Select on the
home screen: VEHICLE > Settings & Service >
Interior monitoring.
If you lock the vehicle, then the interior/towing
protection monitor will stay off until the next
time the vehicle is unlocked.
ZA\ WARNING
No one, especially children, should stay in the
vehicle when it is locked from the outside, be-
cause the windows can no longer be opened
from the inside. Locked doors make it more
difficult for emergency workers to enter the
vehicle, which puts lives at risk.
@) Tips
The interior/towing protection monitor only
functions correctly when the windows and the
panorama glass roof* are closed.
=
.
:
D
eS oe
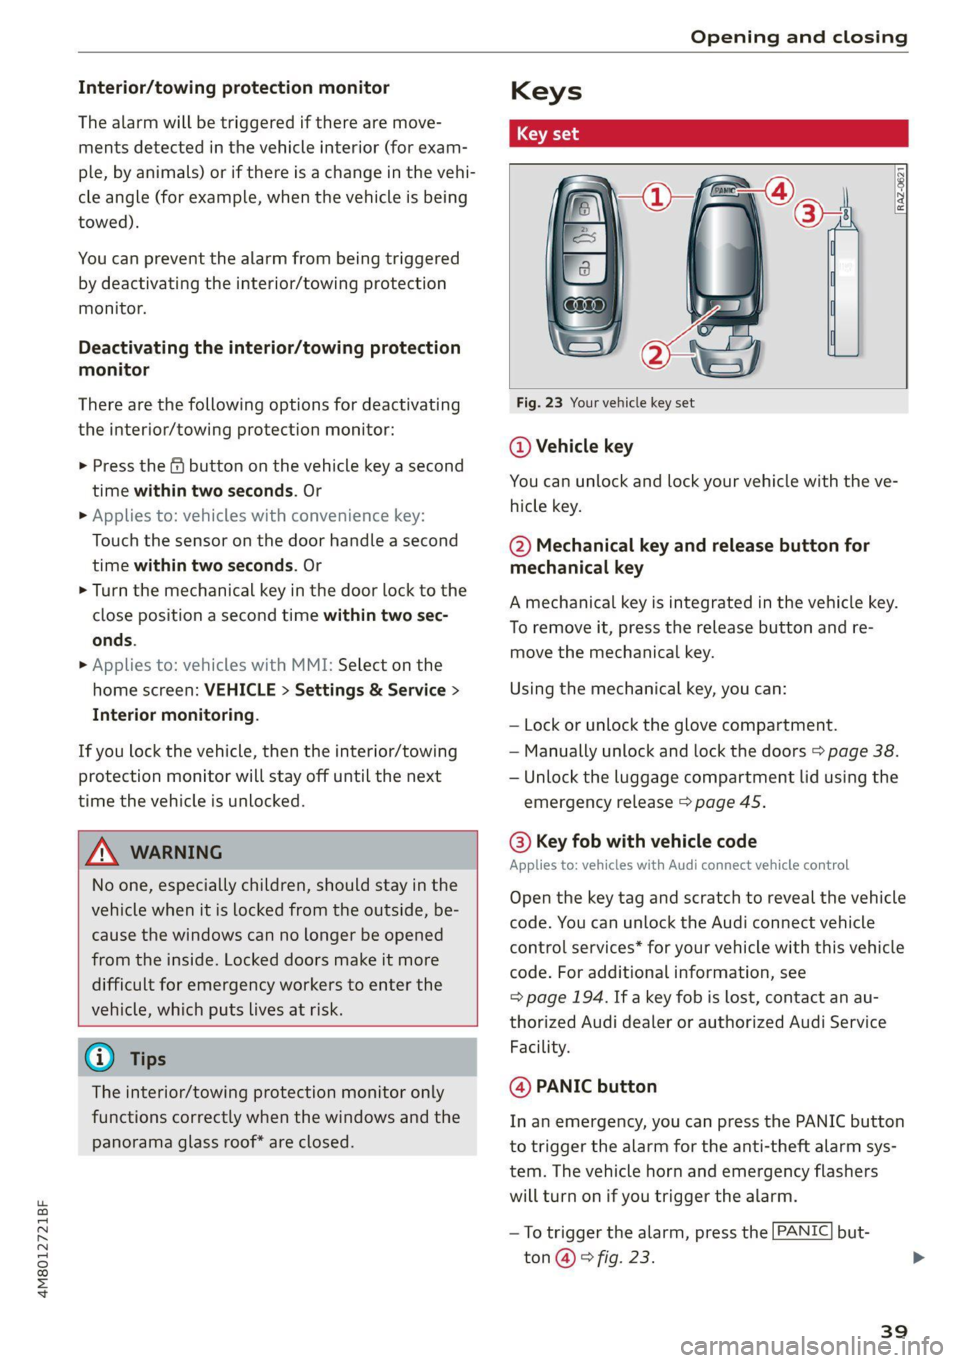
Fig. 23 Your vehicle key set
@ Vehicle key
You can unlock and lock your vehicle with the ve-
hicle key.
@ Mechanical key and release button for
mechanical key
A mechanical key is integrated in the vehicle key.
To remove it, press the release button and re-
move the mechanical key.
Using the mechanical key, you can:
— Lock or unlock the glove compartment.
— Manually unlock and lock the doors > page 38.
— Unlock the luggage compartment lid using the
emergency release > page 45.
@ Key fob with vehicle code
Applies to: vehicles with Audi connect vehicle control
Open the key tag and scratch to reveal the vehicle
code. You can unlock the Audi connect vehicle
control services* for your vehicle with this vehicle
code. For additional information, see
= page 194. If a key fob is lost, contact an au-
thorized Audi dealer or authorized Audi Service
Facility.
@ PANIC button
In an emergency, you can press the PANIC button
to trigger the alarm for the anti-theft alarm sys-
tem. The vehicle horn and emergency flashers
will turn on if you trigger the alarm.
—To trigger the alarm, press the [PANIC] but-
ton @ © fig. 23.
39
Page 298 of 332

Emergency assistance
Preparations
> Only secure the towing cable or tow bar at the
designated towing loops > page 296,
=> page 297.
> Make sure the towing cable is not twisted. Oth-
erwise it could disconnect from the towing loop
while towing.
> Switch the emergency flashers on in both
vehicles > page 53. However, do not do this if it
prohibited by law.
Towing vehicle (front)
> Only start to drive when the towing cable is
taut.
> Press the brake pedal very carefully.
> Avoid sudden braking or driving maneuvers.
Vehicle being towed (rear)
> Make sure the ignition is switched on so that
the steering wheel is not locked and so that you
can use the turn signals, the horn, and the
windshield wipers if needed > /\.
> Switching it off before the vehicle has stopped
may impair the function of the brake booster
and power steering. You would then need to
use more force to steer and brake the vehicle.
> Release the parking brake > page 106.
> Select the “N” selector lever position.
> Make sure the towing cable is always taut.
Z\ WARNING
— Never tow a vehicle using a tow bar or tow-
ing cable if the vehicle does not have electri-
cal power.
— If the vehicle runs out of power while it is
being towed, stop towing the vehicle imme-
diately and consult an authorized Audi deal-
er or qualified repair facility.
296
Front towing loop
Fig. 182 Front bumper: installing the towing loop (version
1)
Fig. 183 Front bumper: installing the towing loop (version
2)
The threaded opening for the towing loop is lo-
cated on the right side of the front bumper.
» Remove the towing loop from the vehicle tool
kit > page 286.
>» Press the cap inward with brief, strong pressure
> fig. 182 or > fig. 183. The cap will loosen
from the bumper.
> Tighten the towing eye as far as it will go into
the mount. Use a suitable object to tighten the
towing eye completely and securely in the
mount.
> After using, place the towing loop back in the
vehicle tool kit.
ZA\ WARNING
If the towing loop is not tightened until it
stops when installing, the threads may be
pulled out when towing the vehicle and result
in an accident. >
Page 302 of 332

Fuses and bulbs
Compressor | 13 | Left headlight
Audi music interface, USB input
4
5 |Engine mount 15 | USB input
6 |Windshield washer system control module
7 LisioTnieNe panel Nas | Equipinent
8 | Climate control system blower T | Ant-theté dlaunsystem
9 |Driver assistance systems control module :
2 | Engine control module
E UL
10. | Emergency 'callsystem 3 | Front seat electronics, lumbar support
11 | Engi
ngine start 4 |Automatic transmission selector lever
Di 5 |Horn
No. | Equipment 6 | Parking brake
1 |Front seat heating 7 |Diagnostic interface
2 |Windshield wipers 8 | Roof electronics control module
3 | Left headlight electronics 9 |48 V drivetrain generator
4 |Panoramic glass roof 10 | Airbag control module
5 |Left front door control module Electronic Stabilization Control (ESC), An-
Il | ‘
6 |Sockets ti-Lock Braking System (ABS)
7 | Right rear door control module 12 | Diagnostic connection, light/rain sensor
9 | Right headlight electronics 13 | Climate control system
10 Windshield washer system/headlight 14 | Right front door control module
washer system control module 15 | Climate control system compressor
11 | Left rear door control module
12 | Parking heater Fuse assignment - left side of cockpit
No. | Equipment
Seat ventilation, seat electronics, rearview
1 mirror, rear climate control system control
panel, diagnostic connection, traffic infor-
mation antenna (TMC)
2 Vehicle electrical system control module,
diagnostic interface
3 |Sound generator Fig. 190 Left side of the cockpit: fuse panel with plastic
4 | Transmission fluid cooling valve ete
5 |Engine start
8 | Night vision assist, active roll stabilization 5
No. | Equipment
9 |Adaptive cruise assist, front wheel sensors - -
2. |Audi phone box, exterior antenna
10 | Exterior sound generator 5
3 | Climate control system, fragrance system
Intersection assistant, driver assist sys- .
11 4 |Head-up display
tems
5
7d
Steering column lock
300