2021 AUDI Q2 S drive
[x] Cancel search: S drivePage 25 of 364

Instruments and controls
CO
<
O
rN
r>
I-I
00
Telephone
Applies to: vehicles with telephone
Important: A mobile phone must be connected
to the MMI
^>page
173, and the telephone tab
must be displayed.
•
Press the
\M
button or the left control button
^>page
16, depending on the equipment in
your vehicle.
The following functions are available on the driv
er information system, depending on the vehicle
equipment:
- To call a contact: Select and confirm Call list /
Favourites / Directory. Select and confirm a
contact.
- Directory contacts: Only directory contacts for
which a telephone number is stored are dis
played in the driver information system. If sev
eral telephone numbers are stored for one
con
tact, the list of stored telephone numbers is
displayed first when the contact is selected. For
more information on the symbols displayed, re
fer to
^>page
185.
- Call list: The call lists contain all received,
placed and missed calls.
- Caller information*: Depending on whether the
caller is stored in the directory and whether the
telephone number is transmitted with the
call,
the name, the telephone number or Unknown
wilL
appear on the display of the driver informa
tion system.
Functions for an incoming call
- To answer a
call:
Press the left thumbwheel
when there is an incoming
call.
- To ignore a
call:
Select and confirm Ignore
when there is an incoming
call.
- To end a
call:
SeLect and confirm End
call.
Functions during a call
Applies to: vehicles with analogue instrument cluster
- To make a further
call:
Select Hold >
\M\
button
> Directory or Call list
>
entry in
list.
- To answer a further call when you are talking
on the phone and have another call on hold:
Select and confirm Replace. The current call
will be replaced by the incoming
call.
Applies to: vehicles with Audi virtual cockpit
- To make a further
call:
Select Hold > left
con
trol button > Directory or Call list
>
entry in
list.
- To answer a further call when you are talking
on the phone and have another call on hold:
Select and confirm Answer. The current call will
be replaced by the incoming
call.
Other functions are:
Microphone off: If
you
select and confirm this
option,
the caller will no longer be able to hear
you;
you will still be able to hear the caller.
Hold/Resume: You can put
a
call on hold and re
trieve
it
from the hold queue later.
Switch:
You can switch between two phone calls
(one of them will be on hold at any given time).
Select End call to end whichever call is active.
The call on hold will remain in the hold queue
and can be retrieved by selecting Resume.
Conference: Up to five callers and one caller on
hold can take part in a conference (depending on
the mobile network provider). To set up a further
call,
select Hold to place all the members of an
existing conference on
hold.
You can then press
the left control button to place another call to a
contact in the directory or the call list. Select Re
sume if
you
want to retrieve all participants in an
existing conference from the hold queue.
- The functions of the telephone can be oper
ated using the multi-function steering
wheel only if the telephone equipment was
installed at the factory.
- The functions of the telephone depend on
your mobile phone and whether they are
supported
by
your mobile network service
provider.
- The option Call waiting must be activated
on your mobile phone and on the MMI for
you to be made aware of incoming calls dur
ing a conversation. The call options depend
on your mobile network service provider.
For more information, contact your service
provider.
23
Page 26 of 364

Instruments and controls
Navigation
Applies to: vehicles with navigation system
Important: The navigation tab must be dis
played.
If route guidance has not been started, the driver
information system display will show
a
compass.
On vehicles with the Audi virtual cockpit*, the
map will be displayed.
•
Press the
HH
button or the left control button
o^page
16, depending on the equipment in
your vehicle.
The following functions are available on the driv
er information system, depending on the vehicle
equipment:
- To call up recent destinations: Select and
con
firm Last destinations > desired destination.
- To call up favourites*: Select and confirm Fa
vourites
>
desired destination.
Applies to: vehicles with analogue instrument cluster
- To display the navigation screen when route
guidance is active: Select and confirm Route
guidance.
- To display the compass when route guidance
is not active: SeLect and confirm Compass.
- To start route guidance to the stored home
address: If applicable, first select and confirm
Stop route guidance, and then select Favour
ites > Home address.
- To cancel the active route guidance: Select and
confirm Stop route guidance.
Applies to: vehicles with Audi virtual cockpit
- To start route guidance to the stored home
address: If applicable, first select and confirm
Stop route guidance, and then select Favour
ites > Home address.
- To cancel the active route guidance: Select
right control button > Stop route guidance.
Other settings
Applies to: vehicles with Audi virtual cockpit
- Select: right control button > desired
entry.
The following settings are available depending
on the equipment on your vehicle and on which
function is selected:
- Map colours
^page
221
- Map orientation
^>page
221
- Automatic zoom
^>page
221
Navigation view when route guidance is
started
Applies to: vehicles with navigation system and Audi virtual
cockpit
1
Fig.
17 Illustration: Standard map when route guidance is
activated (Audi virtual cockpit)
Important: A destination must have been en
tered
Opage
208, the route guidance function
must have been started, and the navigation tab
must be displayed.
Depending on the vehicle equipment and on the
view selected
Opage
17, the following informa
tion is displayed on the driver information sys
tem.
(Ï) Map contents (e.g. special destinations or
traffic information)
(2) Current vehicle position
(@)
(D A bar graph appears when you approach a
turn-off. The fewer bars are displayed, the short
er the distance to the turn-off point. If there is
no impending turn-off, the remaining distance to
the destination/stopover is shown on the right-
hand speedometer along with the estimated ar
rival time.
(4) Name of the street you are currently on.
- Map display
^>page
221
24
Page 27 of 364
Instruments and controls
CO
s
rN rN
I-I
00
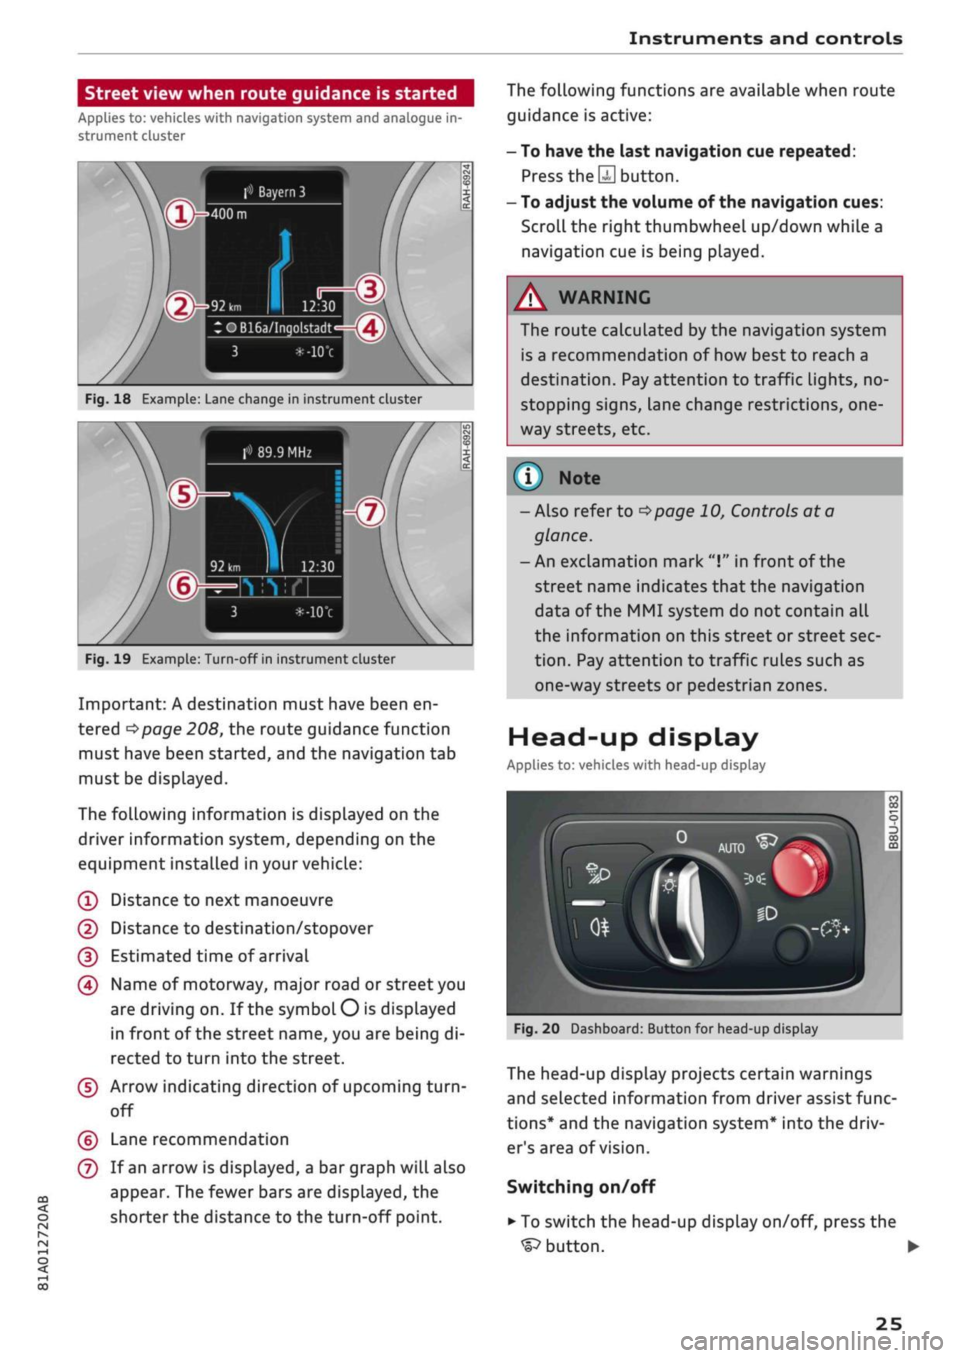
Street view when route guidance is started
Applies to: vehicles with navigation system and analogue in
strument cluster
f»
Bayern
3
:OB16a/Inqolstadt
Fig.
18 Example: Lane change in instrument cluster
> 89.9 MHz
Fig.
19 Example: Turn-off in instrument cluster
Important: A destination must have been en
tered
^>page
208, the route guidance function
must have been started, and the navigation tab
must be displayed.
The following information is displayed on the
driver information system, depending on the
equipment installed in your vehicle:
(T)
Distance to next manoeuvre
@
Distance to destination/stopover
(D Estimated time of arrival
(4) Name of motorway, major road or street you
are driving on. If the symbol
O
is displayed
in front of the street name, you are being di
rected to turn into the street.
(5) Arrow indicating direction of upcoming
turn-
off
(?) Lane recommendation
(7) If an arrow is displayed, a bar graph will also
appear. The fewer bars are displayed, the
shorter the distance to the turn-off point.
The following functions are available when route
guidance is active:
- To have the last navigation cue repeated:
Press
the S
button.
- To adjust the volume of the navigation cues:
Scroll the right thumbwheel up/down while a
navigation cue is being played.
A
WARNING
The route calculated by the navigation system
is a recommendation of how best to reach a
destination. Pay attention to traffic lights, no-
stopping signs, lane change restrictions,
one
way streets, etc.
(T)
Note
- Also refer to
^>page
10, Controls at a
glance.
- An exclamation mark
"I"
in front of the
street name indicates that the navigation
data of the MMI system do not contain all
the information on this street or street sec
tion.
Pay attention to traffic rules such as
one-way streets or pedestrian zones.
Head-up display
Applies to: vehicles with head-up display
Fig.
20 Dashboard: Button for head-up display
The head-up display projects certain warnings
and selected information from driver assist func
tions*
and the navigation system* into the driv
er's area of vision.
Switching on/off
• To switch the head-up display on/off, press the
^button.
•
25
Page 28 of 364

Instruments and controls
Height adjustment
The height of the head-up display can be adjus
ted to your individual requirements.
•
Sit in the correct position in your seat
•=>
page 265.
• Turn the
Settings on infotainment system
•
Select the following on the infotainment sys
tem:
IMENU|
button > Car
>
left control button
> Driver assist
>
Head-up display.
Display contents
The settings on the infotainment system allow
you to specify which information is shown in the
display. Possible options include navigation mes
sages*, adaptive cruise control* and camera-
based traffic sign recognition*.
The display of certain information and some of
the red warning lamps cannot be deactivated on
the infotainment system.
Brightness
You can adjust the brightness of the display via
the infotainment system. In addition, the display
brightness is reduced automatically as the
day
light starts to fade. The basic level of brightness
is determined by the instrument lighting setting
•=>
page 53.
© CAUTION
Do not place any objects over the opening for
the head-up display to avoid scratching the
glass cover.
© Note
- The display may be harder to see in unfav
ourable light conditions or if
you
are wear
ing polarised sunglasses.
- To be able to see the display as clearly as
possible, adjust the position of your seat
and the height setting for the head-up dis
play.
- Notes on cleaning
^tab.
Cleaning the inte
rior on page 314.
Warning and indicator
Lamps
Description
The warning and indicator lamps light up or flash
in the instrument cluster to indicate functions or
faults.
Some of the warning and indicator lamps may be
accompanied by a driver message. The warning
display will be accompanied by the corresponding
warning chime. The warning/indicator lamps and
driver messages on the instrument
duster
dis
play can be masked by further displays. You can
have them displayed again on the driver informa
tion system* by calling up the second tab (driver
messages) via the
\<±\
button on the multi-func
tion steering wheel. If several malfunctions have
occurred,
you can use the Left thumbwheel to
scroll through them on the display.
Some of the warning lamps may be displayed in
different colours.
âs
Central warning/indicator lamps
If the warning/indicator lamp
|g or pq
lights
up,
observe the additional information on the in
strument cluster display.
Applies
to: vehicles with monochrome display
If
a
driver message appears and a central warn
ing [amp
Kfl/central
indicator
lamp^S
lights up,
the central warning/indicator lamp indicates the
priority level of the warning. If
a
white indicator
lamp also appears, the central warning/indicator
lamp indicates its actual colour. For example, if
g
lights up with
H.
read the description for
Overview
When you switch on the ignition, some of the
warning and indicator lamps Light up briefly to
show that the associated systems are working
properly. These systems are marked with a
•/
in
the following tables. If one of these warning/in
dicator lamps does not light up, there is a fault in
the associated system. •
26
Page 30 of 364

Instruments and controls
B
<$*
Fuel tank system
^page
35
Washer fluid level
^>page
35
1
Windscreen wipers
Éyal 1 ^poge
35
9~o
3
<£>
B-c
Sa
«D
Remote control key*
^>page
77
Driver's
door*
Opage
35
Battery in remote control key
^>page
38
Bulb monitor*
•=>
page 35
Headlight range control*
^>page
35
HP 1
Adaptive light*
^J |^poge35
gp
o
©-•
«•
@!
8
y
v
rs}
^* ^
v_^
AdBlue^
£2
Light sensor/rain sensor*
^>page
36
Gearbox (automatic gearbox)
^page
92,
Clutch (manual gearbox)
^>page
32
Steering lock
^>page
32
Engine start system
^>page
32
Electro-mechanical power steering
<=>page
148
Suspension control*
opage
36
Active lane assist*
\^>page
124
Side assist*
^>page
131
Pre sense*
^>page
122
AdBlue*
opage
292
AdBlue*
<^>page
292
28
Further indicator lamps
0
*
A
&
v*
f)
•
inn
LIM
jr~\.
Ë-?
e
ê
^=r
&
É?k*
f)
1 V
(®)
fi£
)
09
orit
fn
<=^c
o
Turn signals
^>page
36
Trailer turn signals*
^>page
36
Rear seat belt*
/
<3page
31
Cruise control system*
^>page
104
Speed Limiter*
ï>page
106
Adaptive cruise control*
^>page
113
Adaptive cruise control*
^>page
113
Adaptive cruise control*
^>page
113
Adaptive cruise control*
^>page
114
Active lane assist*
^>page
124
Hold assist*
^>page
84
Start/stop system*
<^page
79
Start/stop system*
^•page
79
Convenience key*
^page
79
Engine start system
<=>page
32
Gearbox
ï>page
92
Electro-mechanical parking brake
^>page
30
Electro-mechanical parking brake
^>page
30
Hold assist*
^>page
84
Page 31 of 364

Instruments and controls
^^
CQ
<
O
rN
iv
rN
•-i
00
Hill hold assist
^>page
33
Rear seat belt
/
^>page
31
Rear seat belt
/
^>page
31
Child lock
(electric)*
cépage
46
AdBlue*
^page
292
Kfl I ^
page 122
Rest recommendation*
^>page
110
Speed warning function*
cépage
104
Cruise control system*
^>page
104
Speed limiter*
^>page
106
Park assist*
^>page
139
Park assist*
^>page
139
Adaptive cruise control*
^>page
114
Adaptive cruise control*
tapage
114
Active Lane assist*
tapage
124
Side assist*
tapage
131
Pre sense*
Camera-based traffic sign recogni
tion*
^>
page 108
Main beam assist*
^>
page 50
Main beam headLights
Pipage
50
(©) Brake system
If the warning Lamp Lights up, there is a fault in
the brake system.
| Stop vehicle and check brake fluid level
Stop the vehicle and check the brake fluid level.
Obtain professional assistance if necessary.
| Warning! Brake servo inoperative!
You need to apply much more force to operate
the brakes if the brake servo fails. Obtain profes
sional assistance.
| Brakes: fault. Safely stop vehicle
If the warning lamp lights up and the message
appears, there is a fault in the brake servo.
If the ABS indicator lamp
[g]
and ESC indicator
lamp
I^J
light up together with the brake warn
ing
Lamp||
and this driver message appears,
the ABS, ESC and brake force distribution sys
tems have failed
•=> A-
Do not drive on. Please seek professional assis
tance
^A-
| Parking brake system fault! See owner's
manual
- If the warning lamp and the message appear
after you switch on the ignition when the ve
hicle is stationary, please check whether you
can release the parking brake. If the parking
brake cannot be released you should obtain
professional assistance. If the parking brake
can be released but the message
stilL
appears,
drive to a qualified workshop without delay and
have the fault rectified.
- If the warning lamp and the message appear
while driving, there may be a malfunction in
the parking brake auto release or the emergen
cy brake functions. You may not be able to ap
ply or release the parking brake. Do not park
the car on a gradient. Obtain professional assis
tance.
Brake servo: restricted. You can continue driv
ing.
Please contact workshop
There is a fault with the brake servo. The brake
servo remains available with reduced capacity.
29
Page 32 of 364

Instruments
and
controls
The brakes
may
perform differently than usual
and
the
brake pedal may vibrate.
Drive
to
a qualified workshop without delay
and
have
the
fault rectified.
A WARNING
- Before opening
the
bonnet and checking
the
brake fluid level, observe
the
warning infor
mation
on
*$page
295,
Working
on
compo
nents
in the
engine compartment.
-
If
the brake warning lamp does
not go out,
or
if it
lights up when driving,
the
brake
flu
id level in
the
reservoir
is too low -
this
may
cause an increased accident risk. Stop
the
vehicle and
do not
drive on. Obtain profes
sional assistance.
-
If
the brake warning lamp lights
up
togeth
er with
the
ABS indicator lamp and
the
ESC
indicator lamp, this can mean that
the
con
trol function
of
the ESC/ABS
is not
working.
Input from
the
functions that stabilise
the
vehicle
is no
longer available. This could
cause
the
tail of
the vehicle
to
skid
side
ways.
Do not
drive on. Obtain professional
assistance.
(®)/0
Electro-mechanical parking brake
The warning lamp
||
lights
up
when
the
parking
brake
is
applied.
If the warning lamp
||
flashes, insufficient brak
ing force
has
been applied
or
released. Select
first gear (manual gearbox)
or
position
P
(auto
matic gearbox)
as an
additional safeguard. Make
sure that
the
warning lamp has gone
out
before
you drive
off.
2J
Parking brake!
There
is
a malfunction
in the
parking brake. Drive
to a qualified workshop soon
and
have
the
fault
rectified.
[ft]
Parking brake auto release: unavailable
If this message appears, press
the
brake pedal
and then release
the
parking brake.
If the warning lamp flashes and
the
message
ap
pears,
the
brake
may not be
strong enough
to
hold
the
vehicle. The brakes have overheated.
The vehicle can roll away, even
on a
gentle slope.
©J Parking brake is applied
If this message appears, press
the
brake pedal
and then reLease
the
parking brake
as
necessary.
For further information
on the
parking brake
refer
to
^>page
82.
•as
Cooling system
| Switch
off
engine and check coolant level.
See owner's manual
The coolant level
is too low.
Switch
off
the engine and
do not
drive on. Check
the coolant level
^>page
299.
-
If
the coolant level
is too
low, add more coolant
^>page
300. Do not
drive
on
until
the
warning
lamp has gone
out.
| Coolant temperature too high! Let engine
run with vehicle stationary
Let
the
engine cool down
by
running
it at
idling
speed
for
a
few
minutes until
the
warning lamp
goes
out.
-
Do not
drive
on if
the warning lamp does
not
disappear. Obtain professional assistance.
JgJ
Caution:
Vehicle parked
too
steep
A WARNING
- Never open
the
bonnet
if
you
can see
or
hear
steam
or
coolant escaping from
the
engine
compartment; there
is
a risk
of
being
scal
ded.
Wait until you
can no
longer see
or
hear escaping steam
or
coolant.
-The engine compartment
of
any motor
vehi
cle
is
a dangerous place. Before carrying
out
any work
in the
engine compartment, switch
off the engine and allow
it to
cool down.
Please observe
the
important safety warn
ings
^>page
295,
Working
on
components
in
the
engine compartment.
30
Page 33 of 364

Instruments and controls
© CAUTION
CO
<
O
rN
iv
rN
•-i
00
Do not drive on if the warning lamp || lights
up;
otherwise there is a risk of engine dam
age.
t^
Engine oil pressure
| Switch off engine! Oil pressure too low
Switch off the engine and do not drive on. Check
the engine oil level
^>page
298.
- If the engine oil level is too low, add more oil
tapage
297. Do not drive on until the warning
lamp has gone out.
-If the engine oil level is OK
but
the warning
lamp still lights up, switch off the engine and
do not drive on. Obtain professional assistance.
© Note
The oil pressure warning lamp is not an
indi
cator for the oil level. The oil level should
therefore be checked regularly.
C3
Alternator/vehicle battery
| Electrical system: fault. Battery is not being
charged
There is an alternator fault or a fault in the
vehi
cle's electrical system.
Drive to a qualified workshop without delay.
However, you should avoid using electrical equip
ment that is not absolutely necessary because
this will drain the battery. If the battery charge is
insufficient, obtain professional assistance.
S
Electrical system: fault. Please contact
workshop
Drive to a qualified workshop without delay.
Avoid using electrical equipment that is not abso
lutely necessary (such as the radio) because this
will drain the battery. If the battery charge is in
sufficient, obtain professional assistance.
y
Electrical system: low battery charge. Bat
tery will be charged while driving
Starting reliability may be impaired.
If this message disappears after a while, the ve
hicle battery will have been sufficiently charged
while driving.
If the message does not disappear again, drive to
a qualified workshop without delay and have the
fault rectified.
2f
Safety systems
The indicator lamp
terns.
monitors the safety sys-
If
the indicator lamp
Ej
lights up or flashes,
there is a malfunction in one of the safety sys
tems.
Drive to a qualified workshop without delay and
have the fault rectified.
A
WARNING
Have the safety systems examined without
delay; otherwise they may fail to trigger in an
accident - this could result in serious or possi
bly fatal injury.
A
Front seat belt
The warning lamp|| lights up and does not go
out until the driver's and front passenger's* seat
belts have been fastened. When the vehicle has
gathered speed you will also hear a warning
chime.
Note
For further information on the seat belts
•=>
page 275.
y/4
Rear seat belt
Applies to: vehicles with seat belt warning system (rear seats)
If a rear seat belt is buckled/unbuckled, the cor
responding indicator Lamp Lights up briefly.
||
- If the indicator lamp lights up briefly, the
corresponding rear seat is not occupied.
|/RI|-
If the indicator lamp lights up briefly,
the rear seat belt has been fastened.
| /
KJ
"
Ifthe
warning lamp flashes, the seat
belt has been unbuckled with the vehicle moving.
31