2021 ALFA ROMEO STELVIO child seat
[x] Cancel search: child seatPage 185 of 280
183
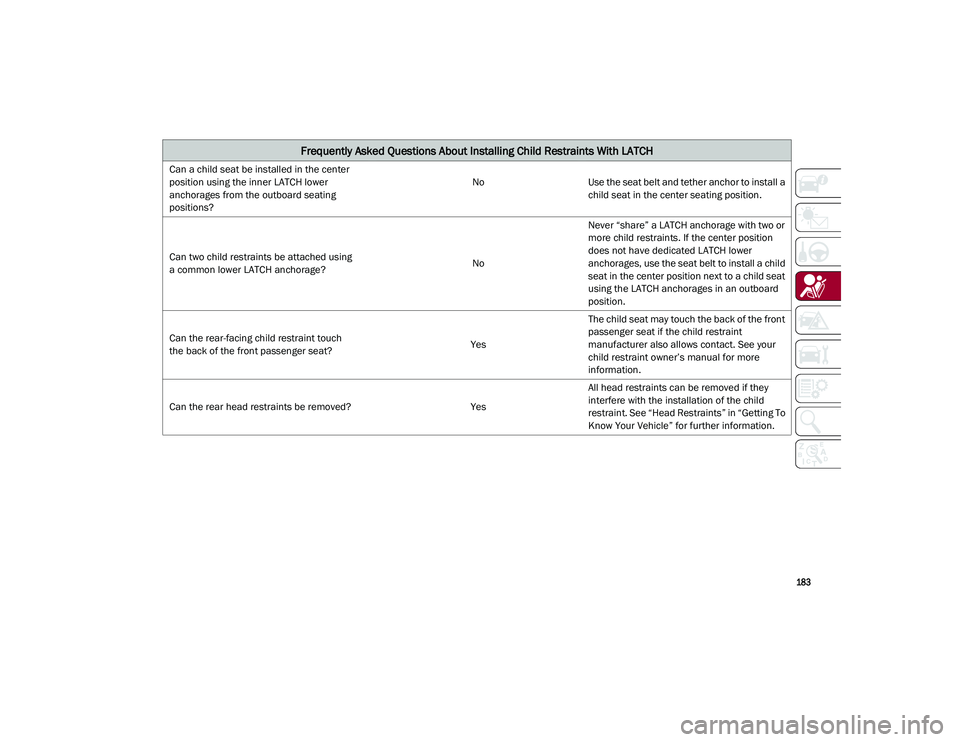
Can a child seat be installed in the center
position using the inner LATCH lower
anchorages from the outboard seating
positions? No
Use the seat belt and tether anchor to install a
child seat in the center seating position.
Can two child restraints be attached using
a common lower LATCH anchorage? NoNever “share” a LATCH anchorage with two or
more child restraints. If the center position
does not have dedicated LATCH lower
anchorages, use the seat belt to install a child
seat in the center position next to a child seat
using the LATCH anchorages in an outboard
position.
Can the rear-facing child restraint touch
the back of the front passenger seat? YesThe child seat may touch the back of the front
passenger seat if the child restraint
manufacturer also allows contact. See your
child restraint owner’s manual for more
information.
Can the rear head restraints be removed? YesAll head restraints can be removed if they
interfere with the installation of the child
restraint. See “Head Restraints” in “Getting To
Know Your Vehicle” for further information.
Frequently Asked Questions About Installing Child Restraints With LATCH
21_GU_OM_EN_USC_t.book Page 183
Page 186 of 280
SAFETY
184
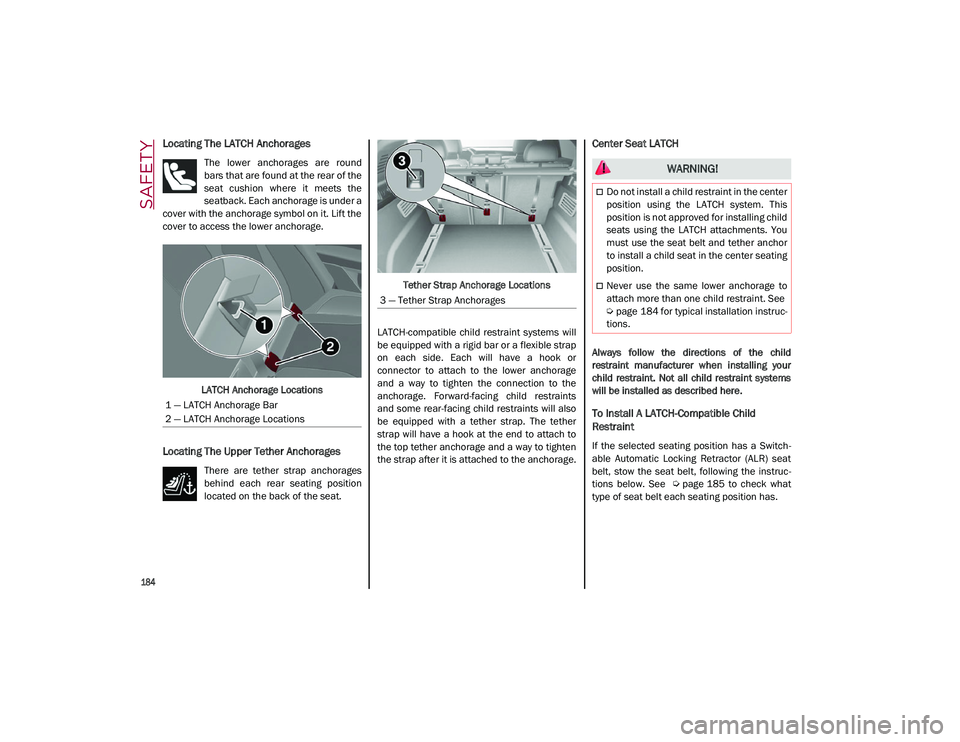
Locating The LATCH Anchorages
The lower anchorages are round
bars that are found at the rear of the
seat cushion where it meets the
seatback. Each anchorage is under a
cover with the anchorage symbol on it. Lift the
cover to access the lower anchorage.
LATCH Anchorage Locations
Locating The Upper Tether Anchorages
There are tether strap anchorages
behind each rear seating position
located on the back of the seat. Tether Strap Anchorage Locations
LATCH-compatible child restraint systems will
be equipped with a rigid bar or a flexible strap
on each side. Each will have a hook or
connector to attach to the lower anchorage
and a way to tighten the connection to the
anchorage. Forward-facing child restraints
and some rear-facing child restraints will also
be equipped with a tether strap. The tether
strap will have a hook at the end to attach to
the top tether anchorage and a way to tighten
the strap after it is attached to the anchorage.
Center Seat LATCH
Always follow the directions of the child
restraint manufacturer when installing your
child restraint. Not all child restraint systems
will be installed as described here.
To Install A LATCH-Compatible Child
Restraint
If the selected seating position has a Switch -
able Automatic Locking Retractor (ALR) seat
belt, stow the seat belt, following the instruc -
tions below. See
Ú
page 185 to check what
type of seat belt each seating position has.
1 — LATCH Anchorage Bar
2 — LATCH Anchorage Locations
3 — Tether Strap Anchorages
WARNING!
Do not install a child restraint in the center
position using the LATCH system. This
position is not approved for installing child
seats using the LATCH attachments. You
must use the seat belt and tether anchor
to install a child seat in the center seating
position.
Never use the same lower anchorage to
attach more than one child restraint. See
Ú
page 184 for typical installation instruc -
tions.
21_GU_OM_EN_USC_t.book Page 184
Page 187 of 280
185
(Continued)
1. Loosen the adjusters on the lower strapsand on the tether strap of the child seat so
that you can more easily attach the hooks
or connectors to the vehicle anchorages.
2. Place the child seat between the lower anchorages for that seating position. If the
second row seat can be reclined, you may
recline the seat and/or raise the head
restraint (if adjustable) to get a better fit. If
the rear seat can be moved forward and
rearward in the vehicle, you may wish to
move it to its rear-most position to make
room for the child seat. You may also move
the front seat forward to allow more room
for the child seat.
3. Attach the lower hooks or connectors of the child restraint to the lower anchorages
in the selected seating position.
4. If the child restraint has a tether strap, connect it to the top tether anchorage. See
Ú
page 187 for directions to attach a
tether anchor.
5. Tighten all of the straps as you push the child restraint rearward and downward
into the seat. Remove slack in the straps
according to the child restraint manufac -
turer’s instructions.
6. Test that the child restraint is installed tightly by pulling back and forth on the
child seat at the belt path. It should not
move more than 1 inch (25.4 mm) in any
direction.How To Stow An Unused Switchable-ALR
(ALR) Seat Belt:
When using the LATCH attaching system to
install a child restraint, stow all ALR seat belts
that are not being used by other occupants or
being used to secure child restraints. An
unused belt could injure a child if they play
with it and accidentally lock the seat belt
retractor. Before installing a child restraint
using the LATCH system, buckle the seat belt
behind the child restraint and out of the child’s
reach. If the buckled seat belt interferes with
the child restraint installation, instead of buck -
ling it behind the child restraint, route the seat
belt through the child restraint belt path and
then buckle it. Do not lock the seat belt.
Remind all children in the vehicle that the seat
belts are not toys and that they should not play
with them.
Installing Child Restraints Using The Vehicle
Seat Belt
Child restraint systems are designed to be
secured in vehicle seats by lap belts or the lap
belt portion of a lap/shoulder belt.
The seat belts in the passenger seating posi -
tions are equipped with a Switchable Auto -
matic Locking Retractor (ALR) that is designed
to keep the lap portion of the seat belt tight
around the child restraint so that it is not
necessary to use a locking clip. The ALR
retractor can be “switched” into a locked
mode by pulling all of the webbing out of the
WARNING!
Improper installation of a child restraint to
the LATCH anchorages can lead to failure
of the restraint. The child could be badly
injured or killed. Follow the child restraint
manufacturer’s directions exactly when
installing an infant or child restraint.
Child restraint anchorages are designed
to withstand only those loads imposed by
correctly-fitted child restraints. Under no
circumstances are they to be used for
adult seat belts, harnesses, or for
attaching other items or equipment to the
vehicle.
WARNING!
Improper installation or failure to properly
secure a child restraint can lead to failure
of the restraint. The child could be badly
injured or killed.
Follow the child restraint manufacturer’s
directions exactly when installing an
infant or child restraint.
WARNING! (Continued)
21_GU_OM_EN_USC_t.book Page 185
Page 188 of 280
SAFETY
186
retractor and then letting the webbing retract
back into the retractor. If it is locked, the ALR
will make a clicking noise while the webbing is
pulled back into the retractor.
Refer to the “Automatic Locking Mode”
description on
Ú
page 168 for additional
information on ALR.
Please see the table below and the following
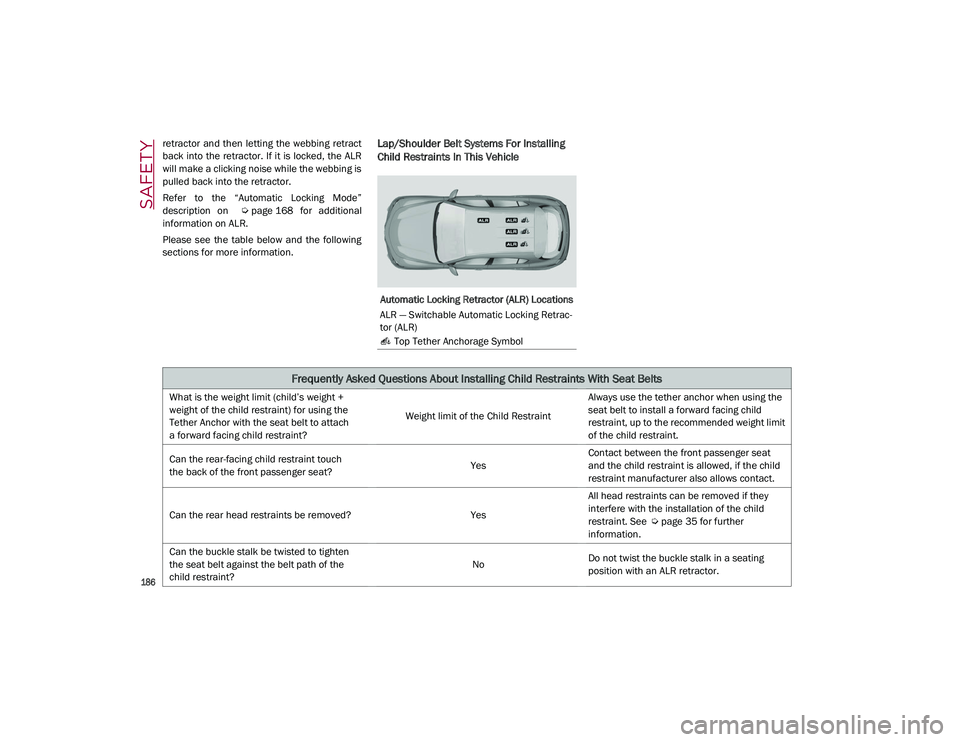
sections for more information.Lap/Shoulder Belt Systems For Installing
Child Restraints In This Vehicle
Automatic Locking Retractor (ALR) Locations
ALR — Switchable Automatic Locking Retrac -
tor (ALR)
Top Tether Anchorage Symbol
Frequently Asked Questions About Installing Child Restraints With Seat Belts
What is the weight limit (child’s weight +
weight of the child restraint) for using the
Tether Anchor with the seat belt to attach
a forward facing child restraint? Weight limit of the Child RestraintAlways use the tether anchor when using the
seat belt to install a forward facing child
restraint, up to the recommended weight limit
of the child restraint.
Can the rear-facing child restraint touch
the back of the front passenger seat? YesContact between the front passenger seat
and the child restraint is allowed, if the child
restraint manufacturer also allows contact.
Can the rear head restraints be removed? YesAll head restraints can be removed if they
interfere with the installation of the child
restraint. See
Ú
page 35 for further
information.
Can the buckle stalk be twisted to tighten
the seat belt against the belt path of the
child restraint? No
Do not twist the buckle stalk in a seating
position with an ALR retractor.
21_GU_OM_EN_USC_t.book Page 186
Page 189 of 280
187
Installing A Child Restraint With A
Switchable Automatic Locking Retractor
(ALR):
Child restraint systems are designed to be
secured in vehicle seats by lap belts or the lap
belt portion of a lap/shoulder belt.
1. Place the child seat in the center of theseating position. If the second row seat
can be reclined, you may recline the seat
and/or raise the head restraint (if adjust-
able) to get a better fit. If the rear seat can
be moved forward and rearward in the
vehicle, you may wish to move it to its
rear-most position to make room for the
child seat. You may also move the front
seat forward to allow more room for the
child seat.
2. Pull enough of the seat belt webbing from the retractor to pass it through the belt
path of the child restraint. Do not twist the
belt webbing in the belt path. 3. Slide the latch plate into the buckle until
you hear a “click.”
4. Pull on the webbing to make the lap portion tight against the child seat.
5. To lock the seat belt, pull down on the shoulder part of the belt until you have
pulled all the seat belt webbing out of the
retractor. Then, allow the webbing to
retract back into the retractor. As the
webbing retracts, you will hear a clicking
sound. This means the seat belt is now in
the Automatic Locking mode.
6. Try to pull the webbing out of the retractor. If it is locked, you should not be able to pull
out any webbing. If the retractor is not
locked, repeat step 5.
7. Finally, pull up on any excess webbing to tighten the lap portion around the child
restraint while you push the child restraint
rearward and downward into the vehicle
seat.
8. If the child restraint has a top tether strap and the seating position has a top tether
anchorage, connect the tether strap to the
anchorage and tighten the tether strap.
See
Ú
page 187 for directions to attach a
tether anchor.
9. Test that the child restraint is installed tightly by pulling back and forth on the
child seat at the belt path. It should not move more than 1 inch (25.4 mm) in any
direction.
Any seat belt system will loosen with time, so
check the belt occasionally, and pull it tight if
necessary.
Installing Child Restraints Using The Top
Tether Anchorage: WARNING!
Improper installation or failure to properly
secure a child restraint can lead to failure
of the restraint. The child could be badly
injured or killed.
Follow the child restraint manufacturer’s
directions exactly when installing an
infant or child restraint.
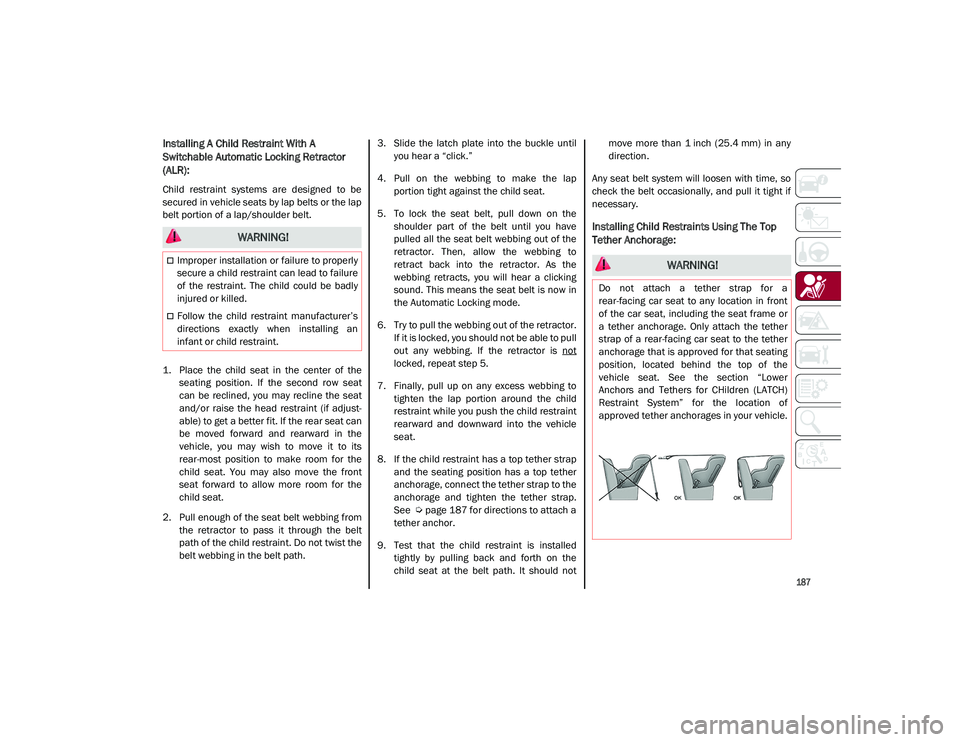
WARNING!
Do not attach a tether strap for a
rear-facing car seat to any location in front
of the car seat, including the seat frame or
a tether anchorage. Only attach the tether
strap of a rear-facing car seat to the tether
anchorage that is approved for that seating
position, located behind the top of the
vehicle seat. See the section “Lower
Anchors and Tethers for CHildren (LATCH)
Restraint System” for the location of
approved tether anchorages in your vehicle.
21_GU_OM_EN_USC_t.book Page 187
Page 190 of 280
SAFETY
188
(Continued)
1. Look behind the seating position where youplan to install the child restraint to find the
tether anchorage. You may need to move the
seat forward to provide better access to the
tether anchorage. If there is no top tether
anchorage for that seating position, move the
child restraint to another position in the
vehicle if one is available.
2. Route the tether strap to provide the most direct path for the strap between the anchor
and the child seat. If your vehicle is equipped
with adjustable rear head restraints, raise the
head restraint, and where possible, route the
tether strap under the head restraint and
between the two posts. If not possible, lower
the head restraint and pass the tether strap
around the outboard side of the head
restraint.
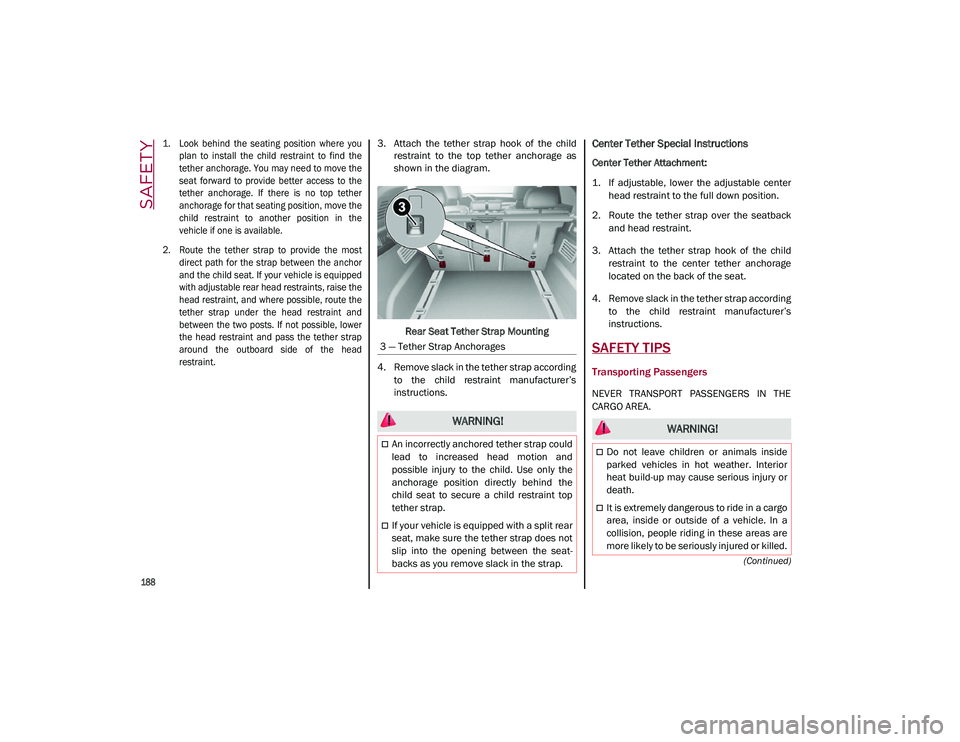
3. Attach the tether strap hook of the child
restraint to the top tether anchorage as
shown in the diagram.
Rear Seat Tether Strap Mounting
4. Remove slack in the tether strap according to the child restraint manufacturer’s
instructions.Center Tether Special Instructions
Center Tether Attachment:
1. If adjustable, lower the adjustable centerhead restraint to the full down position.
2. Route the tether strap over the seatback and head restraint.
3. Attach the tether strap hook of the child restraint to the center tether anchorage
located on the back of the seat.
4. Remove slack in the tether strap according to the child restraint manufacturer’s
instructions.
SAFETY TIPS
Transporting Passengers
NEVER TRANSPORT PASSENGERS IN THE
CARGO AREA.
3 — Tether Strap Anchorages
WARNING!
An incorrectly anchored tether strap could
lead to increased head motion and
possible injury to the child. Use only the
anchorage position directly behind the
child seat to secure a child restraint top
tether strap.
If your vehicle is equipped with a split rear
seat, make sure the tether strap does not
slip into the opening between the seat
-
backs as you remove slack in the strap.
WARNING!
Do not leave children or animals inside
parked vehicles in hot weather. Interior
heat build-up may cause serious injury or
death.
It is extremely dangerous to ride in a cargo
area, inside or outside of a vehicle. In a
collision, people riding in these areas are
more likely to be seriously injured or killed.
21_GU_OM_EN_USC_t.book Page 188
Page 271 of 280

269
A
Accessories Purchased By The Owner.......... 4
Active Blind Spot Assist .............................152
Active Safety Systems ................................ 145
Active Torque Vectoring (ATV) System ......145
Adaptive Cruise Control (ACC)
(Cruise Control) .................................104, 106Off ........................................................... 108
On............................................................108
Additives, Fuel ............................................ 261
Adjust Forward.............................................. 31, 33
Rearward ........................................... 31, 33
Air Bag......................................................... 170 Air Bag Operation ...................................171Air Bag Warning Light ............................169
Driver Knee Air Bag................................ 172Enhanced Accident Response .....175, 207
Event Data Recorder (EDR) ...................207
Front Air Bag...........................................170
If Deployment Occurs ............................175
Knee Impact Bolsters ............................172
Maintaining Your Air Bag System.......... 177
Maintenance ..........................................177
Redundant Air Bag Warning Light.........170
Side Air Bags ..........................................172
Transporting Pets...................................189
Air Bag Light ......................................169, 189
Air Pressure Tires ........................................................240
Alfa Active Suspension (AAS).....................101
Alfa DNA System .......................................... 98
Antifreeze (Engine Coolant) ....................... 262
Anti-Lock Braking (ABS) System ................ 145
Anti-Lock Warning Light ............................... 75 Automatic Climate Controls ........................ 49
Automatic Dimming Mirror .......................... 37
Automatic Door Locks ................................. 27
Automatic Headlights .................................. 43
Automatic Temperature Control (ATC)........ 49
Automatic Transmission .............................. 92
Auxiliary Driving Systems .......................... 149
Auxiliary Power Outlet .................................. 56
B
Battery ................................................. 78, 217 Charging System Light ............................ 78
Keyless Key Fob Replacement ............... 18
Battery Recharging .................................... 218
Belts, Seat .................................................. 189
Blind Spot Monitoring ................................ 150
Bodywork (Cleaning And Maintenance) ... 249
B-Pillar Location ......................................... 237
Brake System Warning Light .....................................74, 75
Brakes ........................................................ 255 Brake Fluid Level ................................... 217
Brightness, Interior Lights ........................... 46
Bulbs, Light ................................................ 190
C
Camera, Rear ............................................. 132
Capacities, Fluid ........................................ 262
Carbon Monoxide Warning ............... 190, 191
Certification Label...................................... 135
Chart, Tire Sizing ........................................ 234
Check Engine Light (Malfunction
Indicator Light) ............................................. 85
Checking Levels ................................ 214, 215
Checking Your Vehicle For Safety ............. 188 Checks, Safety ........................................... 188
Child Restraint ........................................... 178
Child Restraints
Booster Seats ........................................ 180
Child Seat Installation........................... 187
How To Stow An unused ALR Seat Belt ..................................................... 185
Infant And Child Restraints................... 179
LATCH Positions .................................... 182
Lower Anchors And Tethers For Children ............................................. 181
Older Children And Child Restraints .... 179
Seating Positions................................... 181
Clean Air Gasoline ..................................... 260
Cleaning Wheels ................................................... 245
Climate Control ...................................... 48, 54 Automatic..................................................49
Compact Spare Tire................................... 245
Contract, Service ....................................... 267
Cooling System Cooling Capacity .................................... 262
Selection Of Coolant (Antifreeze) ......... 262
Cruise Control (Speed Control) ........ 104, 106
Customer Assistance ................................ 266
D
Daytime Running Lights ...............................42
Defroster, Windshield ............................... 189
Dimensions ................................................ 257
Disabled Vehicle Towing ........................... 205
Door Ajar ................................................ 79, 80
Door Ajar Light ....................................... 79, 80
Door Locks ....................................................27 Automatic..................................................27
21_GU_OM_EN_USC_t.book Page 269
Page 273 of 280
271
J
Jump Starting ............................................. 201
K
Keyless Enter-N-Go ...................................... 25Passive Entry ............................................ 25
Keys .............................................................. 18
L
Lane Change And Turn Signals ................... 44
LaneSense ..................................................126
Lap/Shoulder Belts ....................................164
Latches .......................................................190
Leaks, Fluid ................................................190
Life Of Tires.................................................243
Liftgate .......................................................... 62
Light Bulbs ..................................................190 Types Of Bulbs ....................................... 230
Lights .......................................................... 190 Air Bag ...........................................169, 189
Automatic Headlights .............................. 43
Brake Warning .................................. 74, 75Courtesy/Reading ............................. 45, 46Daytime Running ..................................... 42
Electronic Stability Program(ESP) Indicator ............................................... 79
Exterior ................................................... 190
Fog ............................................................ 44
Headlight Switch ............................... 42, 43 Headlights ......................................... 42, 43
High Beam ................................................ 43
Instrument Cluster ............................ 42, 43Intensity Control ....................................... 46
Interior ............................................... 45, 46
Low Fuel ................................................... 80 Malfunction Indicator (Check Engine).... 77
Map .......................................................... 45
Park ....................................................44, 78
Reading .................................................... 45
Seat Belt Reminder ................................. 75
Turn Signals ..............................44, 78, 190
Warning Instrument Cluster
Descriptions ...................................78, 79
Loading Vehicle .......................................... 135 Tires ........................................................ 237
Locks Automatic Door ........................................ 27
Child Protection ....................................... 27
M
Maintenance ................................................ 61
Malfunction Indicator Light
(Check Engine) .......................................77, 85
Manual Service.................................................... 268
Memory Feature (Memory Seats) ............... 30
Memory Seat ................................................ 30
Methanol .................................................... 260
Mirrors .......................................................... 37 Automatic Dimming ................................. 37
Electric Powered ...................................... 38
Electric Remote ....................................... 38
Heated...................................................... 39
O
Occupant Restraints .................................. 163
Oil Pressure Light ......................................... 79
Oil, Engine Capacity.................................................. 262
Pressure Warning Light ........................... 79 Recommendation.................................. 262
Viscosity ................................................. 262
Opener, Garage Door (Homelink) ................39
Operator Manual Owner's Manual..................................... 268
Outlet Power ........................................................ 56
Overheating, Engine .................................. 204
P
Paintwork (Cleaning And Maintenance) .. 250
Panic Brake Assist (PBA) System ............. 149
Park Assist ................................................. 123
ParkSense System .................................... 123
Passive Entry ................................................25
Pets ............................................................ 189
Placard, Tire And Loading Information .... 237
Power Mirrors.......................................................38Outlet (Auxiliary Electrical Outlet)............56
Seats .........................................................33
Sunroof .....................................................59
Power Seats Forward .............................................. 31, 33
Rearward ........................................... 31, 33
Recline ............................................... 31, 33
Power Supply ............................................. 255
Pregnant Women And Seat Belts ............. 167
Pretensioners Seat Belts .............................................. 167
Prolonged Vehicle Inactivity ...................... 249
R
Radial Ply Tires .......................................... 242
Radio Transmitters And Mobile Phones ....... 5
21_GU_OM_EN_USC_t.book Page 271