2021 ALFA ROMEO STELVIO light
[x] Cancel search: lightPage 178 of 280
SAFETY
176
NOTE:
After an accident, remember to cycle the igni-
tion to the OFF position and remove the key
from the ignition switch to avoid draining the
battery. Carefully check the vehicle for fuel
leaks in the engine compartment and on the
ground near the engine compartment and fuel
tank before resetting the system and starting
the engine. If there are no fuel leaks or
damage to the vehicle electrical devices (e.g.
headlights) after an accident, reset the system by following the procedure described below. If
you have any doubt, contact an authorized
dealer.
Enhanced Accident Response System
Reset Procedure
After the event occurs, when the system is
active, a message regarding fuel cutoff is
displayed. Turn the ignition switch from igni
-
tion ACC or ON/RUN to ignition OFF. Carefully
check the vehicle for fuel leaks in the engine compartment and on the ground near the
engine compartment and fuel tank before
resetting the system and starting the engine.
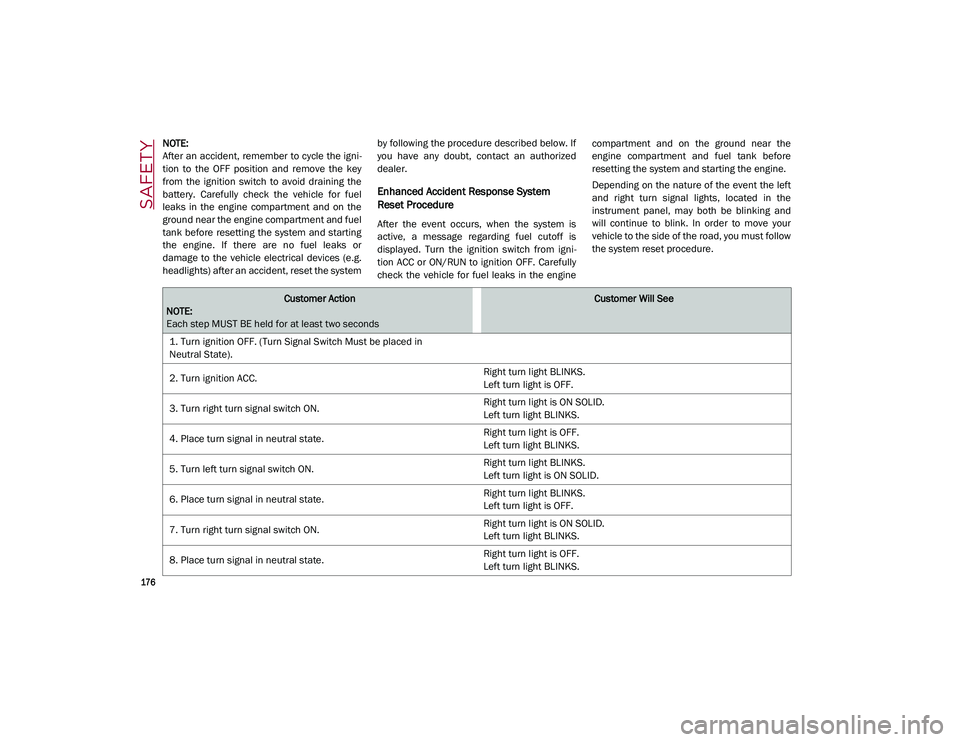
Depending on the nature of the event the left
and right turn signal lights, located in the
instrument panel, may both be blinking and
will continue to blink. In order to move your
vehicle to the side of the road, you must follow
the system reset procedure.
Customer Action
NOTE:
Each step MUST BE held for at least two secondsCustomer Will See
1. Turn ignition OFF. (Turn Signal Switch Must be placed in
Neutral State).
2. Turn ignition ACC. Right turn light BLINKS.
Left turn light is OFF.
3. Turn right turn signal switch ON. Right turn light is ON SOLID.
Left turn light BLINKS.
4. Place turn signal in neutral state. Right turn light is OFF.
Left turn light BLINKS.
5. Turn left turn signal switch ON. Right turn light BLINKS.
Left turn light is ON SOLID.
6. Place turn signal in neutral state. Right turn light BLINKS.
Left turn light is OFF.
7. Turn right turn signal switch ON. Right turn light is ON SOLID.
Left turn light BLINKS.
8. Place turn signal in neutral state. Right turn light is OFF.
Left turn light BLINKS.
21_GU_OM_EN_USC_t.book Page 176
Page 179 of 280
177
(Continued)
(Continued)
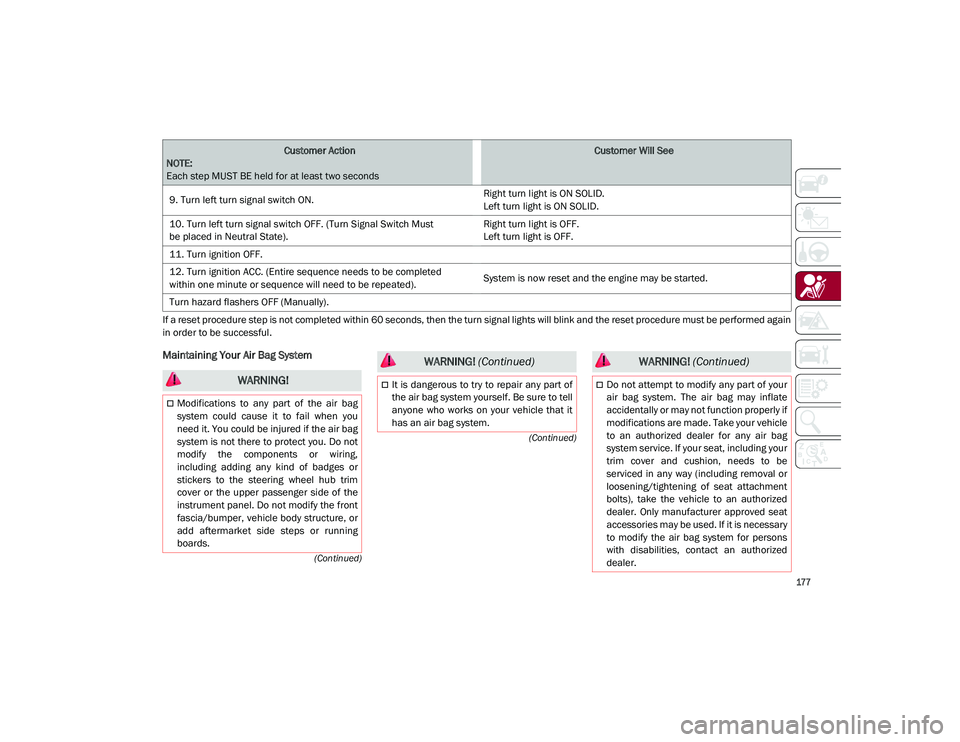
If a reset procedure step is not completed within 60 seconds, then the turn signal lights will blink and the reset procedure must be performed again
in order to be successful.
Maintaining Your Air Bag System
9. Turn left turn signal switch ON. Right turn light is ON SOLID.
Left turn light is ON SOLID.
10. Turn left turn signal switch OFF. (Turn Signal Switch Must
be placed in Neutral State). Right turn light is OFF.
Left turn light is OFF.
11. Turn ignition OFF.
12. Turn ignition ACC. (Entire sequence needs to be completed
within one minute or sequence will need to be repeated). System is now reset and the engine may be started.
Turn hazard flashers OFF (Manually).
Customer Action
NOTE:
Each step MUST BE held for at least two secondsCustomer Will See
WARNING!
Modifications to any part of the air bag
system could cause it to fail when you
need it. You could be injured if the air bag
system is not there to protect you. Do not
modify the components or wiring,
including adding any kind of badges or
stickers to the steering wheel hub trim
cover or the upper passenger side of the
instrument panel. Do not modify the front
fascia/bumper, vehicle body structure, or
add aftermarket side steps or running
boards.
It is dangerous to try to repair any part of
the air bag system yourself. Be sure to tell
anyone who works on your vehicle that it
has an air bag system.
WARNING! (Continued)
Do not attempt to modify any part of your
air bag system. The air bag may inflate
accidentally or may not function properly if
modifications are made. Take your vehicle
to an authorized dealer for any air bag
system service. If your seat, including your
trim cover and cushion, needs to be
serviced in any way (including removal or
loosening/tightening of seat attachment
bolts), take the vehicle to an authorized
dealer. Only manufacturer approved seat
accessories may be used. If it is necessary
to modify the air bag system for persons
with disabilities, contact an authorized
dealer.
WARNING! (Continued)
21_GU_OM_EN_USC_t.book Page 177
Page 191 of 280
189
(Continued)
Transporting Pets
Air Bags deploying in the front seat could harm
your pet. An unrestrained pet will be thrown
about and possibly injured, or injure a
passenger during panic braking or in a colli-
sion.
Pets should be restrained in the rear seat (if
equipped) in pet harnesses or pet carriers that
are secured by seat belts.
Safety Checks You Should Make Inside The
Vehicle
Seat Belts
Inspect the seat belt system periodically,
checking for cuts, frays, and loose parts.
Damaged parts must be replaced immedi -
ately. Do not disassemble or modify the
system.
Front seat belt assemblies must be replaced
after a collision. Rear seat belt assemblies
must be replaced after a collision if they have
been damaged (i.e., bent retractor, torn
webbing, etc.). If there is any question regarding seat belt or retractor condition,
replace the seat belt.
Air Bag Warning Light
The Air Bag warning light will turn on for
four to eight seconds as a bulb check when the
ignition switch is first turned to ON/RUN. If the
light is either not on during starting, stays on,
or turns on while driving, have the system
inspected at an authorized dealer as soon as
possible. After the bulb check, this light will
illuminate with a single chime when a fault
with the Air Bag System has been detected. It
will stay on until the fault is removed. If the
light comes on intermittently or remains on
while driving, have an authorized dealer
service the vehicle immediately
Ú
page 163.
Defroster
Check operation by selecting the defrost mode
and place the blower control on high speed.
You should be able to feel the air directed
against the windshield. See an authorized
dealer for service if your defroster is inoper -
able.
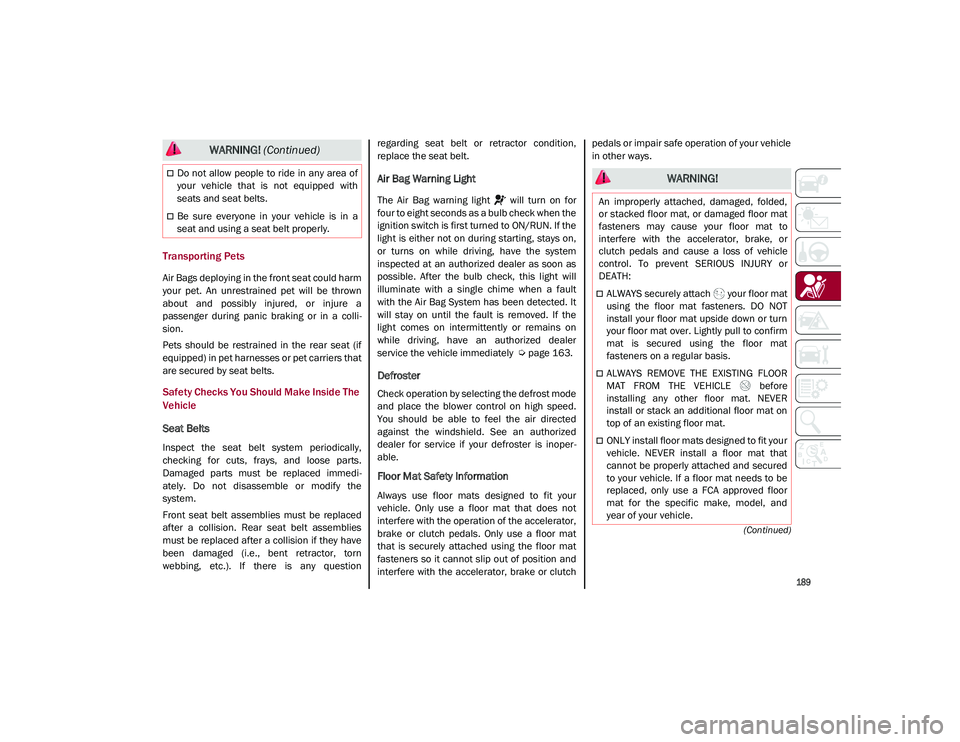
Floor Mat Safety Information
Always use floor mats designed to fit your
vehicle. Only use a floor mat that does not
interfere with the operation of the accelerator,
brake or clutch pedals. Only use a floor mat
that is securely attached using the floor mat
fasteners so it cannot slip out of position and
interfere with the accelerator, brake or clutch pedals or impair safe operation of your vehicle
in other ways.
Do not allow people to ride in any area of
your vehicle that is not equipped with
seats and seat belts.
Be sure everyone in your vehicle is in a
seat and using a seat belt properly.
WARNING!
(Continued)
WARNING!
An improperly attached, damaged, folded,
or stacked floor mat, or damaged floor mat
fasteners may cause your floor mat to
interfere with the accelerator, brake, or
clutch pedals and cause a loss of vehicle
control. To prevent SERIOUS INJURY or
DEATH:
ALWAYS securely attach your floor mat
using the floor mat fasteners. DO NOT
install your floor mat upside down or turn
your floor mat over. Lightly pull to confirm
mat is secured using the floor mat
fasteners on a regular basis.
ALWAYS REMOVE THE EXISTING FLOOR
MAT FROM THE VEHICLE before
installing any other floor mat. NEVER
install or stack an additional floor mat on
top of an existing floor mat.
ONLY install floor mats designed to fit your
vehicle. NEVER install a floor mat that
cannot be properly attached and secured
to your vehicle. If a floor mat needs to be
replaced, only use a FCA approved floor
mat for the specific make, model, and
year of your vehicle.
21_GU_OM_EN_USC_t.book Page 189
Page 192 of 280
SAFETY
190
(Continued)
(Continued)
Periodic Safety Checks You Should Make
Outside The Vehicle
Tires
Examine tires for excessive tread wear and
uneven wear patterns. Check for stones, nails,
glass, or other objects lodged in the tread or
sidewall. Inspect the tread for cuts and cracks.
Inspect sidewalls for cuts, cracks, and bulges.
Check the wheel nuts for tightness. Check the
tires (including spare) for proper cold inflation
pressure.
Lights
Have someone observe the operation of brake
lights and exterior lights while you work the controls. Check turn signal and high beam
indicator lights on the instrument panel.
Door Latches
Check for proper closing, latching, and locking.
Fluid Leaks
Check area under the vehicle after overnight
parking for fuel, coolant, oil, or other fluid
leaks. Also, if gasoline fumes are detected or if
fuel, or brake fluid leaks are suspected, the
cause should be located and corrected imme
-
diately.
Exhaust Gas
ONLY use the driver’s side floor mat on the
driver’s side floor area. To check for inter -
ference, with the vehicle properly parked
with the engine off, fully depress the
accelerator, the brake, and the clutch
pedal (if present) to check for interfer -
ence. If your floor mat interferes with the
operation of any pedal, or is not secure to
the floor, remove the floor mat from the
vehicle and place the floor mat in your
trunk.
ONLY use the passenger’s side floor mat
on the passenger’s side floor area.
ALWAYS make sure objects cannot fall or
slide into the driver’s side floor area when
the vehicle is moving. Objects can become
trapped under accelerator, brake, or
clutch pedals and could cause a loss of
vehicle control.
NEVER place any objects under the floor
mat (e.g., towels, keys, etc.). These
objects could change the position of the
floor mat and may cause interference with
the accelerator, brake, or clutch pedals.
WARNING! (Continued)
If the vehicle carpet has been removed
and re-installed, always properly attach
carpet to the floor and check the floor mat
fasteners are secure to the vehicle carpet.
Fully depress each pedal to check for
interference with the accelerator, brake,
or clutch pedals then re-install the floor
mats.
It is recommended to only use mild soap
and water to clean your floor mats. After
cleaning, always check your floor mat has
been properly installed and is secured to
your vehicle using the floor mat fasteners
by lightly pulling mat.
WARNING! (Continued)
WARNING!
Exhaust gases can injure or kill. They
contain carbon monoxide (CO), which is
colorless and odorless. Breathing it can
make you unconscious and can eventually
poison you. To avoid breathing (CO), follow
these safety tips:
Do not run the engine in a closed garage
or in confined areas any longer than
needed to move your vehicle in or out of
the area.
If you are required to drive with the trunk/lift -
gate/rear doors open, make sure that all
windows are closed and the climate control
BLOWER switch is set at high speed. DO NOT
use the recirculation mode.
21_GU_OM_EN_USC_t.book Page 190
Page 195 of 280
193
To Use SOS - Emergency Call
Push and hold the SOS - Emergency Call
button for a few seconds. The LED, located
next to the SOS button, will blink once and
then stay on indicating a call has been placed.
NOTE:
If the SOS - Emergency Call button is acciden-
tally pushed, there is a 10 second delay before
the call is placed. The system will issue a
verbal alert that a call is about to be made. To
cancel the call connection, push the SOS -
Emergency Call button again.
Once a connection between the vehicle and an
emergency service operator is made, the SOS
- Emergency Call system will transmit the
following important vehicle information to the
operator:
Indication that the occupant placed an SOS
- Emergency Call.
The Vehicle Identification Number (VIN).
The last known GPS coordinates of the
vehicle.
You will then be able to speak with the emer -
gency service operator to determine if addi -
tional help is needed.
The SOS - Emergency Call has priority over
other audio sources, which will be muted. If
you have a phone connected via Bluetooth, it
is disconnected and reconnected at the end of
the SOS - Emergency Call. Voice prompts will
guide you during the SOS - Emergency Call. If a connection is made between an emergency
service operator and your vehicle, emergency
service operators may record conversations
and sounds within your vehicle once a connec
-
tion is made, and by using the service you
consent to having this information shared.
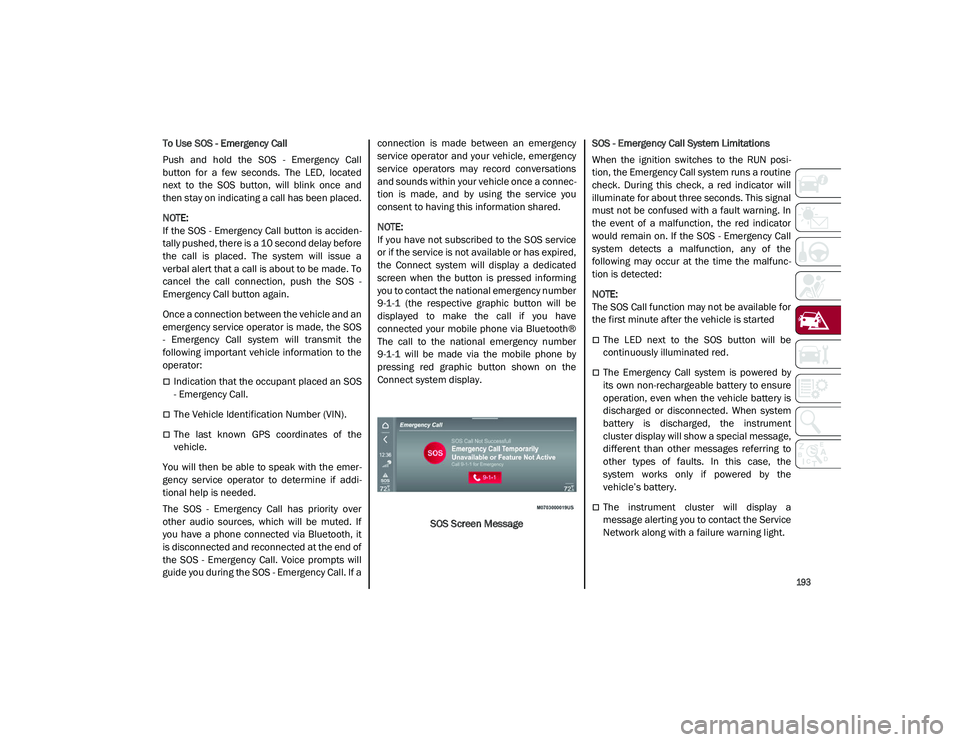
NOTE:
If you have not subscribed to the SOS service
or if the service is not available or has expired,
the Connect system will display a dedicated
screen when the button is pressed informing
you to contact the national emergency number
9-1-1 (the respective graphic button will be
displayed to make the call if you have
connected your mobile phone via Bluetooth®
The call to the national emergency number
9-1-1 will be made via the mobile phone by
pressing red graphic button shown on the
Connect system display.
SOS Screen Message SOS - Emergency Call System Limitations
When the ignition switches to the RUN posi
-
tion, the Emergency Call system runs a routine
check. During this check, a red indicator will
illuminate for about three seconds. This signal
must not be confused with a fault warning. In
the event of a malfunction, the red indicator
would remain on. If the SOS - Emergency Call
system detects a malfunction, any of the
following may occur at the time the malfunc -
tion is detected:
NOTE:
The SOS Call function may not be available for
the first minute after the vehicle is started
The LED next to the SOS button will be
continuously illuminated red.
The Emergency Call system is powered by
its own non-rechargeable battery to ensure
operation, even when the vehicle battery is
discharged or disconnected. When system
battery is discharged, the instrument
cluster display will show a special message,
different than other messages referring to
other types of faults. In this case, the
system works only if powered by the
vehicle’s battery.
The instrument cluster will display a
message alerting you to contact the Service
Network along with a failure warning light.
21_GU_OM_EN_USC_t.book Page 193
Page 196 of 280
IN CASE OF EMERGENCY
194
(Continued)
Even if the SOS - Emergency Call system is fully
functional, external or uncontrolled factors
may prevent or stop SOS - Emergency Call
operation. These include, but are not limited
to, the following factors:
The ignition is in OFF position.
The vehicle’s electrical systems are not
intact.
The SOS - Emergency Call system software
and/or hardware is damaged during a
vehicle collision.
There are network problems that could limit
or impair service operation (e.g., error by
operator, busy network, bad weather, etc.).
If the vehicle battery connection fails due to a
collision or accident, the system can support
an SOS - Emergency Call for a limited period of
time. If the battery is disconnected for service,
the system turns off. In this case, it will be
possible to make an SOS - Emergency Call only
when the battery is reconnected to the
vehicle’s electrical system.
System Requirements
Vehicle must have an operable 3G network
connection.
Vehicle must be powered with a properly
functioning electrical system.
The ignition must be in the RUN or ACC posi -
tion.
WARNING!
Never place anything on or near the
vehicle’s 3G and GPS aerials. You could
prevent 3G and GPS signal reception,
which can prevent your vehicle from
placing an emergency call. An operable
3G network connection and a GPS signal
is required for the SOS-Emergency Call
system to function properly.
Do not add any aftermarket electrical
equipment to the vehicle’s electrical
system. This may prevent your vehicle
from sending a signal to initiate an emer -
gency call. To avoid interference that can
cause the SOS-Emergency Call system to
fail, never add aftermarket equipment
(e.g., two-way mobile radio, CB radio, data
recorder, etc.) to your vehicle’s electrical
system or modify the antennas on your
vehicle. IF YOUR VEHICLE AND SYSTEM
LOSES BATTERY POWER FOR ANY
REASON (INCLUDING DURING OR AFTER
AN ACCIDENT) THE SOS FEATURES, APPS
AND SERVICES AMONG OTHERS WILL
NOT OPERATE.
The Occupant Restraint Controller (ORC)
turns on the air bag warning light in the
instrument cluster if a malfunction in any
part of the air bag system is detected. If
the air bag warning light is illuminated, the
air bag system may not be working prop -
erly and the SOS-Emergency Call system
may not be able to send a signal to an
emergency service operator. If the air bag
warning light is illuminated, contact the
Service Network to have the air bag
system checked immediately.
Ignoring the LED on the SOS-Emergency
Call button could mean you will not have
emergency call services if needed. If the
LED on SOS-Emergency Call button is illu -
minated red, contact the Service Network
to have the emergency call system
checked immediately.
If anyone in the vehicle could be in danger
(e.g., fire or smoke is visible, dangerous
road conditions or location), do not wait
for voice contact from an emergency
service operator. All occupants should exit
the vehicle immediately and move to a
safe location.
Failure to perform scheduled mainte -
nance and regularly inspect your vehicle
may result in vehicle damage, accident or
injury.
WARNING! (Continued)
21_GU_OM_EN_USC_t.book Page 194
Page 203 of 280
201
11. Apply the adhesive label from the sealantbottle where it can be easily seen by the
driver as a reminder that the tire has been
treated with a Tire Service Kit, as well as
not to exceed the speed restriction for the
treated tire.
NOTE:
Only use original sealant cartridges, which can
be purchased at an authorized dealer.
Checking And Restoring Tire Pressure
The compressor can also be used to check
and, if necessary, restore the tire pressure.
Proceed as follows:
1. Make sure that the power switch is in the
O (off) position.
2. Connect the hose directly to the valve on the tire to be inflated.
3. Insert the plug into the socket in the passenger compartment or in the cargo
area and start the engine.
4. Start the compressor by putting the power switch to I (on). As soon as the correct
pressure is reached, put the power switch
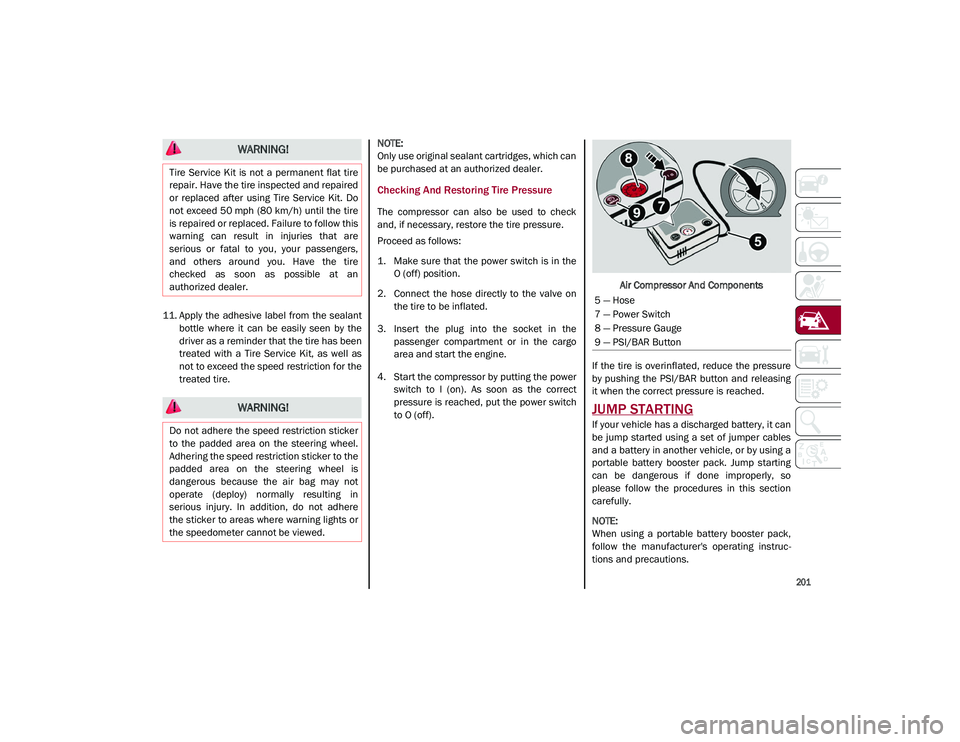
to O (off). Air Compressor And Components
If the tire is overinflated, reduce the pressure
by pushing the PSI/BAR button and releasing
it when the correct pressure is reached.
JUMP STARTING
If your vehicle has a discharged battery, it can
be jump started using a set of jumper cables
and a battery in another vehicle, or by using a
portable battery booster pack. Jump starting
can be dangerous if done improperly, so
please follow the procedures in this section
carefully.
NOTE:
When using a portable battery booster pack,
follow the manufacturer's operating instruc -
tions and precautions.
WARNING!
Tire Service Kit is not a permanent flat tire
repair. Have the tire inspected and repaired
or replaced after using Tire Service Kit. Do
not exceed 50 mph (80 km/h) until the tire
is repaired or replaced. Failure to follow this
warning can result in injuries that are
serious or fatal to you, your passengers,
and others around you. Have the tire
checked as soon as possible at an
authorized dealer.
WARNING!
Do not adhere the speed restriction sticker
to the padded area on the steering wheel.
Adhering the speed restriction sticker to the
padded area on the steering wheel is
dangerous because the air bag may not
operate (deploy) normally resulting in
serious injury. In addition, do not adhere
the sticker to areas where warning lights or
the speedometer cannot be viewed.
5 — Hose
7 — Power Switch
8 — Pressure Gauge
9 — PSI/BAR Button
21_GU_OM_EN_USC_t.book Page 201
Page 206 of 280
IN CASE OF EMERGENCY
204
4. Disconnect the positive (+) end of thejumper cable from the positive (+) post of
the vehicle with the discharged battery.
If frequent jump starting is required to start
your vehicle, you should have the battery and
charging system inspected at an authorized
dealer.
Bump Starting
Never jump start the engine by pushing,
towing or coasting downhill.
NOTE:
You cannot start a vehicle with an automatic
transmission by pushing it.
ENGINE OVERHEATING
If your vehicle is overheating, it will need to be
serviced at an authorized dealer.
Engine overheating may occur in situations
such as (but not limited to) extreme environ -
mental temperatures or frequent engine
stops/starts. If the engine becomes over -heated, the Engine Temperature Warning
Light in the instrument cluster will illuminate
along with a dedicated message
Ú
page 79.
In any of the following situations, you can
reduce the potential for overheating by taking
the appropriate action.
On the highways — slow down.
In city traffic — while stopped, place the
transmission in NEUTRAL, but do not
increase engine idle speed.
NOTE:
There are steps that you can take to slow down
an impending overheat condition:
If your Air Conditioner (A/C) is on, turn it off.
The A/C system adds heat to the engine
cooling system and turning the A/C off can
help remove this heat.
You can also turn the temperature control
to maximum heat, the mode control to floor
and the blower control to high. This allows
the heater core to act as a supplement to
the radiator and aids in removing heat from
the engine cooling system.
NOTE:
If the cooling fan does not operate while the
engine is running, the engine temperature
will increase. Stop the engine and contact
an authorized dealer.
If the engine continues to overheat or
frequently overheats, have the cooling
system inspected. The engine could be seri
-
ously damaged unless repairs are made.
Contact an authorized dealer.
CAUTION!
Accessories plugged into the vehicle power
outlets draw power from the vehicle’s
battery, even when not in use (i.e., cellular
phones, etc.). Eventually, if plugged in long
enough without engine operation, the
vehicle’s battery will discharge sufficiently
to degrade battery life and/or prevent the
engine from starting.
WARNING!
You or others can be badly burned by hot
engine coolant (antifreeze) or steam from
your radiator. If you see or hear steam
coming from under the hood, do not open
the hood until the radiator has had time to
cool. Never try to open a cooling system
pressure cap when the radiator or coolant
bottle is hot.
CAUTION!
Driving with a hot cooling system could
damage your vehicle. If temperature gauge
reads “H”, pull over and stop the vehicle.
Idle the vehicle with the air conditioner
turned off until the pointer drops back into
the normal range. If the pointer remains on
the “H”, turn the engine off immediately,
and call for service.
21_GU_OM_EN_USC_t.book Page 204