2021 ALFA ROMEO STELVIO fuel cap
[x] Cancel search: fuel capPage 13 of 280
11
LANE KEEPING ASSIST (LKA)
SYSTEM —IF EQUIPPED......................... 128
Turning Lane Keeping Assist On Or
Off ......................................................... 129 Lane Keeping Assist Warning
Message ...............................................129
REAR BACK UP CAMERA / DYNAMIC
GRIDLINES ............................................. 132 REFUELING THE VEHICLE ..................... 133
Refueling The Vehicle ..........................133
Refueling Capacity ............................... 133
Refueling Procedure ...........................133
VEHICLE LOADING ................................. 135
Certification Label................................ 135
TRAILER TOWING................................... 136
Common Towing Definitions ...............137
Trailer Hitch Classification .................. 137
Trailer Towing Weights (Maximum
Trailer Weight Ratings) .....................138 Trailer And Tongue Weight ................. 138
Towing Requirements..........................139
Towing Tips ..........................................141
Installing The Receiver ........................ 141
Connecting The Electrical System ......141
Removing The Receiver ....................... 142
SUGGESTIONS FOR DRIVING................ 142
Saving Fuel ...........................................142
Driving Style .........................................142
Conditions Of Use ................................ 142
Performance — Quadrifoglio ...............143
SAFETY
ACTIVE SAFETY SYSTEMS...................... 145
Anti-Lock Brake System (ABS) ........... 145
Active Torque Vectoring (ATV)
System — If Equipped .......................... 145 Dynamic Steering Torque (DST)
System ................................................. 146 Drive Train Control (DTC) System ....... 146
Electronic Stability Control (ESC)
System ................................................. 146 Hill Descent Control (HDC) System —
If Equipped ........................................... 147 Hill Start Assist (HSA) System ............. 148
Panic Brake Assist (PBA) System ....... 149
Traction Control System (TCS) ............ 149
AUXILIARY DRIVING SYSTEMS .............. 149
Blind Spot Monitoring (BSM) System —
If Equipped ......................................... 150 Active Blind Spot Assist (ABSA)
System — If Equipped ......................... 152 Driver Attention Assist (DAA)
System — If Equipped .......................... 155 Forward Collision Warning Plus (FCW+)
System — If Equipped ......................... 156 Tire Pressure Monitoring System
(TPMS) .................................................. 161
OCCUPANT RESTRAINT SYSTEMS ........ 163
Occupant Restraint Systems
Features .............................................. 163 Important Safety Precautions ............ 163
Seat Belt Systems .............................. 164
Supplemental Restraint Systems
(SRS) .................................................... 169 Child Restraints ................................. 178
SAFETY TIPS .......................................... 188
Transporting Passengers .................... 188
Transporting Pets ............................. 189
Safety Checks You Should Make
Inside The Vehicle .............................. 189 Periodic Safety Checks You Should
Make Outside The Vehicle .................. 190 Exhaust Gas ..................................... 190
Carbon Monoxide Warnings ............. 191
IN CASE OF EMERGENCY
HAZARD WARNING FLASHERS ............. 192
SOS — EMERGENCY CALL ..................... 192
JACKING AND TIRE CHANGING............. 195
General Instructions ........................... 195
Jack Information And Usage
Precautions ......................................... 195 Changing Procedure ........................... 196
TIRE SERVICE KIT — IF EQUIPPED ........ 198
Description .......................................... 198
Inflation Procedure ............................. 199
Checking And Restoring Tire
Pressure............................................... 201
21_GU_OM_EN_USC_t.book Page 11
Page 15 of 280
13
FUEL REQUIREMENTS........................... 260
Reformulated Gasoline .................. 260
Gasoline/Oxygenate Blends ..............260
CNG And LP Fuel System
Modifications ....................................... 261 MMT In Gasoline ..................................261
Materials Added To Fuel ...................261
Fuel System Cautions ..........................261
FLUID CAPACITIES ................................. 262
ENGINE FLUIDS AND LUBRICANTS ...... 263
CHASSIS FLUIDS AND LUBRICANTS..... 264PERFORMANCE ..................................... 265 CUSTOMER ASSISTANCE
SUGGESTIONS FOR OBTAINING
SERVICE FOR YOUR VEHICLE ................ 266
Prepare For The Appointment ............ 266
Prepare A List ...................................... 266
Be Reasonable With Requests ........... 266
IF YOU NEED ASSISTANCE .................... 266
Alfa Romeo Customer Center ............. 266
Alfa Romeo Customer Care
(Canada)............................................... 266 Customer Assistance For The
Hearing Or Speech Impaired
(TDD/TTY)............................................. 266 Service Contract ................................. 267
WARRANTY INFORMATION ................... 267REPORTING SAFETY DEFECTS ............. 267
In The 50 United States And
Washington, D.C. ................................. 267 In Canada ............................................ 268
PUBLICATION ORDER FORMS ............. 268
General Information .............................. 268
21_GU_OM_EN_USC_t.book Page 13
Page 17 of 280
15
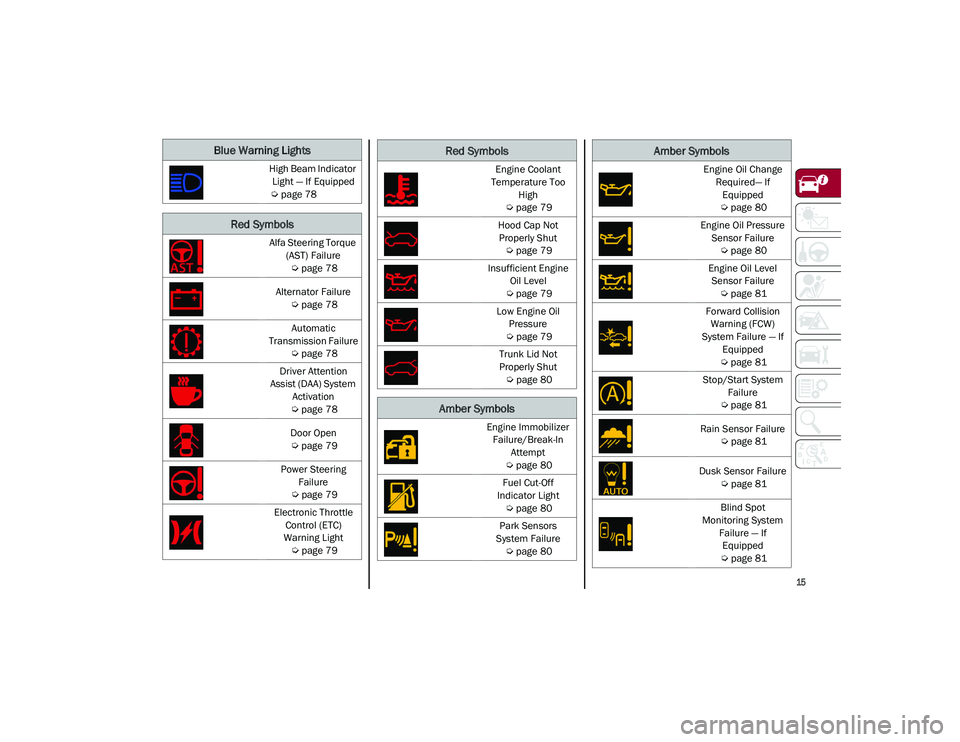
Blue Warning Lights
High Beam Indicator Light — If Equipped
Ú
page 78
Red Symbols
Alfa Steering Torque
(AST) Failure
Ú
page 78
Alternator Failure
Ú
page 78
Automatic
Transmission Failure
Ú
page 78
Driver Attention
Assist (DAA) System Activation
Ú
page 78
Door Open
Ú
page 79
Power Steering Failure
Ú
page 79
Electronic Throttle Control (ETC)
Warning Light
Ú
page 79
Engine Coolant
Temperature Too High
Ú
page 79
Hood Cap Not Properly Shut
Ú
page 79
Insufficient Engine Oil Level
Ú
page 79
Low Engine Oil Pressure
Ú
page 79
Trunk Lid Not
Properly Shut
Ú
page 80
Amber Symbols
Engine Immobilizer
Failure/Break-In Attempt
Ú
page 80
Fuel Cut-Off
Indicator Light
Ú
page 80
Park Sensors
System Failure
Ú
page 80
Red Symbols
Engine Oil Change
Required— If Equipped
Ú
page 80
Engine Oil Pressure Sensor Failure
Ú
page 80
Engine Oil Level Sensor Failure
Ú
page 81
Forward Collision Warning (FCW)
System Failure — If Equipped
Ú
page 81
Stop/Start System Failure
Ú
page 81
Rain Sensor Failure
Ú
page 81
Dusk Sensor Failure
Ú
page 81
Blind Spot
Monitoring System Failure — If Equipped
Ú
page 81
Amber Symbols
21_GU_OM_EN_USC_t.book Page 15
Page 18 of 280
SYMBOL GLOSSARY
16
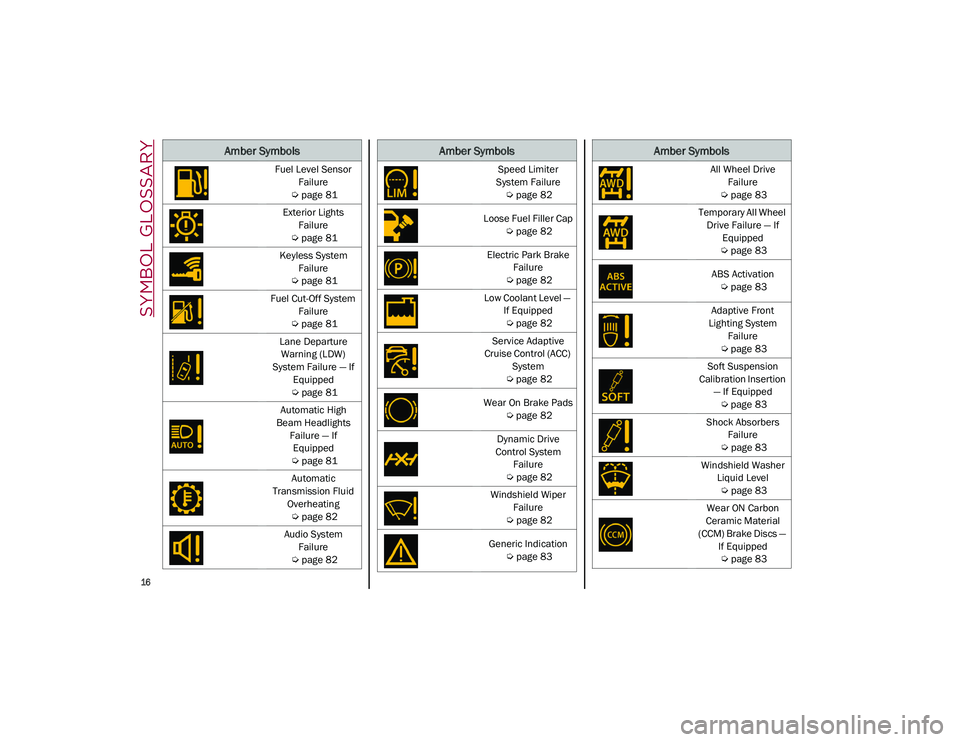
Fuel Level Sensor
Failure
Ú
page 81
Exterior Lights Failure
Ú
page 81
Keyless System Failure
Ú
page 81
Fuel Cut-Off System Failure
Ú
page 81
Lane Departure Warning (LDW)
System Failure — If Equipped
Ú
page 81
Automatic High
Beam Headlights Failure — If Equipped
Ú
page 81
Automatic
Transmission Fluid Overheating
Ú
page 82
Audio System Failure
Ú
page 82
Amber Symbols
Speed Limiter
System Failure
Ú
page 82
Loose Fuel Filler Cap
Ú
page 82
Electric Park Brake Failure
Ú
page 82
Low Coolant Level — If Equipped
Ú
page 82
Service Adaptive
Cruise Control (ACC) System
Ú
page 82
Wear On Brake Pads
Ú
page 82
Dynamic Drive
Control System Failure
Ú
page 82
Windshield Wiper Failure
Ú
page 82
Generic Indication
Ú
page 83
Amber Symbols
All Wheel Drive
Failure
Ú
page 83
Temporary All Wheel Drive Failure — If Equipped
Ú
page 83
ABS Activation
Ú
page 83
Adaptive Front
Lighting System Failure
Ú
page 83
Soft Suspension
Calibration Insertion — If Equipped
Ú
page 83
Shock Absorbers Failure
Ú
page 83
Windshield Washer Liquid Level
Ú
page 83
Wear ON Carbon
Ceramic Material
(CCM) Brake Discs — If Equipped
Ú
page 83
Amber Symbols
21_GU_OM_EN_USC_t.book Page 16
Page 84 of 280

GETTING TO KNOW YOUR INSTRUMENT PANEL
82
Automatic Transmission Fluid Overheating
The telltale will illuminate in the case
of transmission overheating, after a
particularly demanding use. In this
case an engine performance limita-
tion is carried out.
Wait for the telltale to turn off with the engine
off or idling.
Audio System Failure
The telltale will illuminate to report a
failure of the audio system.
Contact an authorized dealer as soon as
possible to have the failure eliminated.
Speed Limiter System Failure
While driving, the telltale will illumi -
nate to signal a Speed Limiter
system failure.
Contact an authorized dealer as soon as
possible to have the failure eliminated.
Loose Fuel Filler Cap
Lights up if the fuel tank cap is open
or not properly closed.
Tighten the cap properly.
Electric Park Brake Failure
The telltale will illuminate and a
message will display to signal a
failure in the electric park brake
system.
This failure may partially or completely block
the vehicle because the park brake could
remain activated even if automatically or
manually disengaged using the relevant
controls. In these circumstances, you can
disengage the park brake following the emer -
gency disengagement procedure
Ú
page 90.
If you are still able to drive the vehicle (park
brake is not engaged), drive to the nearest
authorized dealer and remember, when
executing any maneuvers/commands, that
the electric park brake is not operational.
Low Coolant Level — If Equipped
This telltale will illuminate to indicate
that the vehicle coolant level is low.
Service Adaptive Cruise Control (ACC)
System
This light will illuminate when the
ACC is not operating and needs
service.
Contact an authorized dealer to have the
system checked.
Wear On Brake Pads
This light will illuminate when the
brake pads have reached their wear
limit.
Contact an authorized dealer as soon as
possible.
NOTE:
Always use genuine parts or similar because
the Integrated Brake System (IBS) system
could detect anomalies.
Dynamic Drive Control System Failure
The telltale will illuminate to signal a
failure in the dynamic drive control
system.
Windshield Wiper Failure
Signals a windshield wiper failure.
Contact an authorized dealer.
WARNING!
If a failure is present with sharp braking,
the rear wheels may lock and the vehicle
may swerve.
21_GU_OM_EN_USC_t.book Page 82
Page 135 of 280
133
REFUELING THE VEHICLE
Refueling The Vehicle
Before refueling, make sure that the fuel type
is correct.
Also, stop the engine before refueling.
NOTE:
An inefficient catalytic converter leads to
harmful exhaust emissions, thus contributing
to air pollution.
Refueling Capacity
To ensure that you fill the tank completely, top
off twice after the first click of the fuel nozzle.
Further top-off could cause faults in the fuel
feeding system.
Refueling Procedure
The fuel filler door is unlocked when the
central door locking system is unlocked. It is
automatically locked when the central locking
system is applied.
Opening The Fuel Filler Door
To refuel proceed as follows:
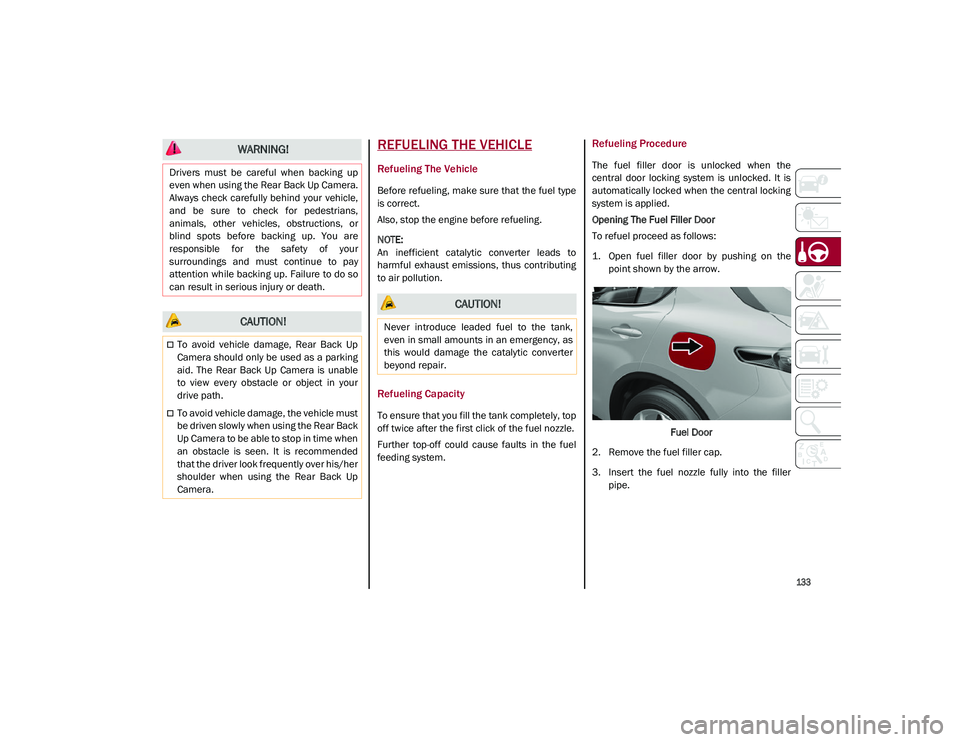
1. Open fuel filler door by pushing on thepoint shown by the arrow.
Fuel Door
2. Remove the fuel filler cap.
3. Insert the fuel nozzle fully into the filler pipe.
WARNING!
Drivers must be careful when backing up
even when using the Rear Back Up Camera.
Always check carefully behind your vehicle,
and be sure to check for pedestrians,
animals, other vehicles, obstructions, or
blind spots before backing up. You are
responsible for the safety of your
surroundings and must continue to pay
attention while backing up. Failure to do so
can result in serious injury or death.
CAUTION!
To avoid vehicle damage, Rear Back Up
Camera should only be used as a parking
aid. The Rear Back Up Camera is unable
to view every obstacle or object in your
drive path.
To avoid vehicle damage, the vehicle must
be driven slowly when using the Rear Back
Up Camera to be able to stop in time when
an obstacle is seen. It is recommended
that the driver look frequently over his/her
shoulder when using the Rear Back Up
Camera.
CAUTION!
Never introduce leaded fuel to the tank,
even in small amounts in an emergency, as
this would damage the catalytic converter
beyond repair.
21_GU_OM_EN_USC_t.book Page 133
Page 136 of 280
STARTING AND OPERATING
134
4. When the fuel nozzle “clicks” or shuts off,before removing the nozzle, wait for at
least 10 seconds in order for the fuel to
flow inside the tank.
5. Remove the fuel filler nozzle, tighten the gas cap about ¼ turn until you hear one
click. This is an indication that cap is prop-
erly tightened.
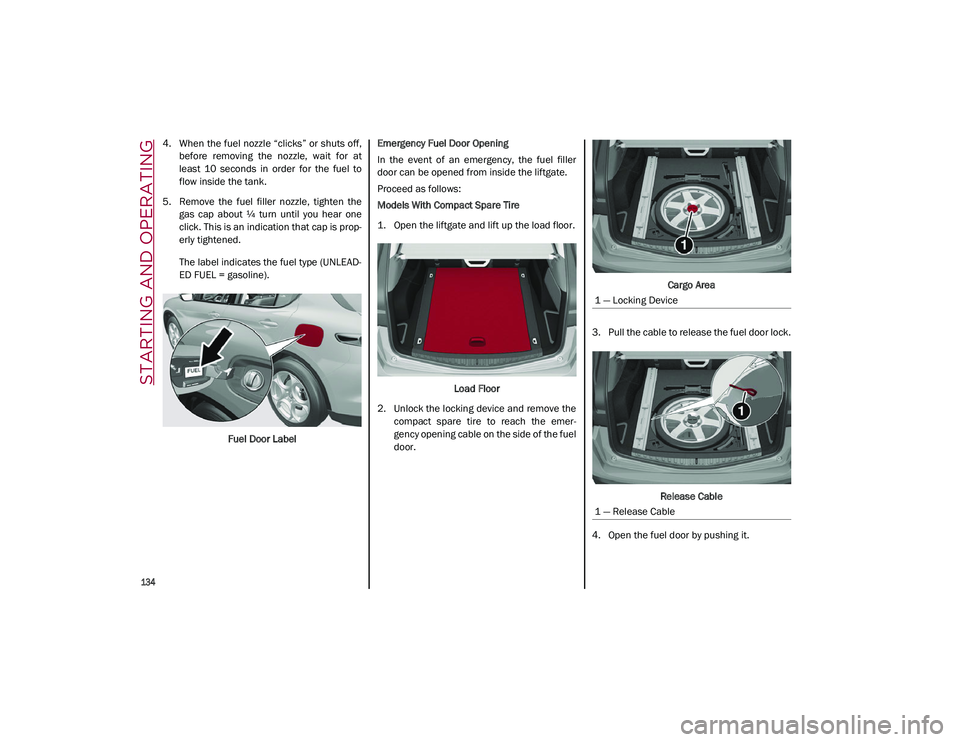
The label indicates the fuel type (UNLEAD -
ED FUEL = gasoline).
Fuel Door Label Emergency Fuel Door Opening
In the event of an emergency, the fuel filler
door can be opened from inside the liftgate.
Proceed as follows:
Models With Compact Spare Tire
1. Open the liftgate and lift up the load floor.
Load Floor
2. Unlock the locking device and remove the compact spare tire to reach the emer -
gency opening cable on the side of the fuel
door. Cargo Area
3. Pull the cable to release the fuel door lock.
Release Cable
4. Open the fuel door by pushing it.
1 — Locking Device
1 — Release Cable
21_GU_OM_EN_USC_t.book Page 134
Page 138 of 280
STARTING AND OPERATING
136
Gross Vehicle Weight Rating (GVWR)
The GVWR is the total permissible weight of
your vehicle including driver, passengers,
vehicle, options and cargo. The label also
specifies maximum capacities of front and
rear axle systems (GAWR). Total load must be
limited so GVWR and front and rear GAWR are
not exceeded.
Payload
The payload of a vehicle is defined as the
allowable load weight a truck can carry,
including the weight of the driver, all passen-
gers, options and cargo.
Gross Axle Weight Rating (GAWR)
The GAWR is the maximum permissible load
on the front and rear axles. The load must be
distributed in the cargo area so that the GAWR
of each axle is not exceeded.
Each axle GAWR is determined by the compo -
nents in the system with the lowest load
carrying capacity (axle, springs, tires or
wheels). Heavier axles or suspension compo -
nents sometimes specified by purchasers for
increased durability do not necessarily
increase the vehicle's GVWR.
Tire Size
The tire size on the Vehicle Certification Label
represents the actual tire size on your vehicle.
Replacement tires must be equal to the load
capacity of this tire size.
Rim Size
This is the rim size that is appropriate for the
tire size listed.
Inflation Pressure
This is the cold tire inflation pressure for your
vehicle for all loading conditions up to full
GAWR.
Curb Weight
The curb weight of a vehicle is defined as the
total weight of the vehicle with all fluids,
including vehicle fuel, at full capacity condi -
tions, and with no occupants or cargo loaded
into the vehicle. The front and rear curb weight
values are determined by weighing your
vehicle on a commercial scale before any
occupants or cargo are added.
Loading
The actual total weight and the weight of the
front and rear of your vehicle at the ground can
best be determined by weighing it when it is
loaded and ready for operation.
The entire vehicle should first be weighed on a
commercial scale to ensure that the GVWR
has not been exceeded. The weight on the
front and rear of the vehicle should then be
determined separately to be sure that the load
is properly distributed over the front and rear
axle. Weighing the vehicle may show that the
GAWR of either the front or rear axles has
been exceeded but the total load is within the specified GVWR. If so, weight must be shifted
from front to rear or rear to front as appro
-
priate until the specified weight limitations are
met. Store the heavier items down low and be
sure that the weight is distributed equally.
Stow all loose items securely before driving.
Improper weight distributions can have an
adverse effect on the way your vehicle steers
and handles and the way the brakes operate.
TRAILER TOWING
In this section you will find safety tips and
information on limits to the type of towing you
can reasonably do with your vehicle. Before
towing a trailer, carefully review this informa -
tion to tow your load as efficiently and safely
as possible.
To maintain the New Vehicle Limited Warranty
coverage, follow the requirements and recom -
mendations in this manual concerning vehi -
cles used for trailer towing.
CAUTION!
Do not load your vehicle any heavier than
the GVWR or the maximum front and rear
GAWR. If you do, parts on your vehicle can
break, or it can change the way your vehicle
handles. This could cause you to lose
control. Also overloading can shorten the
life of your vehicle.
21_GU_OM_EN_USC_t.book Page 136