2021 ALFA ROMEO GIULIA open hood
[x] Cancel search: open hoodPage 11 of 284

9
Adaptive Frontlight System
(AFS Function) — If Equipped ................ 44 Turn Signals ........................................... 44
Lane Change Assist ............................... 44
Static Bending Light Function (SBL) —
If Equipped ............................................. 44
INTERIOR LIGHTS .....................................44
Front Map Reading Lights ..................... 45
Interior Ambient Lighting ....................... 45
Rear Overhead Light .............................. 46
Instrument Panel Dimmer Control ....... 46
WINDSHIELD WIPERS AND WASHERS....46
Windshield Wiper Operation ................ 47
Rain Sensing Wipers.............................. 47
CLIMATE CONTROL .................................48
Automatic Dual-Zone Climate
Control System ...................................... 49
INTERIOR STORAGE AND EQUIPMENT....55
Glove Compartment .............................. 55
Center Console ...................................... 56
Power Outlet........................................... 56
Cigar Lighter And Ash Tray —
If Equipped ............................................. 57
Wireless Charging Pad — If Equipped ... 57
POWER WINDOWS ...................................58
Power Window Controls......................... 58
POWER SUNROOF — IF EQUIPPED ..........60
Power Sunroof........................................ 60
Opening And Closing The Sunroof ........ 60
Venting Sunroof ..................................... 61
Sun Shade Operation ............................ 61
Pinch Protect Feature ............................ 61
Re-Initialization Procedure .................... 61
Sunroof Maintenance ............................ 61
HOOD ........................................................ 62
Opening .................................................. 62
Closing.................................................... 62
TRUNK ...................................................... 63
Opening .................................................. 63
Closing.................................................... 64
Trunk Initialization ................................. 64
Trunk Specifications ............................. 64
ENVIRONMENTAL PROTECTION
SYSTEMS .................................................. 65
ACTIVE AERODYNAMIC SPOILER
(QUADRIFOGLIO VEHICLES) .................... 65
Carbon Fiber Active Aero Front
Spoiler .................................................... 65
GETTING TO KNOW YOUR INSTRUMENT
PANEL
INSTRUMENT PANEL FEATURES............. 66
Instrument Cluster ................................ 66
Tachometer............................................ 67
Engine Oil Temperature Gauge ............ 67
Fuel Level Gauge ................................... 68
Speedometer ......................................... 68
INSTRUMENT CLUSTER DISPLAY............ 68
Instrument Cluster Display
Description ............................................. 68 Reconfigurable Instrument Cluster
Display.................................................... 68 Reconfigurable Display Items ............... 68
Customer Programmable Settings ....... 72
WARNING LIGHTS AND MESSAGES
ON THE INSTRUMENT PANEL ................. 73
Red Warning Lights ............................... 73
Amber Warning Lights ........................... 75 Green Indicator Lights ...........................77
Blue Indicator Lights ..............................77
Red Symbols...........................................78
Amber Symbols ......................................79
Green Symbols .......................................83
Blue Symbols .......................................... 83
ONBOARD DIAGNOSTIC SYSTEM ...........84
Onboard Diagnostic System (OBD II)
Cybersecurity .......................................... 84
EMISSIONS INSPECTION AND
MAINTENANCE PROGRAMS ....................85
STARTING AND OPERATING
STARTING THE ENGINE ............................86
Starting Procedure .................................86
Remote Starting System ........................86
Cold Weather Operation ........................87
Extended Park Starting ..........................87
If Engine Fails To Start ...........................88
After Starting — Warming Up The
Engine .....................................................88 Stopping The Engine ..............................88
Turbocharger Cool Down .......................88
ENGINE BLOCK HEATER —
IF EQUIPPED ............................................89
ENGINE BREAK-IN
RECOMMENDATIONS ...............................89
Engine Break-In ......................................89
ELECTRIC PARK BRAKE (EPB) .................90
Electric Park Brake (EPB) Operating
Modes .....................................................92 Safe Hold ................................................92
21_GA_OM_EN_USC_t.book Page 9
Page 16 of 284

SYMBOL GLOSSARY
14
Door Open
Ú
page 78
Power Steering Failure
Ú
page 78
Electronic Throttle Control (ETC) Warning Light
Ú
page 78
Engine Coolant
Temperature Too High
Ú
page 78
Hood Cap Not Properly Shut
Ú
page 79
Insufficient Engine Oil Level
Ú
page 79
Low Engine Oil Pressure
Ú
page 79
Trunk Lid Not Properly Shut
Ú
page 79
Amber Symbols
Engine Immobilizer Failure/
Break-In Attempt
Ú
page 79
Red Symbols
Fuel Cut-Off Indicator Light
Ú
page 79
Park Sensors System Failure
Ú
page 79
Engine Oil Change
Required— If Equipped
Ú
page 80
Engine Oil Pressure Sensor Failure
Ú
page 80
Engine Oil Level Sensor Failure
Ú
page 80
Forward Collision Warning (FCW) System Failure — If Equipped
Ú
page 80
Stop/Start System Failure
Ú
page 80
Rain Sensor Failure
Ú
page 80
Dusk Sensor Failure
Ú
page 80
Amber Symbols
Blind Spot Monitoring
System Failure — If Equipped
Ú
page 80
Fuel Level Sensor Failure
Ú
page 80
Exterior Lights Failure
Ú
page 81
Keyless System Failure
Ú
page 81
Fuel Cut-Off System Failure
Ú
page 81
Lane Departure Warning (LDW) System Failure — If Equipped
Ú
page 81
Automatic High Beam Headlights Failure — If Equipped
Ú
page 81
Automatic Transmission Fluid Overheating
Ú
page 81
Audio System Failure
Ú
page 81
Amber Symbols
21_GA_OM_EN_USC_t.book Page 14
Page 23 of 284

21
To Exit Remote Start Mode
To drive the vehicle after starting the Remote
Start system, either push and release the
unlock button on the key fob to unlock the
doors, or unlock the vehicle using Passive
Entry via the door handles, and disarm the
Vehicle Security system (if equipped). Then,
prior to the end of the 15 minute cycle, push
and release the START/STOP ignition button
while pressing the brake pedal.
The Remote Start system will turn the engine
off with another push and release of the
Remote Start button on the key fob, or if the
engine is allowed to run for the entire
15 minute cycle.
Remote Start Comfort Systems — If
Equipped
When Remote Start is activated, the heated
steering wheel and front heated seat features
will automatically activate when ambient
temperature is less than 39°F (4°C). These
features will stay on through the duration of
Remote Start.
NOTE:
This feature can be activated through the
radio system. Refer to the Information and
Entertainment System Owner’s Manual
Supplement for further information
VEHICLE SECURITY SYSTEM — IF
EQUIPPED
The Vehicle Security system monitors the
vehicle doors, hood, trunk, and the keyless
push button ignition for unauthorized opera-
tion. It also monitors movement inside the
passenger compartment (volumetric protec -
tion — if equipped), cutting of battery cables,
and unexpected lifting/tilting of the vehicle
(anti-lift protection — if equipped).
While the Vehicle Security system is armed,
interior switches for door locks and trunk
release are disabled.
If something triggers the alarm, the Vehicle
Security system will provide the following
audible and visible signals:
The horn will pulse
The turn signals will flash
The vehicle security light in the instrument
cluster will flash
NOTE:
The Vehicle Security system is activated by the
Engine Immobilizer system, which is automati -
cally activated when you get out of the vehicle
with the key fob and lock the doors.
To Arm The System
Follow these steps to arm the Vehicle Security
system:
1. Make sure the vehicle’s ignition is placed in the OFF position.
2. Perform one of the following methods to lock the vehicle:
• Push the lock button on the interior
power door lock switch with the driver
and/or passenger door open.
• Push the lock button on the exterior
Passive Entry Door Handle with a valid
key fob available in the same exterior
zone
Ú
page 24.
• Push the lock button on the key fob.
3. If any doors (or trunk lid) are open, close them.
To Disarm The System
The Vehicle Security system can be disarmed
using any of the following methods:
Push the unlock button on the key fob.
Grab the Passive Entry door handle to
unlock the door
Ú
page 24.
Cycle the ignition out of the OFF position to
disarm the system.
21_GA_OM_EN_USC_t.book Page 21
Page 64 of 284

GETTING TO KNOW YOUR VEHICLE
62
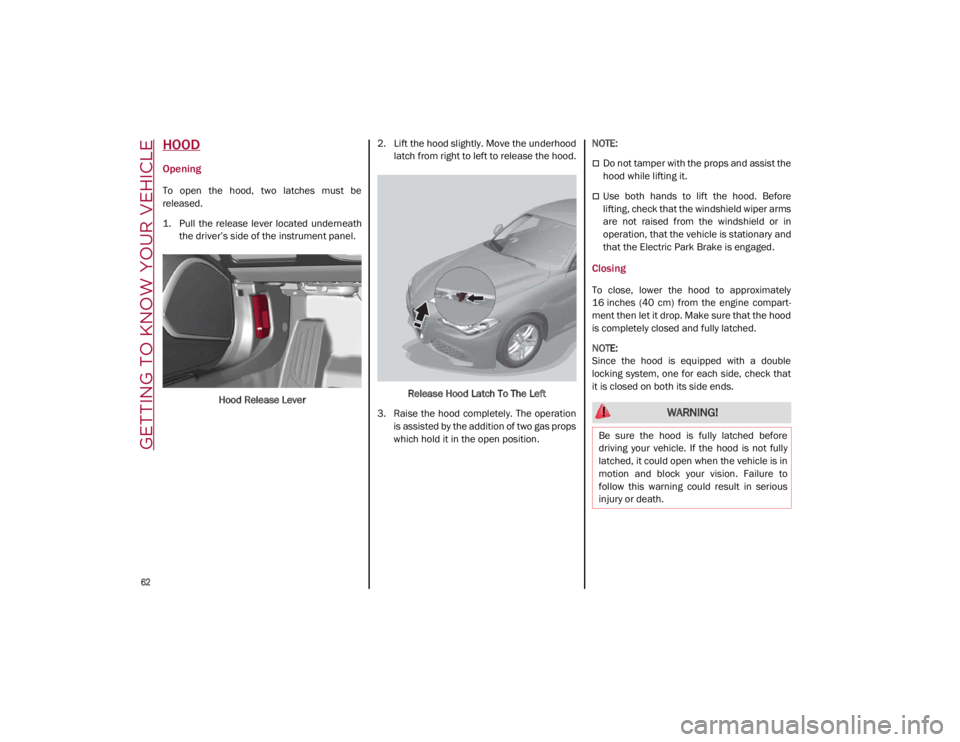
HOOD
Opening
To open the hood, two latches must be
released.
1. Pull the release lever located underneaththe driver’s side of the instrument panel.
Hood Release Lever 2. Lift the hood slightly. Move the underhood
latch from right to left to release the hood.
Release Hood Latch To The Left
3. Raise the hood completely. The operation is assisted by the addition of two gas props
which hold it in the open position.
NOTE:
Do not tamper with the props and assist the
hood while lifting it.
Use both hands to lift the hood. Before
lifting, check that the windshield wiper arms
are not raised from the windshield or in
operation, that the vehicle is stationary and
that the Electric Park Brake is engaged.
Closing
To close, lower the hood to approximately
16 inches (40 cm) from the engine compart
-
ment then let it drop. Make sure that the hood
is completely closed and fully latched.
NOTE:
Since the hood is equipped with a double
locking system, one for each side, check that
it is closed on both its side ends.
WARNING!
Be sure the hood is fully latched before
driving your vehicle. If the hood is not fully
latched, it could open when the vehicle is in
motion and block your vision. Failure to
follow this warning could result in serious
injury or death.
21_GA_OM_EN_USC_t.book Page 62
Page 65 of 284

63
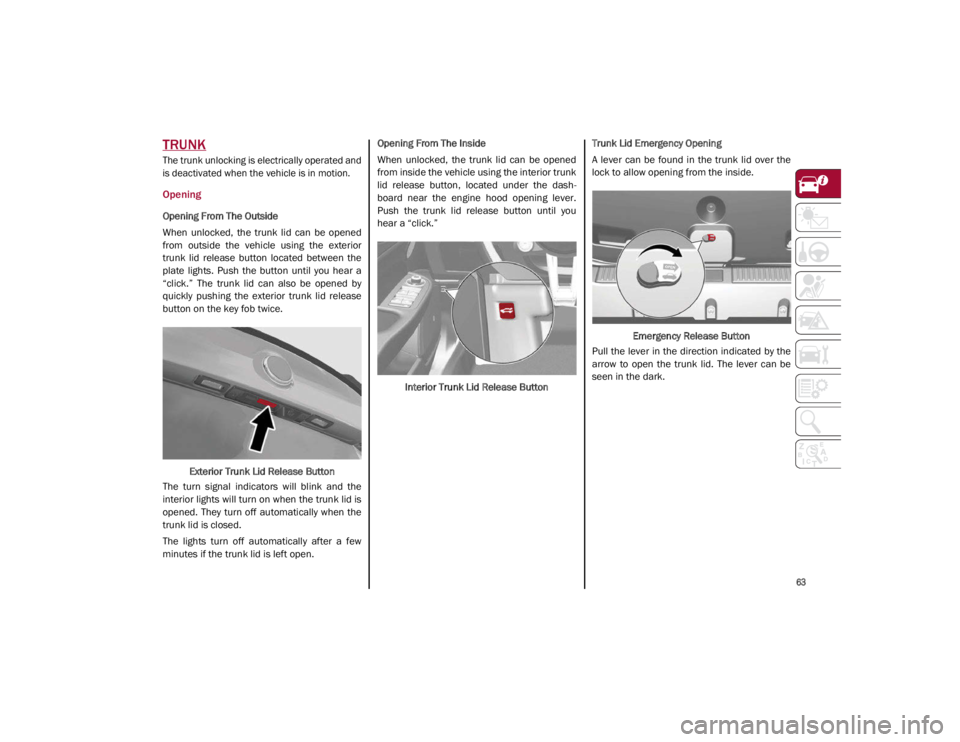
TRUNK
The trunk unlocking is electrically operated and
is deactivated when the vehicle is in motion.
Opening
Opening From The Outside
When unlocked, the trunk lid can be opened
from outside the vehicle using the exterior
trunk lid release button located between the
plate lights. Push the button until you hear a
“click.” The trunk lid can also be opened by
quickly pushing the exterior trunk lid release
button on the key fob twice.Exterior Trunk Lid Release Button
The turn signal indicators will blink and the
interior lights will turn on when the trunk lid is
opened. They turn off automatically when the
trunk lid is closed.
The lights turn off automatically after a few
minutes if the trunk lid is left open. Opening From The Inside
When unlocked, the trunk lid can be opened
from inside the vehicle using the interior trunk
lid release button, located under the dash
-
board near the engine hood opening lever.
Push the trunk lid release button until you
hear a “click.”
Interior Trunk Lid Release Button Trunk Lid Emergency Opening
A lever can be found in the trunk lid over the
lock to allow opening from the inside.
Emergency Release Button
Pull the lever in the direction indicated by the
arrow to open the trunk lid. The lever can be
seen in the dark.
21_GA_OM_EN_USC_t.book Page 63
Page 81 of 284

79
Also check visually for any fluid leaks. Contact
an authorized dealer if the telltale comes on
when the engine is started again.
If the vehicle is used under demanding condi-
tions (e.g. in high-performance driving): slow
down and, if the warning light stays on, stop
the vehicle. Stop for two or three minutes with
the engine running and slightly accelerated to
facilitate better coolant circulation, then turn
the engine off. Check that the coolant level is
correct as described above.
Hood Cap Not Properly Shut
The telltale turns on when the hood
cap is not properly closed, along with
the icon, an image of the vehicle with
an open hood cap appears on the
display.
A buzzer is heard when the hood cap is open
and the vehicle is moving.
Close the hood properly.
Insufficient Engine Oil Level
The telltale turns on, along with the
related message on the display, to
indicate low engine oil level.
Contact an authorized dealer to have the
system checked.
Low Engine Oil Pressure
This telltale indicates low engine oil
pressure. If the telltale turns on
while driving, stop the vehicle and shut off the engine as soon as possible. A
chime will sound when this telltale turns on.
Do not operate the vehicle until the cause is
corrected. This telltale does not indicate how
much oil is in the engine.
NOTE:
Do not use the vehicle until the failure has
been solved. The turning on of the telltale does
not indicate the amount of oil in the engine:
the oil level can be checked on the display
upon entering the vehicle and also by acti
-
vating the “Oil level” function on the Informa -
tion and Entertainment System.
Contact an authorized dealer as soon as
possible.
Trunk Lid Not Properly Shut
The telltale turns on when the trunk lid
is not properly closed, along with the
icon, an image of the vehicle with an
open trunk lid appears on the display.
A buzzer is heard when the trunk lid is open
and the vehicle is moving.
Close the trunk lid properly.
Amber Symbols
Engine Immobilizer Failure/Break-In Attempt
Engine Immobilizer System Failure
The telltale will illuminate to report a
failure of the Engine Immobilizer
system.
Break-In Attempt The telltale will illuminate
when the ignition is cycled to ON position, to
indicate a possible break-in attempt detected
by the alarm system.
Electronic Key Not Recognized The telltale will
illuminate when the engine is started and the
electronic key is not recognized by the system.
Alarm System Failure The telltale will illumi -
nate to report an alarm system failure.
Contact an authorized dealer as soon as
possible.
Fuel Cut-Off Indicator Light
The telltale will illuminate after an
accident has occurred and the
system has shut the fuel off.
For reactivating the fuel cut-off system
Ú
page 159. If it is not possible to restore the
fuel supply, contact an authorized dealer.
Park Sensors System Failure
The telltale will illuminate when the
system has failed or is not available.
Contact an authorized dealer to have the
system checked.
CAUTION!
If the LOW ENGINE OIL PRESSURE symbol
switches on when driving, stop the engine
immediately and contact an authorized
dealer.
21_GA_OM_EN_USC_t.book Page 79
Page 105 of 284

103
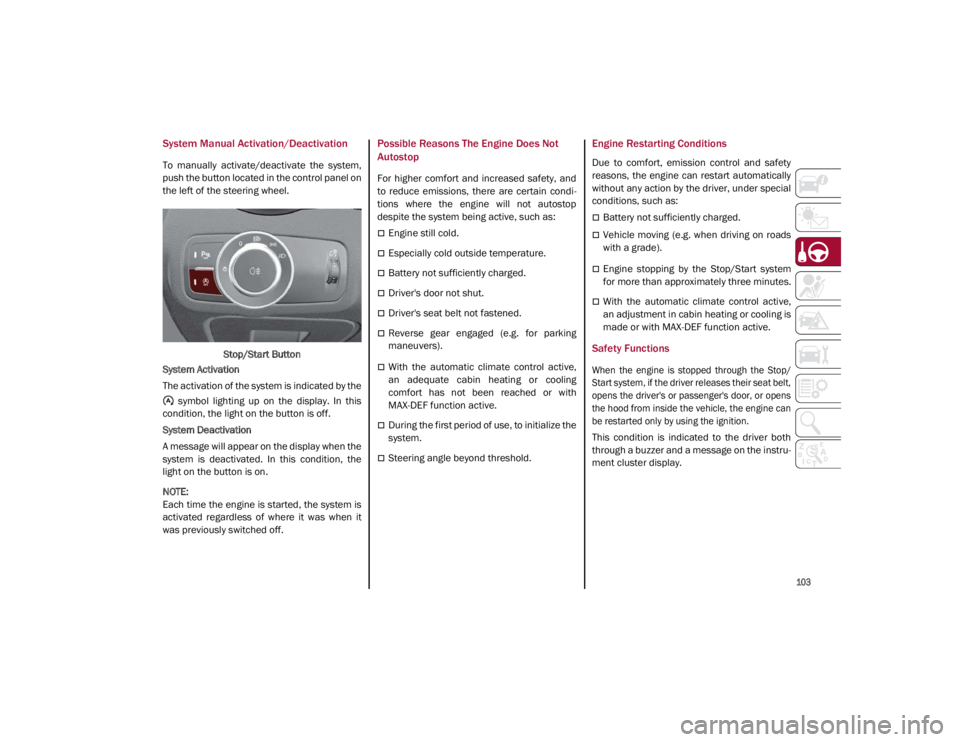
System Manual Activation/Deactivation
To manually activate/deactivate the system,
push the button located in the control panel on
the left of the steering wheel.Stop/Start Button
System Activation
The activation of the system is indicated by the symbol lighting up on the display. In this
condition, the light on the button is off.
System Deactivation
A message will appear on the display when the
system is deactivated. In this condition, the
light on the button is on.
NOTE:
Each time the engine is started, the system is
activated regardless of where it was when it
was previously switched off.
Possible Reasons The Engine Does Not
Autostop
For higher comfort and increased safety, and
to reduce emissions, there are certain condi -
tions where the engine will not autostop
despite the system being active, such as:
Engine still cold.
Especially cold outside temperature.
Battery not sufficiently charged.
Driver's door not shut.
Driver's seat belt not fastened.
Reverse gear engaged (e.g. for parking
maneuvers).
With the automatic climate control active,
an adequate cabin heating or cooling
comfort has not been reached or with
MAX-DEF function active.
During the first period of use, to initialize the
system.
Steering angle beyond threshold.
Engine Restarting Conditions
Due to comfort, emission control and safety
reasons, the engine can restart automatically
without any action by the driver, under special
conditions, such as:
Battery not sufficiently charged.
Vehicle moving (e.g. when driving on roads
with a grade).
Engine stopping by the Stop/Start system
for more than approximately three minutes.
With the automatic climate control active,
an adjustment in cabin heating or cooling is
made or with MAX-DEF function active.
Safety Functions
When the engine is stopped through the Stop/
Start system, if the driver releases their seat belt,
opens the driver's or passenger's door, or opens
the hood from inside the vehicle, the engine can
be restarted only by using the ignition.
This condition is indicated to the driver both
through a buzzer and a message on the instru-
ment cluster display.
21_GA_OM_EN_USC_t.book Page 103
Page 135 of 284

133
(Continued)
(Continued)
Limited Operation Warning
If a message appears on the display, a condi -
tion limiting the LKA system operation may
have occurred. This could be an obstruction of
the camera view, or a fault in the system.
If an obstruction is detected, clean the area of
the windshield by the interior rearview mirror.
Although the vehicle can still be driven in
normal conditions, the system may not func -
tion properly.
When the conditions limiting the system are
corrected, it will go back to normal operation.
Should a fault persist, contact an authorized
dealer.
System Failure Signaling
If the system turns off and appears on the
display, it means that there is a system fault.
In this case, it is still possible to drive the
vehicle, but you are advised to contact an
authorized dealer as soon as possible.
CAUTION!
Projecting loads on the roof of the vehicle
may interfere with the correct operation of
the camera. Before starting, make sure
the load is correctly positioned, in order
not to cover the camera operating range.
If the windshield must be replaced due to
scratches, chips or breakage, contact an
authorized dealer. Do not replace the wind-
shield on your own; there is risk of malfunc -
tion. It is advisable to replace the windshield
if it is damaged in the area of the camera.
Do not tamper with or operate on the
camera. Do not close the openings in the
aesthetic cover located under the interior
rearview mirror. In the event of a failure of
the camera, contact an authorized dealer
immediately.
Do not cover the operating range of the
camera with stickers or other objects. Also
pay attention to other objects on the hood
(e.g. a layer of snow) and make sure they
do not interfere with the camera.
The camera may have limited or absent
operation due to weather conditions such
as: heavy rain, hail, thick fog, heavy snow,
formation of ice layers on the windshield.
CAUTION! (Continued)
Camera operation may also be compro -
mised by the presence of dust, condensa -
tion, dirt or ice on the windshield, traffic
conditions (e.g. vehicles that are driving
not aligned with yours, vehicle driving in a
transverse or opposite way on the same
lane, bend with a small radius of curva -
ture), or road surface conditions and
driving conditions (e.g. off-road driving).
Make sure the windshield is always clean.
Use specific detergents and clean cloths
to avoid scratching the windshield. The
camera operation may also be limited or
absent in some driving, traffic and road
surface conditions.
CAUTION! (Continued)
21_GA_OM_EN_USC_t.book Page 133