2021 ALFA ROMEO GIULIA hood release
[x] Cancel search: hood releasePage 23 of 284

21
To Exit Remote Start Mode
To drive the vehicle after starting the Remote
Start system, either push and release the
unlock button on the key fob to unlock the
doors, or unlock the vehicle using Passive
Entry via the door handles, and disarm the
Vehicle Security system (if equipped). Then,
prior to the end of the 15 minute cycle, push
and release the START/STOP ignition button
while pressing the brake pedal.
The Remote Start system will turn the engine
off with another push and release of the
Remote Start button on the key fob, or if the
engine is allowed to run for the entire
15 minute cycle.
Remote Start Comfort Systems — If
Equipped
When Remote Start is activated, the heated
steering wheel and front heated seat features
will automatically activate when ambient
temperature is less than 39°F (4°C). These
features will stay on through the duration of
Remote Start.
NOTE:
This feature can be activated through the
radio system. Refer to the Information and
Entertainment System Owner’s Manual
Supplement for further information
VEHICLE SECURITY SYSTEM — IF
EQUIPPED
The Vehicle Security system monitors the
vehicle doors, hood, trunk, and the keyless
push button ignition for unauthorized opera-
tion. It also monitors movement inside the
passenger compartment (volumetric protec -
tion — if equipped), cutting of battery cables,
and unexpected lifting/tilting of the vehicle
(anti-lift protection — if equipped).
While the Vehicle Security system is armed,
interior switches for door locks and trunk
release are disabled.
If something triggers the alarm, the Vehicle
Security system will provide the following
audible and visible signals:
The horn will pulse
The turn signals will flash
The vehicle security light in the instrument
cluster will flash
NOTE:
The Vehicle Security system is activated by the
Engine Immobilizer system, which is automati -
cally activated when you get out of the vehicle
with the key fob and lock the doors.
To Arm The System
Follow these steps to arm the Vehicle Security
system:
1. Make sure the vehicle’s ignition is placed in the OFF position.
2. Perform one of the following methods to lock the vehicle:
• Push the lock button on the interior
power door lock switch with the driver
and/or passenger door open.
• Push the lock button on the exterior
Passive Entry Door Handle with a valid
key fob available in the same exterior
zone
Ú
page 24.
• Push the lock button on the key fob.
3. If any doors (or trunk lid) are open, close them.
To Disarm The System
The Vehicle Security system can be disarmed
using any of the following methods:
Push the unlock button on the key fob.
Grab the Passive Entry door handle to
unlock the door
Ú
page 24.
Cycle the ignition out of the OFF position to
disarm the system.
21_GA_OM_EN_USC_t.book Page 21
Page 64 of 284

GETTING TO KNOW YOUR VEHICLE
62
HOOD
Opening
To open the hood, two latches must be
released.
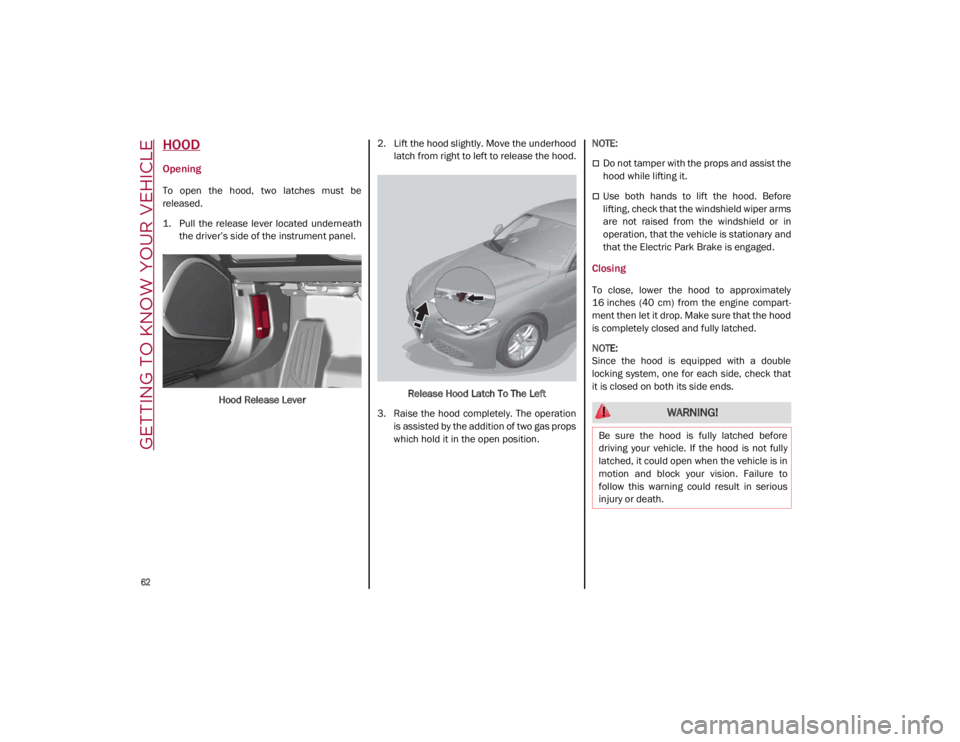
1. Pull the release lever located underneaththe driver’s side of the instrument panel.
Hood Release Lever 2. Lift the hood slightly. Move the underhood
latch from right to left to release the hood.
Release Hood Latch To The Left
3. Raise the hood completely. The operation is assisted by the addition of two gas props
which hold it in the open position.
NOTE:
Do not tamper with the props and assist the
hood while lifting it.
Use both hands to lift the hood. Before
lifting, check that the windshield wiper arms
are not raised from the windshield or in
operation, that the vehicle is stationary and
that the Electric Park Brake is engaged.
Closing
To close, lower the hood to approximately
16 inches (40 cm) from the engine compart
-
ment then let it drop. Make sure that the hood
is completely closed and fully latched.
NOTE:
Since the hood is equipped with a double
locking system, one for each side, check that
it is closed on both its side ends.
WARNING!
Be sure the hood is fully latched before
driving your vehicle. If the hood is not fully
latched, it could open when the vehicle is in
motion and block your vision. Failure to
follow this warning could result in serious
injury or death.
21_GA_OM_EN_USC_t.book Page 62
Page 65 of 284

63
TRUNK
The trunk unlocking is electrically operated and
is deactivated when the vehicle is in motion.
Opening
Opening From The Outside
When unlocked, the trunk lid can be opened
from outside the vehicle using the exterior
trunk lid release button located between the
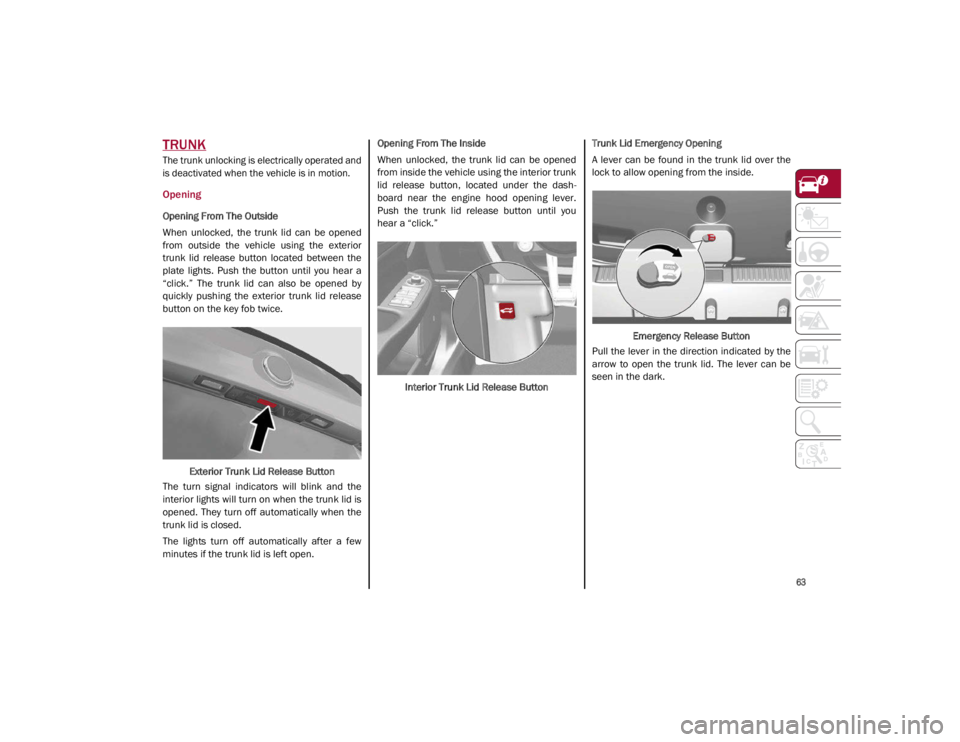
plate lights. Push the button until you hear a
“click.” The trunk lid can also be opened by
quickly pushing the exterior trunk lid release
button on the key fob twice.Exterior Trunk Lid Release Button
The turn signal indicators will blink and the
interior lights will turn on when the trunk lid is
opened. They turn off automatically when the
trunk lid is closed.
The lights turn off automatically after a few
minutes if the trunk lid is left open. Opening From The Inside
When unlocked, the trunk lid can be opened
from inside the vehicle using the interior trunk
lid release button, located under the dash
-
board near the engine hood opening lever.
Push the trunk lid release button until you
hear a “click.”
Interior Trunk Lid Release Button Trunk Lid Emergency Opening
A lever can be found in the trunk lid over the
lock to allow opening from the inside.
Emergency Release Button
Pull the lever in the direction indicated by the
arrow to open the trunk lid. The lever can be
seen in the dark.
21_GA_OM_EN_USC_t.book Page 63
Page 105 of 284

103
System Manual Activation/Deactivation
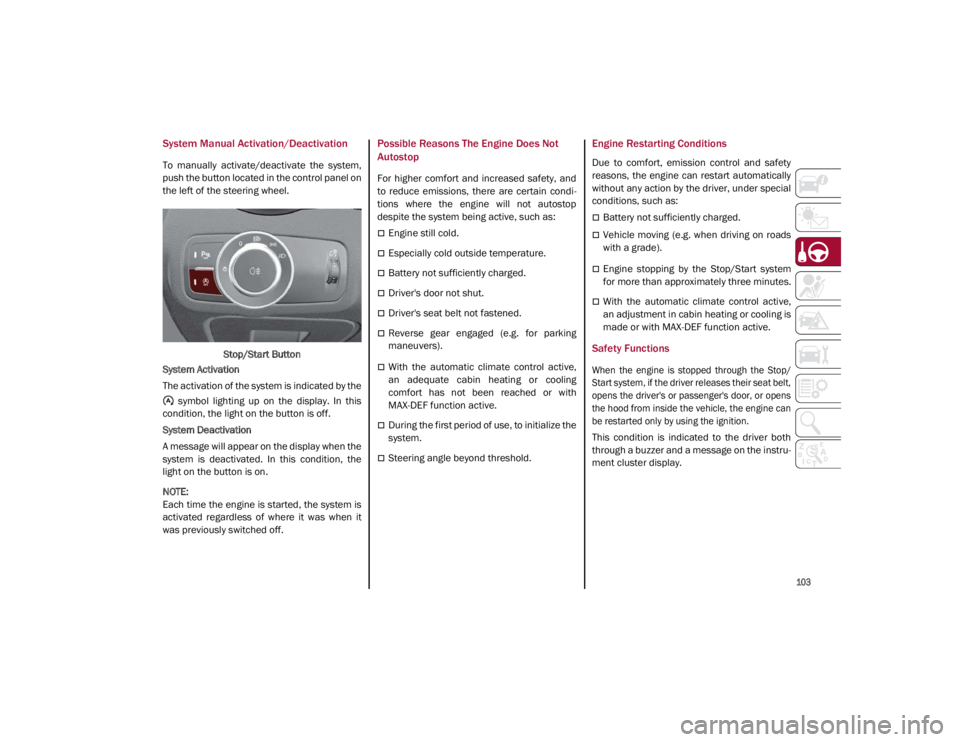
To manually activate/deactivate the system,
push the button located in the control panel on
the left of the steering wheel.Stop/Start Button
System Activation
The activation of the system is indicated by the symbol lighting up on the display. In this
condition, the light on the button is off.
System Deactivation
A message will appear on the display when the
system is deactivated. In this condition, the
light on the button is on.
NOTE:
Each time the engine is started, the system is
activated regardless of where it was when it
was previously switched off.
Possible Reasons The Engine Does Not
Autostop
For higher comfort and increased safety, and
to reduce emissions, there are certain condi -
tions where the engine will not autostop
despite the system being active, such as:
Engine still cold.
Especially cold outside temperature.
Battery not sufficiently charged.
Driver's door not shut.
Driver's seat belt not fastened.
Reverse gear engaged (e.g. for parking
maneuvers).
With the automatic climate control active,
an adequate cabin heating or cooling
comfort has not been reached or with
MAX-DEF function active.
During the first period of use, to initialize the
system.
Steering angle beyond threshold.
Engine Restarting Conditions
Due to comfort, emission control and safety
reasons, the engine can restart automatically
without any action by the driver, under special
conditions, such as:
Battery not sufficiently charged.
Vehicle moving (e.g. when driving on roads
with a grade).
Engine stopping by the Stop/Start system
for more than approximately three minutes.
With the automatic climate control active,
an adjustment in cabin heating or cooling is
made or with MAX-DEF function active.
Safety Functions
When the engine is stopped through the Stop/
Start system, if the driver releases their seat belt,
opens the driver's or passenger's door, or opens
the hood from inside the vehicle, the engine can
be restarted only by using the ignition.
This condition is indicated to the driver both
through a buzzer and a message on the instru-
ment cluster display.
21_GA_OM_EN_USC_t.book Page 103
Page 203 of 284

201
If Steam Is Coming From The Engine Compart-
ment
Do not go near the front of the vehicle. Stop
the engine. Wait until the steam dissipates.
Then, open the hood and start the engine.
If Neither Coolant Nor Steam Is Escaping
Open the hood and idle the engine until it
cools.
NOTE:
If the cooling fan does not operate while the
engine is running, the engine temperature
will increase. Stop the engine and contact
an authorized dealer.
If the engine continues to overheat or
frequently overheats, have the cooling
system inspected. The engine could be seri -
ously damaged unless repairs are made.
Contact an authorized dealer.
MANUAL PARK RELEASE
See an authorized dealer to disengage the
manual park release lever.
TOWING A DISABLED VEHICLE
This section describes procedures for towing a
disabled vehicle using a commercial towing
service. The operators of the assistance vehicle must
be informed with regard to the vehicle's
minimum height from ground in order to avoid
contact between the ends of the fascia/
bumper with the equipment of the breakdown
truck.
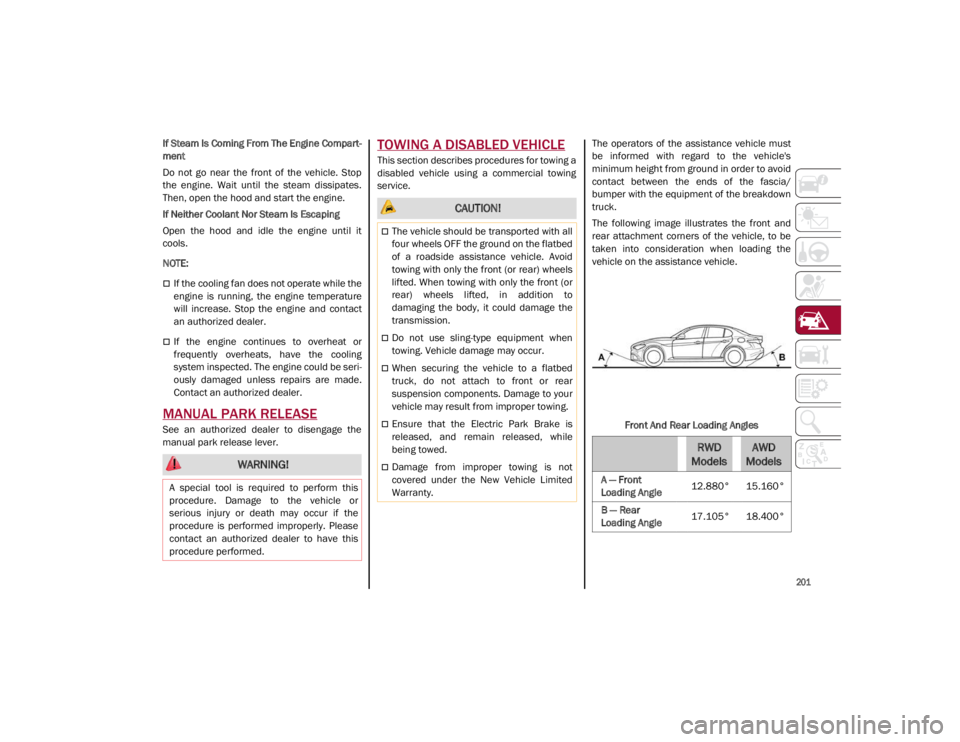
The following image illustrates the front and
rear attachment corners of the vehicle, to be
taken into consideration when loading the
vehicle on the assistance vehicle.
Front And Rear Loading Angles
WARNING!
A special tool is required to perform this
procedure. Damage to the vehicle or
serious injury or death may occur if the
procedure is performed improperly. Please
contact an authorized dealer to have this
procedure performed.
CAUTION!
The vehicle should be transported with all
four wheels OFF the ground on the flatbed
of a roadside assistance vehicle. Avoid
towing with only the front (or rear) wheels
lifted. When towing with only the front (or
rear) wheels lifted, in addition to
damaging the body, it could damage the
transmission.
Do not use sling-type equipment when
towing. Vehicle damage may occur.
When securing the vehicle to a flatbed
truck, do not attach to front or rear
suspension components. Damage to your
vehicle may result from improper towing.
Ensure that the Electric Park Brake is
released, and remain released, while
being towed.
Damage from improper towing is not
covered under the New Vehicle Limited
Warranty.
RWD
ModelsAWD
Models
A — Front
Loading Angle 12.880° 15.160°
B — Rear
Loading Angle 17.105° 18.400°
21_GA_OM_EN_USC_t.book Page 201
Page 220 of 284

SERVICING AND MAINTENANCE
218
Replace The Cabin Air Cleaner
For the correct servicing intervals
Ú
page 204. For cabin air cleaner replace -
ment, contact an authorized dealer.
Lubricating Moving Parts Of The Bodywork
Ensure that the locks and bodywork junction
points, including components such as the seat
guides, door hinges (and rollers), trunk and hood
are periodically lubricated with lithium-based
grease to ensure correct, silent operation and to
protect them from rust and wear.
Thoroughly clean the components, eliminating
every trace of dirt and dust. After lubricating,
eliminate excess oil and grease. Also pay
particular attention to the hood closing
devices, to ensure correct operation. During
operations on the hood, to be carried out with
the engine cold, also remember to check,
clean and lubricate the locking, release and
safety devices. Lubricate the external lock barrels twice a
year. Apply a small amount of high-quality
lubricant directly into the lock barrel.
If necessary, contact an authorized dealer as
soon as possible.
Windshield Wiper
Periodically clean the windshield and rear
window and rubber profile of the windshield
wiper blades, using a sponge or a soft cloth
and a non-abrasive detergent. This eliminates
the salt or impurities accumulated when
driving.
Prolonged operation of the windshield window
wipers with dry glass may cause the deteriora
-
tion of the blades, in addition to abrasion of
the surface of the glass. To eliminate the impu -
rities on the dry glass, always operate the
windshield washers.
In the event of very low outdoor temperatures,
below 0°F (-17.8°C) , ensure that the move -
ment of the rubber part in contact with the
glass is not obstructed. Use a suitable deicing
product to release it if required.
Avoid using the windshield wipers to remove
frost or ice.
Also avoid contact of the rubber profile of the
blades with petroleum derivatives such as
engine oil, gas, etc.
NOTE:
The life of the windshield wiper blades varies
according to the usage frequency. In any case,
it is advised to replace the blades approxi
-
mately once a year. When the blades are worn,
noise, marks on the glass or streaks of water
may be noticed. In the presence of these
conditions, clean the windshield wiper blades
or, if necessary, replace them.
Raising The Windshield Wiper Blades
(“Service Position” Function)
The “service position” function allows the
driver to replace the windshield wiper blades
more easily. It is also recommended to acti -
vate this function when it is snowing and to
make it easier to remove any dirt deposits in
the area where the blades are normally posi -
tioned, when washing.
Activation Of The Function
To activate this function, disable the wind -
shield wiper before setting the ignition device
to OFF.
This function can only be activated within two
minutes of placing the ignition in OFF.
WARNING!
Use only refrigerants and compressor lubricants
approved by FCA US LLC for your air conditioning
system. Some unapproved refrigerants are
flammable and can explode, injuring you. Other
unapproved refrigerants or lubricants can cause
the system to fail, requiring costly repairs. Refer
to Warranty Information Book, located in your
owner’s information kit, for further warranty
information.
WARNING!
Driving with worn windshield wiper blades
is a serious hazard, because visibility is
reduced in bad weather conditions.
21_GA_OM_EN_USC_t.book Page 218
Page 277 of 284

275
Door Ajar ................................................ 78, 79
Door Ajar Light ....................................... 78, 79
Door LocksAutomatic ................................................. 26
Door Opener, Garage ................................... 38
Drive Train Control (DTC) System ..............142
Driving Modes .............................................. 99
Dynamic Steering Torque (DST) System ... 142
E
Electric Park Brake....................................... 90
Electronic Speed Control
(Cruise Control) ..........................................105
Electronic Stability Control (ESC)
System ........................................................142
Electronic Throttle Control Warning
Light .............................................................. 78
Emergency In Case Of ......................................190, 194
SOS Emergency Call .............................. 190
Emergency, In Case Of Jump Starting .........................................198
Overheating ............................................ 200
Tow Hooks ..............................................202
Towing.....................................................201
Emission Control System Maintenance...... 85
Engine ......................................................... 256 Block Heater............................................. 89
Engine Coolant Level .............................214
Exhaust Gas Caution .............................189
Fuel Requirements ................................ 263Jump Starting .........................................199
Overheating ............................................ 200
Engine Compartment .................................211
Engine Compartment (Washing) ...............253 Engine Oil
Level Check............................................ 213
Enhanced Accident Response
Feature .............................................. 172, 203
Ethanol ....................................................... 263
Exhaust Gas Cautions ............................... 189
Exhaust System ......................................... 189
Exterior Lights ............................ 42, 188, 231
F
Flashers Turn Signals .................................... 77, 188
Fluid Leaks ................................................. 188
Fog Lights, Rear ........................................... 44
Forward Collision Warning ........................ 151
Fuel Additives................................................. 264
Clean Air ................................................. 263
Ethanol ................................................... 263
Light .......................................................... 79
Materials Added .................................... 264
Methanol ................................................ 263
Fuses ................................................. 223, 224
G
Garage Door Opener (HomeLink) ............... 38
Gasoline, Clean Air .................................... 263
Gasoline, Reformulated ............................ 263
Gauges Engine Oil Temperature .......................... 67
Fuel ........................................................... 68
Speedometer ........................................... 68
Tachometer .............................................. 67 Glove Compartment Storage .......................55
GVWR ......................................................... 137
H
Hazard Warning Flashers.......................... 190
Head Restraints............................................35
Head Rests ...................................................35
Headlights .....................................................42 Automatic..................................................42
Delay .........................................................43
High Beam ................................................42
Switch .......................................................42
Headlights (Cleaning) ................................ 253
Heated Mirrors..............................................38
Heated Seats ......................................... 33, 34
Heated Steering Wheel ................................27
Heater, Engine Block.................................... 89
Hill Start Assist (HSA) System ................... 143
HomeLink (Garage Door Opener) ................38
Hood Closing ......................................................62Opening.....................................................62
Hood Release ...............................................62
I
Ignition ..........................................................19 Switch .......................................................19
Immobilizer (Sentry Key) ..............................18
In Case Of Emergency ............................... 190
Installing Electrical/Electronic Devices......... 3
Instrument Cluster Descriptions..............................................77
Display ......................................................68
21_GA_OM_EN_USC_t.book Page 275