2021 ALFA ROMEO GIULIA trunk release
[x] Cancel search: trunk releasePage 18 of 284

16
GETTING TO KNOW YOUR VEHICLE
In this section, you will find important informa-
tion to help you become familiar with the
features needed to operate your vehicle, and
how they function.
KEYS
Key Fob
Your vehicle is equipped with a key fob which
supports Passive Entry, Remote Keyless Entry
(RKE), Remote Start (if equipped), and remote
trunk operation. The key fob allows you to lock
or unlock the doors and trunk lid. The key fob
does not need to be pointed at the vehicle to
activate the system. The key fob also contains
an emergency key, which is stored inside the
key fob.
NOTE:
The key fob’s wireless signal may be
blocked if the key fob is located next to a
mobile phone, laptop, or other electronic
device. This may result in poor perfor -
mance.
With ignition in the ON position and the
vehicle moving at 2 mph (4 km/h), all RKE commands are disabled. Key Fob
In case the ignition switch does not change
with the push of a button, the key fob may
have a low or fully depleted battery. A low key
fob battery can be verified by referring to the
instrument cluster, which will display direc -
tions to follow
Ú
page 273.
To Lock/Unlock The Doors And Trunk
Push and release the unlock button on the key
fob once to unlock the driver’s door, or twice
within five seconds to unlock all the doors and
the trunk lid. To lock all the doors and the
trunk lid, push the lock button once. If the
trunk lid is open when the lock button is
pushed, the trunk lid will lock when it is closed. The current unlock setting can be changed
through the radio system menu, so that the
system unlocks:
All doors on the first push of the key fob
unlock button.
The driver door on the first push of the key
fob unlock button.
When the doors are locked/unlocked, the turn
signals will flash and the illuminated entry
system will be activated.
NOTE:
If one or more doors are open when the lock
button is pushed, or the trunk lid is open, the
doors will lock. The doors will unlock again
automatically if the key is left inside the
passenger compartment, otherwise the doors
will stay locked.
Flashing of the turn signals upon locking/
unlocking the doors and activation of the cour -
tesy light upon unlocking the doors can be
activated or deactivated through the radio
system. For further information, refer to the
Information and Entertainment System
Owner’s Manual Supplement.
Trunk Lid Opening
Rapidly push the trunk lid key fob button twice
to open the trunk lid. The turn signals will flash
to indicate that the trunk lid has been opened.
21_GA_OM_EN_USC_t.book Page 16
Page 23 of 284

21
To Exit Remote Start Mode
To drive the vehicle after starting the Remote
Start system, either push and release the
unlock button on the key fob to unlock the
doors, or unlock the vehicle using Passive
Entry via the door handles, and disarm the
Vehicle Security system (if equipped). Then,
prior to the end of the 15 minute cycle, push
and release the START/STOP ignition button
while pressing the brake pedal.
The Remote Start system will turn the engine
off with another push and release of the
Remote Start button on the key fob, or if the
engine is allowed to run for the entire
15 minute cycle.
Remote Start Comfort Systems — If
Equipped
When Remote Start is activated, the heated
steering wheel and front heated seat features
will automatically activate when ambient
temperature is less than 39°F (4°C). These
features will stay on through the duration of
Remote Start.
NOTE:
This feature can be activated through the
radio system. Refer to the Information and
Entertainment System Owner’s Manual
Supplement for further information
VEHICLE SECURITY SYSTEM — IF
EQUIPPED
The Vehicle Security system monitors the
vehicle doors, hood, trunk, and the keyless
push button ignition for unauthorized opera-
tion. It also monitors movement inside the
passenger compartment (volumetric protec -
tion — if equipped), cutting of battery cables,
and unexpected lifting/tilting of the vehicle
(anti-lift protection — if equipped).
While the Vehicle Security system is armed,
interior switches for door locks and trunk
release are disabled.
If something triggers the alarm, the Vehicle
Security system will provide the following
audible and visible signals:
The horn will pulse
The turn signals will flash
The vehicle security light in the instrument
cluster will flash
NOTE:
The Vehicle Security system is activated by the
Engine Immobilizer system, which is automati -
cally activated when you get out of the vehicle
with the key fob and lock the doors.
To Arm The System
Follow these steps to arm the Vehicle Security
system:
1. Make sure the vehicle’s ignition is placed in the OFF position.
2. Perform one of the following methods to lock the vehicle:
• Push the lock button on the interior
power door lock switch with the driver
and/or passenger door open.
• Push the lock button on the exterior
Passive Entry Door Handle with a valid
key fob available in the same exterior
zone
Ú
page 24.
• Push the lock button on the key fob.
3. If any doors (or trunk lid) are open, close them.
To Disarm The System
The Vehicle Security system can be disarmed
using any of the following methods:
Push the unlock button on the key fob.
Grab the Passive Entry door handle to
unlock the door
Ú
page 24.
Cycle the ignition out of the OFF position to
disarm the system.
21_GA_OM_EN_USC_t.book Page 21
Page 26 of 284

GETTING TO KNOW YOUR VEHICLE
24
Passive Entry System
The Passive Entry system is an enhancement
to the vehicle’s key fob. This feature allows you
to lock and unlock the vehicle’s door(s) and
trunk lid without having to push the key fob
lock or unlock buttons.
NOTE:
Passive Entry may be programmed on/off
through the radio screen. Refer to the Infor-
mation and Entertainment System Owner’s
Manual Supplement for Passive Entry
settings.
The key fob may not be able to be detected
by the vehicle Passive Entry system if it is
located next to a mobile phone, laptop, or
other electronic device; these devices may
block the key fob’s wireless signal and
prevent the Passive Entry system from
locking/unlocking the vehicle.
If wearing gloves, or if it has been raining/
snowing on the Passive Entry door handle,
the unlock sensitivity can be affected,
resulting in a slower response time.
If the vehicle is unlocked by Passive Entry
and no door is opened within 60 seconds,
the vehicle will re-lock and (if equipped) will
arm the Vehicle Security system. To Unlock From The Driver Or Passenger Side
With a valid Passive Entry key fob close to the
door handle, grab the handle to unlock the
vehicle. Grabbing the driver’s door handle will
unlock the driver door automatically. Grabbing
the passenger door handle will unlock all
doors and the trunk lid automatically.
Passive Entry Door Handle
NOTE:
If “Unlock All Doors 1st Press” is programmed
all doors will unlock when you grab hold of the
front driver’s door handle. You can select
between “Unlock Driver Door 1st Press” and
“Unlock All Doors 1st Press” through the radio
screen. Refer to the Information and Enter-
tainment System Owner’s Manual Supple -
ment for Passive Entry settings.
All doors will unlock when the front
passenger door handle is grabbed regard -
less of the driver’s door unlock preference
setting.
Exterior Trunk Lid Release Switch (Vehicles With Passive Entry)
Frequency Operated Button Integrated Key
(FOBIK-Safe)
To minimize the possibility of unintentionally
locking a Passive Entry key fob inside your
vehicle, the Passive Entry system is equipped
with an automatic door unlock feature which
will function if the ignition switch is in the OFF
position.
The vehicle will not unlock the doors if an
unauthorized key fob has been detected close
to the outside of the vehicle.
If the Passive Entry function is disabled
through the radio screen, the protections to
avoid accidentally leaving the key fob inside
the vehicle are deactivated.
21_GA_OM_EN_USC_t.book Page 24
Page 27 of 284
25
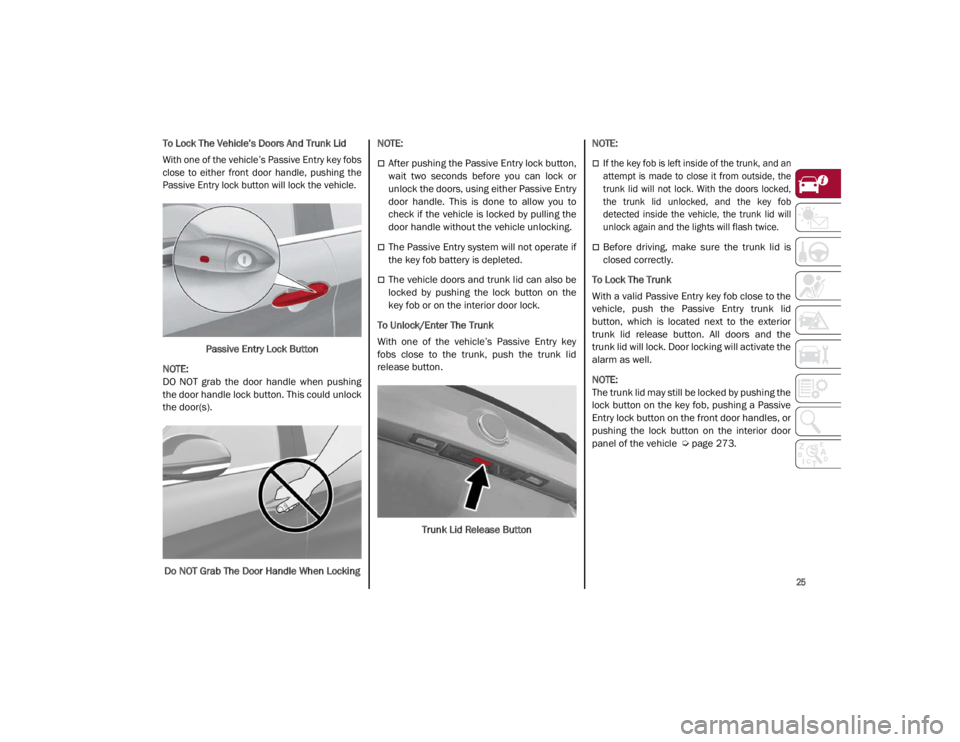
To Lock The Vehicle’s Doors And Trunk Lid
With one of the vehicle’s Passive Entry key fobs
close to either front door handle, pushing the
Passive Entry lock button will lock the vehicle.
Passive Entry Lock Button
NOTE:
DO NOT grab the door handle when pushing
the door handle lock button. This could unlock
the door(s).
Do NOT Grab The Door Handle When Locking
NOTE:
After pushing the Passive Entry lock button,
wait two seconds before you can lock or
unlock the doors, using either Passive Entry
door handle. This is done to allow you to
check if the vehicle is locked by pulling the
door handle without the vehicle unlocking.
The Passive Entry system will not operate if
the key fob battery is depleted.
The vehicle doors and trunk lid can also be
locked by pushing the lock button on the
key fob or on the interior door lock.
To Unlock/Enter The Trunk
With one of the vehicle’s Passive Entry key
fobs close to the trunk, push the trunk lid
release button.
Trunk Lid Release Button
NOTE:
If the key fob is left inside of the trunk, and an
attempt is made to close it from outside, the
trunk lid will not lock. With the doors locked,
the trunk lid unlocked, and the key fob
detected inside the vehicle, the trunk lid will
unlock again and the lights will flash twice.
Before driving, make sure the trunk lid is
closed correctly.
To Lock The Trunk
With a valid Passive Entry key fob close to the
vehicle, push the Passive Entry trunk lid
button, which is located next to the exterior
trunk lid release button. All doors and the
trunk lid will lock. Door locking will activate the
alarm as well.
NOTE:
The trunk lid may still be locked by pushing the
lock button on the key fob, pushing a Passive
Entry lock button on the front door handles, or
pushing the lock button on the interior door
panel of the vehicle
Ú
page 273.
21_GA_OM_EN_USC_t.book Page 25
Page 32 of 284
GETTING TO KNOW YOUR VEHICLE
30
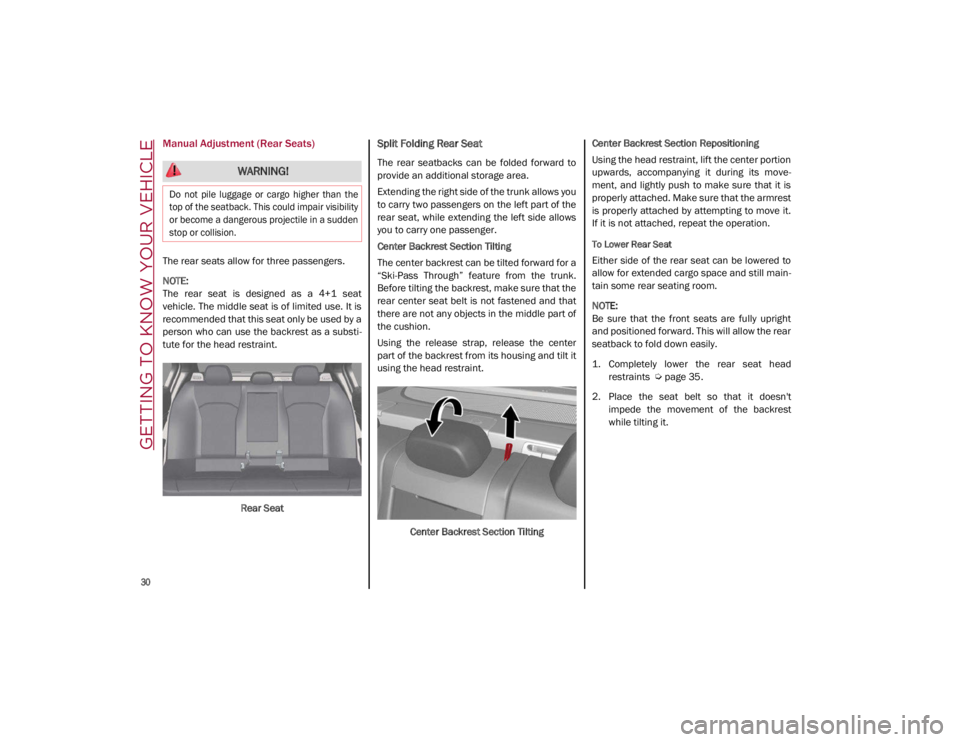
Manual Adjustment (Rear Seats)
The rear seats allow for three passengers.
NOTE:
The rear seat is designed as a 4+1 seat
vehicle. The middle seat is of limited use. It is
recommended that this seat only be used by a
person who can use the backrest as a substi-
tute for the head restraint.
Rear Seat
Split Folding Rear Seat
The rear seatbacks can be folded forward to
provide an additional storage area.
Extending the right side of the trunk allows you
to carry two passengers on the left part of the
rear seat, while extending the left side allows
you to carry one passenger.
Center Backrest Section Tilting
The center backrest can be tilted forward for a
“Ski-Pass Through” feature from the trunk.
Before tilting the backrest, make sure that the
rear center seat belt is not fastened and that
there are not any objects in the middle part of
the cushion.
Using the release strap, release the center
part of the backrest from its housing and tilt it
using the head restraint.Center Backrest Section Tilting Center Backrest Section Repositioning
Using the head restraint, lift the center portion
upwards, accompanying it during its move
-
ment, and lightly push to make sure that it is
properly attached. Make sure that the armrest
is properly attached by attempting to move it.
If it is not attached, repeat the operation.
To Lower Rear Seat
Either side of the rear seat can be lowered to
allow for extended cargo space and still main -
tain some rear seating room.
NOTE:
Be sure that the front seats are fully upright
and positioned forward. This will allow the rear
seatback to fold down easily.
1. Completely lower the rear seat head restraints
Ú
page 35.
2. Place the seat belt so that it doesn't impede the movement of the backrest
while tilting it.
WARNING!
Do not pile luggage or cargo higher than the
top of the seatback. This could impair visibility
or become a dangerous projectile in a sudden
stop or collision.
21_GA_OM_EN_USC_t.book Page 30
Page 33 of 284
31
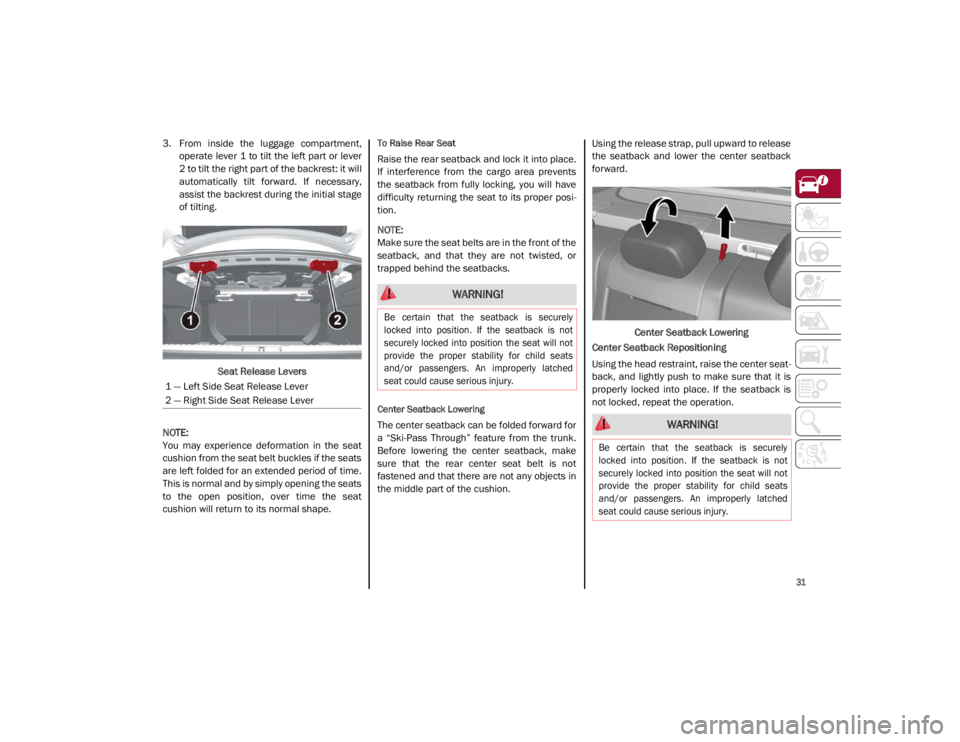
3. From inside the luggage compartment,operate lever 1 to tilt the left part or lever
2 to tilt the right part of the backrest: it will
automatically tilt forward. If necessary,
assist the backrest during the initial stage
of tilting.
Seat Release Levers
NOTE:
You may experience deformation in the seat
cushion from the seat belt buckles if the seats
are left folded for an extended period of time.
This is normal and by simply opening the seats
to the open position, over time the seat
cushion will return to its normal shape.To Raise Rear Seat
Raise the rear seatback and lock it into place.
If interference from the cargo area prevents
the seatback from fully locking, you will have
difficulty returning the seat to its proper posi -
tion.
NOTE:
Make sure the seat belts are in the front of the
seatback, and that they are not twisted, or
trapped behind the seatbacks.
Center Seatback Lowering
The center seatback can be folded forward for
a “Ski-Pass Through” feature from the trunk.
Before lowering the center seatback, make
sure that the rear center seat belt is not
fastened and that there are not any objects in
the middle part of the cushion. Using the release strap, pull upward to release
the seatback and lower the center seatback
forward.
Center Seatback Lowering
Center Seatback Repositioning
Using the head restraint, raise the center seat -
back, and lightly push to make sure that it is
properly locked into place. If the seatback is
not locked, repeat the operation.
1 — Left Side Seat Release Lever
2 — Right Side Seat Release Lever
WARNING!
Be certain that the seatback is securely
locked into position. If the seatback is not
securely locked into position the seat will not
provide the proper stability for child seats
and/or passengers. An improperly latched
seat could cause serious injury.
WARNING!
Be certain that the seatback is securely
locked into position. If the seatback is not
securely locked into position the seat will not
provide the proper stability for child seats
and/or passengers. An improperly latched
seat could cause serious injury.
21_GA_OM_EN_USC_t.book Page 31
Page 65 of 284
63
TRUNK
The trunk unlocking is electrically operated and
is deactivated when the vehicle is in motion.
Opening
Opening From The Outside
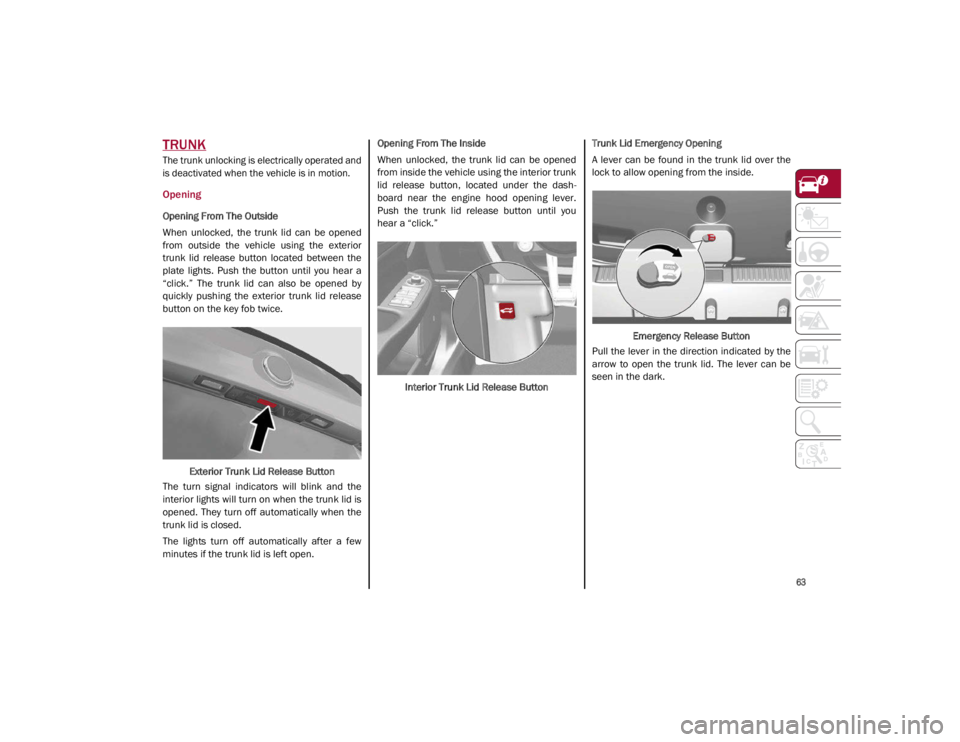
When unlocked, the trunk lid can be opened
from outside the vehicle using the exterior
trunk lid release button located between the
plate lights. Push the button until you hear a
“click.” The trunk lid can also be opened by
quickly pushing the exterior trunk lid release
button on the key fob twice.Exterior Trunk Lid Release Button
The turn signal indicators will blink and the
interior lights will turn on when the trunk lid is
opened. They turn off automatically when the
trunk lid is closed.
The lights turn off automatically after a few
minutes if the trunk lid is left open. Opening From The Inside
When unlocked, the trunk lid can be opened
from inside the vehicle using the interior trunk
lid release button, located under the dash
-
board near the engine hood opening lever.
Push the trunk lid release button until you
hear a “click.”
Interior Trunk Lid Release Button Trunk Lid Emergency Opening
A lever can be found in the trunk lid over the
lock to allow opening from the inside.
Emergency Release Button
Pull the lever in the direction indicated by the
arrow to open the trunk lid. The lever can be
seen in the dark.
21_GA_OM_EN_USC_t.book Page 63
Page 138 of 284
STARTING AND OPERATING
136
(Continued)
4. When the fuel nozzle “clicks” or shuts off,before removing the nozzle, wait for at
least 10 seconds in order for the fuel to
flow inside the tank.
5. Remove the fuel filler nozzle, tighten the gas cap about a quarter turn until you hear
one click. This is an indication that cap is
properly tightened.
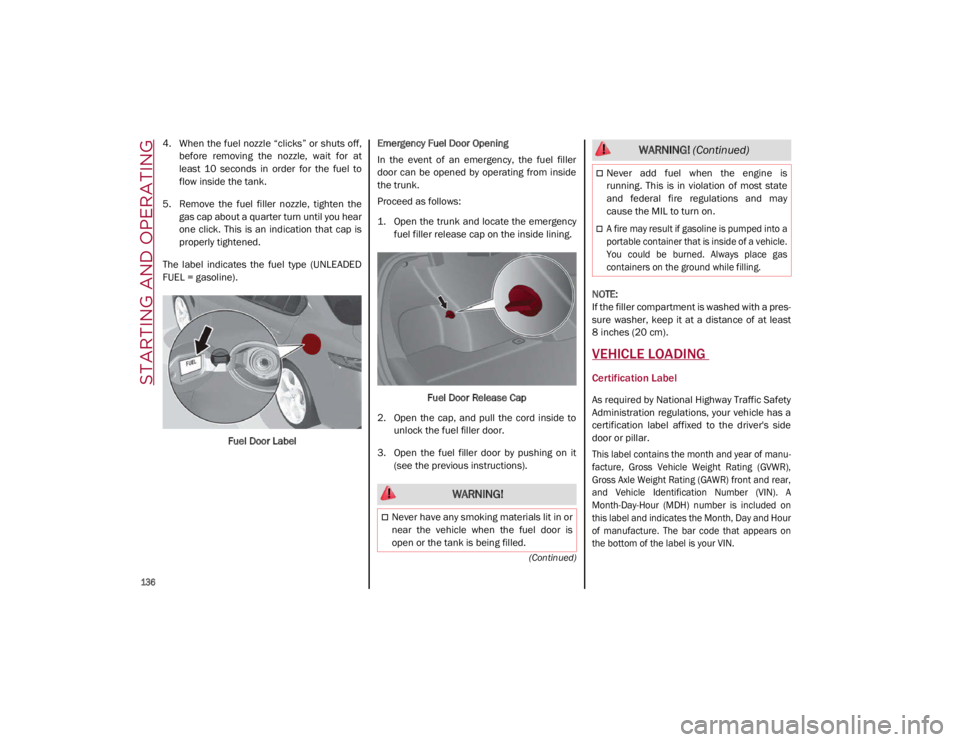
The label indicates the fuel type (UNLEADED
FUEL = gasoline).
Fuel Door Label Emergency Fuel Door Opening
In the event of an emergency, the fuel filler
door can be opened by operating from inside
the trunk.
Proceed as follows:
1. Open the trunk and locate the emergency
fuel filler release cap on the inside lining.
Fuel Door Release Cap
2. Open the cap, and pull the cord inside to unlock the fuel filler door.
3. Open the fuel filler door by pushing on it (see the previous instructions).
NOTE:
If the filler compartment is washed with a pres
-
sure washer, keep it at a distance of at least
8 inches (20 cm).
VEHICLE LOADING
Certification Label
As required by National Highway Traffic Safety
Administration regulations, your vehicle has a
certification label affixed to the driver's side
door or pillar.
This label contains the month and year of manu -
facture, Gross Vehicle Weight Rating (GVWR),
Gross Axle Weight Rating (GAWR) front and rear,
and Vehicle Identification Number (VIN). A
Month-Day-Hour (MDH) number is included on
this label and indicates the Month, Day and Hour
of manufacture. The bar code that appears on
the bottom of the label is your VIN.
WARNING!
Never have any smoking materials lit in or
near the vehicle when the fuel door is
open or the tank is being filled.
Never add fuel when the engine is
running. This is in violation of most state
and federal fire regulations and may
cause the MIL to turn on.
A fire may result if gasoline is pumped into a
portable container that is inside of a vehicle.
You could be burned. Always place gas
containers on the ground while filling.
WARNING! (Continued)
21_GA_OM_EN_USC_t.book Page 136