2021 ALFA ROMEO GIULIA radio
[x] Cancel search: radioPage 28 of 284
GETTING TO KNOW YOUR VEHICLE
26
Automatic Door Locks — If Equipped
The auto door lock feature default condition is
enabled. When enabled, the door locks will
lock automatically when the vehicle's speed
exceeds 12 mph (20 km/h). The auto door
lock feature is enabled/disabled through the
radio screen. Refer to the Information and
Entertainment System Owner’s Manual
Supplement for further information.
Child-Protection Door Lock System — Rear
Doors
To provide a safer environment for small chil-
dren riding in the rear seats, the rear doors are
equipped with a Child-Protection Door Lock
system.
To use the system, open each rear door, use a
flat blade screwdriver (or emergency key) and
rotate the dial to the lock or unlock position.
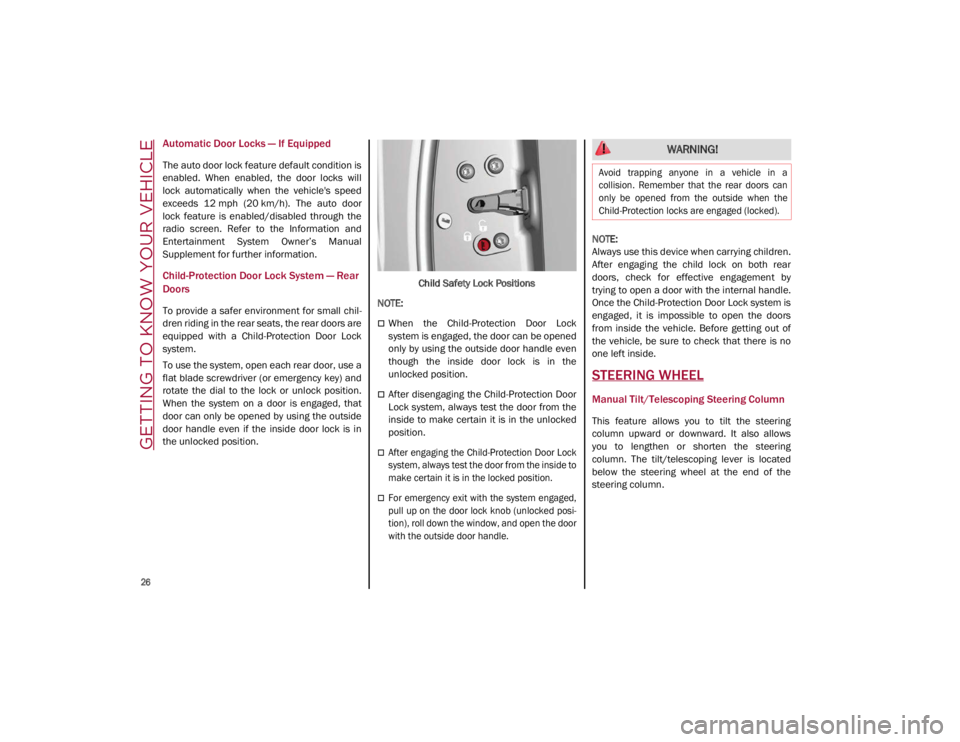
When the system on a door is engaged, that
door can only be opened by using the outside
door handle even if the inside door lock is in
the unlocked position. Child Safety Lock Positions
NOTE:
When the Child-Protection Door Lock
system is engaged, the door can be opened
only by using the outside door handle even
though the inside door lock is in the
unlocked position.
After disengaging the Child-Protection Door
Lock system, always test the door from the
inside to make certain it is in the unlocked
position.
After engaging the Child-Protection Door Lock
system, always test the door from the inside to
make certain it is in the locked position.
For emergency exit with the system engaged,
pull up on the door lock knob (unlocked posi -
tion), roll down the window, and open the door
with the outside door handle.
NOTE:
Always use this device when carrying children.
After engaging the child lock on both rear
doors, check for effective engagement by
trying to open a door with the internal handle.
Once the Child-Protection Door Lock system is
engaged, it is impossible to open the doors
from inside the vehicle. Before getting out of
the vehicle, be sure to check that there is no
one left inside.
STEERING WHEEL
Manual Tilt/Telescoping Steering Column
This feature allows you to tilt the steering
column upward or downward. It also allows
you to lengthen or shorten the steering
column. The tilt/telescoping lever is located
below the steering wheel at the end of the
steering column.
WARNING!
Avoid trapping anyone in a vehicle in a
collision. Remember that the rear doors can
only be opened from the outside when the
Child-Protection locks are engaged (locked).
21_GA_OM_EN_USC_t.book Page 26
Page 35 of 284

33
Power Lumbar
The power lumbar switch is located on the
outboard side of the power seat. Push the
switch forward or rearward to increase or
decrease the lumbar support. Push the switch
upward or downward to raise or lower the
lumbar support.
Seat Cushion Extension — If Equipped
Lift the adjustment lever and push the front of
the cushion forward or rearward to extend the
cushion by a few inches (centimeters).Seat Cushion Extension
Power Bolster Adjustment — If Equipped
Push the power bolster adjustment buttons to
regulate the width of the backrest through the
lateral padding.
Seatback Width Adjustment
Easy Entry Function
The Easy Entry function is designed to move
the driver side seat forward automatically by
2.36 inches (60 mm) to make it easier for the
driver to get in and out of the car.
The movement is activated only if the seat is
set to a driving position which is in front of the
B-Pillar of the vehicle. The function is associated with power driver
seats for each of the three stored positions.
The Easy Entry function can be activated/
deactivated through the radio system. Refer to
the Information and Entertainment System
Owner’s Manual Supplement for further infor
-
mation.
Heated Seats — If Equipped
For information on use with the Remote Start
system, see
Ú
page 21.
6 — Adjustment Lever
4 — Power Adjustable Bolster Buttons
5 — Driver Memory Settings Buttons
WARNING!
Persons who are unable to feel pain to the
skin because of advanced age, chronic
illness, diabetes, spinal cord injury, medi
-
cation, alcohol use, exhaustion or other
physical condition must exercise care
when using the seat heater. It may cause
burns even at low temperatures, espe -
cially if used for long periods of time.
Do not place anything on the seat or seat -
back that insulates against heat, such as
a blanket or cushion. This may cause the
seat heater to overheat. Sitting in a seat
that has been overheated could cause
serious burns due to the increased
surface temperature of the seat.
21_GA_OM_EN_USC_t.book Page 33
Page 36 of 284

GETTING TO KNOW YOUR VEHICLE
34
Front Heated Seats — If Equipped
NOTE:
Quadrifoglio vehicles equipped with Sparco
Racing Seats will not be equipped with the
heated seat feature.
A push of the heated seat buttons located on
the instrument panel, near the climate
controls, will select the heat levels in order of
highest to lowest. A fourth push of the button
will turn the heated seat off.
NOTE:
The heated seat function can also be activated
through the radio system. Refer to the Infor-
mation and Entertainment System Owner’s
Manual Supplement for further information.
You can select three heating levels:
Maximum — three LED indicators illumi -
nated on the buttons
Average — two LED indicators illuminated
on the buttons
Minimum — one LED indicator illuminated
on the buttons Heated Seat Buttons
NOTE:
After selecting a heating level, heat will be
felt within a few minutes.
The engine must be running for the heated
seats to operate.
The “minimum” setting is automatically
deactivated once a certain period of time
has elapsed.
Rear Heated Seats — If Equipped
If equipped with rear heated seats, the
controls can be found on the rear of the center
console and will function the same as the front
heated seat controls.
Rear Heated Seat Buttons
NOTE:
To preserve the battery charge, this function
cannot be activated when the engine is off.
21_GA_OM_EN_USC_t.book Page 34
Page 41 of 284
39
To operate HomeLink®, push and release any
of the programmed HomeLink® buttons.
These buttons will activate the devices they
are programmed to with each press of the
corresponding HomeLink® button.
The HomeLink® indicator light is located
above the center button
Ú
page 273.
Before You Begin Programming
HomeLink®
For efficient programming and accurate trans -
mission of the radio-frequency signal, it is
recommended that a new battery be placed in
the hand-held transmitter of the device that is
being programmed to the HomeLink® system.
Make sure your hand-held transmitter is
programmed to activate the device you are
trying to program your HomeLink® button to.
Ensure that your vehicle is parked outside of
the garage before you begin programming.
It is recommended that you erase all the chan -
nels of your HomeLink® before you use it for
the first time.
Erasing All The HomeLink® Channels
To erase the channels, follow this procedure:
1. Place the ignition switch into the ON/RUN position.
2. Push and hold the two outside HomeLink® buttons (I and III) for up to 20 seconds, or
until the HomeLink® indicator light flashes. NOTE:
Erasing all channels should only be performed
when programming HomeLink® for the first
time. Do not erase channels when program
-
ming additional buttons.
Identifying Whether You Have A Rolling
Code Or Non-Rolling Code Device
Before programming a device to one of your
HomeLink® buttons, determine whether the
device has a rolling code or non-rolling code.
Rolling Code Devices
To determine if your device has a rolling code,
a good indicator is its manufacturing date.
Typically, devices manufactured after 1995
have rolling codes. A device with a rolling code
will also have a “LEARN” or “TRAIN” button
located where the antenna is attached to the
device. The button may not be immediately
visible when looking at the device. The name
and color of the button may vary slightly by
manufacturer.
NOTE:
The “LEARN” or “TRAIN” button is not the
button you normally use to operate the device.
Non-rolling Code Devices
Most devices manufactured before 1995 will
not have a rolling code. These devices will also
not have a “LEARN” or “TRAIN” button.
Programming HomeLink® To A Garage
Door Opener
To program any of the HomeLink® buttons to
activate your garage door opener motor, follow
the steps below:
NOTE:
All HomeLink® buttons are programmed using
this procedure. You do not need to erase all
channels when programming additional buttons.
1. Place the ignition switch into the ON/RUN position.
2. Place the garage door opener transmitter 1 to 3 inches (3 to 8 cm) away from the
HomeLink® button you wish to program,
while keeping the HomeLink® indicator
light in view.
3. Push and hold the HomeLink® button you want to program while you push and hold
the garage door opener transmitter button
you are trying to replicate.
4. Continue to hold both buttons and observe the HomeLink® indicator light. The
HomeLink® indicator light will flash slowly
and then rapidly. Once this happens,
release both buttons.
NOTE:
Make sure the garage door opener motor is
plugged in before moving on to the rolling
code/non-rolling code final steps.
21_GA_OM_EN_USC_t.book Page 39
Page 42 of 284

GETTING TO KNOW YOUR VEHICLE
40
Rolling Code Garage Door Opener Final Steps
NOTE:
You have 30 seconds in which to initiate rolling
code final step 2, after completing rolling code
final step 1.
1. At the garage door opener motor (in thegarage), locate the “LEARN” or “TRAIN”
button. This can usually be found where
the hanging antenna wire is attached to
the garage door opener motor. Firmly push
and release the “LEARN” or “TRAIN”
button.
2. Return to the vehicle and push the programmed HomeLink® button three
times (holding the button for two seconds
each time). If the garage door opener
motor operates, programming is complete.
3. Push the programmed HomeLink® button to confirm that the garage door opener
motor operates. If the garage door opener
motor does not operate, repeat the final
steps for the rolling code procedure. Non-Rolling Code Garage Door Opener Final
Steps
1. Push and hold the programmed HomeLink®
button and observe the HomeLink®
indicator light. If the HomeLink® indicator
light stays on constantly, programming is
complete.
2. Push the programmed HomeLink® button to confirm that the garage door opener
motor operates. If the garage door opener
motor does not operate, repeat the steps
from the beginning.Programming HomeLink® To A
Miscellaneous Device
Follow the procedure on programming
HomeLink® to a garage door opener
Ú
page 39.
Be sure to determine if the device has a rolling
code, or non-rolling code before beginning the
programming process.
NOTE:
Canadian radio frequency laws require trans -
mitter signals to time-out (or quit) after several
seconds of transmission, which may not be
long enough for HomeLink® to pick up the
signal during programming. Similar to this
Canadian law, some U.S. gate operators are
designed to time-out in the same manner. The
procedure may need to be performed multiple
times to successfully pair the device to your
HomeLink® buttons.
Reprogramming A Single HomeLink®
Button
To reprogram a single HomeLink® button that
has been previously trained, without erasing
all the channels, follow the procedure below.
Be sure to determine whether the new device
you want to program the HomeLink® button to
has a Rolling Code, or Non-rolling Code.
WARNING!
Your motorized door or gate will open and
close while you are programming the
universal transceiver. Do not program the
transceiver if people or pets are in the
path of the door or gate.
Do not run your vehicle in a closed garage or
confined area while programming the trans -
ceiver. Exhaust gas from your vehicle
contains Carbon Monoxide (CO) which is
odorless and colorless. Carbon Monoxide is
poisonous when inhaled and can cause you
and others to be severely injured or killed.
21_GA_OM_EN_USC_t.book Page 40
Page 43 of 284
41
1. Place the ignition in the ON/RUN position,without starting the engine.
2. Push and hold the desired HomeLink® button until the HomeLink® Indicator light
begins to flash after 20 seconds. Do not
release the button.
3. Without releasing the button , proceed with
Step 2 in “Programming HomeLink® To A
Garage Door Opener” and follow all
remaining steps.
Canadian/Gate Operator Programming
The programming of transmitters in Canada/
United States require the transmitter signals
to “time-out” after several seconds of trans -
mission.
Canadian radio frequency laws require trans -
mitter signals to time-out (or quit) after several
seconds of transmission – which may not be
long enough for HomeLink® to pick up the
signal during programming. Similar to this
Canadian law, some U.S. gate operators are
designed to time-out in the same manner.
It may be helpful to unplug the device during
the cycling process to prevent possible over -
heating of the garage door or gate motor. 1. Place the ignition in the ON/RUN position.
2. Place the hand-held transmitter 1 to
3 inches (3 to 8 cm) away from the
HomeLink® button you wish to program
while keeping the HomeLink® indicator
light in view.
3. Continue to press and hold the HomeLink® button, while you press and
release (cycle) your hand-held transmitter
every two seconds until HomeLink® has
successfully accepted the frequency
signal. The indicator light will flash slowly
and then rapidly when fully trained.
4. Watch for the HomeLink® indicator to change flash rates. When it changes, it is
programmed. It may take up to 30
seconds or longer in rare cases. The
garage door may open and close while you
are programming.
5. Press and hold the programmed HomeLink® button and observe the indicator light.
NOTE:
If the indicator light stays on constantly,
programming is complete and the garage
door/device should activate when the
HomeLink® button is pressed.
To program the two remaining HomeLink®
buttons, repeat each step for each
remaining button. DO NOT erase the chan
-
nels.
If you unplugged the garage door opener/
device for programming, plug it back in at this
time.
Reprogramming A Single HomeLink® Button
(Canadian/Gate Operator)
To reprogram a channel that has been previ -
ously trained, follow these steps:
1. Place the ignition to the ON/RUN position.
2. Press and hold the desired HomeLink® button until the indicator light begins to
flash after 20 seconds. Do not release the
button.
3. Without releasing the button, proceed with “Canadian/Gate Operator Programming”
step 2 and follow all remaining steps.
21_GA_OM_EN_USC_t.book Page 41
Page 44 of 284

GETTING TO KNOW YOUR VEHICLE
42
EXTERIOR LIGHTS
Headlight Switch
The headlight switch is located on the left side
of the instrument panel, next to the steering
wheel. The headlight switch controls the oper-
ation of the headlights, parking lights, instru -
ment panel lights, instrument panel light
dimming, interior lights and rear fog lights.
In addition, there are buttons for the Park -
Sense system and Engine Stop/Start
Ú
page 86.
Headlight Switch The instrument panel and the various controls
on the dashboard will be illuminated when the
exterior lights are turned on.
To turn on the headlights, rotate the headlight
switch clockwise. When the headlight switch is
on, the parking lights, taillights, license plate
light and instrument panel lights are also turned
on. To turn off the headlights, rotate the head
-
light switch back to the O (off) position.
Daytime Running Lights (DRLs)
The Daytime Running Lights (DRLs) (low inten -
sity) come on automatically whenever the igni -
tion is placed in the ON/RUN position, and the
headlight switch is turned to the position,
and the dusk sensor detects sufficient
external light.
If the turn signals are operated, the brightness
of the corresponding Daytime Running Lights
will be decreased as long as the turn signals
are on.
The DRL can be activated/deactivated from
the radio system, by selecting the following
functions in sequence on the main MENU:
1. “Settings.”
2. “Lights.”
3. “Daytime Running Lights.”
NOTE:
The Daytime Running Lights cannot be deacti -
vated in Canadian markets.
High Beam Headlights
Push the multifunction lever towards the
instrument panel to switch the headlights to
high beams. The headlight switch must be
turned to the (auto) or (on) position.
The High Beam Indicator on the instrument
panel will illuminate when the high beams are
on.
Multifunction Lever
Pulling the multifunction lever back will turn
the low beams on.
Automatic Headlights
This system automatically turns the headlights
on or off according to ambient light levels. To
turn the system on, rotate the headlight switch
to the (AUTO) position.
NOTE:
The function can only operate with the ignition
placed in the ON/RUN position.
1 — ParkSense Button
2 — Parking Light, Daylight Running Lights,
Headlight Switch
3 — Instrument Panel Dimmer
4 — Rear Fog Light Button
5 — Engine Stop/Start Button
21_GA_OM_EN_USC_t.book Page 42
Page 45 of 284

43
To turn the automatic headlights off, turn the
headlight switch out of the (AUTO) position.
Flash-To-Pass
You can signal another vehicle with your head-
lights by lightly pulling the multifunction lever
toward you. This will cause the high beam
headlights to turn on, and remain on, until the
lever is released.
Automatic High Beam Headlights — If
Equipped
The Automatic High Beam Headlights system
provides increased forward lighting at night by
automating high beam control through the use
of a camera mounted on the windshield. This
camera detects vehicle specific light and auto -
matically switches from high beams to low
beams until the approaching vehicle is out of
view.
This function is enabled with the radio system,
and can only be activated with the light switch
turned to (auto).
If the high beam headlights are on, the blue
icon/warning light will illuminate in the
instrument panel.
When the speed is higher than 25 mph
(40 km/h) and the function is active, the lights
will turn off if the multifunction lever is pushed
again. When the speed is lower than 15 mph
(25 km/h) and the function is active, the func
-
tion switches the high beam headlights off.
If the high beam headlights are operated
quickly again (pushing the multifunction lever
towards the instrument panel), the warning
light/icon will illuminate in the instrument
panel, and the high beam headlights will turn
on constantly until the speed exceeds 25 mph
(40 km/h).
When the speed of 25 mph (40 km/h) is
exceeded again, the automatic functioning is
reactivated.
If the multifunction lever is pushed again with
the Automatic High Beam Headlights acti -
vated, the Automatic High Beam Headlights
function deactivates.
To deactivate the automatic headlight function,
rotate the headlight switch to the position.
NOTE:
If the system recognizes heavy traffic areas,
the automatic functions remain disabled
independently of the vehicle’s speed.
The Automatic High Beam functionality may
also be influenced by:
• Reflections on road signs
• Dim headlights from oncoming traffic
• Poor weather conditions •
Presence of dirt or other obstructions on
the sensor
• Damage to the windshield
Parking Lights
To turn on the parking lights and instrument
panel lights, rotate the headlight switch clock -
wise to the position. All of the parking lights
will turn on for eight minutes, and opening the
door activates an audible warning.
To leave only the lights on one side (right/left)
illuminated, move the multifunction lever
(located on the left side of the steering wheel)
to the side that you want to remain on. With
the parking lights on, the warning light on
the instrument panel will illuminate.
To turn off the parking lights, rotate the head -
light switch back to the O (off) position.
Headlight Off Delay
To assist when exiting the vehicle, the “Head -
light Off Delay” feature will leave the head -
lights on for up to 90 seconds. This delay is
initiated when the ignition is placed in the OFF
position while the headlight switch is on, and
then the headlight switch is cycled off. Head -
light delay can be canceled by either turning
on the headlights or side lights, or by placing
the ignition in the ON position.
21_GA_OM_EN_USC_t.book Page 43