2021 ALFA ROMEO GIULIA radio
[x] Cancel search: radioPage 46 of 284

GETTING TO KNOW YOUR VEHICLE
44
The function can be activated from the radio
system by selecting the following functions in
sequence on the main menu:
1. “Settings.”
2. “Lights.”
3. “Headlight Off Delay.”
Rear Fog Light
The rear fog lights may be operated as desired
when visibility is poor due to fog. The rear fog
light button is integrated with the headlight
switch.
Push the button to turn the rear fog lights
on/off.
The lights can be turned off by pushing the
button again or by turning the headlight switch
to the O (off) position and holding it there for a
few seconds.
NOTE:
The headlight switch must first be turned to
the parking lights or headlights position before
the rear fog light button can be pushed.
When the engine is stopped with the rear fog
lights on, they will remain off the next time the
engine is started.
Adaptive Frontlight System (AFS Function) —
If Equipped
This is a system combined with Xenon head-
lights (Bi-Xenon 35 W headlamp if equipped)
which directs the headlights horizontally, and
continuously and automatically adapts them
to the driving conditions around bends or
when cornering.
The system directs the headlights to light up
the road in the best way, taking into account
the speed of the vehicle and the bend or
corner angle, as well as the speed at which the
steering wheel is turned.
The adaptive lights are automatically activated
when the vehicle is started.
Turn Signals
Move the multifunction lever up or down to
activate the turn signals. The arrows on each
side of the instrument cluster flash to show
proper operation.
The or turn signal will blink on the instru -
ment panel.
Lane Change Assist
Lightly push the lever up or down once, without
moving beyond the detent, and the turn signal
will flash five times then automatically turn off.
To turn off the flashing before the end of the
cycle, move the lever in the opposite direction
until the first click (about half way).
Static Bending Light Function (SBL) — If
Equipped
The SBL function utilizes Light Emitting Diodes
(LEDs) in order to better illuminate the street
and increase the light angle while turning. This
function is enabled by rotating the light switch
to position (on) or (auto). The SBL LEDs
activate when the speed is below 25 mph
(40 km/h) and the steering radius is below
0.3 miles (500 m).
This function can be activated/deactivated on
the radio system by selecting the following
functions in sequence on the main menu:
1. “Settings.”
2. “Lights.”
3. “Cornering Lights.”
INTERIOR LIGHTS
Courtesy lights are turned on when the front
doors are opened or when the dimmer control
is rotated to its farthest upward position. The
glove compartment light turns on automati -
cally when the glove compartment is opened
and turn off when it is closed. The door cour -
tesy lights illuminate when one of the front
doors is opened, and turn off when it is closed.
The trunk courtesy lights turn on automatically
when the trunk is opened and turn off when it
is closed. All of these lights turn on and off
regardless of the ignition status.
21_GA_OM_EN_USC_t.book Page 44
Page 47 of 284
45
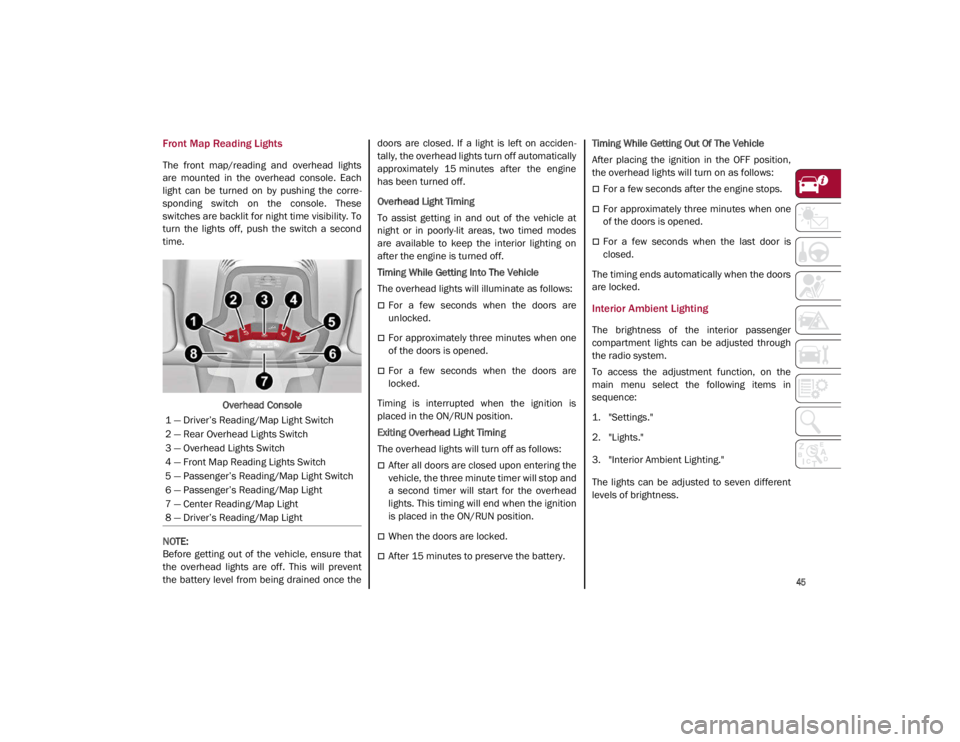
Front Map Reading Lights
The front map/reading and overhead lights
are mounted in the overhead console. Each
light can be turned on by pushing the corre-
sponding switch on the console. These
switches are backlit for night time visibility. To
turn the lights off, push the switch a second
time.
Overhead Console
NOTE:
Before getting out of the vehicle, ensure that
the overhead lights are off. This will prevent
the battery level from being drained once the doors are closed. If a light is left on acciden
-
tally, the overhead lights turn off automatically
approximately 15 minutes after the engine
has been turned off.
Overhead Light Timing
To assist getting in and out of the vehicle at
night or in poorly-lit areas, two timed modes
are available to keep the interior lighting on
after the engine is turned off.
Timing While Getting Into The Vehicle
The overhead lights will illuminate as follows:
For a few seconds when the doors are
unlocked.
For approximately three minutes when one
of the doors is opened.
For a few seconds when the doors are
locked.
Timing is interrupted when the ignition is
placed in the ON/RUN position.
Exiting Overhead Light Timing
The overhead lights will turn off as follows:
After all doors are closed upon entering the
vehicle, the three minute timer will stop and
a second timer will start for the overhead
lights. This timing will end when the ignition
is placed in the ON/RUN position.
When the doors are locked.
After 15 minutes to preserve the battery. Timing While Getting Out Of The Vehicle
After placing the ignition in the OFF position,
the overhead lights will turn on as follows:
For a few seconds after the engine stops.
For approximately three minutes when one
of the doors is opened.
For a few seconds when the last door is
closed.
The timing ends automatically when the doors
are locked.
Interior Ambient Lighting
The brightness of the interior passenger
compartment lights can be adjusted through
the radio system.
To access the adjustment function, on the
main menu select the following items in
sequence:
1. "Settings."
2. "Lights."
3. "Interior Ambient Lighting."
The lights can be adjusted to seven different
levels of brightness.
1 — Driver’s Reading/Map Light Switch
2 — Rear Overhead Lights Switch
3 — Overhead Lights Switch
4 — Front Map Reading Lights Switch
5 — Passenger’s Reading/Map Light Switch
6 — Passenger’s Reading/Map Light
7 — Center Reading/Map Light
8 — Driver’s Reading/Map Light
21_GA_OM_EN_USC_t.book Page 45
Page 50 of 284

GETTING TO KNOW YOUR VEHICLE
48
Activation
Rotating the wiper switch to the Low Sensitivity
Rain Sensing position (4) or High Sensitivity
Rain Sensing position (3) activates the rain
sensor.
The activation of the rain sensor system is
done by tapping the wiper stalk upwards while
the switch is in the Low Sensitivity Rain
Sensing position (4) or High Sensitivity Rain
Sensing position (3).
The variation in sensitivity during rain sensor
operation is also signaled by a stroke of the
wiper.
If the windshield washer is used with the rain
sensor activated, the normal washing cycle is
performed, and then the rain sensor resumes
its normal automatic operation.
NOTE:
Keep the glass in the sensor area clean.
With the windshield wiper lever in the Low
Sensitivity Rain Sensing position (4) or High
Sensitivity Rain Sensing position (3), wiping
operates automatically and is disabled
when the outside temperature is below
32°F (0°C).Deactivation
To turn off the Rain Sensing Wipers, use the
wiper switch or place the ignition in the OFF
position.
In the event of malfunction of the rain sensor
while it is active, the windshield wiper oper
-
ates intermittently at a speed consistent with
the sensitivity setting of the rain sensor,
whether or not there is rain on the glass for as
long as the sensor failure is indicated on the
display.
The sensor continues to operate and it is
possible to set the windshield wiper to contin -
uous mode (1 or 2). The failure indication
remains on for as long as the sensor is active.
The rain sensor is able to recognize and auto -
matically adjust itself in the presence of the
following conditions:
Presence of dirt on the controlled surface
(salt, dirt, etc.).
Presence of streaks of water caused by the
worn window wiper blades.
Difference between day and night.
CLIMATE CONTROL
The Climate Control system allows you to regu -
late the temperature, air flow, and direction of
air circulating throughout the vehicle. The
controls are located on the touchscreen and
on the instrument panel below the radio.
21_GA_OM_EN_USC_t.book Page 48
Page 55 of 284

53
When the function is on, AUTO mode will deac-
tivate. The only manual operations possible
are adjusting blower speed and turning off the
Rear Window Defrost.
Pushing the button switches off the
MAX-DEF function.
Air Temperature Adjustment
Rotate the driver or passenger Temperature
Adjustment Knob clockwise for warmer
temperatures or counterclockwise for cooler
temperatures. The set temperatures are
shown on the radio system.
Push the SYNC button to sync the driver and
passenger air temperatures.
Rotate the passenger Temperature Adjust -
ment Knob to cancel the SYNC function. This
will set a new passenger side temperature.
Rotate the Temperature Adjustment Knob fully
clockwise to engage the HI (maximum heating)
setting or fully counterclockwise to engage the
LO (maximum cooling) setting. To deactivate
these functions, rotate the Temperature
Adjustment Knob to the desired temperature.
Rear passengers’ temperature is linked to
driver side selection.
AUTO Button
When the AUTO button is pushed (indicator
illuminated), the Climate Control system auto -
matically adjusts the following settings:
Quantity and distribution of air flow in the
passenger compartment
The air conditioner
Air recirculation
Cancels any manual settings
Selecting the AUTO function illuminates the
indicator on the A/C button or .
If air distribution or the fan speed is manually
adjusted, the AUTO button indicator turns off
to indicate that the Climate Control system is
no longer in AUTO mode.
After a manual adjustment, push the AUTO
button to resume the automatic system.
SYNC Button
Push the SYNC button (indicator illuminated)
to sync the passenger side air temperature
with the driver side air temperature.
This function makes temperature regulation
easier when the driver is traveling alone.
Turn the passenger Temperature Adjustment
Knob or push the passenger side Air Distribu-
tion Selection Button to change the passenger
side air temperature and return to separate air
temperature management.
Blower Speed
Turn the Blower Speed Knob to increase or
decrease the blower speed. The speed is
displayed with lighted indicators in the radio
system display.
Maximum fan speed = all indicators illumi -
nated on the radio system display
Minimum fan speed = one indicator illumi -
nated on the radio system display
The fan can be turned off by rotating the
Blower Speed Knob counterclockwise to the
off position (all segments on the radio system
display are turned off).
NOTE:
To restore automatic control of the fan speed,
push the AUTO button.
Air Distribution Selection
Push the Air Distribution Selection button on
the faceplate to change the mode of air distri -
bution.
NOTE:
In AUTO mode, the Climate Controls automati -
cally manage the air distribution. When set
manually, the respective symbols on the radio
system indicate the air distribution setting.
21_GA_OM_EN_USC_t.book Page 53
Page 56 of 284

GETTING TO KNOW YOUR VEHICLE
54
Panel Mode
Air comes from the outlets in the
instrument panel to ventilate the
chest and face. Each of these outlets
can be individually adjusted to direct
the flow of air. The air vanes of the center
outlets and outboard outlets can be moved up
and down or side to side to regulate airflow
direction. There is a shut off wheel located
below the air vanes to shut off or adjust the
amount of airflow from these outlets.
Bi-Level Mode
Air comes from the instrument panel
outlets and floor outlets. A slight
amount of air is directed through the
defrost and side window demister
outlets.
NOTE:
Bi-Level mode is designed under comfort
conditions to provide cooler air out of the
panel outlets and warmer air from the floor
outlets.
Floor Mode
Air comes from the floor outlets. A
slight amount of air is directed
through the defrost and side window
demister outlets. This setting heats
the passenger compartment the quickest.
Mix Mode
Air is directed through the floor,
defrost, and side window demister
outlets. This setting works best in
cold or snowy conditions that require
extra heat to the windshield. This setting is
good for maintaining comfort while reducing
moisture on the windshield.
Front Defrost And Panel Mode
Air flow is distributed between the
windshield demisting/defrosting
vents and side/central dashboard
vents. This setting allows air to flow
to the windshield on sunny days.
Front Defrost And Bi-Level Mode
Air flow is distributed to all vents.
Switching The Climate Control System On/Off
To Turn Off The Climate Control System
Rotate the Air Speed Adjustment Knob
completely counterclockwise to turn off the
Climate Control System.
With the air conditioner is off:
Air recirculation is on
The A/C compressor is off
The fan is off
The heated rear window can be activated/
deactivated
NOTE:
The climate control system stores the previ
-
ously set temperatures and resumes opera -
tion when any button on the system is pushed.
To Turn On The Climate Control System
To switch the climate control system on in
automatic mode, push the AUTO button.
Operating Mode
The Climate Control system can be activated
in different ways. It is recommended to use the
automatic function. Push the AUTO button and
set the desired temperatures.
The automatic system adjusts the tempera -
ture, quantity, and distribution of air intro -
duced into the passenger compartment. It
also controls air recirculation and the activa -
tion of the air conditioner.
At any time during automatic operation, you
can change the temperature, activate or deac -
tivate the Rear Defrost, activate SYNC, acti -
vate or deactivate the air conditioner, and
activate or deactivate air recirculation. The
system will automatically adjust to the new
settings.
Climate Control Display Settings
The Climate Control settings are visible on the
radio screen.
The display on the radio system is a pop up
window, which is activated by pushing the
buttons or turning the knobs on the Climate
Control system. The indicator lights located on
21_GA_OM_EN_USC_t.book Page 54
Page 60 of 284
GETTING TO KNOW YOUR VEHICLE
58
NOTE:
Do not place the key fob or any other type of
metal/magnetized object inside the mobile
phone housing or near the wireless
charging pad.
Be sure to place the mobile device correctly
(display facing upward) on the wireless
charging pad.
The ignition must be in the ON/RUN position
in order for the phone to charge.
To avoid interference with the key fob
search, the wireless charging pad will stop
charging when any door is opened.The following messages will display in the
radio system:
“Your Phone Is Being Charged” — The phone
has begun to charge.
“Phone Fully Charged” — The phone has
completed charging its battery.
“Foreign Object Detected” — The phone is
not enabled for wireless charging or an
object that is not permitted has been placed
on the wireless charging pad.
“Unavailable System” — There is a malfunc
-
tion with the wireless charging pad.
The driver can deactivate these messages
through the radio system. Refer to the Infor -
mation and Entertainment System Owner’s
Manual Supplement for further information.
POWER WINDOWS
Power Window Controls
The power window switches work with the igni -
tion in the ACC or ON/RUN position and for
three minutes after the ignition has been
placed in the OFF position. When one of the
front doors is opened, this operation is
disabled.
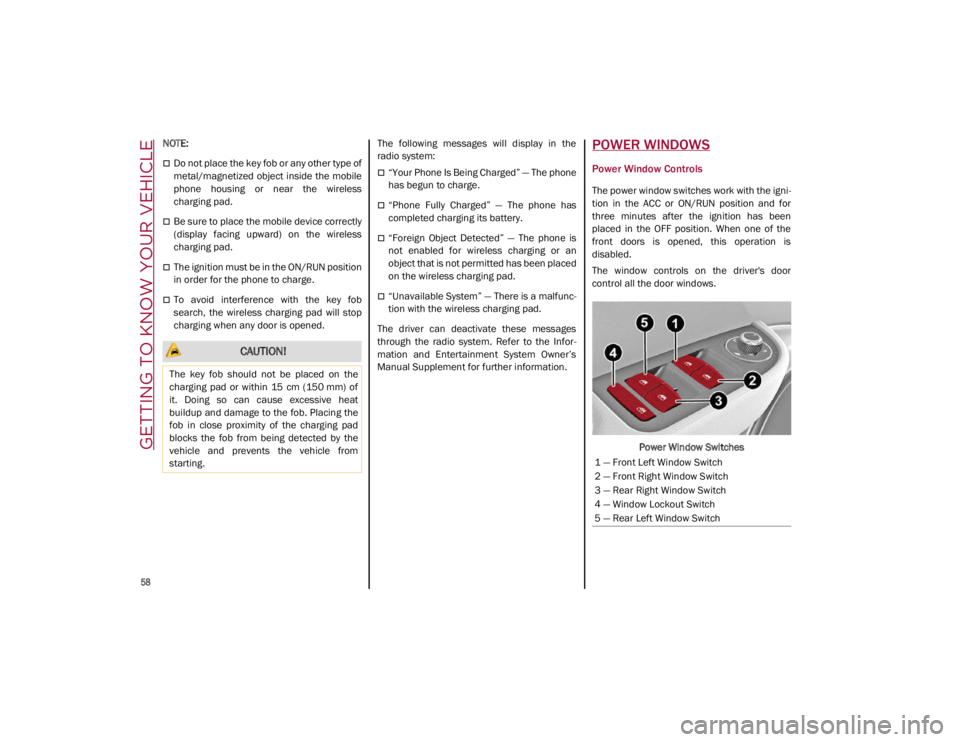
The window controls on the driver's door
control all the door windows.
Power Window Switches
CAUTION!
The key fob should not be placed on the
charging pad or within 15 cm (150 mm) of
it. Doing so can cause excessive heat
buildup and damage to the fob. Placing the
fob in close proximity of the charging pad
blocks the fob from being detected by the
vehicle and prevents the vehicle from
starting.
1 — Front Left Window Switch
2 — Front Right Window Switch
3 — Rear Right Window Switch
4 — Window Lockout Switch
5 — Rear Left Window Switch
21_GA_OM_EN_USC_t.book Page 58
Page 74 of 284

GETTING TO KNOW YOUR INSTRUMENT PANEL
72
11. Driving Mode Display (Alfa DNA System)
12. Distance Traveled (miles/km) display
13. Fuel Consumption
14. Warning Indications Display (e.g. danger ofice, open doors, ABS operation, etc.)
15. Range
Customer Programmable Settings
Multiple settings can be programmed by the
user using the radio. This section describes
only the basic settings:
Units & Language
Clock & Date
Cluster
To access the settings list in the radio, proceed
as follows:
Press the Home button to access the main
menu.
Select Settings from the main menu using
the Rotary Knob or by pressing Settings on
the touchscreen. Rotary Knob
Units & Language
The following settings can be modified under
the “Units & Language” menu:
Units: select US, Metric, or Custom. The
custom option allows for individual selec -
tion of the unit measures
Language: change the language of the
system
Restore Unit & Language Settings: restores
the factory settings
To access and change the setting, turn and
push the Rotary Pad or press the desired
setting on the touchscreen. Clock & Date
The following settings can be modified under
the “Clock & Date” menu:
Sync With GPS Time: activates or deacti
-
vates the clock synchronization through the
GPS. If the function is deactivated, the
options Set Time and Set Date are enabled
Set Time: set the time manually
Time Format: set the time format to either a
12-hour or a 24-hour clock
Set Date: set the date manually
Restore Clock & Date Settings: restores the
factory settings
To access and change the setting, turn and
push the Rotary Pad or press the desired
setting on the touchscreen.
Cluster
The following settings can be modified when
this mode is selected:
Warning Buzzer Volume: allows you to set
the volume of the warning buzzer on seven
levels.
Trip B: activate or deactivate the Trip func -
tion.
Show Phone Info: allows you to activate/
deactivate repetition of the phone function
screens also on the instrument panel
display.
1 — ON/OFF Control And Volume Knob
2 — OPTION Button
3 — Rotary Pad
4 — MENU Button
21_GA_OM_EN_USC_t.book Page 72
Page 75 of 284

73
Show Audio Info: allows you to activate/
deactivate repetition of the audio function
screens (Radio and Media) also on the
instrument panel display.
Show Nav Info: allows you to activate/deac-
tivate repetition of the navigator function
screens also on the instrument panel
display.
Digital speed on all screens: this allows you
to activate/deactivating of digital speed on
the instrument panel display screens other
than the main screen.
Consumption Bar: allows you to activate/
deactivate the consumption baron the
display screens of the instrument panel
where it is available.
Performance pages: allows you to choose,
for each driving mode, one of the two alter -
native contents displayed in the screen.
Custom areas: allows you to select which
content to display in each of the three
customizable areas on the display of the
instrument panel: time, date, outside
temperature, radio information, compass.
Restore Cluster Settings: deletes the
current settings and restores the factory
settings.
To access and change the setting, turn and
push the Rotary Pad or press the desired
setting on the touchscreen.
WARNING LIGHTS AND
MESSAGES ON THE
INSTRUMENT PANEL
The following pages consist of warning lights
and messages.
NOTE:
The warning light turns on together with a
dedicated message and/or chime when
applicable. These indications are precau -
tionary and as such must not be considered
as exhaustive and/or alternative to the
information contained in the Owner’s
Manual, which you are advised to read care -
fully in all cases. Always refer to the informa -
tion in this section in the event of a failure
indication.
The failure indicators appearing on the
display are divided into two categories: very
serious and less serious faults. Serious
faults are indicated by a repeated and
prolonged warning "cycle.” Less serious
faults are indicated by a warning "cycle" with
a shorter duration. You can stop the
warning cycle in both cases by pushing the
button located on the windshield wiper
stalk. The instrument panel warning light
will stay on until the cause of the failure is
eliminated.
Red Warning Lights
Air Bag Warning Light
This warning light will illuminate to
indicate a fault with the air bag, and
will turn on for four to eight seconds
as a bulb check when the ignition is
placed in the ON/RUN or ACC/ON/RUN posi -
tion. This light will illuminate with a single
chime when a fault with the air bag has been
detected, it will stay on until the fault is
cleared. If the light is either not on during
startup, stays on, or turns on while driving,
have the system inspected at an authorized
dealer as soon as possible.
Brake Warning Light
This warning light monitors various
brake functions, including brake
fluid level and parking brake applica -
tion. If the brake light turns on it may
indicate that the parking brake is applied, that
the brake fluid level is low, or that there is a
problem with the Anti-Lock Brake System
reservoir.
If the light remains on when the parking brake
has been disengaged, and the fluid level is at
the full mark on the master cylinder reservoir,
it indicates a possible brake hydraulic system
malfunction or that a problem with the Brake
Booster has been detected by the Anti-Lock
Brake System (ABS) / Electronic Stability
Control (ESC) system. In this case, the light will
remain on until the condition has been
21_GA_OM_EN_USC_t.book Page 73