Page 233 of 284

231
Replacing Exterior Bulbs
NOTE:
Only replace the bulb when the engine is off.
Also ensure that the engine is cold, to prevent
the risk of burns.
Direction Indicators
See below steps to replace:
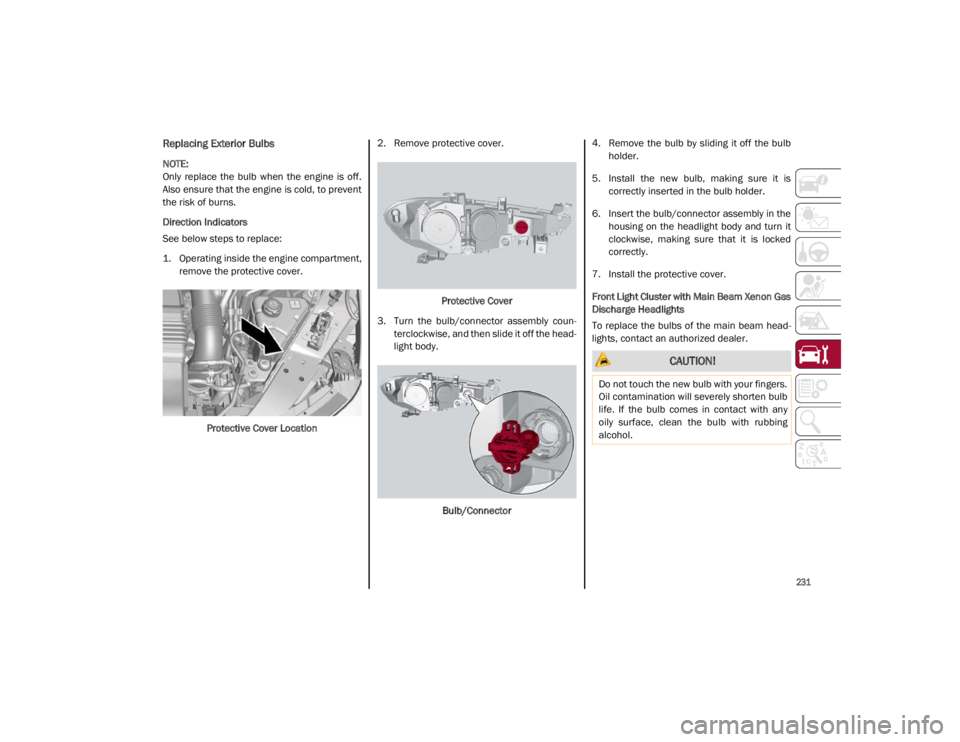
1. Operating inside the engine compartment,remove the protective cover.
Protective Cover Location 2. Remove protective cover.
Protective Cover
3. Turn the bulb/connector assembly coun -
terclockwise, and then slide it off the head -
light body.
Bulb/Connector 4. Remove the bulb by sliding it off the bulb
holder.
5. Install the new bulb, making sure it is correctly inserted in the bulb holder.
6. Insert the bulb/connector assembly in the housing on the headlight body and turn it
clockwise, making sure that it is locked
correctly.
7. Install the protective cover.
Front Light Cluster with Main Beam Xenon Gas
Discharge Headlights
To replace the bulbs of the main beam head -
lights, contact an authorized dealer.
CAUTION!
Do not touch the new bulb with your fingers.
Oil contamination will severely shorten bulb
life. If the bulb comes in contact with any
oily surface, clean the bulb with rubbing
alcohol.
21_GA_OM_EN_USC_t.book Page 231
Page 253 of 284

251
If the battery is not disconnected from the
electrical system, check its state of charge
every 30 days.
Clean and protect the painted parts using
protective wax.
Clean and protect the shiny metal parts
using special compounds available
commercially.
Sprinkle talcum powder on the windshield
wiper rubber blades, and lift them off the
glass.
Cover the vehicle with a fabric or perforated
plastic sheet, paying particular care not to
damage the painted surface by dragging
any dust that may have accumulated on it.
Do not use compact plastic sheets, as they
do not allow humidity to evaporate from the
surface of the vehicle.
Inflate tires to +7.25 psi (+0.5 bar) above
the standard prescribed pressure and
check it periodically.
Do not drain the engine cooling system.
Any time the vehicle is left inactive for two
weeks or more, operate the air conditioning
system with engine idling for at least five
minutes, setting external air and with fan
set to maximum speed. This operation will
ensure appropriate lubrication for the
system, thus minimizing the possibility of
damage to the compressor when the
system is operated again.
NOTE:
After placing the ignition in STOP and having
closed the driver side door, wait at least one
minute before disconnecting the electrical
supply from the battery. When reconnecting
the electrical supply to the battery, make sure
that the ignition is in the STOP position and the
driver side door is closed. Manual Trunk Opening Device
Proceed as follows if the battery needs to be
disconnected:
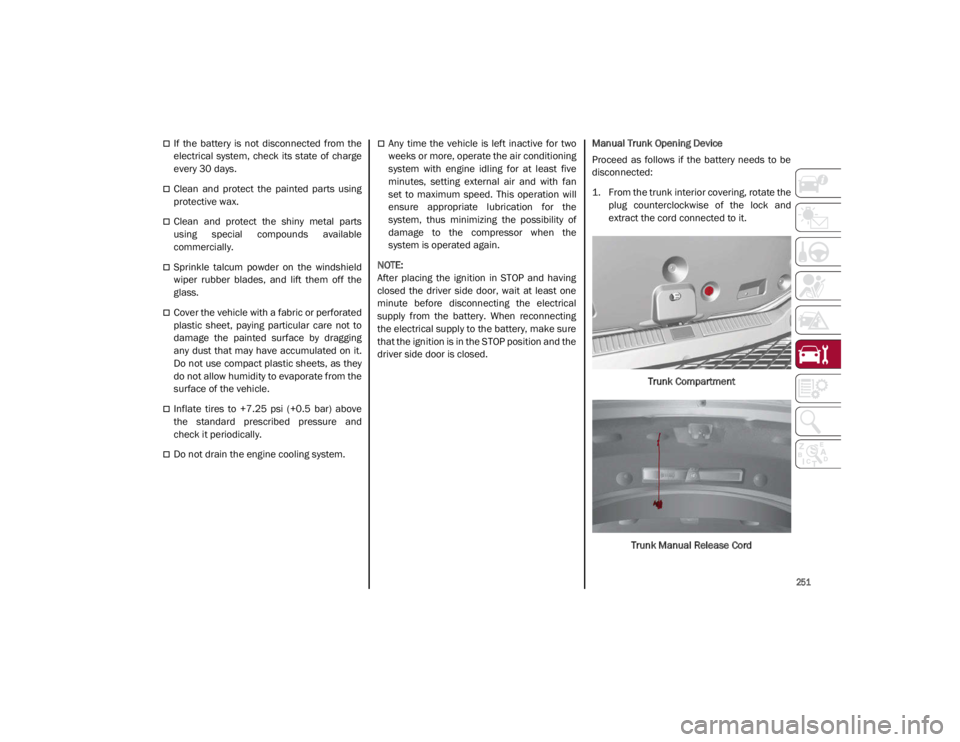
1. From the trunk interior covering, rotate the
plug counterclockwise of the lock and
extract the cord connected to it.
Trunk Compartment
Trunk Manual Release Cord
21_GA_OM_EN_USC_t.book Page 251
Page 254 of 284

SERVICING AND MAINTENANCE
252
2. Make sure the free end of the cordremains outside the trunk when closing
the trunk lid.
Manual Release Cord Shown With Trunk Closed
3. The trunk can now be opened manually by pulling the cord.
4. After releasing the trunk, rewind the strap around the plug, put it back into its
housing and turn it clockwise.BODYWORK
Protection Against Atmospheric Agents
The vehicle is equipped with the best available
technological solutions to protect the body -
work against corrosion.
These include:
Painting products and systems which give
the vehicle resistance to corrosion and
abrasion.
Use of galvanized (or pre-treated) steel
sheets, with high resistance to corrosion.
Spraying of plastic parts, with a protective
function in the more exposed points: under
door, inner wing, edges, etc.
Use of “open” boxed sections to prevent
condensation and pockets of moisture
which could favor the formation of rust
inside.
Use of special films to protect against abra -
sion in exposed areas (e.g. rear wing, doors,
etc.).
Corrosion Warranty
Your vehicle is covered by Corrosion Warranty
against perforation due to rust of any original
element of the structure or bodywork. For the
general terms of this warranty, refer to the
Warranty Booklet.
Preserving The Bodywork
Paint
Touch up abrasions and scratches immedi -
ately to prevent the formation of rust.
Maintenance of paintwork consists of washing
the car: the frequency depends on the condi -
tions and environment where the car is used.
For example, it is advisable to wash the vehicle
more often in areas with high levels of atmo -
spheric pollution or salted roads.
Some parts of the vehicle may be covered with
a matte paint which, in order to be maintained
intact, requires special care.
To correctly wash the vehicle, follow these
instructions:
If high pressure jets or cleaners are used to
wash the vehicle, keep a distance of at least
15 inches (40 cm) from the bodywork to
avoid damage or alteration. Build up of
water could cause damage to the vehicle in
the long term.
To make it easier to remove any dirt deposits in
the area where the blades are normally located it
is recommended to position the windshield
wipers vertically (service position).
Wash the bodywork using a low pressure jet
of water if possible.
Wipe a sponge with a slightly soapy solution over
the bodywork, frequently rinsing the sponge.
Rinse well with water and dry with a leather
chamois.
CAUTION!
The Manual Trunk Opening Device allows
the trunk to be opened without a key, even
if the vehicle is locked. Do not use this
Device unless the vehicle is parked in a
secure area.
21_GA_OM_EN_USC_t.book Page 252