2021 Alfa Romeo 4C Instructieboek (in Dutch)
-
 1
1 -
 2
2 -
 3
3 -
 4
4 -
 5
5 -
 6
6 -
 7
7 -
 8
8 -
 9
9 -
 10
10 -
 11
11 -
 12
12 -
 13
13 -
 14
14 -
 15
15 -
 16
16 -
 17
17 -
 18
18 -
 19
19 -
 20
20 -
 21
21 -
 22
22 -
 23
23 -
 24
24 -
 25
25 -
 26
26 -
 27
27 -
 28
28 -
 29
29 -
 30
30 -
 31
31 -
 32
32 -
 33
33 -
 34
34 -
 35
35 -
 36
36 -
 37
37 -
 38
38 -
 39
39 -
 40
40 -
 41
41 -
 42
42 -
 43
43 -
 44
44 -
 45
45 -
 46
46 -
 47
47 -
 48
48 -
 49
49 -
 50
50 -
 51
51 -
 52
52 -
 53
53 -
 54
54 -
 55
55 -
 56
56 -
 57
57 -
 58
58 -
 59
59 -
 60
60 -
 61
61 -
 62
62 -
 63
63 -
 64
64 -
 65
65 -
 66
66 -
 67
67 -
 68
68 -
 69
69 -
 70
70 -
 71
71 -
 72
72 -
 73
73 -
 74
74 -
 75
75 -
 76
76 -
 77
77 -
 78
78 -
 79
79 -
 80
80 -
 81
81 -
 82
82 -
 83
83 -
 84
84 -
 85
85 -
 86
86 -
 87
87 -
 88
88 -
 89
89 -
 90
90 -
 91
91 -
 92
92 -
 93
93 -
 94
94 -
 95
95 -
 96
96 -
 97
97 -
 98
98 -
 99
99 -
 100
100 -
 101
101 -
 102
102 -
 103
103 -
 104
104 -
 105
105 -
 106
106 -
 107
107 -
 108
108 -
 109
109 -
 110
110 -
 111
111 -
 112
112 -
 113
113 -
 114
114 -
 115
115 -
 116
116 -
 117
117 -
 118
118 -
 119
119 -
 120
120 -
 121
121 -
 122
122 -
 123
123 -
 124
124 -
 125
125 -
 126
126 -
 127
127 -
 128
128 -
 129
129 -
 130
130 -
 131
131 -
 132
132 -
 133
133 -
 134
134 -
 135
135 -
 136
136 -
 137
137 -
 138
138 -
 139
139 -
 140
140 -
 141
141 -
 142
142 -
 143
143 -
 144
144 -
 145
145 -
 146
146 -
 147
147 -
 148
148 -
 149
149 -
 150
150 -
 151
151 -
 152
152 -
 153
153 -
 154
154 -
 155
155


 105
PERIODIC CHECKS
Every 1,000 km or before long journeys,
check and, if necessary, top up the
following:
❒ engine coolant level;
❒ brake fluid;
❒ windscreen washer fluid;
❒ tyre inflatio")
 SERVICING AND CARE
106
CHECKING LEVELS
The topping-up plug 2 and the dipstick 1 for checking the engine oil level and the reservoir 3 for the engine coolant can be accessed
by lifting the tailgate (se")
 107
The brake fluid and windscreen washer is located between the bonnet and the windscreen and can be reached by removing the
panel 4 and the protective grille 5, respectively; use the kit provided fo")
 SERVICING AND CARE
108
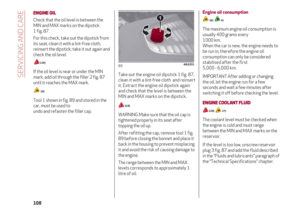
ENGINE OIL
Check that the oil level is between the
MIN and MAX marks on the dipstick
1 fig. 87.
For this check, take out the dipstick from
its seat, clean it with a lint-free c")
 109
WINDSCREEN WASHER LIQUID
121) 122)
To check the windscreen washer fluid
level, proceed as follows:
❒ to avoid any interference during the
procedure, lift the windscreen wiper
blade according")
 SERVICING AND CARE
110
❒ take the white funnel 4 fig. 93 for
topping up the windscreen washer
fluid/fuel and its extension pipe from the
servicing kit in the boot;
❒ take out the plug 2 fig. 91")