2020 YAMAHA NIKEN GT oil level
[x] Cancel search: oil levelPage 70 of 108

Periodic maintenance an d a djustment
6-11
6
EAU36112
CanisterThis model is equipped with a canister
to prevent the discharging of fuel vapor
into the atmosphere. Before operating
this vehicle, make sure to check the
following:
Check each hose connection.
Check each hose and canister for
cracks or damage. Replace if
damaged.
Make sure that the canister
breather is not blocked, and if
necessary, clean it.
EAU1990G
Engine oilThe engine oil level should be checked
regularly. In addition, the oil must be
changed and the oil filter cartridge re-
placed at the intervals specified in the
periodic maintenance chart.NOTICE
ECA11621
In or der to prevent clutch slip-
pa ge (since the en gine oil also
lu bricates the clutch), do not
mix any chemical additives. Do
not use oils with a diesel speci-
fication of “CD” or oils of a hi gh-
er quality than specifie d. In
a ddition, do not use oils la beled
“ENERGY CONSERVING II” or
hi gher.
Make sure that no forei gn mate-
rial enters the crankcase.
To check the en gine oil level
1. After warming up the engine, wait a few minutes for the oil level to
settle for an accurate reading.
2. With the vehicle on a level surface, hold it upright for an accurate
reading.
3. Look at the check window located at the bottom-right side of the
crankcase.TIPThe engine oil should be between the
minimum and maximum level marks.
1. Canister
2. Canister breather
1
2
Recommen ded en gine oil:
See page 8-1.
Oil quantity: Oil change:2.40 L (2.54 US qt, 2.11 Imp.qt)
With oil filter removal: 2.70 L (2.85 US qt, 2.38 Imp.qt)
1. Engine oil filler cap
2. O-ring
3. Engine oil level check window
4. Maximum level mark
5. Minimum level mark
21
3
45
UB5BE1E0.book Page 11 Wednesday, October 30, 2019 9:59 AM
Page 71 of 108

Periodic maintenance an d a djustment
6-12
6
4. If the engine oil is at or below the
minimum level mark, remove the
oil filler cap and add oil.
5. Check the engine oil filler cap O- ring. Replace if damaged.
6. Install the engine oil filler cap.
To chan ge the en gine oil (an d filter)
1. Start the engine and allow it to idle for a few minutes to warm up the
oil, and then stop the engine.
2. Place an oil pan under the engine to collect the used oil.
3. Remove the engine oil filler cap, and then the engine oil drain bolt
and gasket.
TIPSkip steps 4–6 if the oil filter cartridge
is not being replaced.4. Remove the oil filter cartridge withan oil filter wrench.
TIPAn oil filter wrench is available at a
Yamaha dealer.5. Apply a thin coat of clean engineoil to the O-ring of the new oil filter
cartridge.TIPMake sure that the O-ring is properly
seated.6. Install the new oil filter cartridge,and then tighten to the specified
torque.
1. Engine oil filler cap
2. O-ring
21
1. Engine oil drain bolt
2. Gasket
1. Oil filter wrench
2. Oil filter cartridge
1
2
2
1
1. O-ring
UB5BE1E0.book Page 12 Wednesday, October 30, 2019 9:59 AM
Page 72 of 108

Periodic maintenance an d a djustment
6-13
6
7. Install the engine oil drain bolt witha new gasket, and then tighten the
bolt to the specified torque.
8. Pour the specified amount of the recommended oil into the crank-
case.
TIPUsing a funnel is recommended.
9. After checking the engine oil fillercap O-ring, install the filler cap.TIPWipe off any spilled oil before starting
the engine.10. Start the engine and let it idle while checking for oil leaks.TIPIf any oil leaks are found which you
cannot fix, have the vehicle inspected.11. Stop the engine, wait a few minu-tes for the oil level to settle, and
then check the oil level one last
time. NOTICE: Do not operate
the vehicle until you know that
the en gine oil level is sufficient.
[ECA10012] EAU85450
Why Yamalu
beYAMALUBE oil is a Genuine YAMAHA
Part born of the engineers’ passion
and belief that engine oil is an impor-
tant liquid engine component. We form
teams of specialists in the fields of me-
chanical engineering, chemistry, elec-
tronics and track testing, and have
them develop the engine together with
the oil it will use. Yamalube oils take full
advantage of the base oil’s qualities
and blend in the ideal balance of addi-
tives to make sure the final oil clears
our performance standards. Thus,
Yamalube mineral, semisynthetic and synthetic oils have their own distinct
characters and value. Yamaha’s expe-
rience gained over many years of re-
search and development into oil since
the 1960’s helps make Yamalube the
best choice for your Yamaha engine.
1. Torque wrenchTi ghtenin g torque:
Oil filter cartridge: 17 N·m (1.7 kgf·m, 13 lb·ft)
Ti ghtenin g torque:
Engine oil drain bolt:
43 N·m (4.3 kgf·m, 32 lb·ft)1
UB5BE1E0.book Page 13 Wednesday, October 30, 2019 9:59 AM
Page 81 of 108

Periodic maintenance an d a djustment
6-22
6
EAU40262
Checkin g the brake flui d levelBefore riding, check that the brake fluid
is above the minimum level mark.
Check the brake fluid level with the top
of the reservoir level. Replenish the
brake fluid if necessary.
Front brake Rear
brake
WARNING
EWA16011
Improper maintenance can result in
loss of b raking a bility. O bserve
these precautions: Insufficient brake flui d may al-
low air to enter the b rake sys-
tem, re ducin g brakin g
performance.
Clean the filler cap before re-
movin g. Use only DOT 4 b rake
flui d from a seale d container.
Use only the specifie d b rake flu-
i d ; otherwise, the ru bber seals
may deteriorate, causin g leak-
a g e.
Refill with the same type of
brake flui d. A dding a brake flui d
other than DOT 4 may result in a
harmful chemical reaction.
Be careful that water or dust
d oes not enter the brake flui d
reservoir when refilling . Water
will si gnificantly lower the boil-
in g point of the flui d an d may re-
sult in vapor lock, an d d ir
t may
clo g the ABS hy draulic unit
valves.
NOTICE
ECA17641
Brake flui d may damag e painte d
surfaces or plastic parts. Always
clean up spille d flui d imme diately.As the brake pads wear, it is normal for
the brake fluid level to gradually go
down. A low brake fluid level may indi-
cate worn brake pads and/or brake
system leakage; therefore, be sure to
check the brake pads for wear and the
brake system for leakage. If the brake
1. Minimum level mark
1
1. Minimum level mark
Specified b rake flui d:
DOT 4
1
UB5BE1E0.book Page 22 Wednesday, October 30, 2019 9:59 AM
Page 87 of 108

Periodic maintenance an d a djustment
6-28
6
EAUM1653
Lu bricatin g the swin garm piv-
otsThe swingarm pivots must be lubricat-
ed by a Yamaha dealer at the intervals
specified in the periodic maintenance
and lubrication chart.
EAU23273
Checkin g the front forkThe condition and operation of the
front fork must be checked as follows
at the intervals specified in the periodic
maintenance and lubrication chart.
To check the con dition
Check the inner tubes for scratches,
damage and excessive oil leakage.
To check the operation 1. Place the vehicle on a level surfa- ce and hold it in an upright posi-
tion. WARNING! To avoi d injury,
securely support the vehicle so
there is no dan ger of it fallin g
over.
[EWA10752]
2. While applying the front brake, push down hard on the handle-
bars several times to check if the
front fork compresses and re-
bounds smoothly.
Recommen ded lu bricants:
Centerstand:
Lithium-soap-based grease
Sidestand:
Molybdenum disulfide grease
Recommen ded lu bricant:
Lithium-soap-based grease
UB5BE1E0.book Page 28 Wednesday, October 30, 2019 9:59 AM
Page 100 of 108
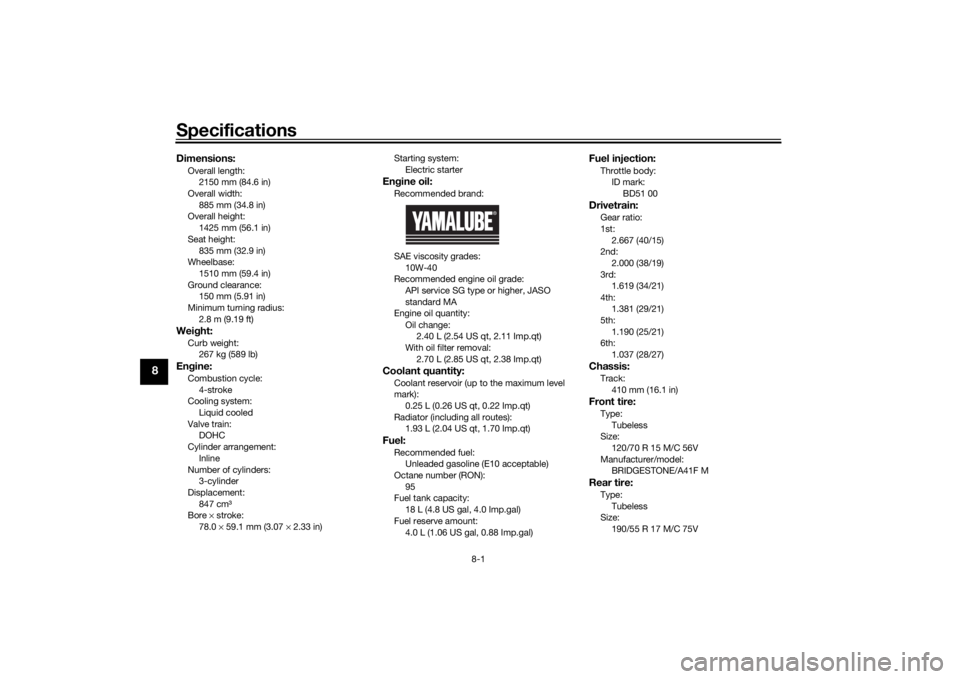
Specifications
8-1
8
Dimensions:Overall length:2150 mm (84.6 in)
Overall width:
885 mm (34.8 in)
Overall height: 1425 mm (56.1 in)
Seat height: 835 mm (32.9 in)
Wheelbase:
1510 mm (59.4 in)
Ground clearance: 150 mm (5.91 in)
Minimum turning radius: 2.8 m (9.19 ft)Wei ght:Curb weight:
267 kg (589 lb)Engine:Combustion cycle:
4-stroke
Cooling system: Liquid cooled
Valve train: DOHC
Cylinder arrangement:
Inline
Number of cylinders: 3-cylinder
Displacement: 847 cm³
Bore × stroke:
78.0 × 59.1 mm (3.07 × 2.33 in) Starting system:
Electric starter
Engine oil:Recommended brand:
SAE viscosity grades:
10W-40
Recommended engine oil grade:
API service SG type or higher, JASO
standard MA
Engine oil quantity:
Oil change: 2.40 L (2.54 US qt, 2.11 Imp.qt)
With oil filter removal:
2.70 L (2.85 US qt, 2.38 Imp.qt)Coolant quantity:Coolant reservoir (up to the maximum level
mark):0.25 L (0.26 US qt, 0.22 Imp.qt)
Radiator (including all routes): 1.93 L (2.04 US qt, 1.70 Imp.qt)Fuel:Recommended fuel:Unleaded gasoline (E10 acceptable)
Octane number (RON): 95
Fuel tank capacity:
18 L (4.8 US gal, 4.0 Imp.gal)
Fuel reserve amount: 4.0 L (1.06 US gal, 0.88 Imp.gal)
Fuel injection:Throttle body:ID mark: BD51 00Drivetrain:Gear ratio:
1st:2.667 (40/15)
2nd:
2.000 (38/19)
3rd: 1.619 (34/21)
4th: 1.381 (29/21)
5th:
1.190 (25/21)
6th: 1.037 (28/27)Chassis:Track:
410 mm (16.1 in)Front tire:Type:Tubeless
Size:
120/70 R 15 M/C 56V
Manufacturer/model: BRIDGESTONE/A41F MRear tire:Type:
Tubeless
Size: 190/55 R 17 M/C 75V
UB5BE1E0.book Page 1 Wednesday, October 30, 2019 9:59 AM
Page 105 of 108

10-1
10
Index
AABS....................................................... 3-21
ABS warning light ................................... 3-6
Air filter element.................................... 6-15
Auxiliary DC jacks................................. 3-33BBattery .................................................. 6-30
Brake and clutch levers, checking and
lubricating........................................... 6-27
Brake and shift pedals, checking and lubricating........................................... 6-26
Brake fluid, changing............................ 6-23
Brake fluid level, checking.................... 6-22
Brake lever............................................ 3-20
Brake lever free play, checking ............ 6-20
Brake light switches ............................. 6-20
Brake pedal .......................................... 3-21CCables, checking and lubricating ......... 6-25
Canister ................................................ 6-11
Care ........................................................ 7-1
Catalytic converter ............................... 3-27
Centerstand and sidestand, checking
and lubricating ................................... 6-27
Clutch lever........................................... 3-19
Clutch lever free play, adjusting ........... 6-19
Coolant ................................................. 6-14
Coolant temperature warning light ......... 3-6
Cruise control indicator lights................. 3-6
Cruise control switches .......................... 3-4
Cruise control system............................. 3-8DData recording, vehicle........................... 9-2
Diagnostic connector ............................. 9-2 Dimmer/Pass switch .............................. 3-4
D-mode (drive mode) ........................... 3-18
Drive chain, cleaning and lubricating ... 6-25
Drive chain slack .................................. 6-23
Drive mode switch ................................. 3-5
EEngine break-in ...................................... 5-1
Engine idling speed, checking ............. 6-15
Engine oil.............................................. 6-11
Engine overheating .............................. 6-36
Engine serial number ............................. 9-1
Engine trouble warning light .................. 3-6FFront and rear brake pads, checking ... 6-21
Front fork, adjusting ............................. 3-30
Front fork, checking ............................. 6-28
Fuel ...................................................... 3-25
Fuel consumption, tips for reducing ...... 5-4
Fuel tank cap........................................ 3-24
Fuel tank overflow hose ....................... 3-26
Fuses, replacing ................................... 6-31HHandlebar switches ............................... 3-3
Hazard switch ........................................ 3-4
Helmet holding cable ........................... 3-29
High beam indicator light ....................... 3-5
Horn switch ............................................ 3-4IIdentification numbers ........................... 9-1
Ignition circuit cut-off system .............. 3-35
Immobilizer system ................................ 3-1
Immobilizer system indicator light ......... 3-7
Indicator lights and warning lights ......... 3-5
MMain switch/steering lock ....................... 3-2
Maintenance and lubrication, periodic ... 6-5
Maintenance, emission control
system .................................................. 6-3
Matte color, caution................................ 7-1
MENU switch .......................................... 3-4
Model label ............................................. 9-1
Multi-function meter unit ...................... 3-11NNeutral indicator light ............................. 3-5OOil level warning light .............................. 3-5PPanel, removing and installing ................ 6-9
Parking.................................................... 5-5
Part locations.......................................... 2-1QQuick shift system ................................ 3-20RRear view mirrors .................................. 3-30SSafety information................................... 1-1
Seats ..................................................... 3-27
SELECT switch ....................................... 3-5
Shift indicator light .................................. 3-7
Shifting.................................................... 5-3
Shift pedal............................................. 3-19
Shock absorber assembly, adjusting ... 3-32
Sidestand.............................................. 3-34
Spark plugs, checking .......................... 6-10
Specifications ......................................... 8-1
Starting the engine ................................. 5-2
Steering bearings, lubricating ............... 6-29
UB5BE1E0.book Page 1 Wednesday, October 30, 2019 9:59 AM