Page 17 of 94

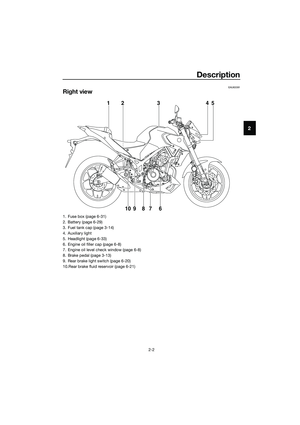
Instrument and control functions
3-3
3
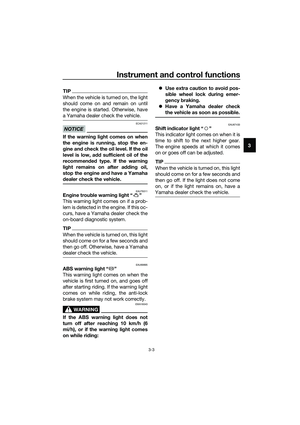
TIP
When the vehicle is turned on, the light
should come on and remain on until
the engine is started. Otherwise, have
a Yamaha dealer check the vehicle.
NOTICE
ECA21211
If the warning light comes on when
the engine is running, stop the en-
gine and check the oil level. If the oil
level is low, add sufficient oil of the
recommended type. If the warning
light remains on after adding oil,
stop the engine and have a Yamaha
dealer check the vehicle.
EAU79311Engine trouble warning light “ ”
This warning light comes on if a prob-
lem is detected in the engine. If this oc-
curs, have a Yamaha dealer check the
on-board diagnostic system.
TIP
When the vehicle is turned on, this light
should come on for a few seconds and
then go off. Otherwise, have a Yamaha
dealer check the vehicle.
EAU69895ABS warning light “ ”
This warning light comes on when the
vehicle is first turned on, and goes off
after starting riding. If the warning light
comes on while riding, the anti-lock
brake system may not work correctly.
WARNING
EWA16043
If the ABS warning light does not
turn off after reaching 10 km/h (6
mi/h), or if the warning light comes
on while riding: Use extra caution to avoid pos-
sible wheel lock during emer-
gency braking.
Have a Yamaha dealer check
the vehicle as soon as possible.
EAU67433Shift indicator light “ ”
This indicator light comes on when it is
time to shift to the next higher gear.
The engine speeds at which it comes
on or goes off can be adjusted.
TIP
When the vehicle is turned on, this light
should come on for a few seconds and
then go off. If the light does not come
on, or if the light remains on, have a
Yamaha dealer check the vehicle.
ABS
UB6WE0E0.book Page 3 Friday, March 27, 2020 11:37 AM
Page 18 of 94

Instrument and control functions
3-4
3
EAU87090
Multi-function meter unit
The multi-function meter unit is also
equipped with a shift timing indicator
light control mode.
WARNING
EWA12423
Be sure to stop the vehicle before
making any setting changes to the
multi-function meter unit. Changing
settings while riding can distract the
operator and increase the risk of an
accident.
EAU87140Switching the display units
The display units can be switched be-
tween kilometers and miles. To switch
the display units, push the “SELECT”
button until the display units change.
EAU86831Speedometer
The speedometer shows the vehicle’s
traveling speed.
EAU87170Tachometer
The tachometer allows the rider to
monitor the engine speed and keep it
within the ideal power range.
NOTICE
ECA10032
Do not operate the engine in the ta-
chometer red zone.
Red zone: 12500 r/min and above
EAU86841Fuel meter
The fuel meter indicates the amount of
fuel in the fuel tank. The display seg-
ments of the fuel meter disappear from
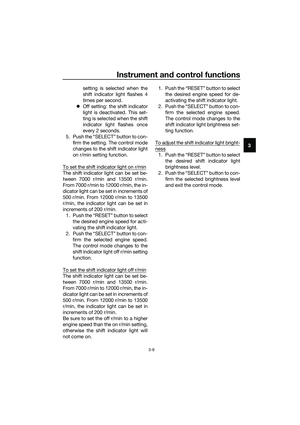
1. “RESET” button
2. “SELECT” button
3. Clock
4. Coolant temperature meter
5. Transmission gear display
6. Tachometer
7. Speedometer
8. Shift indicator light “ ”
9. Fuel meter
10.Multi-function display
MPH
MPG mile
321 458910
67
1. Tachometer
2. Tachometer red zone
1. Fuel meter
MPH
MPG mile
12
MPH
MPG mile
1
UB6WE0E0.book Page 4 Friday, March 27, 2020 11:37 AM
Page 19 of 94
 towards “E” (empty) as the fuel
level decreases. When approximately
3.0 L (0.79 US gal, 0.66 Imp.gal) of fuel
remains, the last segment starts")
Instrument and control functions
3-5
3 “F” (full) towards “E” (empty) as the fuel
level decreases. When approximately
3.0 L (0.79 US gal, 0.66 Imp.gal) of fuel
remains, the last segment starts flash-
ing. Refuel as soon as possible.
TIP
If a problem is detected in the electrical
circuit, the fuel level segments will flash
repeatedly. If this occurs, have a
Yamaha dealer check the vehicle.
EAU87290Clock
The clock uses a 12-hour time system.
To set the clock
1. Push both the “SELECT” button
and “RESET” button until the hour
digits start flashing.
2. Use the “RESET” button to set the
hours.
3. Push the “SELECT” button and
the minute digits start flashing.
4. Use the “RESET” button to set the
minutes.
5. Push the “SELECT” button to con-
firm the settings.
EAU87350Coolant temperature meter
This meter shows the temperature of
the coolant, and thereby the condition
of the engine. The segments come on
from “C” (cold) to “H” (hot) as the en-
gine temperature increases. If the hot
segment flashes, stop the engine as
soon as possible, and let the engine
cool. (See page 6-37.)
EAU87400Transmission gear display
This display shows the selected gear.
The neutral position is indicated by
“ ” and by the neutral indicator light.1. Clock
MPH
MPG mile
1
1. Coolant temperature meter
1. Neutral indicator light Ž
2. Transmission gear display
MPH
MPG mile
1
MPH
MPG mile
12
UB6WE0E0.book Page 5 Friday, March 27, 2020 11:37 AM
Page 20 of 94

two tripmeters (TRIP 1 and TRIP 2)
a fuel re")
Instrument and control functions
3-6
3
EAU87580Multi-function display
The multi-function display is equipped
with the following:
an odometer (ODO)
two tripmeters (TRIP 1 and TRIP 2)
a fuel reserve tripmeter (TRIP F)
an oil change tripmeter (OIL TRIP)
an oil change indicator
an instantaneous fuel consump-
tion display (km/L, L/100 km, or
MPG)
an average fuel consumption dis-
play (AVE_ _._ km/L, AVE_ _._
L/100 km, or AVE_ _._ MPG)
Push the “SELECT” button to change
the display in the following order:
ODO → TRIP 1 → TRIP 2 → TRIP F →
km/L, L/100 km or MPG → AVE_ _._
km/L, AVE_ _._ L/100 km or AVE_ _._
MPG → OIL TRIP → ODO
TIP
The fuel reserve tripmeter appears only
when you are low on fuel.
EAU86890Odometer
The odometer shows the total distance
traveled by the vehicle.
TIP
The odometer will lock at 999999 and
cannot be reset.
EAU88050Tripmeters
The tripmeters show the distance trav-
eled since they were last reset.
To reset a tripmeter, change the dis-
play to the tripmeter you want to reset,
and then push the “RESET” button un-
til it is reset.
TIP
The tripmeters will reset and continue
counting after 9999.9 is reached.
EAU87600Fuel reserve tripmeter
If the last segment of the fuel meter
starts flashing, the display automati-
cally changes to the fuel reserve trip-
meter “TRIP F” and starts counting the
distance traveled from that point.
To reset the fuel reserve tripmeter,
push the “RESET” button until it is re-
set.
TIP
If you do not reset the fuel reserve trip-
meter manually, it will reset automati-
cally and disappear from the display
after refueling and traveling 5 km (3 mi).
1. Multi-function display
MPH
MPG mile
1
UB6WE0E0.book Page 6 Friday, March 27, 2020 11:37 AM
Page 21 of 94

Instrument and control functions
3-7
3
EAU87680Oil change tripmeter
This tripmeter shows the distance trav-
eled since the last engine oil change.
The oil change indicator “OIL” will flash
at the initial 1000 km (600 mi), the next
4000 km (2500 mi), and then every
5000 km (3000 mi) thereafter.
To reset the oil change tripmeter and
oil change indicator, select the oil
change tripmeter, and then push the
“RESET” button until “OIL” and the
tripmeter start flashing. While “OIL”
and the tripmeter are flashing, push the
“RESET” button until the tripmeter is
reset.
TIP
When the engine oil has been
changed, the oil change tripmeter and
the oil change indicator must be reset.
Otherwise, the oil change indicator will
not come on at the correct time.
EAU87771Instantaneous fuel consumption
display
This display shows the fuel consump-
tion under the current riding condi-
tions. It can be set to either “km/L” or
“L/100 km”, or “MPG” when using
miles. To switch the fuel consumption
measurement units, push the “SE-
LECT” button until the measurement
units change.
“km/L”: the distance that can be
traveled on 1.0 L of fuel.
“L/100 km”: the amount of fuel
necessary to travel 100 km.
“MPG”: the distance that can be
traveled on 1.0 Imp.gal of fuel.
TIP
When traveling under 10 km/h (6 mi/h),
1.
2. Oil change tripmeter
MPH
21
1. Instantaneous fuel consumption display
MPH
1
UB6WE0E0.book Page 7 Friday, March 27, 2020 11:37 AM
Page 22 of 94

Instrument and control functions
3-8
3
EAU87860Average fuel consumption display
This display shows the average fuel
consumption since it was last reset.
The average fuel consumption display
can be set to either “AVE_ _._ km/L” or
“AVE_ _._ L/100 km”, or “AVE_ _._
MPG” when using miles. To switch the
fuel consumption measurement units,
push the “SELECT” button until the
measurement units change.
“AVE_ _._ km/L”: the average dis-
tance that can be traveled on 1.0 L
of fuel.
“AVE_ _._ L/100 km”: the average
amount of fuel necessary to travel
100 km.
“AVE_ _._ MPG”: the average dis-
tance that can be traveled on 1.0
Imp.gal of fuel.
TIP
To reset the display, push the
“RESET” button until it resets.
After resetting, “_ _._” is shown
until the vehicle has traveled some
distance.
EAU87960Shift indicator light control mode
This mode cycles through 4 control
functions in the order listed below.
Shift indicator light on / flash / off
Shift indicator light on r/min
Shift indicator light off r/min
Shift indicator light brightness
To set the shift indicator light on / flash
/ off
1. Turn the vehicle off.
2. Push and hold the “SELECT” but-
ton.
3. Turn the vehicle on, and then re-
lease the “SELECT” button after 5
seconds.
4. Push the “RESET” button to select
one of the following flashing pat-
tern settings:
On setting: the shift indicator
light will come on when the
set engine speed is reached.
This setting is selected when
the shift indicator light stays
on.
Flash setting: the shift indica-
tor light will flash when the set
engine speed is reached. This
1. Average fuel consumption display
MPH
1
1. Shift indicator light Ž
2. Brightness level display
MPH
1
2
UB6WE0E0.book Page 8 Friday, March 27, 2020 11:37 AM
Page 23 of 94

Instrument and control functions
3-9
3 setting is selected when the
shift indicator light flashes 4
times per second.
Off setting: the shift indicator
light is deactivated. This set-
ting is selected when the shift
indicator light flashes once
every 2 seconds.
5. Push the “SELECT” button to con-
firm the setting. The control mode
changes to the shift indicator light
on r/min setting function.
To set the shift indicator light on r/min
The shift indicator light can be set be-
tween 7000 r/min and 13500 r/min.
From 7000 r/min to 12000 r/min, the in-
dicator light can be set in increments of
500 r/min. From 12000 r/min to 13500
r/min, the indicator light can be set in
increments of 200 r/min.
1. Push the “RESET” button to select
the desired engine speed for acti-
vating the shift indicator light.
2. Push the “SELECT” button to con-
firm the selected engine speed.
The control mode changes to the
shift indicator light off r/min setting
function.
To set the shift indicator light off r/min
The shift indicator light can be set be-
tween 7000 r/min and 13500 r/min.
From 7000 r/min to 12000 r/min, the in-
dicator light can be set in increments of
500 r/min. From 12000 r/min to 13500
r/min, the indicator light can be set in
increments of 200 r/min.
Be sure to set the off r/min to a higher
engine speed than the on r/min setting,
otherwise the shift indicator light will
not come on.1. Push the “RESET” button to select
the desired engine speed for de-
activating the shift indicator light.
2. Push the “SELECT” button to con-
firm the selected engine speed.
The control mode changes to the
shift indicator light brightness set-
ting function.
To adjust the shift indicator light bright-
ness
1. Push the “RESET” button to select
the desired shift indicator light
brightness level.
2. Push the “SELECT” button to con-
firm the selected brightness level
and exit the control mode.
UB6WE0E0.book Page 9 Friday, March 27, 2020 11:37 AM
Page 24 of 94

Instrument and control functions
3-10
3
EAU1234M
Handlebar switches
Left
Right
EAU12362Pass switch “PASS”
Press this switch to flash the headlight.
TIP
When the dimmer switch is set
to Ž, the passing switch has no ef-
fect.
EAU12402Dimmer switch “ / ”
Set this switch to “ ” for the high
beam and to “ ” for the low beam.
EAU12461Turn signal switch “ / ”
To signal a right-hand turn, push this
switch to “ ”. To signal a left-hand
turn, push this switch to “ ”. When
released, the switch returns to the cen-
ter position. To cancel the turn signal
lights, push the switch in after it has re-
turned to the center position.
EAU12501Horn switch “ ”
Press this switch to sound the horn.
EAU68270Start/Engine stop switch “ / / ”
To crank the engine with the starter,
set this switch to “ ”, and then slide
the switch toward “ ”. See page 5-2
for starting instructions prior to starting
the engine.
Set this switch to “ ” to stop the en-
gine in case of an emergency, such as
when the vehicle overturns or when the
throttle cable is stuck.
EAU88272Hazard switch “OFF/ ”
Use this switch to turn on the hazard
lights (simultaneous flashing of all turn
signal lights). The hazard lights are
used in case of an emergency or to
warn other drivers when your vehicle is
stopped where it might be a traffic haz-
ard.
The hazard lights can be turned on or
off only when the key is in the “ON” po-
sition. You can turn the main switch to
the “OFF” or “LOCK” position, and the
hazard lights will continue to flash. To
turn off the hazard lights, turn the main
switch to the “ON” position and oper-
ate the hazard switch again.
1. Pass switch “PASS”
2. Dimmer switch “ / ”
3. Horn switch “ ”
4. Turn signal switch “ / ”
1. Start/Engine stop switch “ / / ”
2. Hazard switch “ ”
1
2
3
4
1
2
/
UB6WE0E0.book Page 10 Friday, March 27, 2020 11:37 AM