2020 VOLVO S90 TWIN ENGINE brake
[x] Cancel search: brakePage 430 of 655

STARTING AND DRIVING
* Option/accessory.
428
Leveling control settings *
Turn off leveling control before lifting the vehicle with a jack to help avoid problemswith the pneumatic suspension.
Center display settings
Disable Leveling Control
In certain situations, this function must be turned off, e.g. before the vehicle is raised using a jack *. The level difference caused by
raising the vehicle with a jack could cause problems with the pneumatic suspension. Turning off the function in the center display:1. Tap
Settings in the Top view.
2. Tap
My CarParking Brake and
Suspension.
3. Select
Disable Leveling Control.
Related information
Leveling control
* and suspension (p. 425)
Loading recommendations (p. 558)
Economical driving
Drive economically and more environmentally conscious by thinking ahead and avoidingrapid starts and stops.
Adapt your driving style and speed to the cur- rent traffic conditions. To help achieve the greatest distance with the lowest fuel consumption with Twin Engine,observe the following:
Charge
Charge the vehicle regularly by plugging it into an electrical outlet. Make it a habit toalways begin trips with the hybrid batteryfully charged.
Locate charging stations along your route.
If possible, choose parking spots withcharging stations.
NOTE
Charge the vehicle from the electricity grid as often as possible!
Preconditioning
Whenever possible, precondition the vehi- cle before driving by connecting thecharging cable to an electrical outlet.
Avoid parking the vehicle somewherewhere the interior will become too hot ortoo cold while the vehicle is parked. If pos- sible, park the vehicle in a climate-con-trolled garage.
During a short drive after passenger com-partment preconditioning, turn off thepassenger compartment fan or the airconditioning in a hot climate.
If preconditioning is not possible when itis cold outside, use seat and steeringwheel heating first. Avoid heating theentire passenger compartment to reducethe amount of current being taken fromthe hybrid battery.
Page 431 of 655

STARTING AND DRIVING
}}
* Option/accessory.429
Driving
Choose the Pure drive mode to help mini-
mize electric power consumption.
Maintain a steady speed and a generous following distance to traffic ahead to mini-mize braking. This drive mode has thelowest power consumption.
Balance energy requirements using theaccelerator pedal. Use the indicator on theinstrument panel to see available electricpower and avoid starting the combustionengine unnecessarily. The electric motor ismore effective than the combustionengine, especially at low speeds.
When braking is necessary, brake gentlyusing the brake pedal. This will helprecharge the hybrid battery. A regenerativefunction is integrated in the brake pedaland can be augmented by the electricmotor's braking capacity when the gearselector is in mode
B.
Higher speeds increase energy consump-tion - air resistance increases with speed.
Activate the
Hold function in the Function
view at high speeds when traveling farther than is possible using the hybrid battery'scapacity.
Whenever possible, avoid using the
Charge function to charge the hybrid bat-
tery. Charging the battery using the com- bustion engine increases fuel consump- tion and carbon dioxide emissions.
In a cold climate, reduce heating of thewindshield/rear window, mirrors, seatsand the steering wheel.
Maintain the correct pressure in the tiresand check pressure regularly.
The type of tires used could affect energyconsumption - consult a retailer for adviceon suitable tires.
Remove unnecessary items from the vehi-cle - the heavier the load, the higher thefuel consumption.
Roof loads increase air resistance andincrease fuel consumption. Remove roofboxes, ski racks, etc. that are not in use.
Avoid driving with the windows open.
Do not keep the vehicle still on an upwardgradient by using the accelerator pedal.Use the brakes instead.
Related information
Drive-E
‒ purer driving pleasure (p. 28)
Energy distribution in hybrid mode using map data
* (p. 424)
Factors affecting electric motor range (p. 429)
Hybrid gauge (p. 83)
Checking tire pressure (p. 527)
Factors affecting electric motor range
A number of factors affect the electric motor's driving range. The ability to achieve along driving range varies according to theoutside conditions and to how the vehicle isdriven.
The certified value for the distance that can be driven using the electric motor should not beconsidered an expected driving range. Theactual range is dependent on a number of fac-tors.
Factors affecting driving rangeThe driver can influence some factors affectingdriving range, but not all. The longest range is achieved under very favorable conditions when all factors positivelyinfluence range.
Page 434 of 655

STARTING AND DRIVING
* Option/accessory.
432
Preparing for a long trip
It is important to have the vehicle's systems and equipment checked carefully before driv-ing long distances.
Check that
the engine is running properly and that fuel consumption is normal
there are no leaks (fuel, oil or other fluid)
the brake pedal is functioning properly
all lights are working
‒ adjust the head-
light height if the vehicle is carrying aheavy load
tire tread depth and air pressure are atcorrect levels. Change to snow tires whendriving in areas where there is a risk ofsnowy or icy roads
the start battery is sufficiently charged
the wiper blades are in good condition
Related information
Checking tire pressure (p. 527)
Filling washer fluid (p. 621)
Winter driving (p. 432)
Economical driving (p. 428)
Vehicle modem settings (p. 501)
Loading recommendations (p. 558)
Pilot Assist
* (p. 287)
Tire sealing system (p. 542)
Winter driving
It is important to check the vehicle before driving in cold/snowy conditions to makesure it can be driven safely.
Before the cold season arrives: Make sure the engine coolant contains 50% antifreeze. This mixture helps pro-tect the engine from frost erosion down toapprox. –35 °C (–31 °F). Do not mix dif-ferent types of antifreeze as this couldpose a health risk.
Keep the fuel tank well filled to preventcondensation from forming.
Check the viscosity of the engine oil. Oilwith low viscosity (thinner oil) improvescold-weather starting and reduces fuelconsumption when driving with a coldengine.
CAUTION
Low-viscosity oil should not be used with hard driving or in hot weather.
Check the condition and charge level of the start battery. Cold weather placesgreater demands on the start battery andreduces its capacity.
Use washer fluid containing antifreeze tohelp prevent ice from forming in thewasher fluid reservoir.
Slippery driving conditionsTo help optimize traction and roadholding,Volvo recommends using snow tires on allwheels whenever there is a risk of snow or iceon the road.
NOTE
Certain countries require use of winter tires by law. Not all countries permit the use ofstudded tires.
Practice driving on slippery surfaces under controlled conditions to learn how the vehiclereacts.
Related information
Snow tires (p. 541)
Snow chains (p. 541)
Braking on salted roads (p. 406)
Braking on wet roads (p. 405)
Filling washer fluid (p. 621)
Start battery (p. 579)
Replacing windshield wiper blades(p. 619)
Refilling coolant (p. 576)
Page 435 of 655

STARTING AND DRIVING
433
Driving through standing water
It may be necessary to drive the vehicle through standing water, e.g. deep puddles orflooding on the road. This must be done withgreat caution.
To help prevent damage to the vehicle when driving through water:
Do not drive in water higher than the floorof the vehicle. If possible, check the depthof the water at its deepest point beforedriving through it. Be particularly carefulwhen driving through flowing water.
Do not drive faster than walking speed.
Do not stop the vehicle in the water. Drivecarefully forward or back the vehicle out ofthe water.
Remember that waves created by passingvehicles could cause the water level to riseabove the vehicle's floor level.
Avoid driving through salt water to helpavoid the risk of corrosion.
CAUTION
Parts of the vehicle (e.g. engine, transmis- sion, driveline, electrical components, etc.)can be damaged if the vehicle is driventhrough water higher than its floor level.Damage to any components caused byflooding, vapor lock or insufficient oil is notcovered under warranty. If the engine stalls while the vehicle is in water, do not attempt to restart it. Havethe vehicle towed on the bed of a towtruck to a workshop - an authorized Volvoworkshop is recommended.
CAUTION
Because it can be difficult to determine the water depth, Volvo recommends not driv-ing through standing or running water. Thedriver is always responsible for operatingthe vehicle in a safe manner and adheringto all applicable laws and regulations.
When you have passed the water, press lightly on the brake pedal and check that the brakesare functioning properly. Water, mud, slush,etc. can make the brake linings slippery,resulting in delayed braking effect. If the vehicle is equipped with a trailer cou- pling contact, clean the contact after driving inwater or mud.
Related information
Recovery (p. 444)
Page 446 of 655
||
STARTING AND DRIVING
* Option/accessory.
444
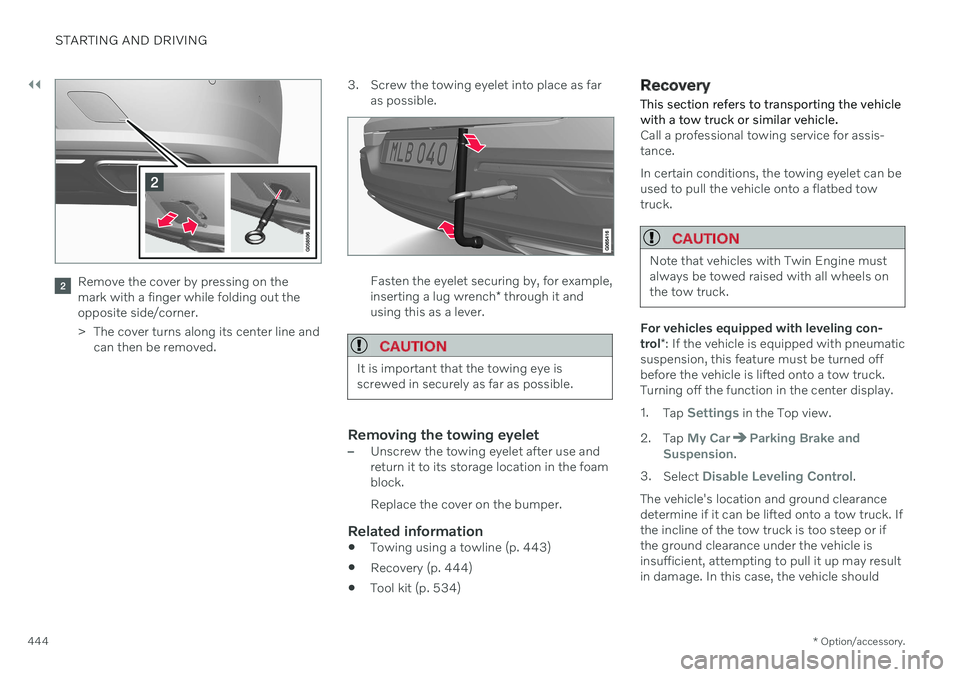
Remove the cover by pressing on the mark with a finger while folding out theopposite side/corner.
> The cover turns along its center line and
can then be removed. 3. Screw the towing eyelet into place as far
as possible.Fasten the eyelet securing by, for example, inserting a lug wrench * through it and
using this as a lever.
CAUTION
It is important that the towing eye is screwed in securely as far as possible.
Removing the towing eyelet–Unscrew the towing eyelet after use and return it to its storage location in the foamblock. Replace the cover on the bumper.
Related information
Towing using a towline (p. 443)
Recovery (p. 444)
Tool kit (p. 534)
Recovery
This section refers to transporting the vehicle with a tow truck or similar vehicle.
Call a professional towing service for assis- tance. In certain conditions, the towing eyelet can be used to pull the vehicle onto a flatbed towtruck.
CAUTION
Note that vehicles with Twin Engine must always be towed raised with all wheels onthe tow truck.
For vehicles equipped with leveling con- trol *: If the vehicle is equipped with pneumatic
suspension, this feature must be turned off before the vehicle is lifted onto a tow truck.Turning off the function in the center display. 1. Tap
Settings in the Top view.
2. Tap
My CarParking Brake and
Suspension.
3. Select
Disable Leveling Control.
The vehicle's location and ground clearance determine if it can be lifted onto a tow truck. Ifthe incline of the tow truck is too steep or ifthe ground clearance under the vehicle isinsufficient, attempting to pull it up may resultin damage. In this case, the vehicle should
Page 538 of 655

WHEELS AND TIRES
* Option/accessory.
536
Removing a wheel Wheel changes must always be carried out correctly. The following instructions showhow to remove a wheel and what is impor-tant to keep in mind.
CAUTION
When not in use, the jack
* should be
kept in its storage compartment under the cargo compartment floor.
The jack provided with your vehicle isintended to be used only in temporarysituations such as changing wheels inthe event of a flat tire. Only the jackthat came with your particular modelshould be used to lift the vehicle. If thevehicle needs to be lifted more fre-quently or for a prolonged period, usinga garage jack or hoist is recommended.Always follow this device's instructionsfor use.
WARNING
Apply the parking brake and put the gear selector in the Park (
P) position.
Block the wheels standing on theground, use rigid wooden blocks orlarge stones.
Check that the jack is not damaged,the threads are properly lubricated andit is free from dirt.
Be sure the jack is on a firm, level, non-slippery surface and that it is uprightand not leaning.
The jack must correctly engage in thejack attachment.
No objects should be placed betweenthe base of the jack and the ground, orbetween the jack and the attachmentbar on the vehicle.
Never let anyone remain in the vehiclewhen it is raised on a jack.
If a tire must be changed near passingtraffic, make sure all passengers moveto a safe location.
Use a jack intended for the vehiclewhen changing a tire. For any otherjob, use stands to support the vehicle.
Never crawl under or allow any part ofyour body to be extended under a vehi-cle supported by a jack. 1. Turn on the vehicle's hazard warning
flashers if a wheel change must be per-formed in an area with traffic.
2. Apply the parking brake and put the gear selector in P, or first gear if the vehicle has
a manual transmission. For vehicles with
Leveling Control* : If the
vehicle is equipped with pneumatic sus- pension, this must be switched off before the vehicle is lifted with the jack *.
3. Take out the jack *, lug wrench * and tool for
removing the plastic covers, which are stowed in the foam block.
Tool for removing the plastic covers on the wheel bolts.
4. Place chocks in front of and behind the wheels that are still on the ground. For example, use heavy wooden blocks orlarge stones.
Page 540 of 655

WHEELS AND TIRES
* Option/accessory.
538
Installing a wheel Wheel changes must always be carried out correctly. The following instructions showhow to install a wheel and what is importantto keep in mind.
CAUTION
When not in use, the jack
* should be
kept in its storage compartment under the cargo compartment floor.
The jack provided with your vehicle isintended to be used only in temporarysituations such as changing wheels inthe event of a flat tire. Only the jackthat came with your particular modelshould be used to lift the vehicle. If thevehicle needs to be lifted more fre-quently or for a prolonged period, usinga garage jack or hoist is recommended.Always follow this device's instructionsfor use.
WARNING
Apply the parking brake and put the gear selector in the Park (
P) position.
Block the wheels standing on theground, use rigid wooden blocks orlarge stones.
Check that the jack is not damaged,the threads are properly lubricated andit is free from dirt.
Be sure the jack is on a firm, level, non-slippery surface and that it is uprightand not leaning.
The jack must correctly engage in thejack attachment.
No objects should be placed betweenthe base of the jack and the ground, orbetween the jack and the attachmentbar on the vehicle.
Never let anyone remain in the vehiclewhen it is raised on a jack.
If a tire must be changed near passingtraffic, make sure all passengers moveto a safe location.
Use a jack intended for the vehiclewhen changing a tire. For any otherjob, use stands to support the vehicle.
Never crawl under or allow any part of your body to be extended under a vehi-cle supported by a jack.
The vehicle must be raised high enough sothat the wheel you are removing can turnfreely.
1. Clean the contact surfaces between the wheel and the wheel hub.
2. Lift the wheel into place. Tighten the wheel bolts securely.Do not grease the wheel bolt threads.
3. Lower the vehicle so that the wheel can- not rotate.
Page 544 of 655

||
WHEELS AND TIRES
542
CAUTION
Snow chains can be used on the vehicle, with the following restrictions:
Always follow the manufacturer'sinstallation instructions carefully. Installchains as tightly as possible andretighten periodically.
Only put snow chains on the frontwheels (also applies to all-wheel drivevehicles).
If accessory, aftermarket or "custom"tires and wheels with different dimen-sions than the original tires and wheelsare used, snow chains in some casesmay NOT be used. Sufficient distancebetween the chains and brakes, sus-pension and body components mustbe maintained.
Check local regulations regarding theuse of snow chains before installing.
Never exceed the snow chain manu-facturer's specified maximum speedlimit. Under no circumstances shouldyou exceed 50 km/h (30 mph).
Avoid bumps, holes or sharp turnswhen driving with snow chains.
Avoid driving on surfaces withoutsnow as this wears out both the snowchains and the tires.
The handling of the vehicle can be adversely affected when driving withchains. Avoid fast or sharp turns aswell as locked wheel braking.
Some types of strap-on chains affectbrake components and therefore mustNOT be used.
Consult a Volvo retailer for more information about snow chains.
Related information
Winter driving (p. 432)
Tire sealing system 14
The temporary tire sealing system can be used to seal a puncture in a tire or to checkand adjust the pressure in the tire. Models equipped with a spare wheel 15
do not
have the tire sealing system.
WARNING
California Proposition 65 Operating, servicing and maintaining a pas- senger vehicle can expose you to chemi-cals including engine exhaust, carbon mon-oxide, phthalates, and lead, which areknown to the State of California to causecancer and birth defects or other reproduc-tive harm. To minimize exposure, avoidbreathing exhaust, do not idle the engineexcept as necessary, service your vehicle ina well ventilated area and wear gloves orwash your hands frequently when servicingyour vehicle. For more information go towww.P65Warnings.ca.gov/passenger-vehicle.
The tire sealing system consists of a compres- sor and a bottle containing sealing compound.The sealing functions as a temporary repair.