Page 422 of 502

Loosen the wheel bolts Wheel bolts.
Find the jacking point under the vehicle which is closest to the wheel that is being changed.
Insert the crank into the opening on the jack (depends on the vehicle equipment).
Crank up the jack until it just fits under the jacking point of the vehicle.
Ensure that the entire surface of the foot of the jack is resting securely on the floor, and that the
foot of the jack is positioned fully underneath the point of application and .
Position the jack and simultaneously continue to crank the claw up until it is in position around the
vertical rib underneath the vehicle .
Crank the jack further until the wheel is just clear of the ground.
WARNING
Incorrect use of the vehicle jack could cause the vehicle to slip off the jack. This could lead to severe
injuries. Observe the following points in order to reduce the risk of injuries:
jacks could slip out of position this includes vehicle jacks supplied with other Volkswagen models.
the vehicle to slip off the jack. If necessary, use a large, sturdy board or similar support for the
vehicle jack.
side member securely Fig. 206
lace any part of your body (e.g. an arm or leg) underneath the vehicle if the latter is
supported only by the vehicle jack.
Page 429 of 502
Take the breakdown set out of the luggage compartment.
Take the sticker
Do not remove foreign objects (e.g. screws or nails) from the tyre.
WARNING
Ignoring any of the items on this important safety checklist can lead to accidents and severe injuries.
Sealing and inflating tyres
First read and observe the introductoryinformation and safety warnings
Sealing a tyre
Fig.
0to unscrew the valve core from the tyre valve. Place
the core on a clean surface.
Fig.
0vigorously to and fro several times.
Fig.
0tightly onto the tyre filler bottle in a clockwise direction. The
plastic foil on the closure is pierced automatically.
Fig.
0and place the open end fully on the tyre valve.
Fig.
0to screw the valve core back into the tyre valve.
Inflating the tyre
Fig.
Fig.
0is closed.
-volt plug Fig.
0into one of the vehicle's 12-volt sockets Electrical sockets
Page 488 of 502

214 Vehicle identification number.
Vehicle data sticker
The vehicle data sticker Fig. 213 is located on the cover of the owner's manual and under the
rear luggage compartment trim on the luggage compartment wall. It contains the following data:
Vehicle identification number (chassis number)
Vehicle type, engine power, gearbox type
Engine and gearbox codes, paint number, interior equipment. In the example, the engine code
is CPTA Fig. 213
Additional equipment, PR numbers
Type plate
The type plate Fig. 213can be seen on the lower part of the door pillar when the driver door is
open. Vehicles for certain export countries do not have a type plate.
The type plate contains the following data:
Approval
Gross vehicle weight rating
Gross combination weight rating (vehicle plus trailer)
Gross front axle weight rating
Gross rear axle weight rating
Vehicle identification number (VIN)
The vehicle identification number can be read from outside the vehicle through a viewer in the
windscreen Fig. 214(arrow). The viewer is located in the lower corner of the windscreen. The
vehicle identification number is also stamped on the right-hand water drainage channel. The water
drainage channel is located between the suspension turret and wing. Open the bonnet to gain
access to the vehicle identification number In the engine compartment
The vehicle identification number can be displayed in the Infotainment system using the button
and the and Service function buttons Infotainment system controls and displays
Vehicle data
Page 489 of 502
Fig. 215
Fig. 216 Vehicle identification number.
Vehicle data sticker
The vehicle data sticker Fig. 215 is located on the cover of the owner's manual and under the
rear luggage compartment trim on the luggage compartment wall. It contains the following data:
Vehicle identification number (chassis number)
Vehicle type, engine power, gearbox type
Engine and gearbox codes, paint number, interior equipment. In the example, the engine code
is CCZB Fig. 215
Additional equipment, PR numbers
Type plate
The type plate Fig. 215can be seen on the lower part of the door pillar when the driver door is
open. Vehicles for certain export countries do not have a type plate.
The type plate contains the following data:
Gross vehicle weight rating
Page 490 of 502
Gross front axle weight rating
Gross rear axle weight rating
Vehicle identification number (VIN)
The vehicle identification number can be read from outside the vehicle through a viewer in the
windscreen Fig. 216(arrow). The viewer is located in the lower corner of the windscreen. The
vehicle identification number is also stamped on the right-hand water drainage channel. The water
drainage channel is located between the suspension turret and wing. Open the bonnet to gain
access to the vehicle identification number In the engine compartment
The vehicle identification number can be displayed in the Infotainment system using the button
and the and Service function buttons Infotainment system controls and displays
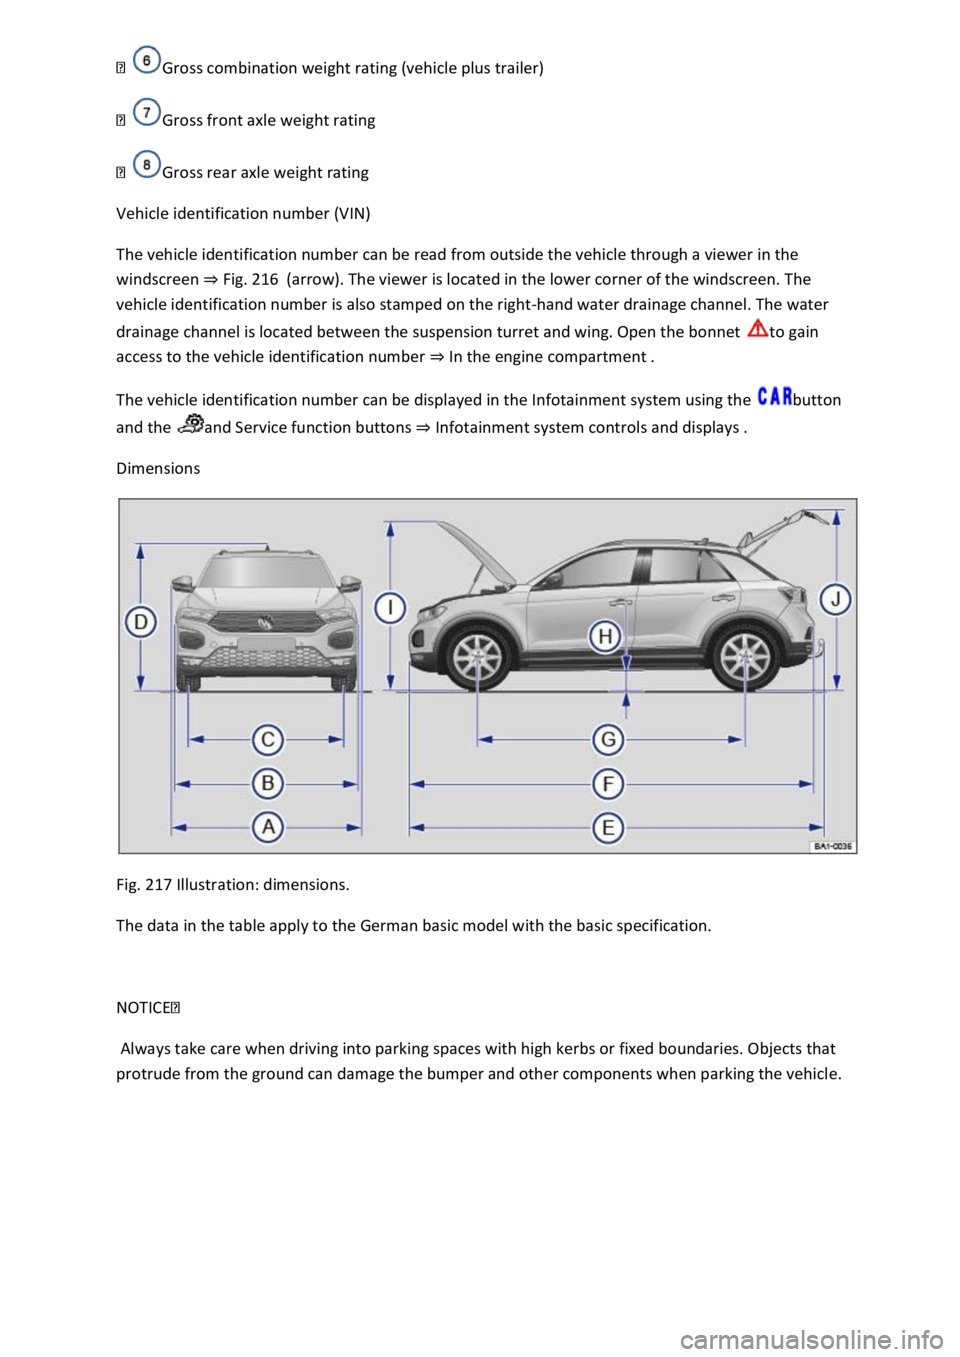
Dimensions
Fig. 217 Illustration: dimensions.
The data in the table apply to the German basic model with the basic specification.
NOTICE
Always take care when driving into parking spaces with high kerbs or fixed boundaries. Objects that
protrude from the ground can damage the bumper and other components when parking the vehicle.