Page 65 of 117

Basic operation65To adjust a setting like the illustrated
example, you may optionally:
● Touch P or Q.
● Touch anywhere on the line.
● Move the slider with your finger.
Tone settings Press b, select OPTIONS and then
select AUDIO SETTINGS .
Several predefined settings are
available to optimise the tone for a
specific style of music (e.g. Pop-
Rock or Classical ).
To adjust the tone individually, select
User . Change the settings as desired.
Notice
If you change the settings of a
predefined setting, e.g. Pop-Rock,
this settings will be applied to the User setting.
Balance and fader
Select the Balance tab.
Several predefined settings are
available to adjust the volume
distribution inside the vehicle (e.g. All
passengers or Front only ).
To change the current setting, e.g. All
passengers , select that setting and
then select the desired new setting
from the displayed list.
You may individually adjust the
predefined settings.
To define the point in the passenger
compartment where the volume is at
its highest level, move the cursor in
the illustration on the right side of the
screen to the desired point.
To return to the default factory
settings, select h.
Volume settings Press b, select OPTIONS and then
select AUDIO SETTINGS . Then
select the Sound tab.
Audible touch feedback
If the audible touch feedback function
is activated, each touch of a screen
button or menu item is indicated by a
beeping sound.
To adjust the touch beep volume,
activate Touch tones and then adjust
the setting.
Speed compensated volume Activate or deactivate Volume linked
to speed .
Page 66 of 117

66Basic operationIf activated, the volume of the
Infotainment system is adapted
automatically to make up for the road and wind noise as you drive.
Speech output Select the Voice tab.
Adjust the volume for all speech
outputs of the system.
Ringtone Select the Ringtones tab.
Adjust the ringtone volume of
incoming calls.
System settings
Press :.Configuring the system
Select System configuration to
perform some basic system
configurations, e.g.:
● Adjust the display of units for temperature or fuel consumption.
● Reset the system configuration to
factory defaults.
● Update the installed software version.
Changing display language
To adjust the language for the menu
texts, select Language and then
select the desired language.
Notice
If the selected display language is
supported by the embedded speech recognition, the language of the
speech recognition will be changed
accordingly; if not, embedded
speech recognition will be not
available.
Adjusting time and date
Select Date and time .
Changing time and date formats
To change the time and date formats, select the respective tabs and then
select the desired formats.
Setting time and date
By default the displayed time and date is automatically adjusted by the
system.
To manually adjust the displayed time
and date:
Select the Time tab.
Set GPS Synchronisation: to OFF
and then select the Time field to set
the desired time.
Select the Date tab and then select
the desired date format.
Page 67 of 117

Basic operation67Adjusting the screenSelect Screen configuration .
Text scroll function
Select the Animation tab.
If long texts on the screen should be
scrolled automatically, activate
Automatic scrolling .
If Automatic scrolling is deactivated,
long texts are truncated.
Adjusting the brightness
Select Brightness and set the
brightness of the screen to the
desired level.
Storing your personal settings
To go to the profile settings, touch the top line of the screen and then select
Profiles .
You can store a multitude of settings
in a personal profile. For example, all
current tone settings, all radio presets
and a phone book.
In case you share the vehicle with
other people, this enables you to
restore your personal settings from
your profile at any time.
A maximum of three personal profiles may be stored.
Additionally, a Common profile is
available. All settings done at any
time are automatically stored in that
profile. If no personal profile is
activated, the Common profile is
active.
Storing your personal profile
After performing all your personal
settings:
Select one of the personal profile
tabs.
Select the input field > and enter the
desired name of your personal profile.
Finally, confirm your inputs to store
them in your personal profile.
Activating your personal profile
Touch the top line of the screen, then select Profiles and then select the tab
with the name of your personal
profile.
Activating the Common profile
If a personal profile is currently active:
Go to the Common profile tab and
then select Activate profile .
Resetting a personal profile
You can at any time reset a personal
profile to restore the default factory
settings on that profile.
Activate the respective profile and
then select Reset the profile .
Page 68 of 117
68Basic operationResetting the Common profile
You can at any time reset the
Common profile to restore the default
factory settings on that profile.
Select Common profile and then
select Reset the common profile .
Page 69 of 117

Radio69RadioUsage.......................................... 69
Radio data system .......................70
Digital audio broadcasting ...........71Usage
Activating the radio
Press b. The audio main menu last
selected is displayed.
If the radio main menu is not active,
select SOURCES and then select
Radio .
The station last played will be
received.
Selecting a waveband
Select OPTIONS and repeatedly
touch i to toggle between the
different wavebands.
Searching for stations
Automatic station search
Briefly touch P or Q to play the
previous or next receivable station.
Manual station search
Press and hold P or Q. Release when
the required frequency has almost
been reached.
A search is made for the next station
that can be received and it is played
automatically.
Station lists
In the station lists, all receivable radio
stations within the current reception
area are available for selection.
To display the station list of the
waveband currently active, select
List .
Select the desired station.Update station lists
If the stations stored in the waveband-
specific station list can no longer be
received, the station lists must be
updated.
To start an update for the currently
active waveband, select U.
Page 70 of 117

70RadioStoring favourite stations
Up to 24 radio stations of all
wavebands can be stored as
favourites in the Presets list.
Select Presets to display the preset
buttons.
Storing the currently active station
Touch and hold the desired button in
the Presets list for a few seconds. The
respective frequency or station name is displayed on the button.
If a station is already stored on a
preset button, that station will be
overwritten by the new one.
Alternatively, touch ; Mem in the
radio main menu to store the currently
active station.
Storing a station from a station list
Select OPTIONS and then select the
desired waveband.
To store a station from the station list, briefly touch ; next to the desired
station. The station is stored and the
number of the preset button will be
displayed. To delete a station,
touch ; again.
Alternatively, touch and hold the name of the station until it is stored.To delete the station, touch and hold
the name of the station again until a corresponding message is displayed.
Retrieving stations
In the radio main menu select
Presets and then briefly touch the
preset button of the desired station.
Radio data system
Radio data system (RDS) is a service of FM stations that considerably
facilitates the finding of the desired
station and its fault-free reception.Advantages of RDS
● On the display, the programme name of the station appears
instead of its frequency.
● During a station search, the Infotainment system tunes in to
RDS stations only.
● The Infotainment system always tunes into the best receivable
broadcasting frequency of the set station by means of AF
(alternative frequency).
● Depending on the station that is received, the Infotainment
system displays radio text that
can contain e.g. information on
the current programme.
Activating RDS In the radio main menu, select
OPTIONS and activate RDS.
If RDS is activated, RDS is displayed
in the bottom line of the radio main
menu.
Page 71 of 117

Radio71Radio text
If RDS is activated, information on the
radio programme currently active or
the music track currently playing are
displayed below the programme
name.
To show or hide the information, go to
the OPTIONS menu and activate or
deactivate Information .
Traffic announcements
Many RDS stations broadcast traffic
news. If the traffic announcements
function is activated, radio or media
playback is interrupted for the
duration of a traffic announcement.
To activate traffic announcements, go to the OPTIONS menu and activate
TA .
If TA is activated, TA is displayed in
the bottom line of the radio main
menu.
Digital audio broadcasting
Digital audio broadcasting (DAB)
broadcasts radio stations digitally.DAB stations are indicated by the
programme name instead of the
broadcasting frequency.
General information ● With DAB, several radio programmes (services) can bebroadcast on a single ensemble.
● Besides high-quality digital audio
services, DAB is also able to
transmit programme-associated data and a multitude of other data services including travel andtraffic information.
● As long as a given DAB receiver can pick up the signal sent out bya broadcasting station (even if
the signal is very weak), sound
reproduction is ensured.
● In the event of poor reception, the
volume is reduced automatically
to avoid the output of
disagreeable noises.
If the DAB signal is too weak to
be picked up by the receiver,
reception is interrupted
completely. This incident can be
avoided by activating DAB-FM
auto tracking, see below.● Interference caused by stations that are on nearby frequencies (aphenomenon that is typical of AMand FM reception) does not
occur with DAB.
● If the DAB signal is reflected by natural obstacles or buildings,
the reception quality of DAB is
improved, whereas AM or FM
reception is considerably
impaired in such cases.
● When DAB reception is enabled, the FM tuner of the Infotainmentsystem remains active in the
background and continually
searches for the FM stations with
the best reception. If Traffic
announcement 3 70 is activated,
traffic announcements of the FM
station with the best reception
are issued. Deactivate Traffic
announcement if DAB reception
should not be interrupted by FM
traffic announcements.
FM-DAB Linking
This function enables switching from
an FM station to a corresponding
DAB station and vice versa.
Page 72 of 117
72RadioSwitching from FM to DAB occurs as
soon as a corresponding DAB station
is available. Therefore, it is
recommended to store favourite
stations as DAB stations to reduce
frequent switching.
Switching from DAB to FM occurs if
the signal is too weak to be picked up by the receiver.
Activation
Precondition is that RDS is activated
before FM-DAB Linking can be
activated.
To activate FM-DAB Linking, select
OPTIONS in the radio main menu and
then activate FM-DAB Follow-up .
The following symbol will be
displayed when FM-DAB Linking is
activated:Deactivation
To deactivate FM-DAB Linking, select
OPTIONS in the radio main menu and
then deselect FM-DAB Follow-up .
FM-DAB Linking will automatically be
deactivated when RDS is
deactivated.
 1
1 2
2 3
3 4
4 5
5 6
6 7
7 8
8 9
9 10
10 11
11 12
12 13
13 14
14 15
15 16
16 17
17 18
18 19
19 20
20 21
21 22
22 23
23 24
24 25
25 26
26 27
27 28
28 29
29 30
30 31
31 32
32 33
33 34
34 35
35 36
36 37
37 38
38 39
39 40
40 41
41 42
42 43
43 44
44 45
45 46
46 47
47 48
48 49
49 50
50 51
51 52
52 53
53 54
54 55
55 56
56 57
57 58
58 59
59 60
60 61
61 62
62 63
63 64
64 65
65 66
66 67
67 68
68 69
69 70
70 71
71 72
72 73
73 74
74 75
75 76
76 77
77 78
78 79
79 80
80 81
81 82
82 83
83 84
84 85
85 86
86 87
87 88
88 89
89 90
90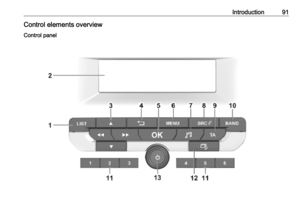 91
91 92
92 93
93 94
94 95
95 96
96 97
97 98
98 99
99 100
100 101
101 102
102 103
103 104
104 105
105 106
106 107
107 108
108 109
109 110
110 111
111 112
112 113
113 114
114 115
115 116
116
