Page 116 of 418
116
Stowing rings
Use the stowing rings on the rear floor to fix the net, your loads or luggage.
High load retaining net
This allows the use of the entire load space, up to the roof:- behind the front seats in row 1, when the rear seats (and bench seats) in rows 2 and 3 are folded or removed.- behind the rear seats and bench seats in row 2, when the rear seats (and bench seats) in row 3 are folded or removed.
Luggage retaining net
Attached to the stowing rings on the rear floor, it allows objects to be held down.
As a safety measure in the event of sudden braking, it is recommended that heavy objects are placed as far for ward in the vehicle as possible.It is recommended that the load is secured firmly using the stowing rings on the floor.
As a safety measure in the event of sudden braking, it is recommended that heavy objects are placed on the floor as close as possible to the backrest of the seat(s) or bench seat.
Ease of use and comfort
Page 117 of 418

117
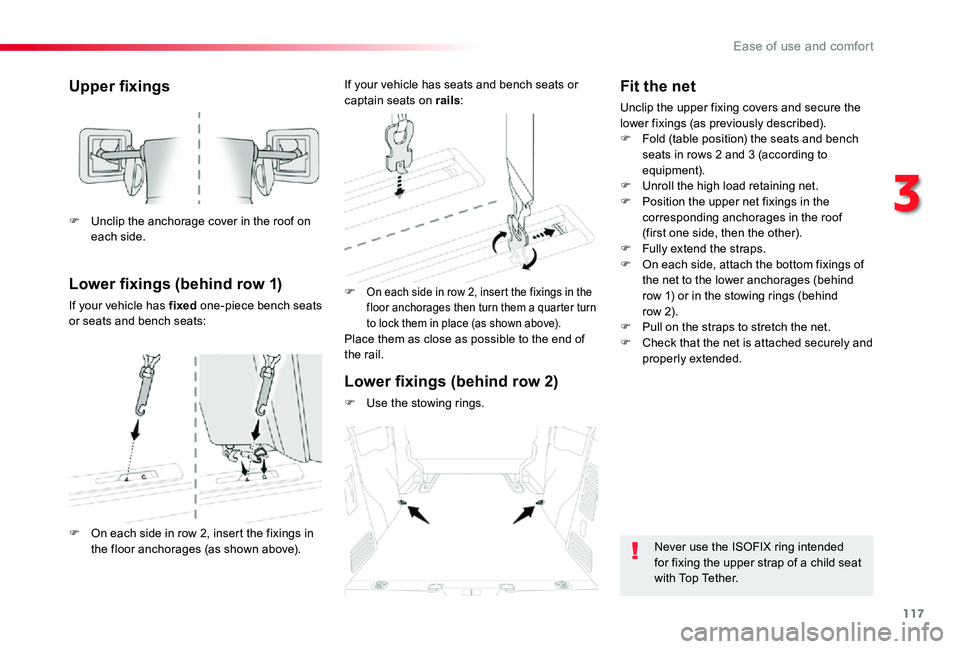
Upper fixings
Lower fixings (behind row 1)
If your vehicle has fixed one-piece bench seats or seats and bench seats:
F On each side in row 2, insert the fixings in the floor anchorages then turn them a quarter turn to lock them in place (as shown above).Place them as close as possible to the end of the rail.
F Unclip the anchorage cover in the roof on each side.
F On each side in row 2, insert the fixings in the floor anchorages (as shown above).
If your vehicle has seats and bench seats or captain seats on rails:
Lower fixings (behind row 2)
F Use the stowing rings.
Fit the net
Unclip the upper fixing covers and secure the lower fixings (as previously described).F Fold (table position) the seats and bench seats in rows 2 and 3 (according to equipment).F Unroll the high load retaining net.F Position the upper net fixings in the corresponding anchorages in the roof (first one side, then the other).
F Fully extend the straps.F On each side, attach the bottom fixings of the net to the lower anchorages (behind row 1) or in the stowing rings (behind row 2).F Pull on the straps to stretch the net.F Check that the net is attached securely and properly extended.
Never use the ISOFIX ring intended for fixing the upper strap of a child seat with Top Tether.
3
Ease of use and comfort
Page 122 of 418

122
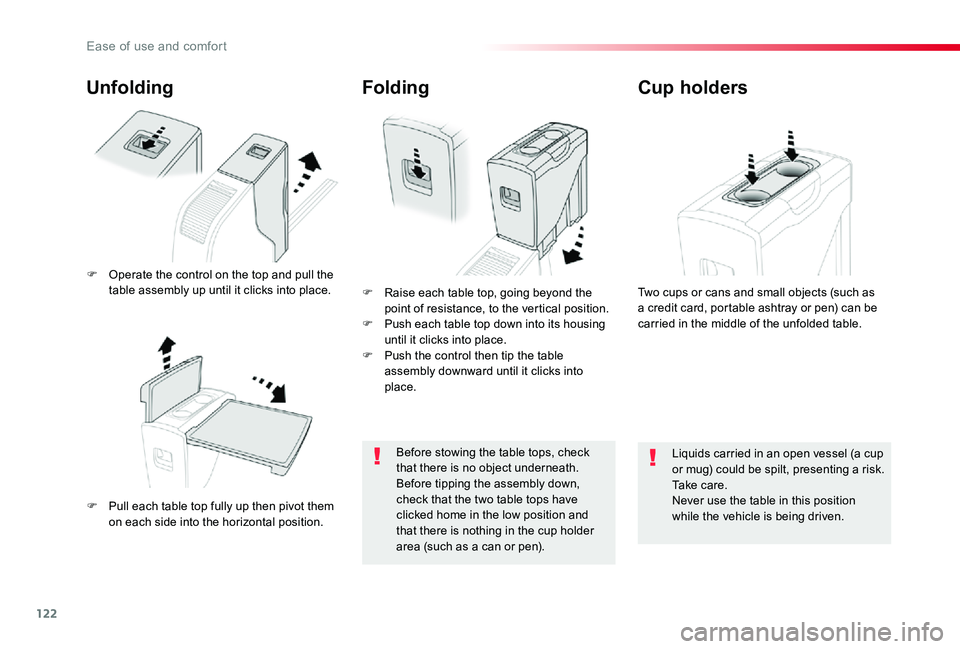
Unfolding
F Pull each table top fully up then pivot them on each side into the horizontal position.
F Raise each table top, going beyond the point of resistance, to the vertical position.F Push each table top down into its housing until it clicks into place.F Push the control then tip the table assembly downward until it clicks into place.
Folding
Before stowing the table tops, check that there is no object underneath. Before tipping the assembly down, check that the two table tops have clicked home in the low position and that there is nothing in the cup holder
area (such as a can or pen).
F Operate the control on the top and pull the table assembly up until it clicks into place.
Cup holders
Liquids carried in an open vessel (a cup or mug) could be spilt, presenting a risk. Take care.Never use the table in this position while the vehicle is being driven.
Two cups or cans and small objects (such as a credit card, portable ashtray or pen) can be carried in the middle of the unfolded table.
Ease of use and comfort
Page 124 of 418

124
Take care of passengers' feet when manoeuvring the assembly.
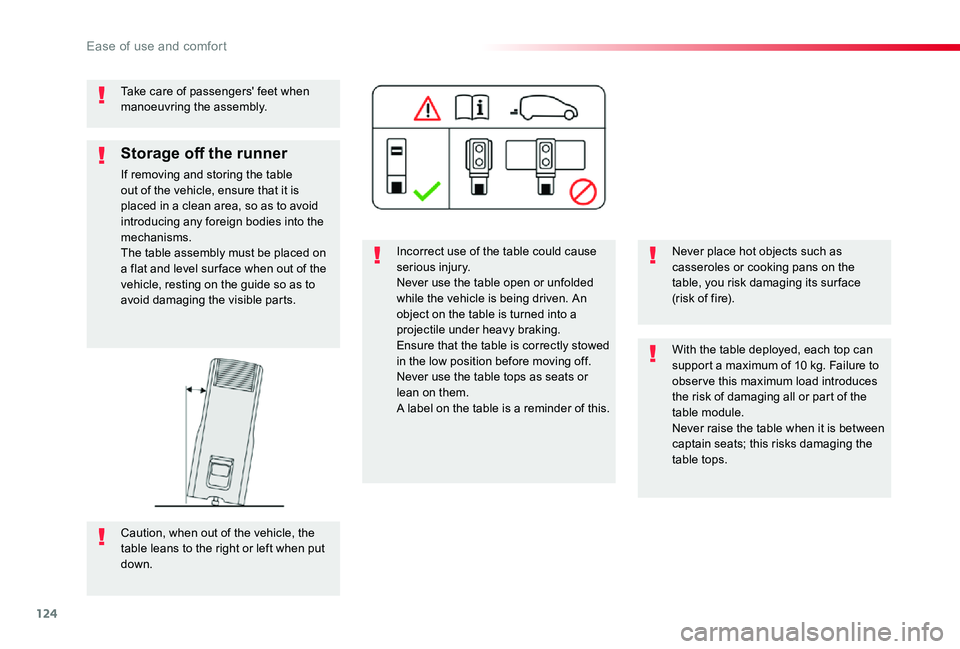
Incorrect use of the table could cause serious injury.Never use the table open or unfolded while the vehicle is being driven. An object on the table is turned into a projectile under heavy braking.Ensure that the table is correctly stowed in the low position before moving off.Never use the table tops as seats or lean on them.A label on the table is a reminder of this.
Never place hot objects such as casseroles or cooking pans on the table, you risk damaging its sur face (risk of fire).
With the table deployed, each top can support a maximum of 10 kg. Failure to obser ve this maximum load introduces the risk of damaging all or part of the table module.Never raise the table when it is between captain seats; this risks damaging the table tops.
Storage off the runner
If removing and storing the table out of the vehicle, ensure that it is placed in a clean area, so as to avoid introducing any foreign bodies into the mechanisms.The table assembly must be placed on a flat and level sur face when out of the vehicle, resting on the guide so as to avoid damaging the visible parts.
Caution, when out of the vehicle, the table leans to the right or left when put down.
Ease of use and comfort
Page 131 of 418

131
Front demist - defrost
These markings on the control panel indicate the control positions for rapid demisting or defrosting of the windscreen and side windows.
Manual air conditioning
With Stop & Start, when demisting has been activated, the STOP mode is not available.
Dual-zone digital air
conditioning
F Put the air flow, temperature and distribution controls to the dedicated marked position.
The system automatically manages the air conditioning, air flow and air intake, and provides optimum distribution towards the windscreen and side windows.
The system reverts to the previous settings.
F Press this button to demist or defrost the windscreen and side windows as quickly as possible.
F To stop, press this button again or on "AUTO".
F For air conditioning, press this button; its indicator lamp comes on.
Heated windscreen and washer jetsFor more information on the Wiper control stalk and in particular the heated windscreen and washer jets, refer to the corresponding section.
3
Ease of use and comfort
Page 134 of 418

134
In order for these systems to be fully effective, follow the operation and maintenance guidelines below:F To obtain an even air distribution, take care not to obstruct the exterior air intake grilles located at the base of the windscreen, the nozzles, the vents and the air outlets, as well as the air extractor located at the rear.F Do not cover the sunshine sensor, located at the top of the windscreen; this is used for regulation of the air conditioning system.F Operate the air conditioning system for at least 5 to 10 minutes, once or twice a month
to keep it in per fect working order.F Ensure that the passenger compartment filter is in good condition and have the filter elements replaced regularly. We recommend the use of a combined passenger compartment filter. Thanks to its special active additive, it contributes to the purification of the air breathed by the occupants and the cleanliness of the passenger compartment (reduction of allergic symptoms, bad odours and greasy deposits).F To ensure correct operation of the air conditioning system, you are also advised to have it checked regularly as recommended in the maintenance and warranty guide.F If the system does not produce cold air, switch it off and contact an authorized Toyota dealer or repairer, or another duly qualified and equipped professional.
Recommendations for heating, ventilation and air conditioning
If after an extended stop in sunshine, the interior temperature is very high, first ventilate the passenger compartment for a few moments.Put the air flow control at a setting high enough to quickly change the air in the passenger compartment.The air conditioning system does not contain chlorine and does not present any danger to the ozone layer.
The condensation created by the air conditioning results in a discharge of water under the vehicle which is per fectly normal.
When towing the maximum load on a steep gradient in high temperatures, switching off the air conditioning increases the available engine power and so improves the towing ability.
Stop & Start
The heating and air conditioning systems only work when the engine is running.To maintain a comfortable temperature in the passenger compartment, you can temporarily deactivate the Stop & Start system.For more information on Stop & Star t, refer to the corresponding section.
Air vents
To close a vent, move the control towards the outside of the vehicle. Slight resistance may be felt.
Ease of use and comfort
Page 154 of 418

154
Wiper control stalk
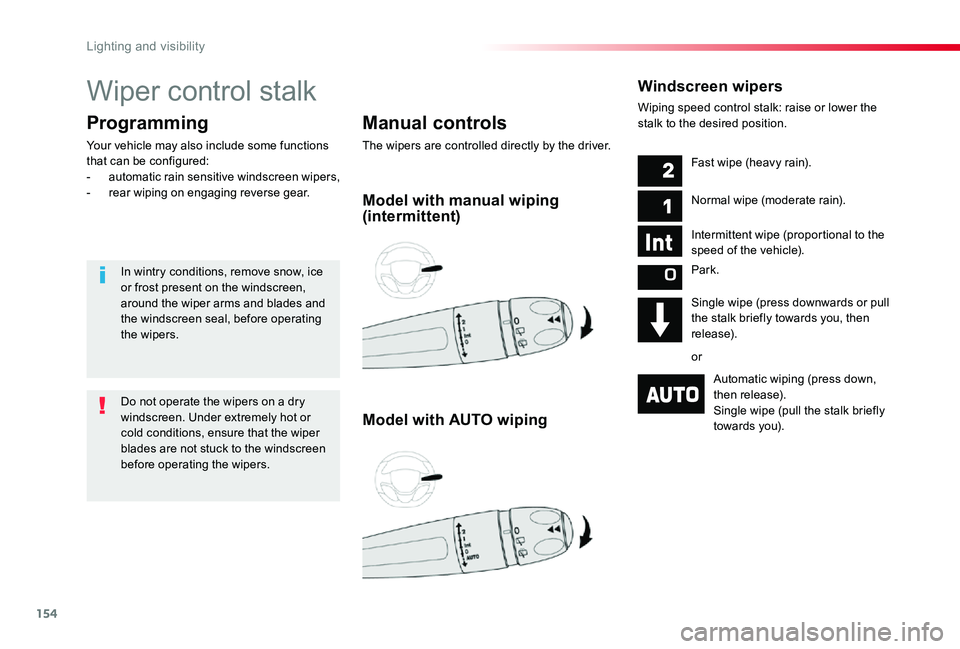
Manual controls
The wipers are controlled directly by the driver.
Programming
Your vehicle may also include some functions that can be configured:- automatic rain sensitive windscreen wipers,- rear wiping on engaging reverse gear.
Windscreen wipers
Wiping speed control stalk: raise or lower the stalk to the desired position.
Model with manual wiping (intermittent)
Model with AUTO wiping
Fast wipe (heavy rain).
Normal wipe (moderate rain).
Intermittent wipe (proportional to the
speed of the vehicle).
Park.
Single wipe (press downwards or pull the stalk briefly towards you, then release).
or
Automatic wiping (press down, then release).Single wipe (pull the stalk briefly towards you).
Do not operate the wipers on a dry windscreen. Under extremely hot or cold conditions, ensure that the wiper blades are not stuck to the windscreen before operating the wipers.
In wintry conditions, remove snow, ice or frost present on the windscreen, around the wiper arms and blades and the windscreen seal, before operating the wipers.
Lighting and visibility
Page 156 of 418

156
If a significant accumulation of snow or ice is present, or when using a bicycle carrier on the boot, deactivate the automatic rear wiper.
This function is activated by default.
Reverse gear
When reverse gear is engaged, the rear wiper will come into operation automatically if the windscreen wipers are operating.
Activation / Deactivation
Activation or deactivation of the function is done in the vehicle configuration menu.
F Pull the windscreen wiper stalk towards you. The screenwash then the wipers operate for a fixed period.The headlamp wash is only activated if the dipped headlamps are on and the vehicle is moving.With daytime running lamps, to activate the headlamp wash, position the lighting stalk in the dipped beam position.
Windscreen and headlamp
wash
On vehicles fitted with automatic air conditioning, any action on the windscreen wash control results in temporary closing of the air intake to avoid odours inside the passenger compartment.
Screenwash/headlamp wash level low
In the case of vehicles fitted with headlamp washers, when the fluid reser voir low level is reached this warning lamp comes on in the instrument panel, accompanied by an audible signal and a message.
The warning lamp comes on when the ignition is switched on, or every time the stalk is operated, until the reser voir is refilled.Next time you stop, refill the screenwash / headlamp wash reser voir.
With audio system or touch screen
The system is activated or deactivated via the vehicle configuration menu.
Lighting and visibility