2020 TOYOTA PROACE CITY ECO mode
[x] Cancel search: ECO modePage 120 of 272
120
Steering mounted control
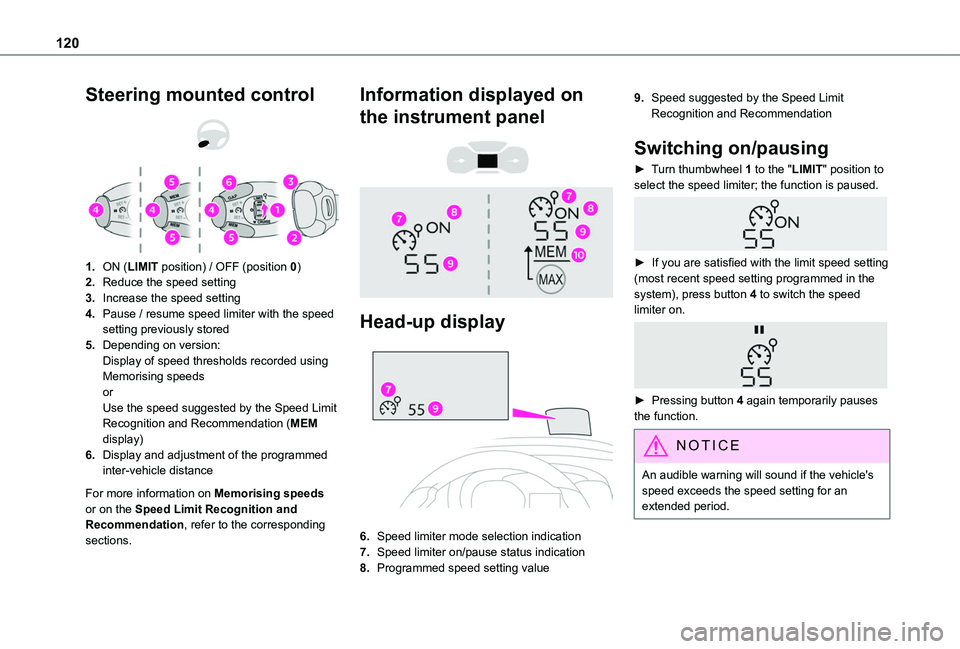
1.ON (LIMIT position) / OFF (position 0)
2.Reduce the speed setting
3.Increase the speed setting
4.Pause / resume speed limiter with the speed setting previously stored
5.Depending on version:Display of speed thresholds recorded using Memorising speedsorUse the speed suggested by the Speed Limit Recognition and Recommendation (MEM display)
6.Display and adjustment of the programmed inter-vehicle distance
For more information on Memorising speeds or on the Speed Limit Recognition and Recommendation, refer to the corresponding sections.
Information displayed on
the instrument panel
Head-up display
6.Speed limiter mode selection indication
7.Speed limiter on/pause status indication
8.Programmed speed setting value
9.Speed suggested by the Speed Limit Recognition and Recommendation
Switching on/pausing
► Turn thumbwheel 1 to the "LIMIT" position to select the speed limiter; the function is paused.
► If you are satisfied with the limit speed setting (most recent speed setting programmed in the system), press button 4 to switch the speed limiter on.
► Pressing button 4 again temporarily pauses the function.
NOTIC E
An audible warning will sound if the vehicle's speed exceeds the speed setting for an extended period.
Page 122 of 272
122
allow running at a constant speed and keeping an adequate safety distance.Remain vigilant when the cruise control is activated. If you hold one of the speed setting modification buttons, a very rapid change in the speed of your vehicle may occur.When descending a steep hill, the cruise control system cannot prevent the vehicle from exceeding the set speed. Brake if necessary to control the speed of your vehicle.On steep climbs or when towing, the set speed may not be reached or maintained.
NOTIC E
Exceeding the programmed speed settingYou can temporarily exceed the speed setting by pressing the accelerator pedal (the programmed speed flashes).To return to the speed setting, release the accelerator pedal (when the set speed is
reached again, the displayed speed stops flashing).
WARNI NG
Operating limitsNever use the system in the following situations:– in an urban area with the risk of
pedestrians crossing the road,
– in heavy traffic,– on winding or steep roads,– on slippery or flooded roads,– in unfavourable climatic conditions,– driving on a speed circuit,– driving on a rolling road,– use of snow chains, non-slip covers or studded tyres.
Programmable cruise
control
Refer to the General recommendations on the use of driving and manoeuvring aids and to Cruise control - particular recommendations.This system automatically keeps the vehicle’s speed at the cruise value programmed by the driver (speed setting), without using the accelerator pedal.The cruise control is switched on manually.It requires a minimum vehicle speed of 40 km/h (25 mph).
With a manual gearbox, third gear or higher must be engaged.With an automatic gearbox, mode D or second gear or higher in mode M must be engaged.
NOTIC E
The cruise control remains active after changing gear, regardless of the gearbox type, on engines fitted with Stop & Start.
NOTIC E
Switching off the ignition cancels any speed setting.
Steering mounted control
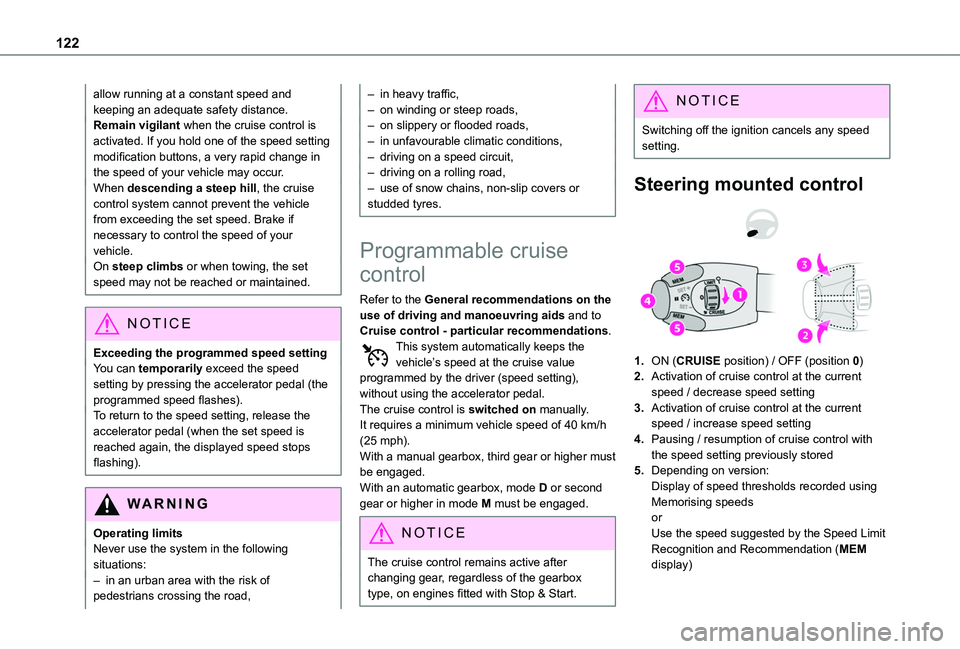
1.ON (CRUISE position) / OFF (position 0)
2.Activation of cruise control at the current speed / decrease speed setting
3.Activation of cruise control at the current speed / increase speed setting
4.Pausing / resumption of cruise control with the speed setting previously stored
5.Depending on version:Display of speed thresholds recorded using Memorising speedsorUse the speed suggested by the Speed Limit Recognition and Recommendation (MEM display)
Page 123 of 272
123
Driving
6
For more information on Memorising speeds or on the Speed Limit Recognition and Recommendation, refer to the corresponding sections.
Information displayed on
the instrument panel
Head-up display
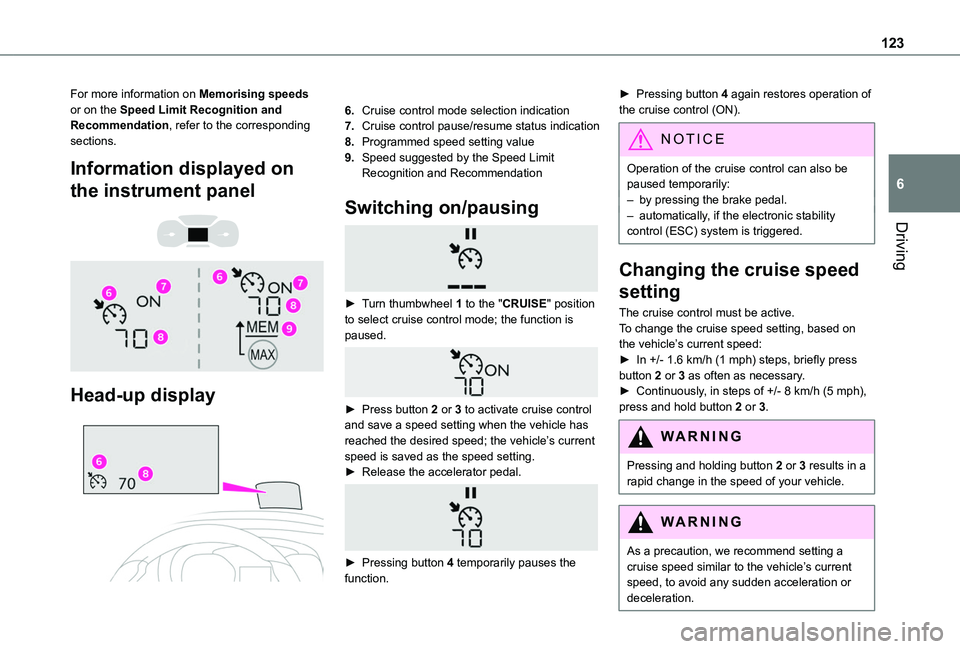
6.Cruise control mode selection indication
7.Cruise control pause/resume status indication
8.Programmed speed setting value
9.Speed suggested by the Speed Limit Recognition and Recommendation
Switching on/pausing
► Turn thumbwheel 1 to the "CRUISE" position to select cruise control mode; the function is paused.
► Press button 2 or 3 to activate cruise control and save a speed setting when the vehicle has reached the desired speed; the vehicle’s current
speed is saved as the speed setting.► Release the accelerator pedal.
► Pressing button 4 temporarily pauses the function.
► Pressing button 4 again restores operation of the cruise control (ON).
NOTIC E
Operation of the cruise control can also be paused temporarily:– by pressing the brake pedal.– automatically, if the electronic stability control (ESC) system is triggered.
Changing the cruise speed
setting
The cruise control must be active.To change the cruise speed setting, based on the vehicle’s current speed:► In +/- 1.6 km/h (1 mph) steps, briefly press button 2 or 3 as often as necessary.► Continuously, in steps of +/- 8 km/h (5 mph), press and hold button 2 or 3.
WARNI NG
Pressing and holding button 2 or 3 results in a rapid change in the speed of your vehicle.
WARNI NG
As a precaution, we recommend setting a cruise speed similar to the vehicle’s current speed, to avoid any sudden acceleration or deceleration.
Page 125 of 272
125
Driving
6
To do so, it has a camera located at the top of the windscreen and, depending on version, a radar located in the front bumper.
WARNI NG
Primarily designed for driving on main roads and motorways, this system only works with moving vehicles driving in the same direction as your vehicle.
NOTIC E
If the driver operates a direction indicator to overtake a slower vehicle, the cruise control allows the vehicle to temporarily approach the vehicle in front to assist the overtaking manoeuvre, without ever exceeding the speed setting.
WARNI NG
Some vehicles present on the road may not be properly seen or may be poorly interpreted by the camera and/or radar (e.g. a lorry), which may lead to a poor assessment of the distances and lead to the vehicle inappropriately accelerating or braking.
Steering mounted control
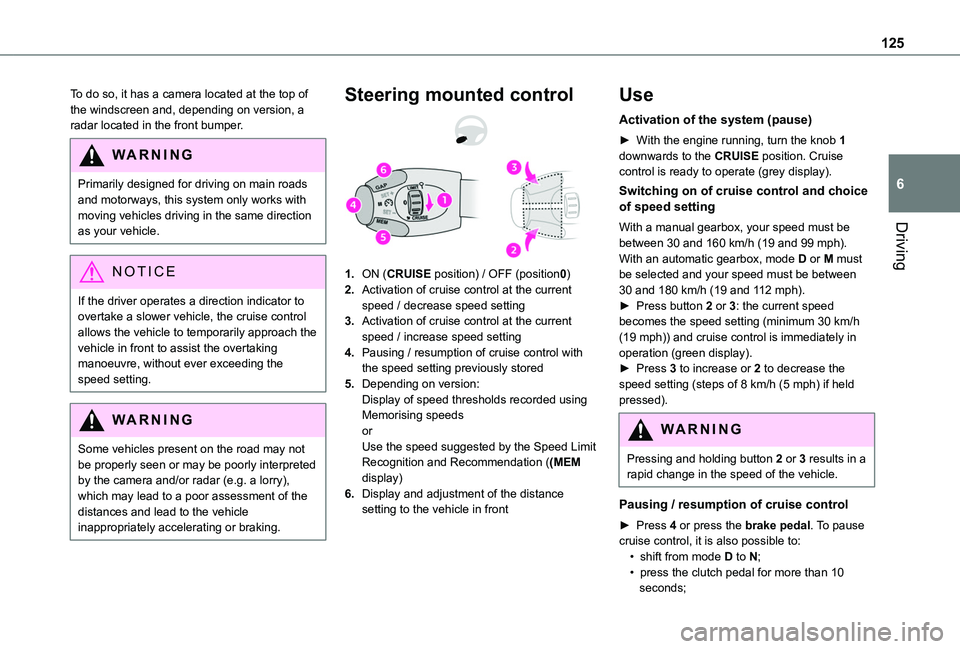
1.ON (CRUISE position) / OFF (position0)
2.Activation of cruise control at the current speed / decrease speed setting
3.Activation of cruise control at the current speed / increase speed setting
4.Pausing / resumption of cruise control with the speed setting previously stored
5.Depending on version:Display of speed thresholds recorded using Memorising speedsorUse the speed suggested by the Speed Limit Recognition and Recommendation ((MEM display)
6.Display and adjustment of the distance setting to the vehicle in front
Use
Activation of the system (pause)
► With the engine running, turn the knob 1 downwards to the CRUISE position. Cruise control is ready to operate (grey display).
Switching on of cruise control and choice of speed setting
With a manual gearbox, your speed must be between 30 and 160 km/h (19 and 99 mph).With an automatic gearbox, mode D or M must be selected and your speed must be between 30 and 180 km/h (19 and 112 mph).► Press button 2 or 3: the current speed becomes the speed setting (minimum 30 km/h (19 mph)) and cruise control is immediately in operation (green display).► Press 3 to increase or 2 to decrease the speed setting (steps of 8 km/h (5 mph) if held pressed).
WARNI NG
Pressing and holding button 2 or 3 results in a rapid change in the speed of the vehicle.
Pausing / resumption of cruise control
► Press 4 or press the brake pedal. To pause cruise control, it is also possible to:• shift from mode D to N;• press the clutch pedal for more than 10 seconds;
Page 127 of 272
127
Driving
6
Messages and alerts
NOTIC E
The display of these messages or alerts is not sequential.
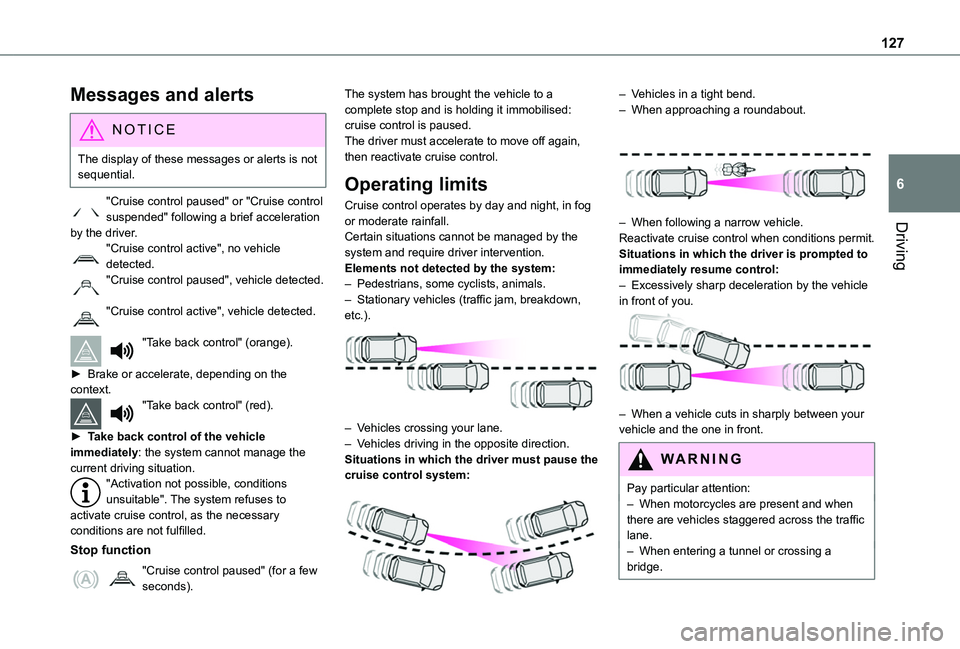
"Cruise control paused" or "Cruise control suspended" following a brief acceleration by the driver.
"Cruise control active", no vehicle detected."Cruise control paused", vehicle detected.
"Cruise control active", vehicle detected.
"Take back control" (orange).
► Brake or accelerate, depending on the context."Take back control" (red).
► Take back control of the vehicle immediately: the system cannot manage the current driving situation."Activation not possible, conditions unsuitable". The system refuses to activate cruise control, as the necessary conditions are not fulfilled.
Stop function
"Cruise control paused" (for a few seconds).
The system has brought the vehicle to a complete stop and is holding it immobilised: cruise control is paused.The driver must accelerate to move off again, then reactivate cruise control.
Operating limits
Cruise control operates by day and night, in fog or moderate rainfall.Certain situations cannot be managed by the system and require driver intervention.Elements not detected by the system:– Pedestrians, some cyclists, animals.– Stationary vehicles (traffic jam, breakdown, etc.).
– Vehicles crossing your lane.– Vehicles driving in the opposite direction.
Situations in which the driver must pause the cruise control system:
– Vehicles in a tight bend.– When approaching a roundabout.
– When following a narrow vehicle.Reactivate cruise control when conditions permit.Situations in which the driver is prompted to immediately resume control:– Excessively sharp deceleration by the vehicle in front of you.
– When a vehicle cuts in sharply between your vehicle and the one in front.
WARNI NG
Pay particular attention:– When motorcycles are present and when there are vehicles staggered across the traffic lane.– When entering a tunnel or crossing a bridge.
Page 142 of 272
142
WARNI NG
Please routinely check your exterior mirrors while driving and during manoeuvres.
WARNI NG
Some items may not be seen by the rear camera.
WARNI NG
Certain vehicles may be difficult to see (dark colours, lamps off) when the brightness of the screen is reduced using the vehicle’s lighting dimmer.
WARNI NG
The image quality may be affected by the environment, the exterior conditions (rain, dirt, dust), the driving mode and the lighting conditions (night, low sun).In the presence of areas in shade, or in conditions of bright sunlight or inadequate lighting, the image may be darkened and with lower contrast.
WARNI NG
Obstacles may appear further away than they actually are.During parking manoeuvres and lane changes, it is important to check the sides of the vehicle using the mirrors.The rear parking sensors also supplement the information on the vehicle's surroundings.
Activation / Deactivation
The system starts when the ignition is switched on.
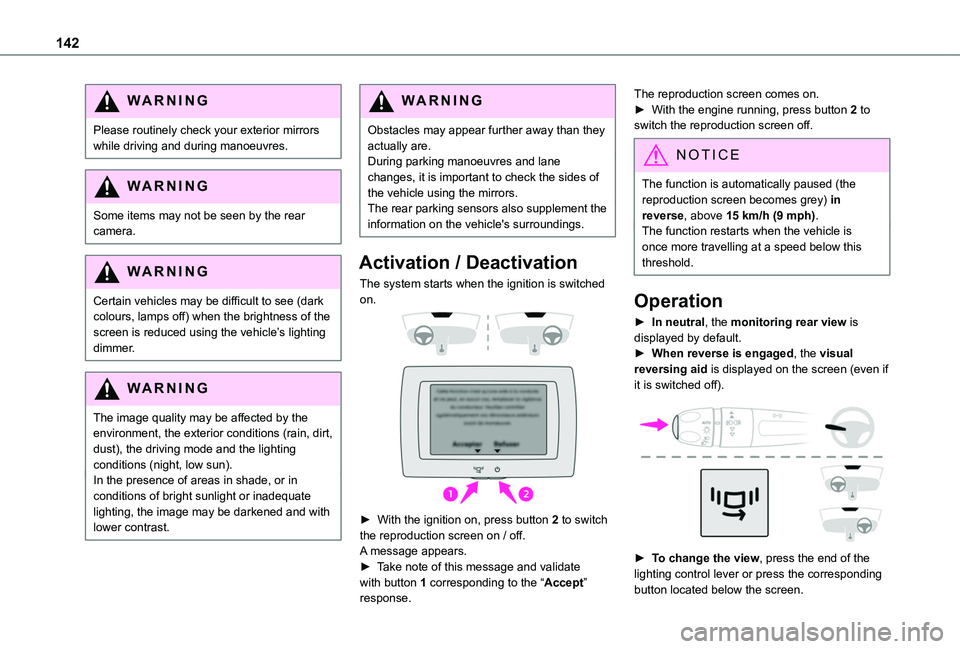
► With the ignition on, press button 2 to switch the reproduction screen on / off.
A message appears.► Take note of this message and validate with button 1 corresponding to the “Accept” response.
The reproduction screen comes on.► With the engine running, press button 2 to switch the reproduction screen off.
NOTIC E
The function is automatically paused (the reproduction screen becomes grey) in reverse, above 15 km/h (9 mph).The function restarts when the vehicle is
once more travelling at a speed below this threshold.
Operation
► In neutral, the monitoring rear view is displayed by default.► When reverse is engaged, the visual reversing aid is displayed on the screen (even if it is switched off).
► To change the view, press the end of the lighting control lever or press the corresponding button located below the screen.
Page 150 of 272
150
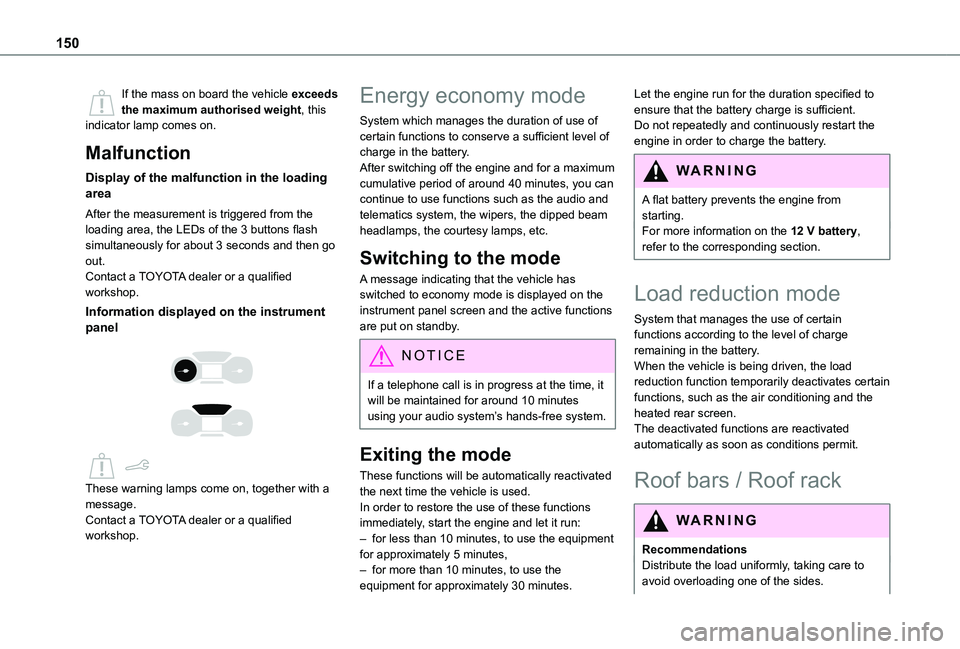
If the mass on board the vehicle exceeds the maximum authorised weight, this indicator lamp comes on.
Malfunction
Display of the malfunction in the loading area
After the measurement is triggered from the loading area, the LEDs of the 3 buttons flash simultaneously for about 3 seconds and then go out.Contact a TOYOTA dealer or a qualified workshop.
Information displayed on the instrument panel
These warning lamps come on, together with a message.Contact a TOYOTA dealer or a qualified workshop.
Energy economy mode
System which manages the duration of use of certain functions to conserve a sufficient level of charge in the battery.After switching off the engine and for a maximum cumulative period of around 40 minutes, you can continue to use functions such as the audio and telematics system, the wipers, the dipped beam headlamps, the courtesy lamps, etc.
Switching to the mode
A message indicating that the vehicle has switched to economy mode is displayed on the instrument panel screen and the active functions are put on standby.
NOTIC E
If a telephone call is in progress at the time, it will be maintained for around 10 minutes using your audio system’s hands-free system.
Exiting the mode
These functions will be automatically reactivated the next time the vehicle is used.In order to restore the use of these functions immediately, start the engine and let it run:– for less than 10 minutes, to use the equipment for approximately 5 minutes,– for more than 10 minutes, to use the equipment for approximately 30 minutes.
Let the engine run for the duration specified to ensure that the battery charge is sufficient.Do not repeatedly and continuously restart the engine in order to charge the battery.
WARNI NG
A flat battery prevents the engine from starting.For more information on the 12 V battery,
refer to the corresponding section.
Load reduction mode
System that manages the use of certain functions according to the level of charge remaining in the battery.When the vehicle is being driven, the load reduction function temporarily deactivates certain functions, such as the air conditioning and the heated rear screen.The deactivated functions are reactivated automatically as soon as conditions permit.
Roof bars / Roof rack
WARNI NG
RecommendationsDistribute the load uniformly, taking care to avoid overloading one of the sides.
Page 193 of 272
193
Bluetooth® audio system
10
Menus
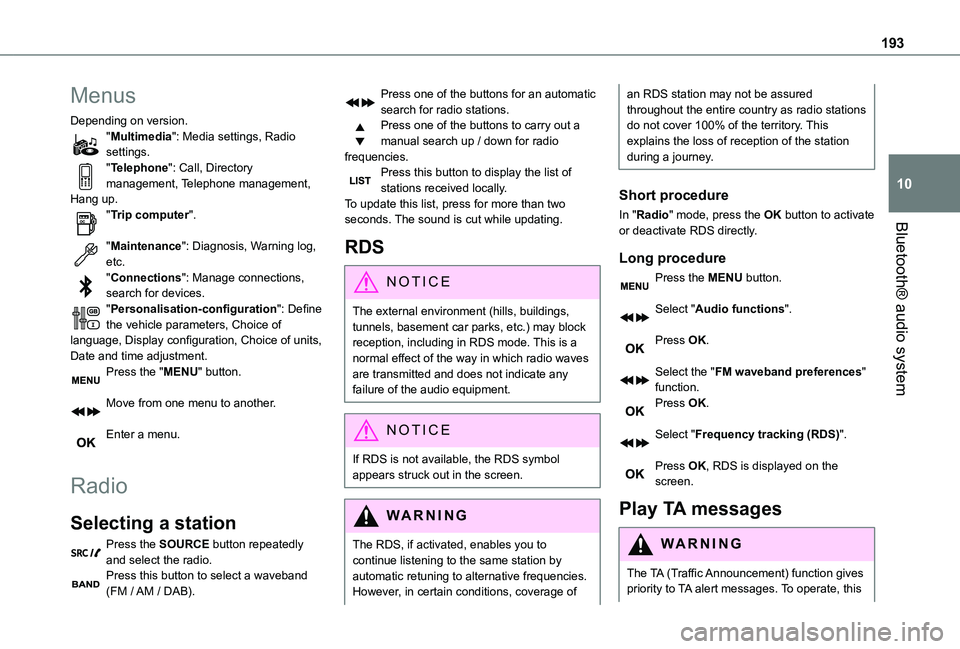
Depending on version."Multimedia": Media settings, Radio settings."Telephone": Call, Directory management, Telephone management, Hang up."Trip computer".
"Maintenance": Diagnosis, Warning log, etc."Connections": Manage connections, search for devices."Personalisation-configuration": Define the vehicle parameters, Choice of language, Display configuration, Choice of units, Date and time adjustment.Press the "MENU" button.
Move from one menu to another.
Enter a menu.
Radio
Selecting a station
Press the SOURCE button repeatedly and select the radio.Press this button to select a waveband (FM / AM / DAB).
Press one of the buttons for an automatic search for radio stations.Press one of the buttons to carry out a manual search up / down for radio frequencies.Press this button to display the list of stations received locally.To update this list, press for more than two seconds. The sound is cut while updating.
RDS
NOTIC E
The external environment (hills, buildings, tunnels, basement car parks, etc.) may block reception, including in RDS mode. This is a normal effect of the way in which radio waves are transmitted and does not indicate any failure of the audio equipment.
NOTIC E
If RDS is not available, the RDS symbol appears struck out in the screen.
WARNI NG
The RDS, if activated, enables you to continue listening to the same station by automatic retuning to alternative frequencies. However, in certain conditions, coverage of
an RDS station may not be assured throughout the entire country as radio stations do not cover 100% of the territory. This explains the loss of reception of the station during a journey.
Short procedure
In "Radio" mode, press the OK button to activate or deactivate RDS directly.
Long procedure
Press the MENU button.
Select "Audio functions".
Press OK.
Select the "FM waveband preferences" function.Press OK.
Select "Frequency tracking (RDS)".
Press OK, RDS is displayed on the screen.
Play TA messages
WARNI NG
The TA (Traffic Announcement) function gives priority to TA alert messages. To operate, this