Page 137 of 172
 1376-2. Setup
6
Phone
Bluetooth® phone to this sys-
tem.
1 Open the lid and connect a
USB device. ( P.54)
2 Select “Transfer Contacts
from Device”.
3 Select “From USB”.
4 Select “USB 1")
1376-2. Setup
6
Phone
Bluetooth® phone to this sys-
tem.
1 Open the lid and connect a
USB device. ( P.54)
2 Select “Transfer Contacts
from Device”.
3 Select “From USB”.
4 Select “USB 1” or “USB 2”
when the multiple USB
devices are connected. If a
USB device is connected,
skip this procedure.
5 Select “Replace Contacts” or
“Add Contact”. If the contact
is already registered, skip
this procedure.
“Replace Contacts”: Select to trans-
fer the contact fro m the connected
USB device or Bluetooth
® phone
and replace the current one.
“Add Contact”: Select to transfer
the desired contact data from the
connected USB device or Blue-
tooth
® phone to add to the current
one.
6 Select a desired file from
vCard file list.
7 Check that a confirmation
screen is displayed when the
operation is complete.
●Depending on the type of Blue-
tooth® phone used and number of
files, it may take time to display
vCard file lists and download con-
tacts.
●Downloading may not complete
correctly in the following cases:
• If the power switch is turned off during downloading.
• If the USB device or Bluetooth
® phone is removed before down-
loading is complete.
New contact data can be regis-
tered.
Up to 4 numbers per person can
be registered. For PBAP com-
patible Bluetooth
® phones, this
function is available when “Auto-
matic Transfer” is set to off.
( P.134)
1 Select “New Contact”.
2 Enter the name and select
“OK”.
3 Enter the phone number and
select “OK”.
4 Select the phone type for the
phone number.
5 To add another number to
this contact, select “Yes”.
■Registering a new contact
in a different way (from the
call history screen)
1 Display the phone top
screen. ( P.116)
2 Select “History” and select a
contact not yet registered in
the contact list.
3 Select “Add to Contacts”.
4 Follow the steps in “Register-
ing a new contact to the con-
tacts list” from step 2.
( P.137)
Registering a new contact
to the contacts list
Page 138 of 172
 1386-2. Setup
For PBAP compatible Blue-
tooth
® phones, this function is
available when “Automatic
Transfer” is set to off. ( P.134)
1 Select “Edit Contact”.
2 Select the desired contact")
1386-2. Setup
For PBAP compatible Blue-
tooth
® phones, this function is
available when “Automatic
Transfer” is set to off. ( P.134)
1 Select “Edit Contact”.
2 Select the desired contact.
3 Select next to the name
or desired number.
4 Enter the name or the phone
number and select “OK”.
For PBAP compatible Blue-
tooth
® phones, this function is
available when “Automatic
Transfer” is set to off. ( P.134)
1 Select “Delete Contacts”.
2 Select the desired contact
and select “Delete”.
3 Select “Yes” when the confir-
mation screen appears.
●Multiple data can be selected and
deleted at the same time.
●When a Bluetooth® phone is
deleted, the contact data will be
deleted at the same time.
Up to 15 contacts (maximum of
4 numbers per contact) can be
registered in the favorites list.
■Registering the contacts in
the favorites list
1 Select “Add Favorite”.
2 Select the desired contact to
add to the favorites list.
Dimmed contacts are already
stored as a favorite.
3 Check that a confirmation
screen is displayed when the
operation is complete.
When 15 contacts have
already been registered to the
favorites list
1 When 15 contacts have
already been registered to
the favorites list, a registered
contact needs to be replaced.
Select “Yes” when the confir-
mation screen appears to
replace a contact.
2 Select the contact to be
replaced.
3 Check that a confirmation
screen is displayed when the
operation is complete.
■Registering contacts in the
favorites list in a different
way (from the contact
details screen)
1 Display the phone top
screen. ( P.116)
2 Select “Contacts” and select
the desired contact.
3 Select “Add Favorite”.
4 Check that a confirmation
screen is displayed when the
operation is complete.
Editing the contact data
Deleting the contact data
Favorites list setting
Page 139 of 172
 1396-2. Setup
6
Phone
■Deleting the contacts in the
favorites list
1 Select “Remove Favorite”.
2 Select the desired contacts
and select “Remove”.
3 Select “Yes” when the confir-
mation")
1396-2. Setup
6
Phone
■Deleting the contacts in the
favorites list
1 Select “Remove Favorite”.
2 Select the desired contacts
and select “Remove”.
3 Select “Yes” when the confir-
mation screen appears.
4 Check that a confirmation
screen is displayed when the
operation is complete.
■Deleting contacts in the
favorites list in a different
way (from the contact
details screen)
1 Display the phone top
screen. ( P.116)
2 Select “Favorites” or “Con-
tacts” and select the desired
contact to delete.
3 Select “Remove Favorite”.
4 Select “Yes” when the confir-
mation screen appears.
5 Check that a confirmation
screen is displayed when the
operation is complete.
Calls can be made by saying the
voice tag of a registered contact
in the contact list. ( P.96)
1 Select “Manage Voice Tags”. 2
Select the desired item to be
set.
Select to register a new voice
tag. ( P.139)
Select to edit a voice tag.
( P.139)
Select to delete a voice tag.
( P.140)
■Registering a voice tag
Up to 50 voice tags can be reg-
istered.
1 Select “New”.
2 Select the desired contact to
register a voice tag for.
3 Select “REC” and record a
voice tag.
When recording a voice tag,
do so in a quiet area.
“Play”: Select to p lay the voice tag.
4Select “OK” when voice tag
registration is complete.
■Editing a voice tag
1 Select “Edit”.
2 Select the desired contact to
edit.
3 Follow the steps in “Register-
ing a voice tag” from step 3.
( P.139)
Setting voice tags
A
B
C
Page 140 of 172
 1406-2. Setup
■Deleting the voice tag
1 Select “Delete”.
2 Select the desired contact
and select “Delete”.
3 Select “Yes” when the confir-
mation screen appears.
●Multiple data can be")
1406-2. Setup
■Deleting the voice tag
1 Select “Delete”.
2 Select the desired contact
and select “Delete”.
3 Select “Yes” when the confir-
mation screen appears.
●Multiple data can be selected and
deleted at the same time.
●Voice tags are deleted when the
set language of the system is
changed. ( P. 4 5 )
1 Display the phone settings
screen. ( P.132)
2 Select “Messaging”.
3 Select the desired item to be
set.
Select to set automatic mes-
sage transfer on/off.
Select to set automatic mes-
sage readout on/off.
Select to set updating mes-
sage read status on phone
on/off.
Select to set display of mes-
saging account names on the
message screen on/off. When set to on, messaging
account names used on the
cellular phone will be dis-
played.
Select to set adding the vehi-
cle signature to outgoing
messages on/off.
The vehicle signature can be
edited. (
P.140)
Select to reset all setup
items.
●Depending on the phone, these
functions may not be available.
1 Select “Vehicle Signature”.
2 Select the desired item to be
set.
Select to set adding the vehi-
cle signature to outgoing
messages on/off.
Select to edit the vehicle sig-
nature. ( P.140)
Select to reset all setup
items.
■Editing vehicle signature
1 Select “Edit Vehicle Signa-
ture”.
Message settings screen
A
B
C
D
�9�H�K�L�F�O�H���V�L�J�Q�D�W�X�U�H���V�H�W�W�L�Q�J�V
E
F
A
B
C
Page 141 of 172
1416-2. Setup
6
Phone
2Enter desired signature with
using keyboard.
3 Select “OK”.
4 Select “OK” on the confirma-
tion screen, or select “Edit
Again” when it needs to
amend.
Page 142 of 172
 1426-3. What to do if...
6-3.What to do if...
■When using the hands-free
system with a Bluetooth
®
device
The hands-free system or Blue-
tooth
® device does not work.
■When registering/connect")
1426-3. What to do if...
6-3.What to do if...
■When using the hands-free
system with a Bluetooth
®
device
The hands-free system or Blue-
tooth
® device does not work.
■When registering/connect-
ing a cellular phone
A cellular phone cannot be reg-
istered.
A Bluetooth
® connection can-
not be made.
Troubleshooting
If there is a problem with the
hands-free system or a
Bluetooth
® device, first
check the table below.
Troubleshooting
Likely causeSolution
The connected
device may not
be a compatible
Bluetooth
® cellu-
lar phone.
For a list of spe-
cific devices
which operation
has been con-
firmed on this
system, check
with your Toyota
dealer or the fol-
lowing website:
http://www.
toyota.com/
Entune/ in the
United States,
and http://www.
toyota.ca/entune
in Canada
The Bluetooth®
version of the
connected cellu-
lar phone may
be older than the
specified ver-
sion.Use a cellular
phone with Blue-
tooth
® version
2.0 or higher
(recommended:
Ver. 4 .1 + E D R o r
higher). ( P. 2 8 )
Likely causeSolution
An incorrect
passcode was
entered on the
cellular phone.Enter the correct
passcode on the
cellular phone.
The registration
operation has
not been com-
pleted on the cel-
lular phone side.
Complete the
registration oper-
ation on the cel-
lular phone
(approve regis-
tration on the
phone).
Old registration
information
remains on
either this sys-
tem or the cellu-
lar phone.
Delete the exist-
ing registration
information from
both this system
and the cellular
phone, then reg-
ister the cellular
phone you wish
to connect to this
system. ( P.32)
Likely causeSolution
Another Blue-
tooth
® device is
already con-
nected.
Manually con-
nect the cellular
phone you wish
to use to this
system. ( P.30)
Bluetooth® func-
tion is not
enabled on the
cellular phone.Enable the Blue-
tooth
® function
on the cellular
phone.
Page 143 of 172
 1436-3. What to do if...
6
Phone
■When making/receiving a
call
A call cannot be made/received.
■When using the phonebook
Phonebook data cannot be
transferred manually/automati-
cally. Phonebook")
1436-3. What to do if...
6
Phone
■When making/receiving a
call
A call cannot be made/received.
■When using the phonebook
Phonebook data cannot be
transferred manually/automati-
cally. Phonebook data cannot be
edited.
Automatic Blue-
tooth
® connec-
tion on this
system is set to
off.
Set automatic
Bluetooth
® con-
nection on this
system to on
when the power
switch is in
ACCESSORY or
ON mode.
( P. 3 4 )
Preferred device
settings function
on this system is
set to on.
Set preferred
device settings
function on this
system to off.
( P. 3 5 )
Set the desired
cellular phone to
the highest auto-
matic connec-
tion priority.
( P. 3 5 )
Likely causeSolution
Your vehicle is in
a area.
Move to where
no longer
appears on the
display.
Likely causeSolutionLikely causeSolution
The profile ver-
sion of the con-
nected cellular
phone may not
be compatible
with transferring
phonebook data.
For a list of spe-
cific devices
which operation
has been con-
firmed on this
system, check
with your Toyota
dealer or the fol-
lowing website:
http://www.
toyota.com/
Entune/ in the
United States,
and http://www.
toyota.ca/entune
in Canada
Automatic con-
tact transfer
function on this
system is set to
off.Set automatic
contact transfer
function on this
system to on.
( P.135)
Passcode has
not been entered
on the cellular
phone.
Enter the pass-
code on the cel-
lular phone if
requested
(default pass-
code: 1234).
Transfer opera-
tion on the cellu-
lar phone has
not completed.
Complete trans-
fer operation on
the cellular
phone (approve
transfer opera-
tion on the
phone).
Page 144 of 172
 1446-3. What to do if...
■When using the Bluetooth®
message function
Messages cannot be viewed.
New message notifications are
not displayed.
■In other situations
The Bluetooth
® connection sta")
1446-3. What to do if...
■When using the Bluetooth®
message function
Messages cannot be viewed.
New message notifications are
not displayed.
■In other situations
The Bluetooth
® connection sta- tus is displayed at the top of the
screen each time the power
switch is in ACCESSORY or ON
mode.
Even though all conceivable
measures have been taken, the
symptom status does not
change.
Likely causeSolution
Automatic con-
tact transfer
function on this
system is set to
on.Set automatic
contact transfer
function on this
system to off.
(
P.135)
Likely causeSolution
Message trans-
fer is not enabled
on the cellular
phone.
Enable mes-
sage transfer on
the cellular
phone (approve
message trans-
fer on the
phone).
Automatic trans-
fer function on
this system is set
to off.Set automatic
transfer function
on this system to
on. ( P.135)
Likely causeSolution
Notification of
SMS/MMS/E-
mail reception on
this system is set
to off.Set notification
of SMS/MMS/E-
mail reception on
this system to
on. ( P.133)
Automatic mes-
sage transfer
function is not
enabled on the
cellular phone.Enable auto-
matic transfer
function on the
cellular phone.
Likely causeSolution
Connection con-
firmation display
on this system is
set to on.
To turn off the
display, set con-
nection confir-
mation display
on this system to
off. ( P. 3 5 )
Likely causeSolution
The cellular
phone is not
close enough to
this system.Bring the cellu-
lar phone closer
to this system.
Radio interfer-
ence has
occurred.
Turn off Wi-Fi®
devices or other
devices that may
emit radio
waves.
 1
1 2
2 3
3 4
4 5
5 6
6 7
7 8
8 9
9 10
10 11
11 12
12 13
13 14
14 15
15 16
16 17
17 18
18 19
19 20
20 21
21 22
22 23
23 24
24 25
25 26
26 27
27 28
28 29
29 30
30 31
31 32
32 33
33 34
34 35
35 36
36 37
37 38
38 39
39 40
40 41
41 42
42 43
43 44
44 45
45 46
46 47
47 48
48 49
49 50
50 51
51 52
52 53
53 54
54 55
55 56
56 57
57 58
58 59
59 60
60 61
61 62
62 63
63 64
64 65
65 66
66 67
67 68
68 69
69 70
70 71
71 72
72 73
73 74
74 75
75 76
76 77
77 78
78 79
79 80
80 81
81 82
82 83
83 84
84 85
85 86
86 87
87 88
88 89
89 90
90 91
91 92
92 93
93 94
94 95
95 96
96 97
97 98
98 99
99 100
100 101
101 102
102 103
103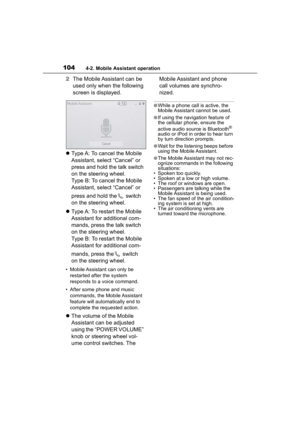 104
104 105
105 106
106 107
107 108
108 109
109 110
110 111
111 112
112 113
113 114
114 115
115 116
116 117
117 118
118 119
119 120
120 121
121 122
122 123
123 124
124 125
125 126
126 127
127 128
128 129
129 130
130 131
131 132
132 133
133 134
134 135
135 136
136 137
137 138
138 139
139 140
140 141
141 142
142 143
143 144
144 145
145 146
146 147
147 148
148 149
149 150
150 151
151 152
152 153
153 154
154 155
155 156
156 157
157 158
158 159
159 160
160 161
161 162
162 163
163 164
164 165
165 166
166 167
167 168
168 169
169 170
170 171
171 1416-2. Setup
6
Phone
2Enter desired signature with
using keyboard.
3 Select “OK”.
4 Select “OK” on the confirma-
tion screen, or select “Edit
Again” when it needs to
amend.")