Page 18 of 402

181-1. Basic function
HIGHLANDER_HIGHLANDER
HV_NAVI_(U)
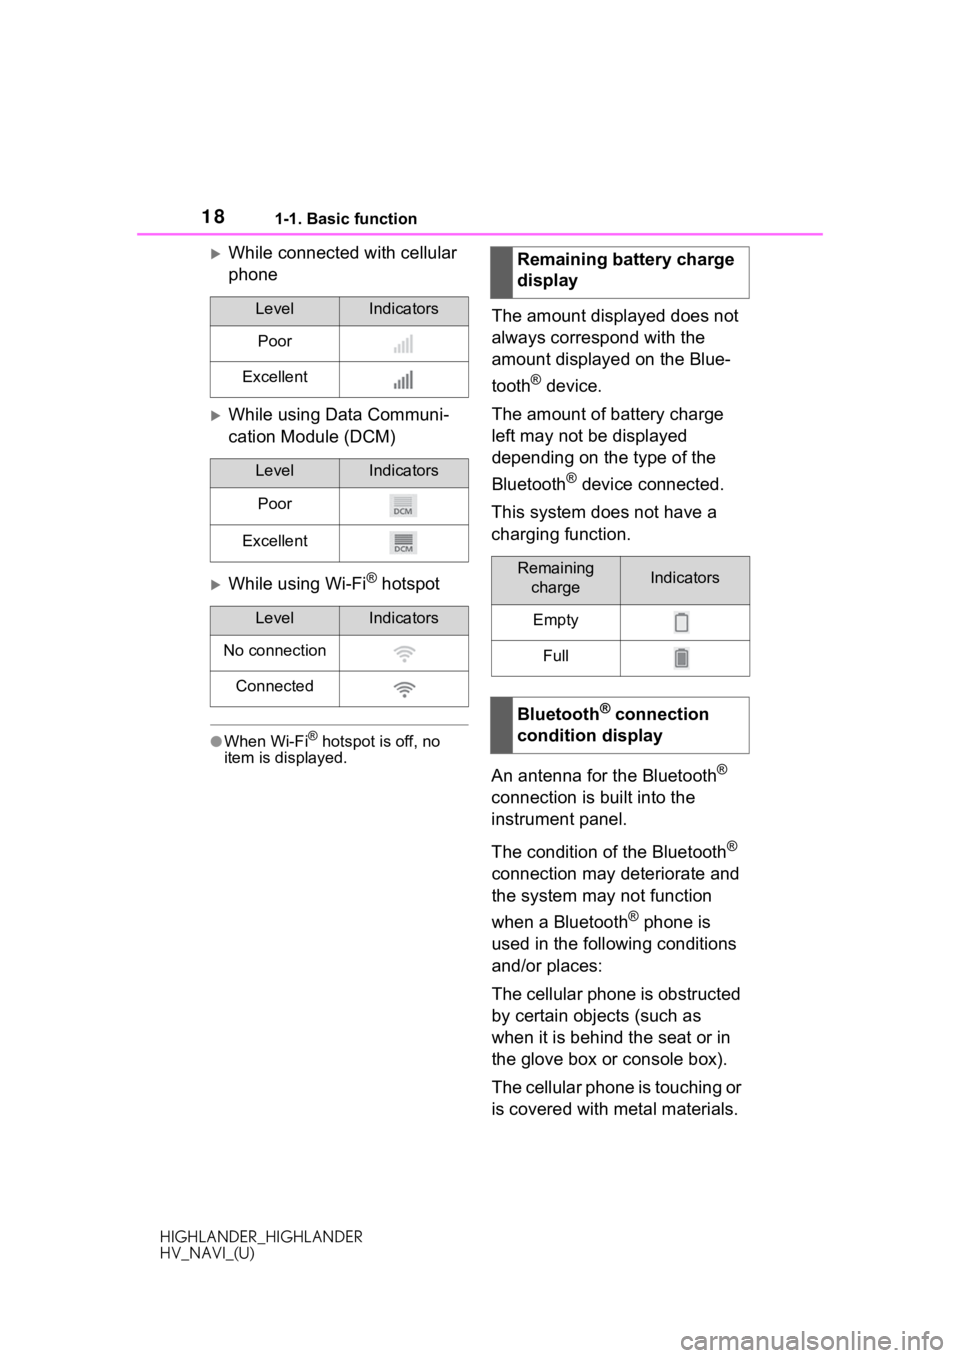
While connected with cellular
phone
While using Data Communi-
cation Module (DCM)
While using Wi-Fi® hotspot
●When Wi-Fi® hotspot is off, no
item is displayed.
The amount displayed does not
always correspond with the
amount displayed on the Blue-
tooth
® device.
The amount of battery charge
left may not be displayed
depending on the type of the
Bluetooth
® device connected.
This system does not have a
charging function.
An antenna for the Bluetooth
®
connection is built into the
instrument panel.
The condition of the Bluetooth
®
connection may deteriorate and
the system may not function
when a Bluetooth
® phone is
used in the following conditions
and/or places:
The cellular phone is obstructed
by certain objects (such as
when it is behind the seat or in
the glove box or console box).
The cellular phone is touching or
is covered with metal materials.
LevelIndicators
Poor
Excellent
LevelIndicators
Poor
Excellent
LevelIndicators
No connection
Connected
Remaining battery charge
display
Remaining chargeIndicators
Empty
Full
Bluetooth® connection
condition display
Page 19 of 402
191-1. Basic function
HIGHLANDER_HIGHLANDER
HV_NAVI_(U)
1
Quick guide
Leave the Bluetooth® phone in a
place where the condition of the
Bluetooth
® connection is good.
Press the “MENU” button, then
select “Setup” to display the
“Setup” screen. The items
shown on the “Setup” screen
can be set.
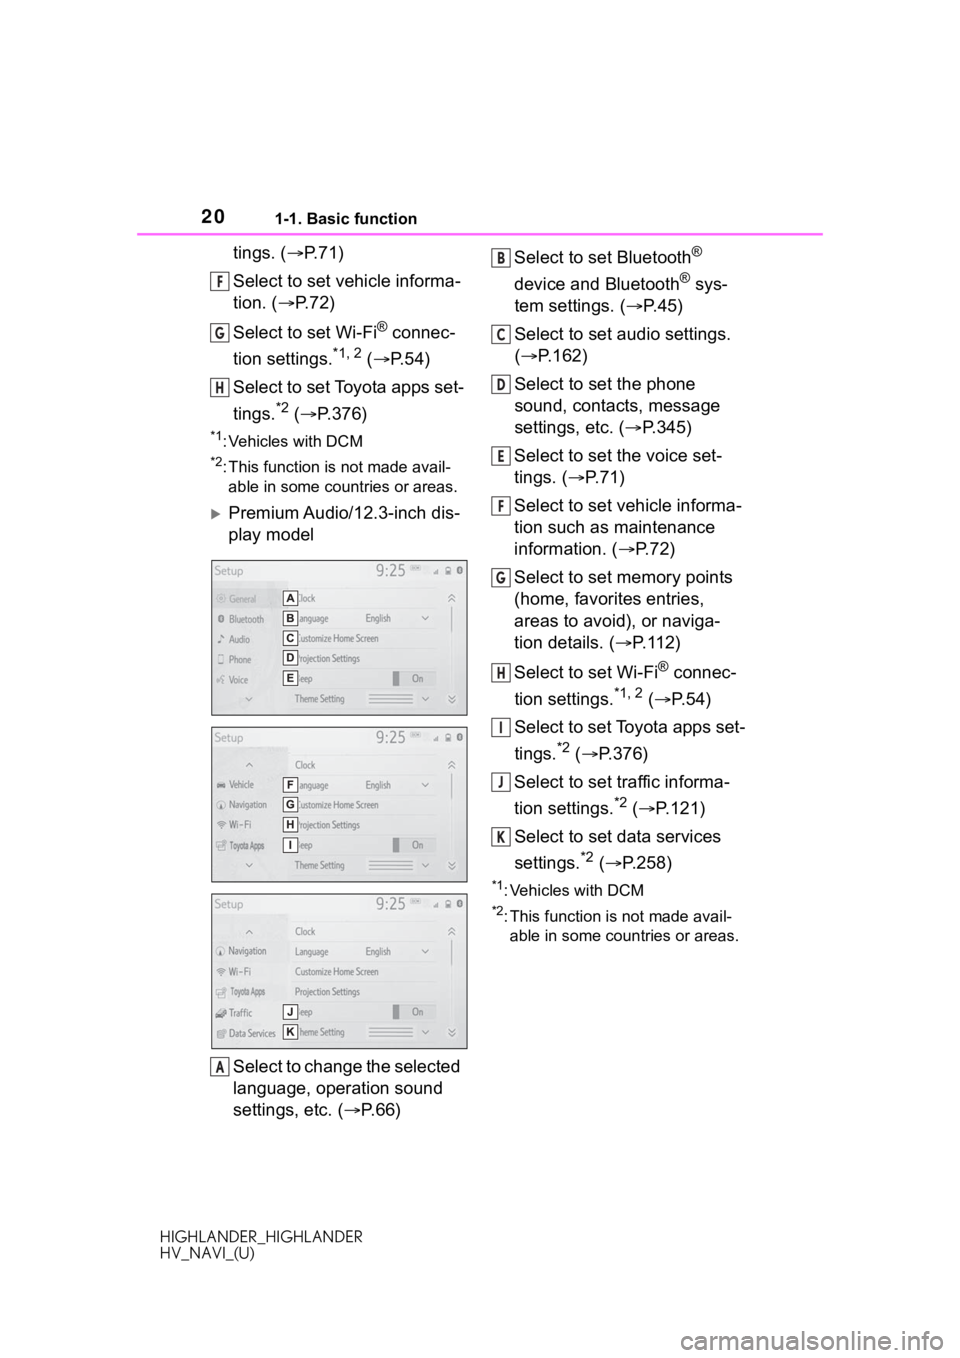
Audio/Audio Plus
Select to change the selected
language, operation sound
settings, etc. ( P.66)
Select to set Bluetooth
®
device and Bluetooth
® sys-
tem settings. ( P.45)
Select to set audio settings.
( P.162)
Select to set the phone
sound, contacts, message
settings, etc. ( P.345)
Select to set the voice set-
IndicatorsConditions
(Blue)
Indicates that the con-
dition of the Blue-
tooth
® connection is
good.
(Gray)
While in this condition,
sound quality during
phone calls may dete-
riorate.
Indicates that the cel-
lular phone is not con-
nected via Bluetooth
®.
“Setup” screen
“Setup” screen
A
B
C
D
E
Page 20 of 402

201-1. Basic function
HIGHLANDER_HIGHLANDER
HV_NAVI_(U)
tings. (P.71)
Select to set vehicle informa-
tion. ( P. 7 2 )
Select to set Wi-Fi
® connec-
tion settings.
*1, 2 ( P.54)
Select to set Toyota apps set-
tings.
*2 ( P.376)
*1: Vehicles with DCM
*2: This function is not made avail-
able in some countries or areas.
Premium Audio/12.3-inch dis-
play model
Select to change the selected
language, operation sound
settings, etc. ( P. 6 6 ) Select to set Bluetooth
®
device and Bluetooth
® sys-
tem settings. ( P.45)
Select to set audio settings.
( P.162)
Select to set the phone
sound, contacts, message
settings, etc. ( P.345)
Select to set the voice set-
tings. ( P.71)
Select to set vehicle informa-
tion such as maintenance
information. ( P.72)
Select to set memory points
(home, favorites entries,
areas to avoid), or naviga-
tion details. ( P. 1 1 2 )
Select to set Wi-Fi
® connec-
tion settings.
*1, 2 ( P. 5 4 )
Select to set Toyota apps set-
tings.
*2 ( P.376)
Select to set traffic informa-
tion settings.
*2 ( P.121)
Select to set data services
settings.
*2 ( P.258)
*1: Vehicles with DCM
*2: This function is not made avail-
able in some countries or areas.
F
G
H
A
B
C
D
E
F
G
H
I
J
K
Page 25 of 402
251-2. Navigation operation
HIGHLANDER_HIGHLANDER
HV_NAVI_(U)
1
Quick guide*: Premium Audio/12.3-inch display model
1 Turn the engine switch
to ACC or
ON.
2 Press the “MAP” button.
8-inch display model
12.3-inch display model
3 Select . 4
Search for your home.
• Select “Address”( P. 9 5 ) o r
“Current Location” to search
for your home.
5 Select “Enter”.
6 Select “OK”.
Registration of home is com-
plete.
• Registering home in a different
way
P. 1 1 2
• Editing the name, location, phone number and icon
P. 1 1 2
• Setting home as the destination P.26, 92
Registering home*
Registering home
Page 28 of 402

282-1. Basic information before operation
HIGHLANDER_HIGHLANDER
HV_NAVI_(U)
2-1.Basic information before operation
After a few seconds, the caution
screen will be displayed.
After about 5 seconds or select-
ing “Continue”, the caution
screen automatically switches to
the next screen.
*: Premium Audio/12.3-inch display
model only
This system reminds users
when to replace certain parts or
components and shows dealer
information (if registered) on the
screen.
When the vehicle reaches a pre-
viously set driving distance or
date specified for a scheduled
maintenance check, the mainte-
nance remainder screen will be
displayed when the system is turned on.
To prevent this screen from
being displayed again, select
“Do Not Tell Me Again”.
To register maintenance infor-
mation: P. 7 3
If is selected, the regis-
tered phone number can be
called.
When system response is
extremely slow, the system can
be restarted.
1 Press and hold the “POWER
VOLUME”/“PWR/VOL” knob
for 3 seconds or more.
8-inch display model
12.3-inch display model
Initial screen
When the engine switch
is turned to
ACC or ON, the initial
screen will be displayed and
the system will begin oper-
ating.
Caution screen
WA R N I N G
●When the vehicle is stopped
with the engine running
hybrid system operating>,
always apply the parking brake
for safety.
Maintenance information*
Restarting the system
Page 39 of 402

392-1. Basic information before operation
HIGHLANDER_HIGHLANDER
HV_NAVI_(U)
2
Basic function
Depending on the position of the
headlight switch, the screen
changes to day or night mode.
This feature is available when
the headlight is switched on.
1 Select “Day Mode”.
●If the screen is set to day mode
with the headlight switch turned
on, this condition is memorized
even with the engine
tem> turned off.
The contrast and brightness of
the screen can be adjusted
according to the brightness of
your surroundings.
1 Select “General” or “Cam-
era”.
2 Select the desired item.
“Display (General)” screen
only: Select “<” or “>” to select
the desired display.
• “Contrast”
“+”: Select to strengthen the con-
trast of the screen.
“-”: Select to weaken the contrast of
the screen.
• “Brightness”
“+”: Select to brighten the screen.
“-”: Select to darken the screen.
Changing between day
and night mode
Adjusting the con-
trast/brightnessLinking multi-informa-
tion display and the
system
The following functions of
the system are linked with
the multi-information dis-
play in the instrument clus-
ter:
Audio*1
Phone*1, 2
etc.
These functions can be
operated using multi-infor-
mation display control
switches on the steering
wheel. For details, refer to
“OWNER’S MANUAL”.
*1: If equipped
*2: When an Apple CarPlay con-
nection is established, this
function will be unavailable.
Page 40 of 402

402-2. Connectivity settings
HIGHLANDER_HIGHLANDER
HV_NAVI_(U)
2-2.Connectivity settings
*: This function is not made avail-able in some countries or areas.
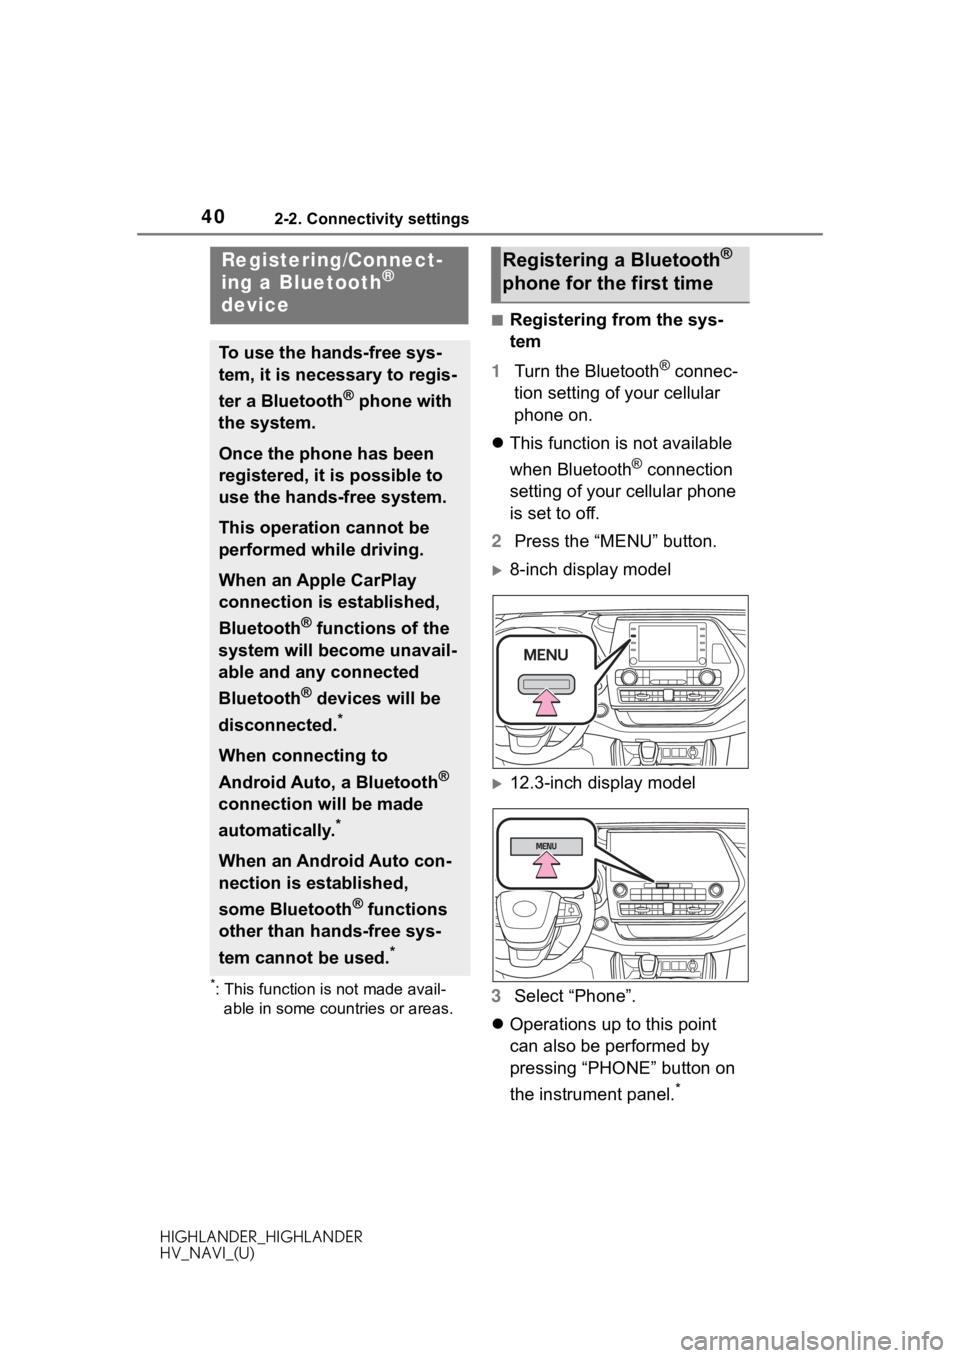
■Registering from the sys-
tem
1 Turn the Bluetooth
® connec-
tion setting of your cellular
phone on.
This function is not available
when Bluetooth
® connection
setting of your cellular phone
is set to off.
2 Press the “MENU” button.
8-inch display model
12.3-inch display model
3 Select “Phone”.
Operations up to this point
can also be performed by
pressing “PHONE” button on
the instrument panel.
*
Registering/Connect-
ing a Bluetooth®
device
To use the hands-free sys-
tem, it is necessary to regis-
ter a Bluetooth
® phone with
the system.
Once the phone has been
registered, it is possible to
use the hands-free system.
This operation cannot be
performed while driving.
When an Apple CarPlay
connection is established,
Bluetooth
® functions of the
system will become unavail-
able and any connected
Bluetooth
® devices will be
disconnected.
*
When connecting to
Android Auto, a Bluetooth
®
connection will be made
automatically.
*
When an Android Auto con-
nection is established,
some Bluetooth
® functions
other than hands-free sys-
tem cannot be used.
*
Registering a Bluetooth®
phone for the first time
Page 41 of 402

412-2. Connectivity settings
HIGHLANDER_HIGHLANDER
HV_NAVI_(U)
2
Basic function
*: Except 12.3-inch display model
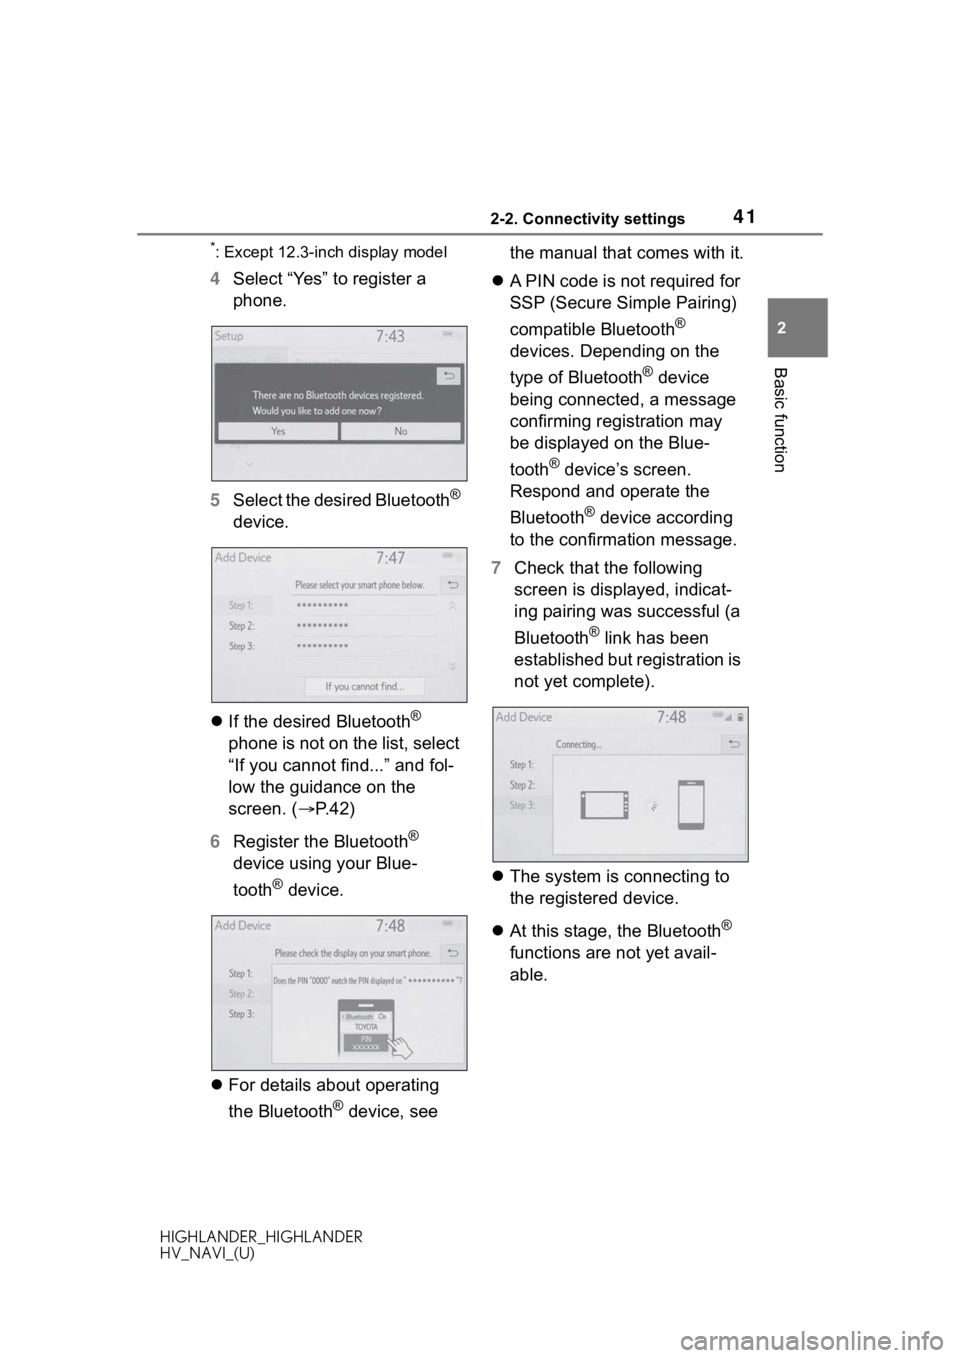
4 Select “Yes” to register a
phone.
5 Select the desired Bluetooth
®
device.
If the desired Bluetooth
®
phone is not on the list, select
“If you cannot find...” and fol-
low the guidance on the
screen. ( P. 4 2 )
6 Register the Bluetooth
®
device using your Blue-
tooth
® device.
For details about operating
the Bluetooth
® device, see the manual that comes with it.
A PIN code is not required for
SSP (Secure Simple Pairing)
compatible Bluetooth
®
devices. Depending on the
type of Bluetooth
® device
being connected, a message
confirming registration may
be displayed on the Blue-
tooth
® device’s screen.
Respond and operate the
Bluetooth
® device according
to the confirmation message.
7 Check that the following
screen is displayed, indicat-
ing pairing was successful (a
Bluetooth
® link has been
established but registration is
not yet complete).
The system is connecting to
the registered device.
At this stage, the Bluetooth
®
functions are not yet avail-
able.