Page 79 of 350
79
3. OTHER SETTINGS
BASIC FUNCTION
2
1Display the vehicle settings screen.
(P.75)
2Select “Dealer Info” .
3Select the items to be edited.
1Select “Edit” next to “Dealer” or “Con-
tact”.
2Enter the name and select “OK”.
1Select “Edit” next to “Phone #”.
2 Enter the phone number and select
“OK”.
SETTING DEALER
INFORMATION*
Dealer information can be registered in
the system. If the vehicle alert screen
is displayed, selecting the call dealer
button on the screen will call the phone
number registered in the dealer infor-
mation. (
P.322)
No.FunctionPage
Select to enter the name of
a dealer.79
Select to enter the name of
a dealer member.79
Select to enter the phone
number.79
Select to delete the dealer
information displayed on
the screen.
*: Audio with DCM/Audio Plus with DCM only.
This function is not made availabl e in some countries or areas.
EDITING DEALER OR
CONTACT NAME
EDITING PHONE NUMBER
Page 80 of 350

80
1. QUICK REFERENCE ..................... 82
2. SOME BASICS............................... 84
TURNING THE SYSTEM ON AND OFF ..................................................... 84
SELECTING AN AUDIO SOURCE ........ 84
DISC SLOT ............................................ 85
USB PORT............................................. 86
SOUND SETTINGS ............................... 86
AUDIO SCREEN ADJUSTMENT .......... 88
VOICE COMMAND SYSTEM ................ 89
1. AM/FM/SiriusXM®
Satellit
e Radio ............................ 90
OVERVIEW ............................................ 90
PRESETTING A STATION .................... 93
CACHING A RADIO PROGRAM ........... 93
SELECTING A STATION FROM
THE LIST ............................................. 95
RADIO OPTIONS ................................... 96
RADIO BROADCAST DATA SYSTEM .............................................. 96
USING HD Radio™ TECHNOLOGY...... 97
AVAILABLE HD Radio™ TECHNOLOGY.................................... 97
HD Radio™ TROUBLESHOOTING GUIDE ................................................. 98
HOW TO SUBSCRIBE TO SiriusXM Radio Services..................................... 99
DISPLAYING THE RADIO ID............... 100
REFER TO THE TABLE BELOW TO IDENTIFY THE PROBLEM AND
TAKE THE SUGGESTED
CORRECTIVE ACTION..................... 101
1BASIC OPERATION2RADIO OPERATION
3
AUDIO/VISUAL SYSTEM
Page 85 of 350

85
1. BASIC OPERATION
AUDIO/VISUAL SYSTEM
3
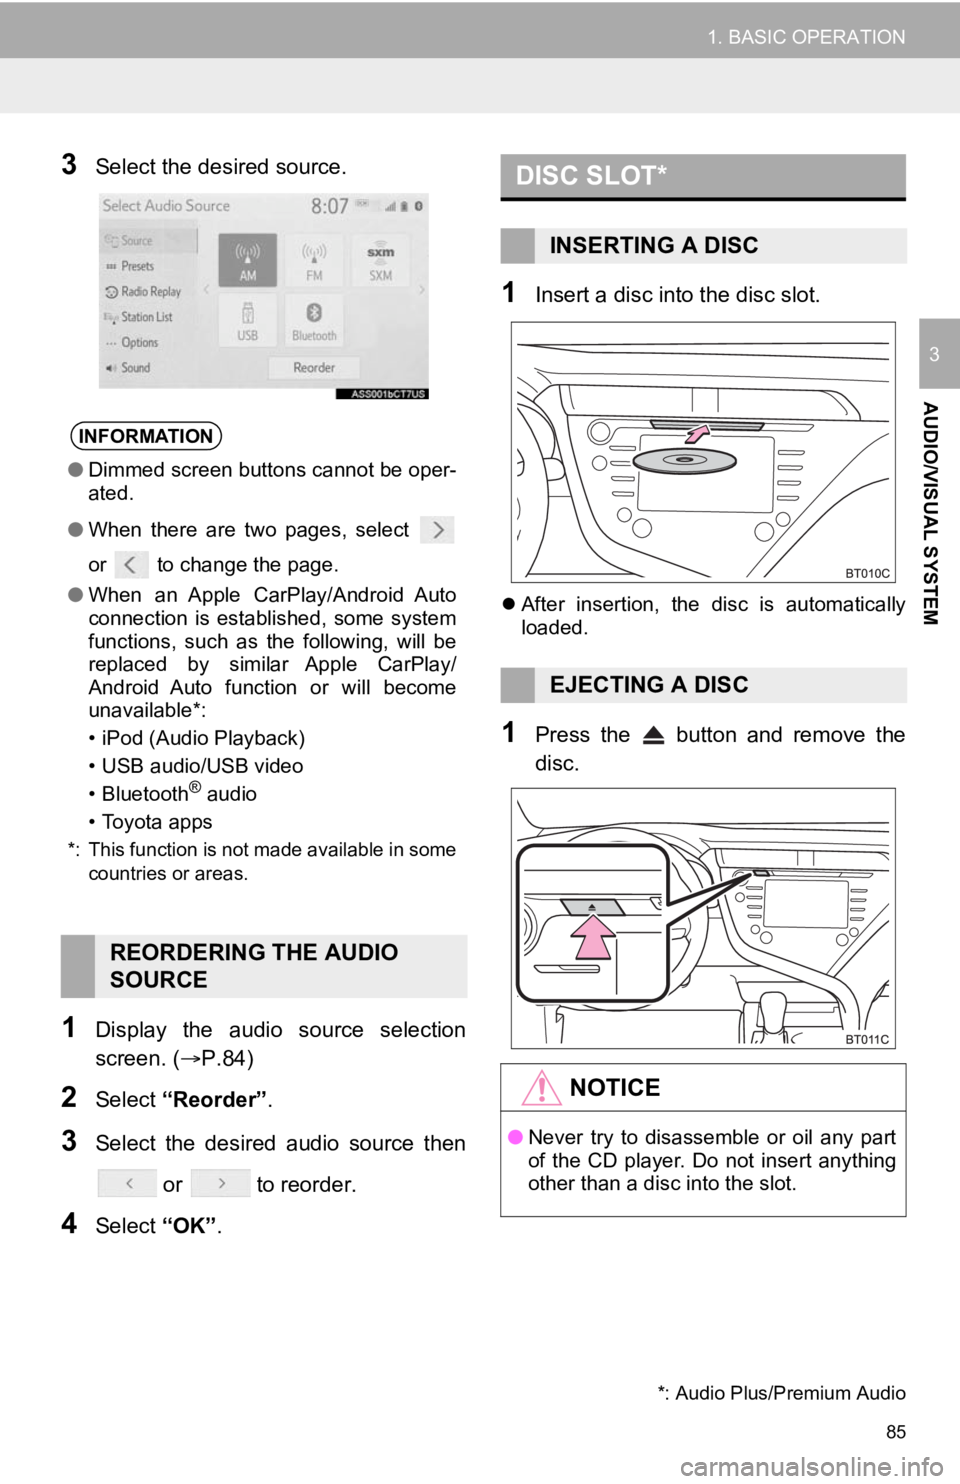
3Select the desired source.
1Display the audio source selection
screen. (P.84)
2Select “Reorder” .
3Select the desired audio source then
or to reorder.
4Select “OK”.
1Insert a disc into the disc slot.
After insertion, the disc is automatically
loaded.
1Press the button and remove the
disc.
INFORMATION
● Dimmed screen buttons cannot be oper-
ated.
● When there are two pages, select
or to change the page.
● When an Apple CarPlay/Android Auto
connection is established, some system
functions, such as the following, will be
replaced by similar Apple CarPlay/
Android Auto function or will become
unavailable*:
• iPod (Audio Playback)
• USB audio/USB video
• Bluetooth
® audio
• Toyota apps
*: This function is not made available in some countries or areas.
REORDERING THE AUDIO
SOURCE
DISC SLOT*
INSERTING A DISC
EJECTING A DISC
NOTICE
●Never try to disassemble or oil any part
of the CD player. Do not insert anything
other than a disc into the slot.
*: Audio Plus/Premium Audio
Page 86 of 350

86
1. BASIC OPERATION
1Open the lid and connect a device.
Turn on the power of the device if it is not
turned on.
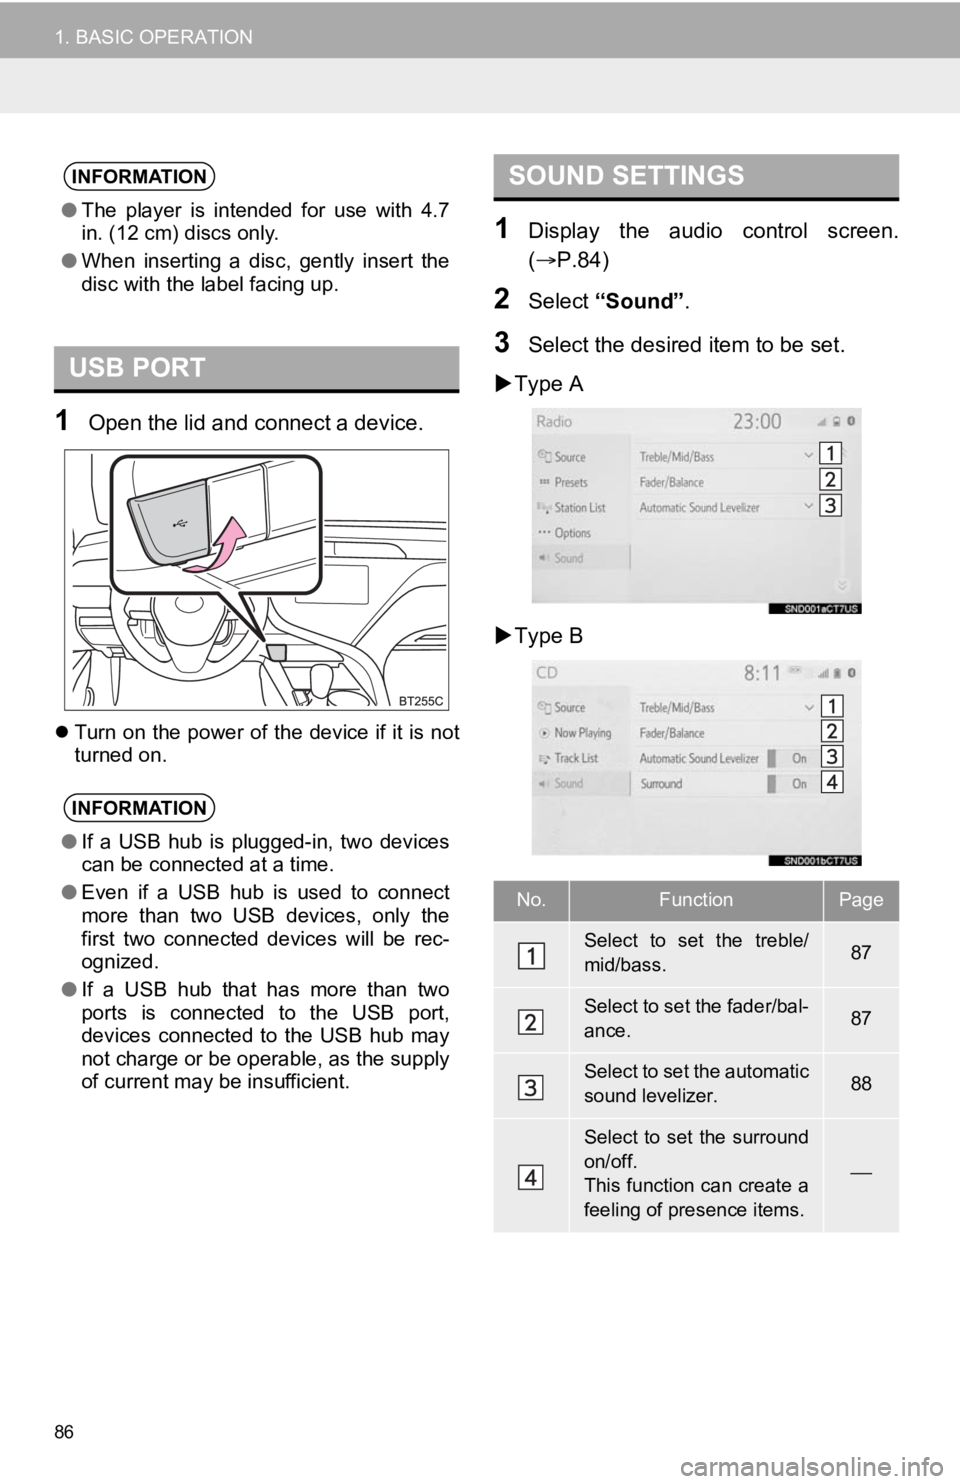
1Display the audio control screen.
( P.84)
2Select “Sound” .
3Select the desired item to be set.
Type A
Type B
INFORMATION
● The player is intended for use with 4.7
in. (12 cm) discs only.
● When inserting a disc, gently insert the
disc with the label facing up.
USB PORT
INFORMATION
●If a USB hub is plugged-in, two devices
can be connected at a time.
● Even if a USB hub is used to connect
more than two USB devices, only the
first two connected devices will be rec-
ognized.
● If a USB hub that has more than two
ports is connected to the USB port,
devices connected to the USB hub may
not charge or be operable, as the supply
of current may be insufficient.
SOUND SETTINGS
No.FunctionPage
Select to set the treble/
mid/bass.87
Select to set the fader/bal-
ance.87
Select to set the automatic
sound levelizer.88
Select to set the surround
on/off.
This function can create a
feeling of presence items.
Page 88 of 350
88
1. BASIC OPERATION
Type A
1Select “Automatic Sound Levelizer” .
2Select “High” , “Mid”, “Low” or “Off” .
Type B
1Select “Automatic Sound Levelizer” .
2Select to set the automatic sound lev-
elizer on/off.
1Press the “MENU” button.
2Select “Setup”.
3Select “Audio” .
4Select “Common” .
5Select “Screen Format” .
6Select the desired item to be adjusted.
AUTOMATIC SOUND
LEVELIZER (ASL)
The system adjusts to the optimum vol-
ume and tone quality according to ve-
hicle speed to compensate for
increased road noise, wind noise, or
other noises while driving.AUDIO SCREEN
ADJUSTMENT
SCREEN FORMAT SETTINGS
The screen format can be selected for
USB video.
No.Function
Select to display a 4 : 3 screen, with
either side in black.
Select to enlarge the image horizon-
tally and vertica lly to full screen.
Select to enlarge the image by the
same ratio horizontally and vertical-
ly.
Page 89 of 350

89
1. BASIC OPERATION
AUDIO/VISUAL SYSTEM
3
1Press the “MENU” button.
2Select “Setup” .
3Select “Audio” .
4Select “Common” .
5Select “Display”.
6Select the desired item to be adjusted.
1Press the talk switch to operate the
voice command system.
COLOR, TONE, CONTRAST
AND BRIGHTNESS
ADJUSTMENT
The color, tone, contrast and
brightness of the screen can be
adjusted.
Screen buttonFunction
“Color” “R”Select to strengthen the
red color of the screen.
“Color” “G”
Select to strengthen the
green color of the
screen.
“Tone” “+”Select to strengthen the
tone of the screen.
“Tone” “-”Select to weaken the
tone of the screen.
“Contrast” “+”Select to strengthen the
contrast of the screen.
“Contrast” “-”Select to weaken the
contrast of the screen.
“Brightness” “+”Select to brighten the
screen.
“Brightness” “-”Select to darken the
screen.
INFORMATION
● Depending on the audio source, some
functions may not be available.
VOICE COMMAND SYSTEM
The voice command system and its list
of commands can be operated.
( P.138)
Page 91 of 350
91
2. RADIO OPERATION
AUDIO/VISUAL SYSTEM
3
■CONTROL PANEL
No.FunctionPage
Select to display the audio source selection screen.
Select to display the preset stations screen.93
*1Select to display the cac he radio operation screen.93
Select to display a list of receivable stations.95
Select to display the radio options screen.96
Select to display the sound setting screen.86
Select to tune to preset stations/channels.93
*1Displays items on the channels r egistered to smart favorites.94,
124
*1Displays the artist info and song title or album.
Select to change the displayed information.
Displays messages when available from RBDS.
*1Displays cover art, station logo, etc.
*1Displays genre information.
*2Select to display HD) multicast channels available.97
Turn to step up/down frequencies/channels.
Turn to move up/down the station. Also, the knob can be used to enter
selections on the lis t screens by pressing it.
Page 93 of 350

93
2. RADIO OPERATION
AUDIO/VISUAL SYSTEM
31Tune in the desired station.
2Select and hold “(Hold Edit)”.
To change the preset station to a different
one, select and hold the preset station.
1Select “SXM Replay” *3 or “Radio Re-
play” *
1.
2Select the desired cache radio opera-
tion button.
PRESETTING A STATION
Radio mode has a mix preset function,
which can store up to 36 stations (6
stations per page x 6 pages) from any
of the AM, FM or SXM bands.
INFORMATION
●The number of preset radio stations dis-
played on the screen can be changed.
( P.124)
*1: Premium Audio
*2: Audio with DCM/Audio Plus/Premium Audio *3: Audio with DCM/Audio Plus
CACHING A RADIO
PROGRAM
AM/FM*1 and SXM*2 radio program
can be cached and played back in a
time-shifted manner.
No.Function
Returns to the live radio broadcast
Displays the replay offset from the
current time
Skips backward 2 minutes (AM/FM)
Select to change the current/previ-
ous track (SXM)
Fast rewinds continuously
Pauses the playback (To restart, se-
lect
)
Fast forwards continuously
Skips forward 2 minutes (AM/FM)
Select to change the next track
(SXM)