2020 TOYOTA AVALON HYBRID bluetooth
[x] Cancel search: bluetoothPage 212 of 326

212
2. SETUP
1. PHONE SETTINGS
1Press the “MENU” button.
2Select “Setup” .
3Select “Phone” .
4Select the desired item to be set.
1Display the phone settings screen.
(P.212)
2Select “Sounds” .
3 Select the desired item to be set.
PHONE SETTINGS SCREEN
No.InformationPage
Connecting a Bluetooth®
device and editing the
Bluetooth® device infor-
mation48, 51
*Sound settings212
*Notification settings213
*Contact/call history set-
tings214
*Message settings221
*: This operation cannot be performed while driving.
SOUND SETTINGS SCREEN
The call and ringtone volume can be
adjusted. A ringtone can be selected.
Page 214 of 326

214
2. SETUP
1Display the phone settings screen.
(P.212)
2Select “Contacts/Call History” .
3Select the desired item to be set.
No.Function
Select to change the incoming call
display.
“Full Screen”: When a call is re-
ceived, the incoming call screen is
displayed and can be operated on
the screen.
“Drop-down” : A message is dis-
played at the top of the screen.
Select to set the SMS/MMS notifica-
tion pop-up on/off.
Select to change the incoming SMS/
MMS display.
“Full Screen” : When an SMS/MMS
message is received, the incoming
SMS/MMS display screen is dis-
played and can be operated on the
screen.
“Drop-down” : When an SMS/MMS
message is received, a message is
displayed at the top of the screen.
Select to set the e-mail notification
pop-up on/off.
Select to change the incoming e-
mail display.
“Full Screen” : When an e-mail is
received, the incoming e-mail dis-
play screen is displayed and can be
operated on the screen.
“Drop-down” : When an e-mail is
received, a message is displayed at
the top of the screen.
Select to set display of the contact/
history transfer completion message
on/off.
Select to reset all setup items.
INFORMATION
● Depending on the phone, these func-
tions may not be available.
CONTACT/CALL HISTORY
SETTINGS SCREEN
Contacts can be transferred from a
Bluetooth
® phone to this system. Con-
tacts and favorites can be added, edit-
ed and deleted. Also, the call history
can be deleted.
Page 215 of 326

215
2. SETUP
PHONE
7
1Select “Automatic Transfer”.
2Select the desired item to be set.
No.FunctionPage
For PBAP compatible
Bluetooth® phones: Select
to change the contact/ his-
tory transfer settings.215
Select to update contacts
from the connected phone
or a USB memory.
216
Select to sort contacts by
the first name or last name
field.
Select to add contacts to
the favorites list. 219
Select to delete contacts
from the favorites list. 219
*Select to clear the call his-
tory.
*Select to add new contacts
to the contact list.218
*Select to edit contacts in
the contact list.218
*Select to delete contacts
from the contact list.218
Select to set the voice tags.220
Select to reset all setup
items.
*: For PBAP compatible Bluetooth
® phones,
this function is available when “Automatic
Transfer” is set to off. ( P.214)
INFORMATION
●Depending on the type of phone, certain
functions may not be available.
● Contact data is managed independently
for every registered phone. When one
phone is connected, another phone’s
registered data cannot be read.
SETTING AUTOMATIC
CONTACT/HISTORY
TRANSFER
The automatic contact/history function
is available for PBAP compatible
Bluetooth
® phones only.
No.Function
Select to set automatic contact/his-
tory transfer on/off.
When set to on, the phone’s contact
data and history are automatically
transferred.
Select to update contacts from the
connected phone. ( P.216)
Select to set the transferred contact
image display on/off.
Select to reset all setup items.
Page 216 of 326

216
2. SETUP
■UPDATING CONTACTS FROM
PHONE
1Select “Update Now” .
Contacts are transferred automatically.
2Check that a confirmation screen is
displayed when the operation is com-
plete.
This operation may be unnecessary
depending on the type of cellular phone.
If another Bluetooth
® device is connected
when transferring contact data, depending
on the phone, the connected Bluetooth
®
device may need to be disconnected.
Depending on the type of Bluetooth
®
phone being connected, it may be neces-
sary to perform additional steps on the
phone.
■UPDATING THE CONTACTS IN A
DIFFERENT WAY (FROM THE CALL
HISTORY SCREEN)*
1
1Display the phone top screen.
(P.194)
2Select “History” and select a contact
not yet registered in the contact list.
3Select “Update Contact” .
4Select the desired contact.
5Select a phone type for the phone
number.
*
1: For PBAP compatible Bluetooth®
phones, this function is available when
“Automatic Transfer” is set to off.
( P.215)
■FROM PHONE (OPP COMPATIBLE
Bluetooth
® PHONES ONLY)
1Select “Transfer Contacts from De-
vice” .
2Select “From Phone (Bluetooth*2)”.
When the contact is not registered
3Transfer the contact data to the system
using a Bluetooth
® phone.
This operation may be unnecessary
depending on the type of cellular phone.
To cancel this function, select “Cancel”.
4Check that a confirmation screen is
displayed when the operation is com-
plete.
When the contact is registered
3Select “Replace Contacts” or “Add
Contact” .
“Replace Contacts” : Select to transfer
the contact from the connected cellular
phone and replace the current one.
“Add Contact”: Select to transfer the de-
sired contact data fr om the connected cel-
lular phone to add t o the current one.
4Transfer the contact data to the system
using a Bluetooth
® phone.
This operation may be unnecessary
depending on the type of cellular phone.
To cancel this function, select “Cancel”.
5Check that a confirmation screen is
displayed when the operation is com-
plete.
*
2: The Bluetooth® word mark and logos
are registered trademarks owned by
Bluetooth SIG, Inc.
TRANSFERRING CONTACTS
FROM DEVICE
Page 217 of 326

217
2. SETUP
PHONE
7
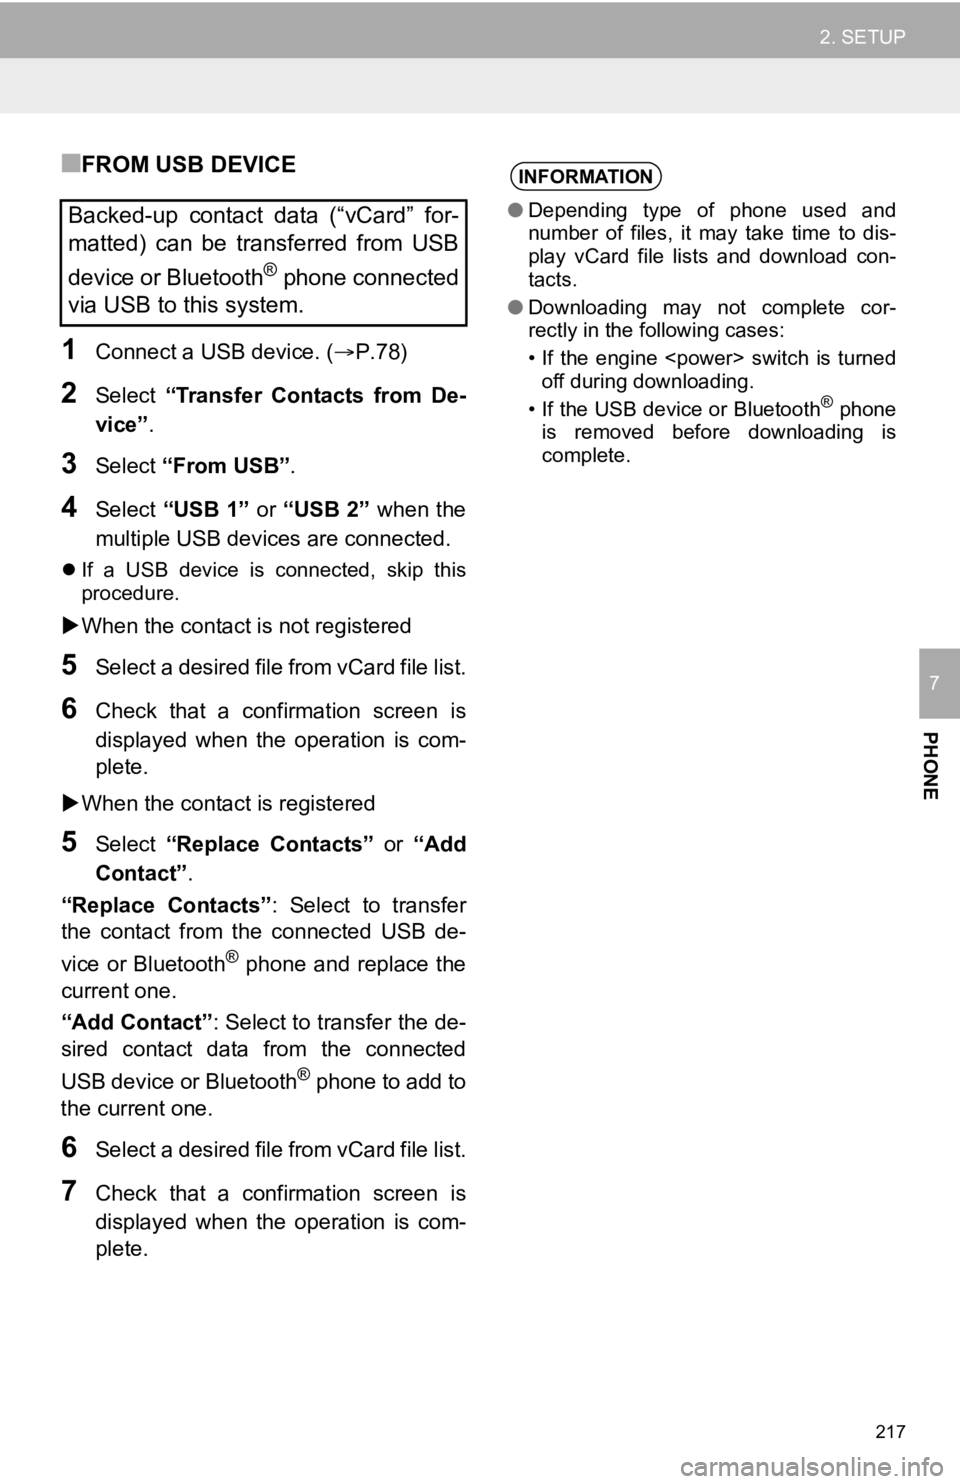
■FROM USB DEVICE
1Connect a USB device. (P.78)
2Select “Transfer Contacts from De-
vice” .
3Select “From USB” .
4Select “USB 1” or “USB 2” when the
multiple USB devices are connected.
If a USB device is connected, skip this
procedure.
When the contact is not registered
5Select a desired file from vCard file list.
6Check that a confirmation screen is
displayed when the operation is com-
plete.
When the contact is registered
5Select “Replace Contacts” or “Add
Contact”.
“Replace Contacts” : Select to transfer
the contact from the connected USB de-
vice or Bluetooth
® phone and replace the
current one.
“Add Contact” : Select to transfer the de-
sired contact data from the connected
USB device or Bluetooth
® phone to add to
the current one.
6Select a desired file from vCard file list.
7Check that a confirmation screen is
displayed when the operation is com-
plete.
Backed-up contact data (“vCard” for-
matted) can be transferred from USB
device or Bluetooth
® phone connected
via USB to this system.
INFORMATION
● Depending type of phone used and
number of files, it may take time to dis-
play vCard file lists and download con-
tacts.
● Downloading may not complete cor-
rectly in the following cases:
• If the engine
off during downloading.
• If the USB device or Bluetooth
® phone
is removed before downloading is
complete.
Page 218 of 326

218
2. SETUP
1Select “New Contact” .
2Enter the name and select “OK”.
3Enter the phone number and select
“OK”.
4Select the phone type for the phone
number.
5To add another number to this contact,
select “Yes”.
■REGISTERING A NEW CONTACT IN
A DIFFERENT WAY (FROM THE
CALL HISTORY SCREEN)
1Display the phone top screen.
(P.194)
2Select “History” and select a contact
not yet registered in the contact list.
3Select “Add to Contacts” .
4Follow the steps in “REGISTERING A
NEW CONTACT TO THE CONTACT
LIST” from “STEP 2”. ( P.218)
1Select “Edit Contact”.
2Select the desired contact.
3Select corresponding to the de-
sired name or number.
For editing the name
4Follow the steps in “REGISTERING A
NEW CONTACT TO THE CONTACT
LIST” from “STEP 2”. (P.218)
For editing the number
4Follow the steps in “REGISTERING A
NEW CONTACT TO THE CONTACT
LIST” from “STEP 3”. (P.218)
1Select “Delete Contacts” .
2Select the desired contact and select
“Delete”.
3Select “Yes” when the confirmation
screen appears.
REGISTERING A NEW
CONTACT TO THE CONTACT
LIST
New contact data can be registered.
Up to 4 numbers per person can be
registered. For PBAP compatible
Bluetooth
® phones, this function is
available when “Automatic Transfer” is
set to off. (P.214)
EDITING THE CONTACT DATA
For PBAP compatible Bluetooth
®
phones, this function is available when
“Automatic Transfer” is set to off.
( P.214)
DELETING THE CONTACT
DATA
For PBAP compatible Bluetooth
®
phones, this function is available when
“Automatic Transfer” is set to off.
( P.214)
INFORMATION
● Multiple data can be selected and
deleted at the same time.
Page 222 of 326

222
3. WHAT TO DO IF...
1. TROUBLESHOOTING
When using the hands-fr ee system with a Bluetooth® device
If there is a problem with the hands-free system or a Bluetooth® device, first check
the table below.
SymptomLikely causeSolution
Page
Cellular
phoneThis
system
The hands-free sys-
tem or Bluetooth® de-
vice does not work.
The connected de-
vice may not be a
compatible
Bluetooth
® cellular
phone.
For a list of specific
devices which
operation has been
confirmed on this
system, check with
your Toyota dealer or
the following website:
http://www.toyota.com/
Entune/ in the United
States, http://
www.toyota.ca/entunein Canada, and http://
www.toyotapr.com/
entune in Puerto Rico
The Bluetooth® ver-
sion of the connect-
ed cellular phone
may be older than
the specified ver-
sion.Use a cellular phone
with Bluetooth® ver-
sion 2.0 or higher (rec-
ommended: Ver. 4.1
+EDR).46
Page 223 of 326

223
3. WHAT TO DO IF...
PHONE
7
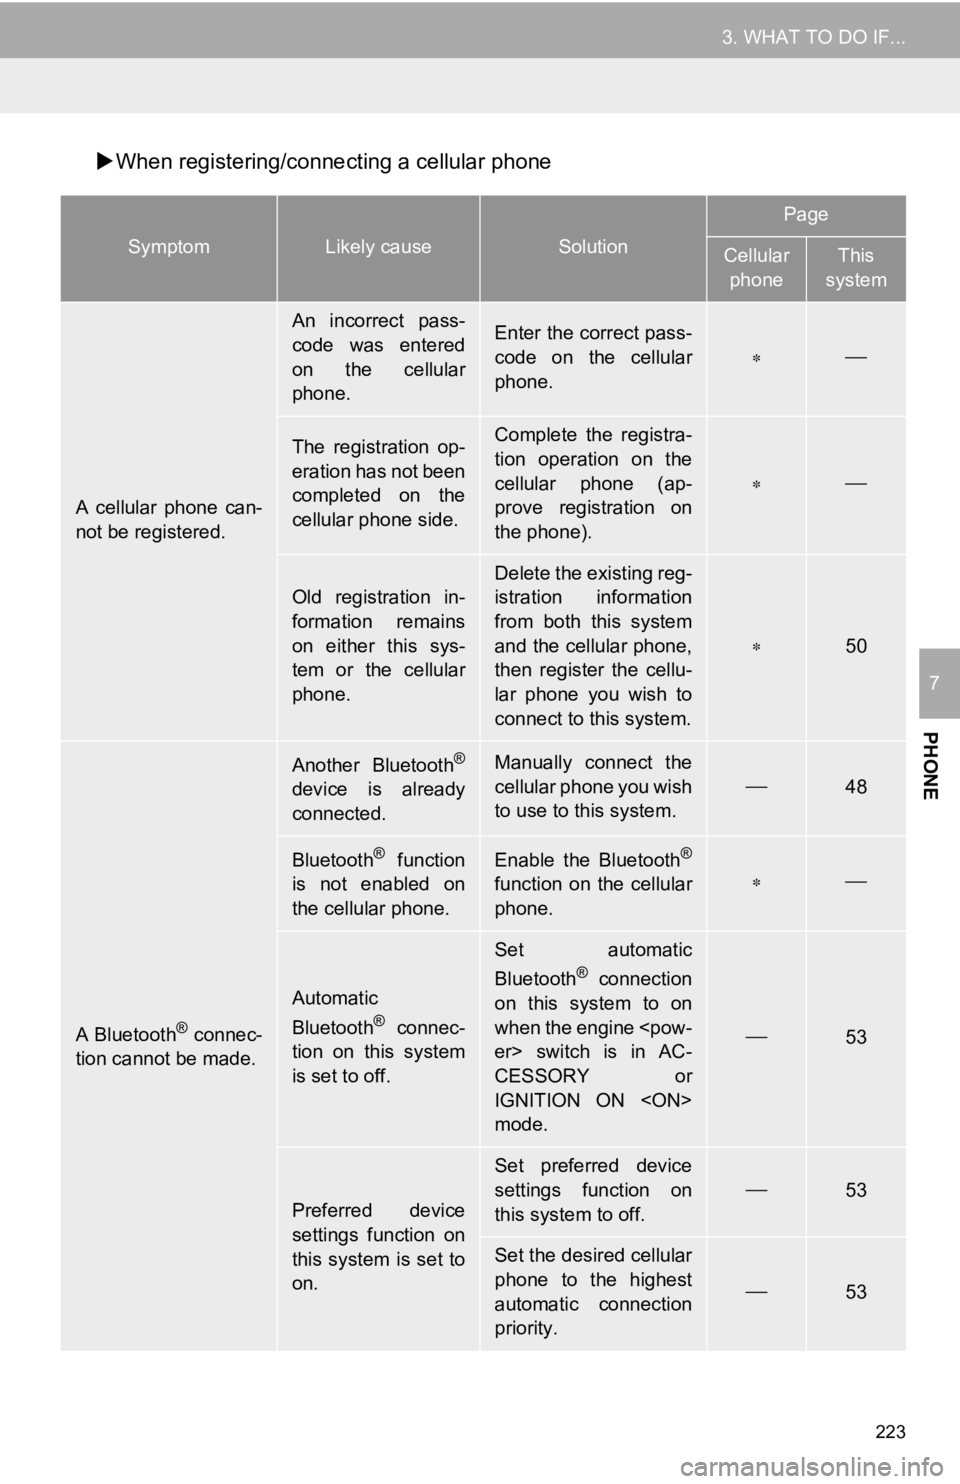
When registering/conne cting a cellular phone
SymptomLikely causeSolution
Page
Cellular
phoneThis
system
A cellular phone can-
not be registered.
An incorrect pass-
code was entered
on the cellular
phone.Enter the correct pass-
code on the cellular
phone.
The registration op-
eration has not been
completed on the
cellular phone side.Complete the registra-
tion operation on the
cellular phone (ap-
prove registration on
the phone).
Old registration in-
formation remains
on either this sys-
tem or the cellular
phone.Delete the existing reg-
istration information
from both this system
and the cellular phone,
then register the cellu-
lar phone you wish to
connect to this system.
50
A Bluetooth® connec-
tion cannot be made.
Another Bluetooth®
device is already
connected.
Manually connect the
cellular phone you wish
to use to this system.
48
Bluetooth® function
is not enabled on
the cellular phone.Enable the Bluetooth®
function on the cellular
phone.
Automatic
Bluetooth® connec-
tion on this system
is set to off.
Set automatic
Bluetooth® connection
on this system to on
when the engine
CESSORY or
IGNITION ON
mode.
53
Preferred device
settings function on
this system is set to
on.
Set preferred device
settings function on
this system to off.
53
Set the desired cellular
phone to the highest
automatic connection
priority.
53