2020 TESLA MODEL Y weight
[x] Cancel search: weightPage 20 of 232

Opening
To open the front trunk:
1.
Ensure that the area around the hood is free of
obstacles.
2.
Touch the associated OPEN button on the
touchscreen, double-click the front trunk button on
the
key fob accessory, or touch the front trunk button
on the mobile app.
3.
Pull the hood up.
When a door or trunk/liftgate is open, the touchscreen displays the Door Open indicator light. The image of your
Model
Y on the touchscreen also displays the
open front trunk.
WARNING: Before opening or closing the hood, it
is important to check that the area around the
hood is free of obstacles (people and objects).
Failure to do so may result in damage or serious
injury.
NOTE: The front trunk locks whenever closed and you
lock
Model Y using the touchscreen, mobile app, key
card, you leave
Model Y carrying your authenticated
phone (if Walk-Away Door Lock is turned on), or if Valet
mode is active (see
Valet Mode on page 44).
Closing
The Model Y hood is not heavy enough to latch under its
own weight and applying pressure on the front edge or center of the hood can cause damage.
To properly close the hood:
1.
Lower the hood until the striker touches the latches.
2.
Place both hands on the front of the hood in the areas shown (in green), then press down
firmly to
engage the latches.
3. Carefully try to lift the front edge of the hood to
ensure that it is fully closed.CAUTION: To prevent damage:
Page 34 of 232

Guidelines for Seating Children
Your Model Y seat belts are designed for adults and larger children. You must restrain infants and small children in
the second row seats only, and you must use a suitable child safety seat appropriate for the child’s age, weight, and
size.
WARNING: Never seat a child on a rear facing child seat with an ACTIVE AIRBAG in front of it. DEATH or
SERIOUS INJURY to the child can occur. See Passenger Front Airbag Status on page 38.
WARNING: Never seat a child on a seat with an ACTIVE AIRBAG in front of it. DEATH or SERIOUS INJURY to
the child can occur.
WARNING: Always ensure that all Model Y seats are locked in position before traveling. Failure to do so
increases the risk of injury. Pay attention to all warnings displayed on the touchscreen.
WARNING: Do not associate the Easy Entry setting with the driver
Page 35 of 232

Choosing a Child Safety Seat
All children age 12 and under should ride in the second and third row seats. Always use a child safety seat suitable for a young child’s age and weight. The following table is based on child safety seat recommendations determined
by the National Highway
Tra
Page 37 of 232

In the second row, install LATCH child safety seats in the
outboard seating positions only. Use only a seat belt
retained seat in the center position.
To install a LATCH child safety seat, slide the safety seat
latches onto the anchor bars until they click into place. Carefully read and follow the instructions provided by
the child safety seat manufacturer.
Once installed, test the security of the installation before seating a child. Attempt to twist the child safety seat from side to side and try to pull it away from the seat, then check to ensure the anchors remain securely in place.
NOTE: Lower LATCH anchors should not be used with
child seats or booster seats that have an integrated safety belt in situations where the combined weight of
the child plus the child restraint is more than
65 lbs (29.5
kg). In these situations, use the safety belt instead.
Attaching Upper Tether Straps
If an upper tether strap is provided, attach its hook to the anchor point located behind the rear seat.
NOTE: The location of anchor points may not be readily
visible but can be found by identifying a slice in the seat
Page 38 of 232

For a single-strap tether at the center seating position, raise the head support
(see Raising/Lowering the Rear
Center Head Support on page 27) and run the strap
under the head support.
Testing a Child Safety Seat
Before seating a child, always make sure the child safety seat is not loose:
1.
Hold the child safety seat by the belt path and try to slide the safety seat from side to side and front to back.
2.
If the seat moves more than one inch (2.5 cm), it is
too loose. Tighten the belt or reconnect the
LATCH
retained child safety seat.
3.
If you are unable to reduce slack, try a different seat
location or try another child safety seat.
Child Safety Seat WarningsWARNING: Extreme hazard! Do not seat a child
on the front passenger seat even if you are using
a child safety seat. This seat has an airbag in front
of it. Although this airbag is disabled when Model
Y detects a lightweight passenger, do not rely on
technology to protect your child.
WARNING: Child restraint systems are designed
to be secured in vehicle seats by lap belts or the
lap belt portion of a lap-shoulder belt. Children
could be endangered in a crash if their child
restraints are not properly secured in the vehicle.
WARNING: According to collision statistics,
children are safer when properly restrained in the
rear seating positions than in the front seating
positions.
WARNING: Do not use a forward facing child
safety seat until your child weighs over 20 lbs (9
kg) and can sit independently. Up to the age of
two, a child
Page 41 of 232

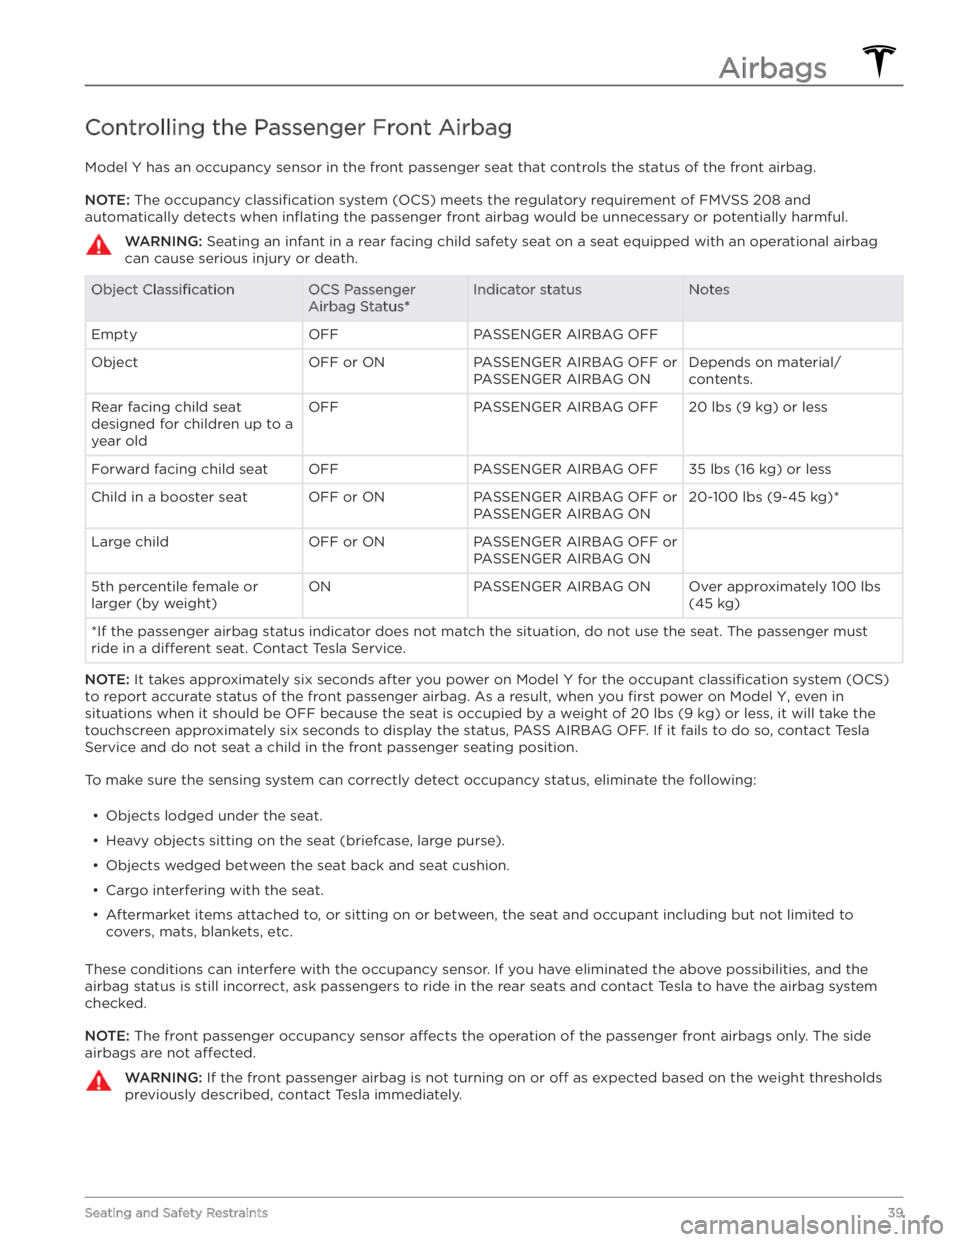
Controlling the Passenger Front Airbag
Model Y has an occupancy sensor in the front passenger seat that controls the status of the front airbag.
NOTE: The occupancy classification system (OCS) meets the regulatory requirement of FMVSS 208 and
automatically detects when
inflating the passenger front airbag would be unnecessary or potentially harmful.
WARNING: Seating an infant in a rear facing child safety seat on a seat equipped with an operational airbag
can cause serious injury or death.
Object ClassificationOCS Passenger
Airbag Status*Indicator statusNotesEmptyOFFPASSENGER AIRBAG OFF ObjectOFF or ONPASSENGER AIRBAG OFF or
PASSENGER AIRBAG ONDepends on material/
contents.Rear facing child seat
designed for children up to a
year oldOFFPASSENGER AIRBAG OFF20 lbs (9 kg) or lessForward facing child seatOFFPASSENGER AIRBAG OFF35 lbs (16 kg) or lessChild in a booster seatOFF or ONPASSENGER AIRBAG OFF or
PASSENGER AIRBAG ON20-100 lbs (9-45 kg)*Large childOFF or ONPASSENGER AIRBAG OFF or
PASSENGER AIRBAG ON 5th percentile female or
larger (by weight)ONPASSENGER AIRBAG ONOver approximately 100 lbs
(45 kg)
*If the passenger airbag status indicator does not match the situation, do not use the seat. The passenger must
ride in a
different seat. Contact Tesla Service.
NOTE: It takes approximately six seconds after you power on Model Y for the occupant classification system (OCS)
to report accurate status of the front passenger airbag. As a result, when you
first power on Model Y, even in
situations when it should be OFF because the seat is occupied by a weight of
20 lbs (9 kg) or less, it will take the
touchscreen approximately six seconds to display the status, PASS AIRBAG OFF. If it fails to do so, contact Tesla
Service and do not seat a child in the front passenger seating position.
To make sure the sensing system can correctly detect occupancy status, eliminate the following:
Page 75 of 232

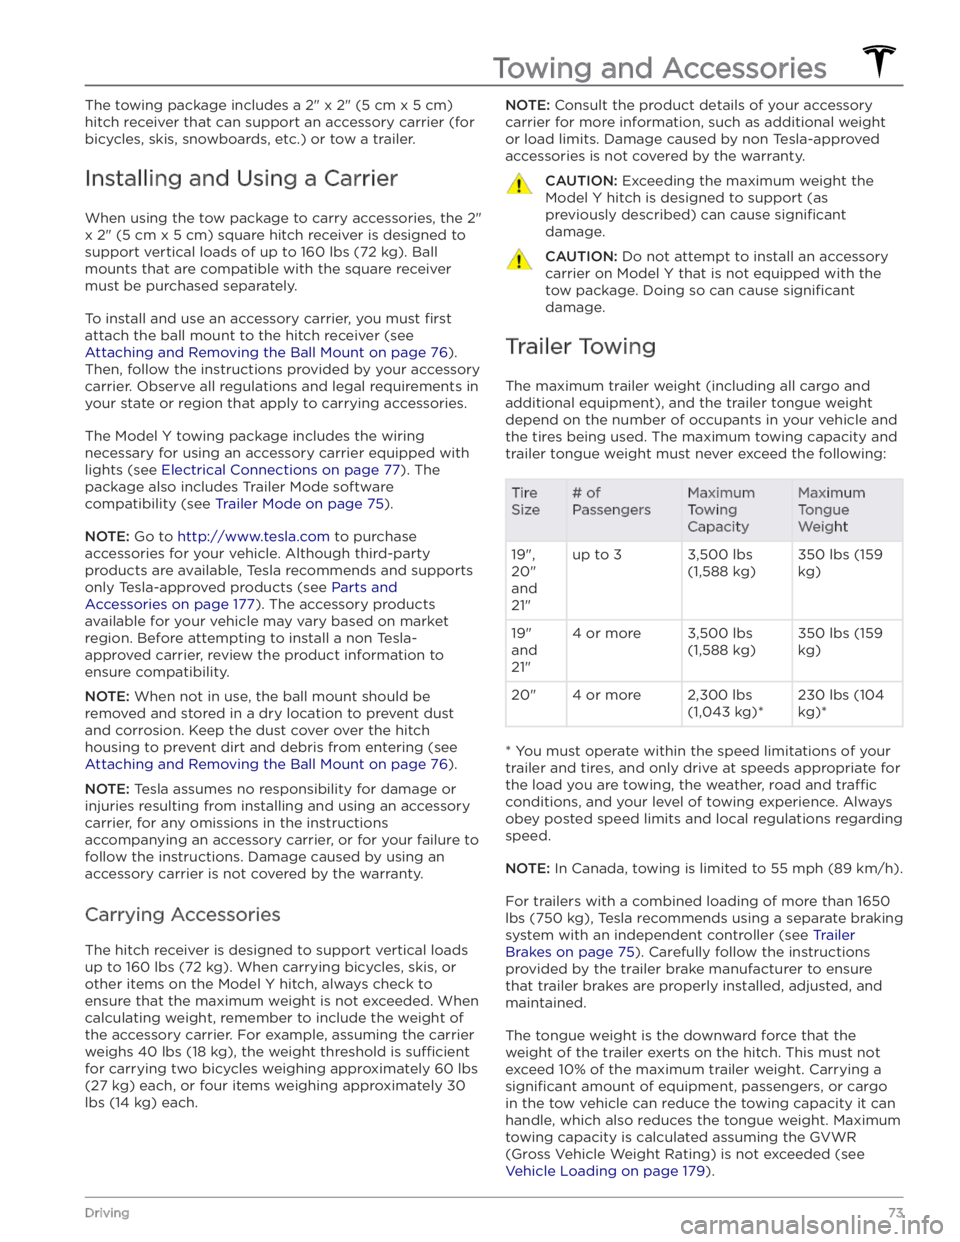
The towing package includes a 2" x 2" (5 cm x 5 cm)
hitch receiver that can support an accessory carrier (for bicycles, skis, snowboards, etc.) or tow a trailer.
Installing and Using a Carrier
When using the tow package to carry accessories, the 2"
x 2" (5 cm x 5 cm) square hitch receiver is designed to
support vertical loads of up to
160 lbs (72 kg). Ball
mounts that are compatible with the square receiver
must be purchased separately.
To install and use an accessory carrier, you must first
attach the ball mount to the hitch receiver (see
Attaching and Removing the Ball Mount on page 76).
Then, follow the instructions provided by your accessory
carrier. Observe all regulations and legal requirements in your state or region that apply to carrying accessories.
The Model Y towing package includes the wiring
necessary for using an accessory carrier equipped with lights (see
Electrical Connections on page 77). The
package also includes Trailer Mode software compatibility (see
Trailer Mode on page 75).
NOTE: Go to http://www.tesla.com to purchase
accessories for your vehicle. Although third-party products are available, Tesla recommends and supports
only Tesla-approved products (see
Parts and
Accessories on page 177). The accessory products
available for your vehicle may vary based on market
region. Before attempting to install a non Tesla-
approved carrier, review the product information to ensure compatibility.
NOTE: When not in use, the ball mount should be
removed and stored in a dry location to prevent dust and corrosion. Keep the dust cover over the hitch housing to prevent dirt and debris from entering (see
Attaching and Removing the Ball Mount on page 76).
NOTE: Tesla assumes no responsibility for damage or
injuries resulting from installing and using an accessory carrier, for any omissions in the instructions accompanying an accessory carrier, or for your failure to follow the instructions. Damage caused by using an accessory carrier is not covered by the warranty.
Carrying Accessories
The hitch receiver is designed to support vertical loads
up to
160 lbs (72 kg). When carrying bicycles, skis, or
other items on the
Model Y hitch, always check to
ensure that the maximum weight is not exceeded. When calculating weight, remember to include the weight of
the accessory carrier.
For example, assuming the carrier
weighs 40 lbs (18 kg), the weight threshold is su
Page 181 of 232

Load Capacity Labeling
It is important to understand how much weight your
Model Y can safely carry. This weight is called the
vehicle capacity weight and includes the weight of all
occupants, cargo and any additional equipment added to your
Model Y since it was manufactured.
Two labels attached to Model Y indicate how much
weight
Model Y can safely carry.
Both labels are visible on the door pillar when the front door is open.
NOTE: If your Model Y is fitted with Tesla accessory
wheels or tires, your
Model Y may include an additional
label indicating that load capacity may
differ from what
is stated on the label. If this is the case, instead of referring to the label, refer to the Owner