2020 TESLA MODEL Y heater
[x] Cancel search: heaterPage 30 of 232

Removing/Installing a Head Support
To remove the head support:
1.
Raise the head support as described above.
2.
Press and hold the button on the outer base of the right post.
3.
Insert a short, flat object (such as a small flat-head
screwdriver) into the opening on the inside base of
the left post and pull the head support upward.
To re-install the head support:
1.
With the front of the head support facing forward, insert both posts into the corresponding holes on the seat back.
2.
Press down on the head support until it clicks into place.
3.
Pull up on the head support to ensure that it is
secure.
WARNING: Ensure that the head support is
correctly installed before seating an occupant.
Failure to do so increases the risk of injury or
death if a collision occurs.
Seat Heaters
The front and rear seats contain heating pads that
operate at three levels from 3 (highest) to 1 (lowest).
To
operate the seat heaters, see Climate Controls on page
125.
WARNING: To avoid burns resulting from
prolonged use, individuals who have peripheral
neuropathy, or whose capacity to feel pain is
limited because of diabetes, age, neurological
injury, or some other condition, should exercise
caution when using the climate control system
and seat heaters.
Seat Covers
WARNING: Do not use seat covers in Model Y.
Doing so could restrict deployment of the seat-
mounted side air bags if a collision occurs. Also, if
the vehicle is equipped with an occupant
detection system that is used to determine the
status of the passenger front airbag, seat covers
may interfere with this system.
Front and Rear Seats
28MODEL Y OWNER
Page 128 of 232

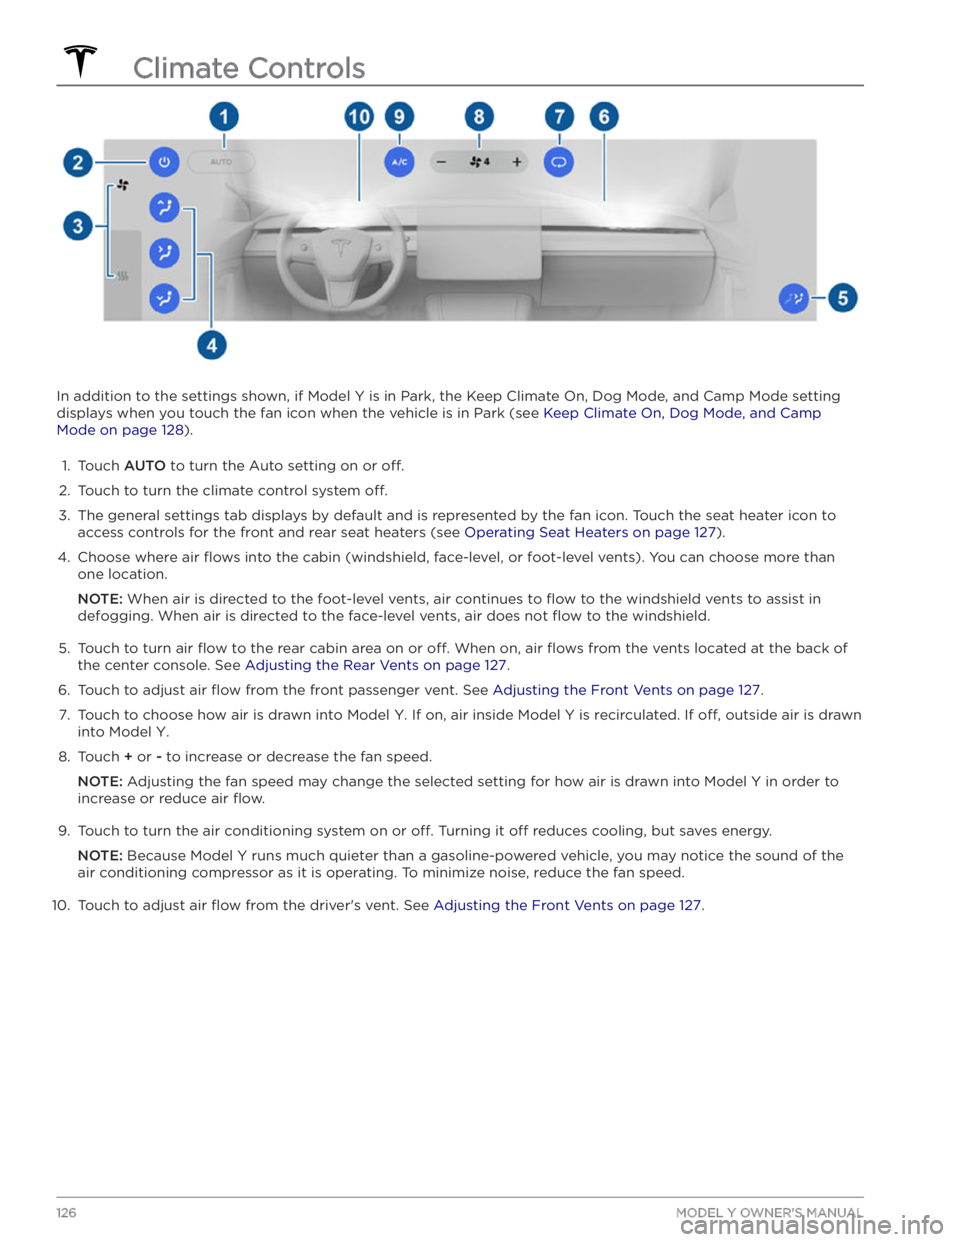
In addition to the settings shown, if Model Y is in Park, the Keep Climate On, Dog Mode, and Camp Mode setting
displays when you touch the fan icon when the vehicle is in Park (see
Keep Climate On, Dog Mode, and Camp
Mode on page 128).
1.
Touch AUTO to turn the Auto setting on or off.
2.
Touch to turn the climate control system off.
3.
The general settings tab displays by default and is represented by the fan icon. Touch the seat heater icon to
access controls for the front
and rear seat heaters (see Operating Seat Heaters on page 127).
4.
Choose where air flows into the cabin (windshield, face-level, or foot-level vents). You can choose more than
one location.
NOTE: When air is directed to the foot-level vents, air continues to flow to the windshield vents to assist in
defogging. When air is directed to the face-level vents, air does not
flow to the windshield.
5.
Touch to turn air flow to the rear cabin area on or off. When on, air flows from the vents located at the back of
the center console. See
Adjusting the Rear Vents on page 127.
6.
Touch to adjust air flow from the front passenger vent. See Adjusting the Front Vents on page 127.
7.
Touch to choose how air is drawn into Model Y. If on, air inside Model Y is recirculated. If off, outside air is drawn
into
Model Y.
8.
Touch + or - to increase or decrease the fan speed.
NOTE: Adjusting the fan speed may change the selected setting for how air is drawn into Model Y in order to
increase or reduce air
flow.
9.
Touch to turn the air conditioning system on or off. Turning it off reduces cooling, but saves energy.
NOTE: Because Model Y runs much quieter than a gasoline-powered vehicle, you may notice the sound of the
air conditioning compressor as it is operating. To minimize noise, reduce the fan speed.
10.
Touch to adjust air flow from the driver
Page 129 of 232

Operating Seat Heaters
To control the front seat heaters for the driver and
passenger, touch the corresponding control on the main climate control area at the bottom of the touchscreen.
To control the rear seat heaters (if equipped) or access
duplicate controls for the front seat heaters, touch the
fan icon, then touch the seat heater icon followed by
the seat for which you want to adjust heating. Seat
heaters operate at three setting levels from 3 (highest)
to 1 (lowest). When operating, the associated seat icon
displays twisting lines that turn red to indicate the setting level. You can touch
All Off to turn off all seat
heaters simultaneously.
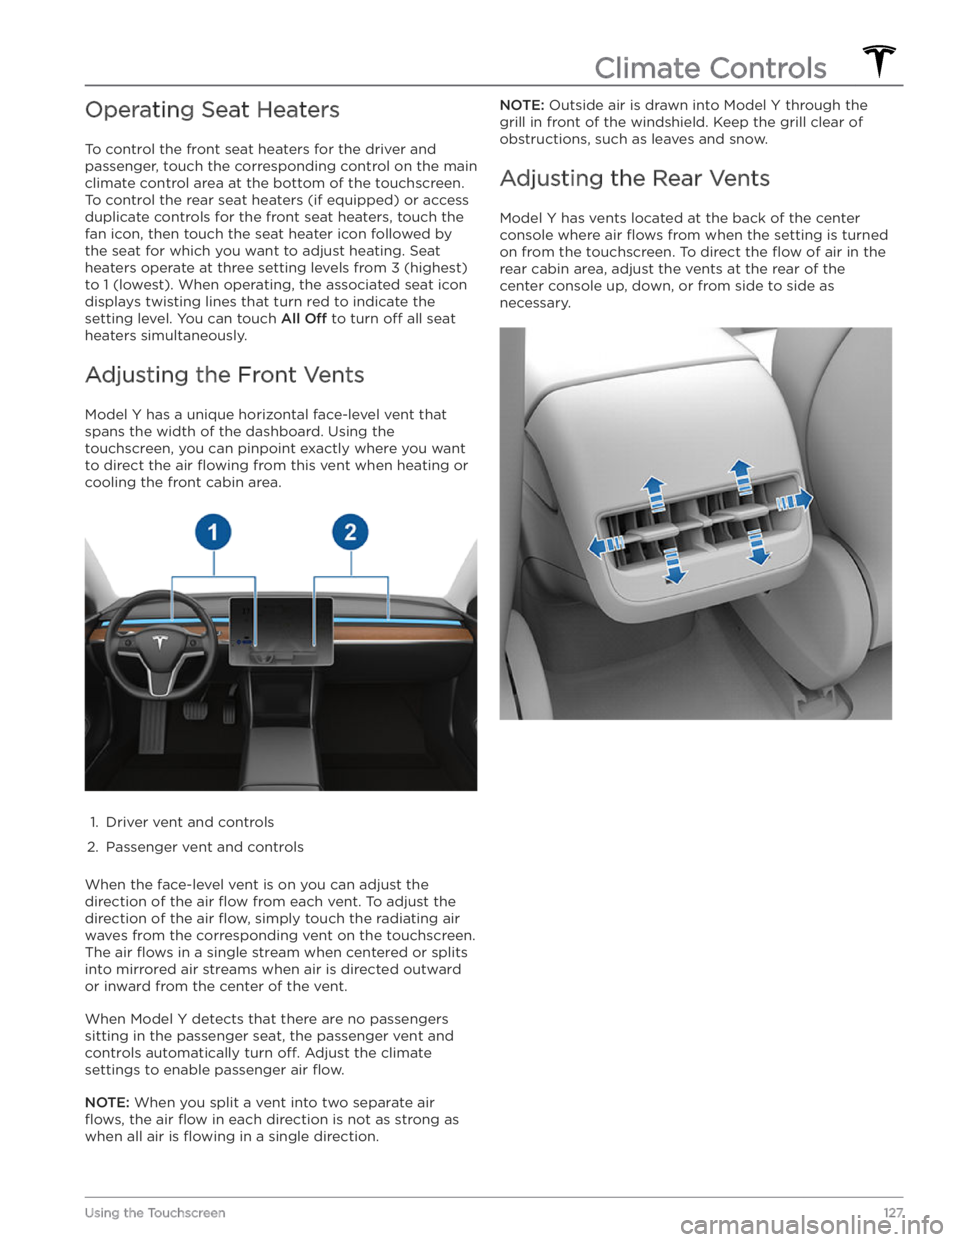
Adjusting the Front Vents
Model Y has a unique horizontal face-level vent that
spans the width of the dashboard. Using the
touchscreen, you can pinpoint exactly where you want to direct the air
flowing from this vent when heating or
cooling the front cabin area.
1.
Driver vent and controls
2.
Passenger vent and controls
When the face-level vent is on you can adjust the direction of the air
flow from each vent. To adjust the
direction of the air
flow, simply touch the radiating air
waves from the corresponding vent on the touchscreen.
The air
flows in a single stream when centered or splits
into mirrored air streams when air is directed outward or inward from the center of the vent.
When Model Y detects that there are no passengers
sitting in the passenger seat, the passenger vent and controls automatically turn
off. Adjust the climate
settings to enable passenger air
flow.
NOTE: When you split a vent into two separate air
flows, the air flow in each direction is not as strong as
when all air is
flowing in a single direction.
NOTE: Outside air is drawn into Model Y through the
grill in front of the windshield. Keep the grill clear of
obstructions, such as leaves and snow.
Adjusting the Rear Vents
Model Y has vents located at the back of the center
console where air
flows from when the setting is turned
on from the touchscreen. To direct the
flow of air in the
rear cabin area, adjust the vents at the rear of the center console up, down, or from side to side as necessary.
Climate Controls
127Using the Touchscreen
Page 223 of 232

(UMC_a017)
Charging speed reduced
High temperature detected by Mobile Connector
High temperature detected by Mobile Connector alerts indicate the outlet used to charge is becoming too warm, so charging has been slowed to protect the
outlet.
This is not typically an issue with your vehicle or your
Mobile Connector, but rather an issue with the outlet. A
warm outlet may be caused by a plug that is not fully inserted, a loose building wiring connection to the outlet, or an outlet that is beginning to wear out.
To regain normal charge speed, make sure your adapter
is fully plugged into the outlet. If charging speed does not return to normal, contact an electrician to inspect the outlet and building wiring connections to the outlet and complete any repairs needed.
If the outlet is worn, it should be replaced with a high-
quality outlet. Consider upgrading to a Tesla Wall
Connector for greater convenience and highest charging speed.
(VCFRONT_a182)
12V battery must be replaced soon
Software updates will not complete
until serviced
The 12V battery has aged or degraded and needs to be
replaced. Until the battery is replaced, vehicle software updates will not complete.
It is recommended to replace the battery at your earliest convenience. In the meantime, continue normal use of the vehicle.
The vehicle is still OK to drive with this alert present, for
a period of time. However, if you continually delay the 12V battery replacement, the vehicle may eventually not have enough power to start or restart.
If the 12V battery is too low to turn on the vehicle or open the doors, follow the instructions in
Jump Starting
the 12V Battery on page 195.
For more information on the battery system, see Battery
Information on page 156.
(VCFRONT_a192)
Electrical system power reduced
Vehicle may shut down
unexpectedly
The electrical system cannot maintain the voltage
required to support all vehicle features.
If you drive the vehicle while this alert is present, certain
features may be disabled or function at a reduced level due to the low voltage. It is also possible the vehicle will
shut down unexpectedly.
Try turning off non-critical features, like seat heaters or
cabin fans, to help the vehicle maintain electrical power
for as long as possible.
Eliminating or reducing usage of non-critical features
may allow the vehicle to reach its destination without
shutting down, although this is not guaranteed.
Schedule service before your next planned drive. The vehicle may shut down unexpectedly or may not restart without service.
(VCSEC_a221)
Air pressure below
recommendation for tires
Check pressure and refill air as
needed
This alert does NOT indicate that there is a flat tire.
The tire pressure monitoring system (TPMS) has detected that the air pressure in one or more of your
tires is at least 20% lower than the recommended cold tire pressure. This recommended pressure should be displayed on the Tire and Loading information label.
See Maintaining Tire Pressures on page 164 for detailed
information on how to keep the tires properly
inflated.
This alert may appear in cold weather because the tire pressure decreases when cold.
Page 229 of 232

reading light: 23
rear seats, adjusting and folding: 26
rear view camera: 69
rear window switches, disabling: 15
recent (Media Player): 136
Recents (navigation): 131
recording videos: 70, 144
regenerative braking: 61
relative speed limit: 117
release notes: 150
restarting the touchscreen: 49
Reverse gear: 51
RFID transponders: 177
roadside assistance: 193
roof racks: 181
rotating tires: 165
Round Trip Energy (navigating): 132
S
safety defects, reporting: 202
safety information: 31, 36, 43
airbags: 43
child seats: 36
seat belts: 31
schedule service: 151
scheduled charging: 160
scheduled departure: 160
using: 160
seat belts: 29, 30, 171
cleaning: 171
in a collision: 30
overview of: 29
pre-tensioners: 30
wearing when pregnant: 30
seat covers: 28
seat heaters: 125, 127
seating capacity: 179
seats: 25, 125
heaters: 125
security settings: 142
sensors: 81
Sentry Mode: 142
service data recording: 199
service intervals: 162
Settings, erasing: 124
shifting gears: 51
Show Calendar Upon Entry: 140
Side Clearance (Summon): 105
side collision warning: 111
slip start: 63
Smart Summon: 108
smartphone: 8, 11
authenticating as a key: 8
removing as a key: 11
Software Reinstall: 149
software reset: 124
software update preferences: 149
software updates: 149
software version: 7
specifications: 181, 183, 185
12V battery: 185
brakes: 183
cargo volume: 183
dimensions: 181
exterior: 181
High Voltage Battery: 185
interior: 181
motor: 183
steering: 183
subsystems: 183
suspension: 185
tires: 185
transmission: 183
weights: 183
wheels: 185
speed assist: 117
Speed Limit Mode: 123
speed limit warning: 117
stability control: 63
starting: 49
steering specifications: 183
steering wheel: 46, 53
adjusting position: 46
adjusting sensitivity: 46
buttons: 46
lights, controlling: 53
scroll buttons: 46
steering, automatic: 89
streaming radio: 135
streaming services: 135
summer tires: 168
Summon: 105
Summon Distance: 105
supercharging: 160
described: 160
idle fees: 160
pay-per-use fees: 160
suspension specifications: 185
Index