2020 Ram 3500 radio
[x] Cancel search: radioPage 453 of 568

SERVICING AND MAINTENANCE451
Cleaning Plastic Instrument Cluster
Lenses
The lenses in front of the instruments in this
vehicle are molded in clear plastic. When
cleaning the lenses, care must be taken to
avoid scratching the plastic.
1. Clean with a wet soft cloth. A mild soap
solution may be used, but do not use high
alcohol content or abrasive cleaners. If
soap is used, wipe clean with a clean damp
cloth.
2. Dry with a soft cloth.
LEATHER PARTS
Mopar Total Clean is specifically recommended
for leather upholstery.
Your leather upholstery can be best preserved
by regular cleaning with a damp soft cloth.
Small particles of dirt can act as an abrasive
and damage the leather upholstery and should
be removed promptly with a damp cloth.
Stubborn soils can be removed easily with a soft
cloth and Mopar Total Clean. Care should be taken to avoid soaking your leather upholstery
with any liquid. Please do not use polishes, oils,
cleaning fluids, solvents, detergents, or
ammonia-based cleaners to clean your leather
upholstery. Application of a leather conditioner
is not required to maintain the original
condition.
NOTE:
If equipped with light colored leather, it tends to
show any foreign material, dirt, and fabric dye
transfer more so than darker colors. The leather
is designed for easy cleaning, and FCA recom
-
mends Mopar total care leather cleaner applied
on a cloth to clean the leather seats as needed.
GLASS SURFACES
All glass surfaces should be cleaned on a
regular basis with Mopar Glass Cleaner, or any
commercial household-type glass cleaner.
Never use an abrasive type cleaner. Use caution
when cleaning the inside rear window equipped
with electric defrosters or windows equipped
with radio antennas. Do not use scrapers or
other sharp instruments that may scratch the
elements.
When cleaning the rear view mirror, spray
cleaner on the towel or cloth that you are using.
Do not spray cleaner directly on the mirror.
CAUTION!
Do not use Alcohol and Alcohol-based and/or
Ketone based cleaning products to clean
leather upholstery, as damage to the
upholstery may result.7
20_DJD2_OM_EN_USC_t.book Page 451
Page 474 of 568

472MULTIMEDIA
Tilt Side Mirrors In Reverse —
If Equipped On
Off
NOTE:
When the “Tilt Side Mirrors In Reverse” feature is selected, the exterior side-view mirrors tilt downward when the ignition is in the ON/RUN position
and the transmission gear selector is in the REVERSE position. The mirrors move back to their previous position when the transmission is shifted out
of REVERSE. Surround View Camera — If Equipped On
Off
NOTE:
The “Surround View Camera” feature displays a complete 360 degree view of the vehicle's exterior environment while backing up. Surround View Camera Delay — If Equipped On
Off
NOTE:
The “Surround View Camera Delay” setting determines whether or not the screen will display the 360 degree view image with guidelines for up to
10 seconds after the vehicle is shifted out of REVERSE. This delay will be canceled if the vehicle’s speed exceeds 8 mph (13 km/h), the transmission
is shifted into PARK, or the ignition is switched to the OFF position.
Surround View Camera Guidelines — If Equipped On
Off
NOTE:
The “Surround View Camera Guidelines” feature allows you to see active guidelines over the Surround View camera display whenever the gear
selector is put into REVERSE or the Surround View button on the touchscreen is pressed. The image will be displayed on the radio touchscreen display.
Setting Name Selectable Options
20_DJD2_OM_EN_USC_t.book Page 472
Page 475 of 568

MULTIMEDIA473
ParkView Backup Camera Active
Guidelines On
Off
NOTE:
Your vehicle may be equipped with the ParkView Backup Camera Active Guidelines that allows you to see active guidelines over the ParkView Backup
camera display whenever the gear selector is put into REVERSE. The image will be displayed on the radio touchscreen display along with a caution
note to “check entire surroundings” across the top of the screen. After five seconds, this note disappears. Fixed Guidelines On Off
ParkView Backup Camera Delay On Off
NOTE:
When the vehicle is shifted out of REVERSE (with camera delay turned OFF), the rear camera mode is exited and the navigation or audio screen
appears again. When the vehicle is shifted out of REVERSE (with camera delay turned ON), the rear view image with dynamic grid lines will be
displayed for up to 10 seconds after shifting out of REVERSE unless the forward vehicle speed exceeds 8 mph (12 km/h), the transmission is shifted
into PARK or the ignition is switched to the OFF position. Forward Facing Camera Guidelines — If Equipped On
Off
NOTE:
The “Forward Facing Camera Guidelines” feature is an off-road type of feature that shows the path of the tires based on the steering wheel input. CHMSL (Center High Mounted Stop Lamp) Camera Dynamic Centerline — If Equipped On
Off
NOTE:
When the “CHMSL Camera Dynamic Centerline” feature is selected, it will assist in backing up for trailer alignment and hook up. This feature is only
available if your vehicle is equipped with Surround View Camera.
Setting Name Selectable Options
9
20_DJD2_OM_EN_USC_t.book Page 473
Page 484 of 568

482MULTIMEDIA
SiriusXM® Setup — If Equipped
After pressing the SiriusXM® Setup button on the touchscreen, the following settings will be available:
Setting Name Selectable Options
Tune StartOnOff
Channel Skip List of Channels
NOTE:
SiriusXM® can be programmed to exclude undesirable channels while scanning. To make your selection, press the Channel Skip button on the touch -
screen, select the channels you would like to skip.
Subscription Info Sirius ID
NOTE:
New vehicle purchasers or lessees will receive a free limited time subscription to SiriusXM® Satellite Radio with your radio. Following the expiration
of the free services, it will be necessary to access the information on the Subscription Information screen to re-subscribe.
1. Press the Subscription Info button on the touchscreen to access the Subscription Information screen.
2. Write down the SIRIUS ID numbers for your receiver. To reactivate your service, either call the number listed on the screen or visit the provider online.
20_DJD2_OM_EN_USC_t.book Page 482
Page 485 of 568

MULTIMEDIA483
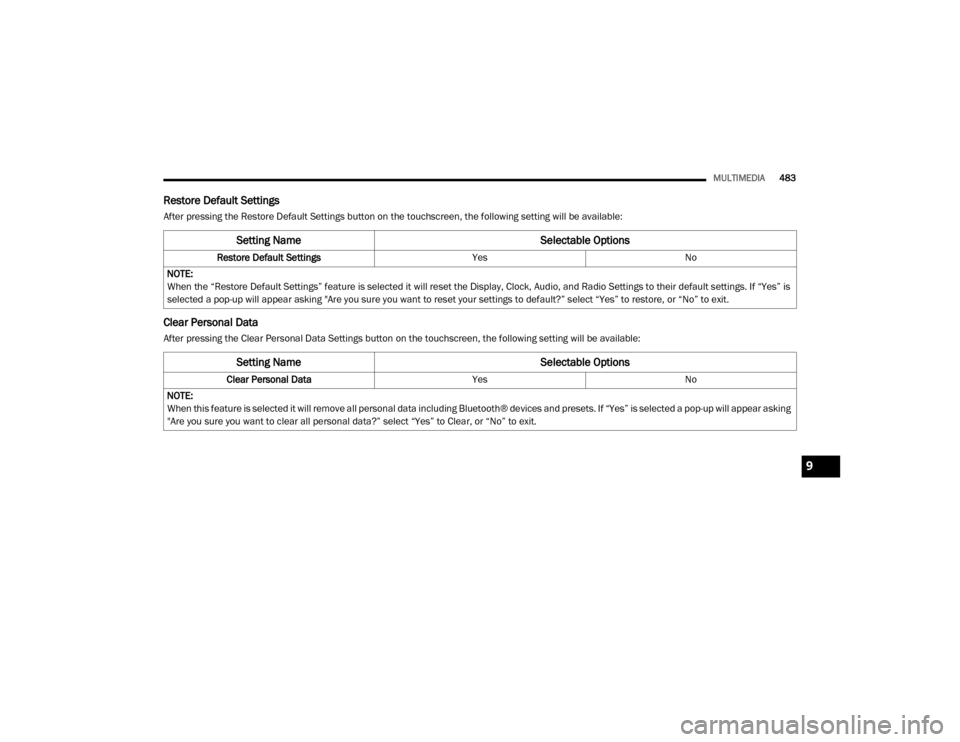
Restore Default Settings
After pressing the Restore Default Settings button on the touchscreen, the following setting will be available:
Clear Personal Data
After pressing the Clear Personal Data Settings button on the touchscreen, the following setting will be available:
Setting Name Selectable Options
Restore Default SettingsYesNo
NOTE:
When the “Restore Default Settings” feature is selected it will reset the Display, Clock, Audio, and Radio Settings to their default settings. If “Yes” is
selected a pop-up will appear asking "Are you sure you want to reset your settings to default?” select “Yes” to restore, or “No” to exit.
Setting Name Selectable Options
Clear Personal DataYesNo
NOTE:
When this feature is selected it will remove all personal data including Bluetooth® devices and presets. If “Yes” is selected a pop-up will appear asking
"Are you sure you want to clear all personal data?” select “Yes” to Clear, or “No” to exit.
9
20_DJD2_OM_EN_USC_t.book Page 483
Page 487 of 568

MULTIMEDIA485
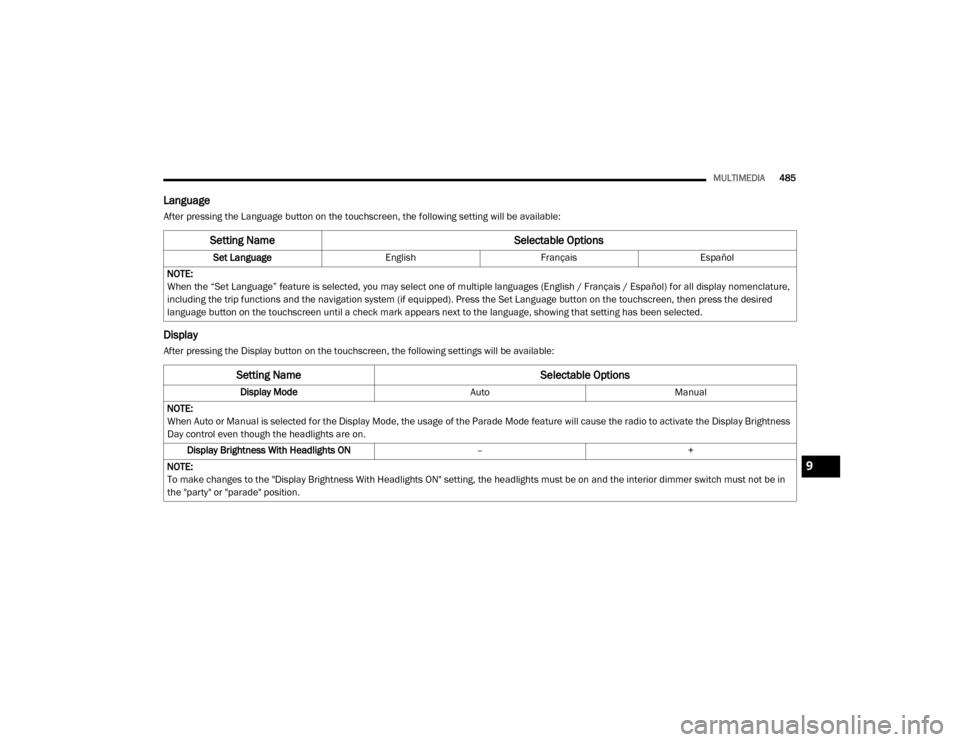
Language
After pressing the Language button on the touchscreen, the following setting will be available:
Display
After pressing the Display button on the touchscreen, the following settings will be available:
Setting Name Selectable Options
Set LanguageEnglishFrançais Español
NOTE:
When the “Set Language” feature is selected, you may select one of multiple languages (English / Français / Español) for all display nomenclature,
including the trip functions and the navigation system (if equipped). Press the Set Language button on the touchscreen, then press the desired
language button on the touchscreen until a check mark appears next to the language, showing that setting has been selected.
Setting Name Selectable Options
Display ModeAutoManual
NOTE:
When Auto or Manual is selected for the Display Mode, the usage of the Parade Mode feature will cause the radio to activate the Display Brightness
Day control even though the headlights are on. Display Brightness With Headlights ON –+
NOTE:
To make changes to the "Display Brightness With Headlights ON" setting, the headlights must be on and the interior dimmer switch must not be in
the "party" or "parade" position.
9
20_DJD2_OM_EN_USC_t.book Page 485
Page 490 of 568

488MULTIMEDIA
Camera
After pressing the Camera button on the touchscreen, the following settings will be available: Time Format
12 hrs
24 hrs
AM PM
Show Time In Status Bar — If Equipped OnOff
NOTE:
The “Show Time In Status Bar” feature allows you to turn on or shut off the digital clock in the status bar.
Setting Name Selectable Options
Setting NameSelectable Options
Surround View Camera — If Equipped OnOff
NOTE:
The “Surround View Camera” feature displays a complete 360 degree view of the vehicle's exterior environment while backing up. Surround View Camera Delay — If Equipped OnOff
NOTE:
The “Surround View Camera Delay” setting determines whether or not the screen will display the 360 degree view image with guidelines for up to
10 seconds after the vehicle is shifted out of REVERSE. This delay will be canceled if the vehicle’s speed exceeds 8 mph (13 km/h), the transmission
is shifted into PARK, or the ignition is switched to the OFF position.
Surround View Camera Guidelines — If Equipped OnOff
NOTE:
The “Surround View Camera Guidelines” feature allows you to see active guidelines over the Surround View camera display whenever the gear
selector is put into REVERSE, or the Surround View button on the touchscreen is pressed. The image will be displayed on the radio touchscreen
display.
20_DJD2_OM_EN_USC_t.book Page 488
Page 492 of 568

490MULTIMEDIA
Safety & Driving Assistance
After pressing the Safety & Driving Assistance button on the touchscreen, the following settings will be available:
Setting Name Selectable Options
Surround View Camera — If
Equipped On
Off
NOTE:
The “Surround View Camera” feature displays a complete 360 degree view of the vehicle's exterior environment while backing up. Surround View Camera Delay — If Equipped On
Off
NOTE:
The “Surround View Camera Delay” setting determines whether or not the screen will display the 360 degree view image with guidelines for up to
10 seconds after the vehicle is shifted out of REVERSE. This delay will be canceled if the vehicle’s speed exceeds 8 mph (13 km/h), the transmission
is shifted into PARK, or the ignition is switched to the OFF position.
Surround View Camera Guidelines — If Equipped On
Off
NOTE:
The “Surround View Camera Guidelines” feature allows you to see active guidelines over the Surround View camera display whenever the gear
selector is put into REVERSE, or the Surround View button on the touchscreen is pressed. The image will be displayed on the radio touchscreen
display. ParkView Backup Camera Delay On Off
NOTE:
The “ParkView Backup Camera Delay” setting determines whether or not the screen will display the rear view image with dynamic grid lines for up to
10 seconds after the vehicle is shifted out of REVERSE. This delay will be canceled if the vehicle’s speed exceeds 8 mph (13 km/h), the transmission
is shifted into PARK, or the ignition is switched to the OFF position.
20_DJD2_OM_EN_USC_t.book Page 490