Page 479 of 553
MULTIMEDIA477
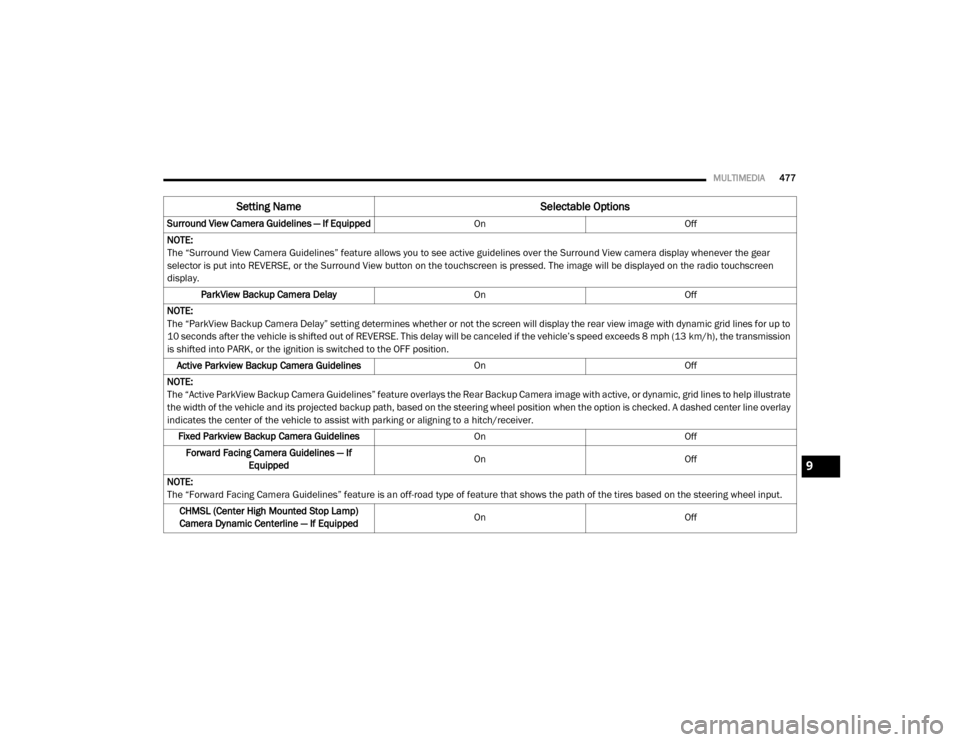
Surround View Camera Guidelines — If Equipped OnOff
NOTE:
The “Surround View Camera Guidelines” feature allows you to see active guidelines over the Surround View camera display whenever the gear
selector is put into REVERSE, or the Surround View button on the touchscreen is pressed. The image will be displayed on the radio touchscreen
display. ParkView Backup Camera Delay OnOff
NOTE:
The “ParkView Backup Camera Delay” setting determines whether or not the screen will display the rear view image with dynamic grid lines for up to
10 seconds after the vehicle is shifted out of REVERSE. This delay will be canceled if the vehicle’s speed exceeds 8 mph (13 km/h), the transmission
is shifted into PARK, or the ignition is switched to the OFF position. Active Parkview Backup Camera Guidelines OnOff
NOTE:
The “Active ParkView Backup Camera Guidelines” feature overlays the Rear Backup Camera image with active, or dynamic, grid lines to help illustrate
the width of the vehicle and its projected backup path, based on the steering wheel position when the option is checked. A dashed center line overlay
indicates the center of the vehicle to assist with parking or aligning to a hitch/receiver. Fixed Parkview Backup Camera Guidelines OnOff
Forward Facing Camera Guidelines — If Equipped On
Off
NOTE:
The “Forward Facing Camera Guidelines” feature is an off-road type of feature that shows the path of the tires based on the steering wheel input. CHMSL (Center High Mounted Stop Lamp)
Camera Dynamic Centerline — If Equipped On
Off
Setting Name Selectable Options
9
20_DJD2_OM_EN_USC_t.book Page 477
Page 480 of 553
478MULTIMEDIA
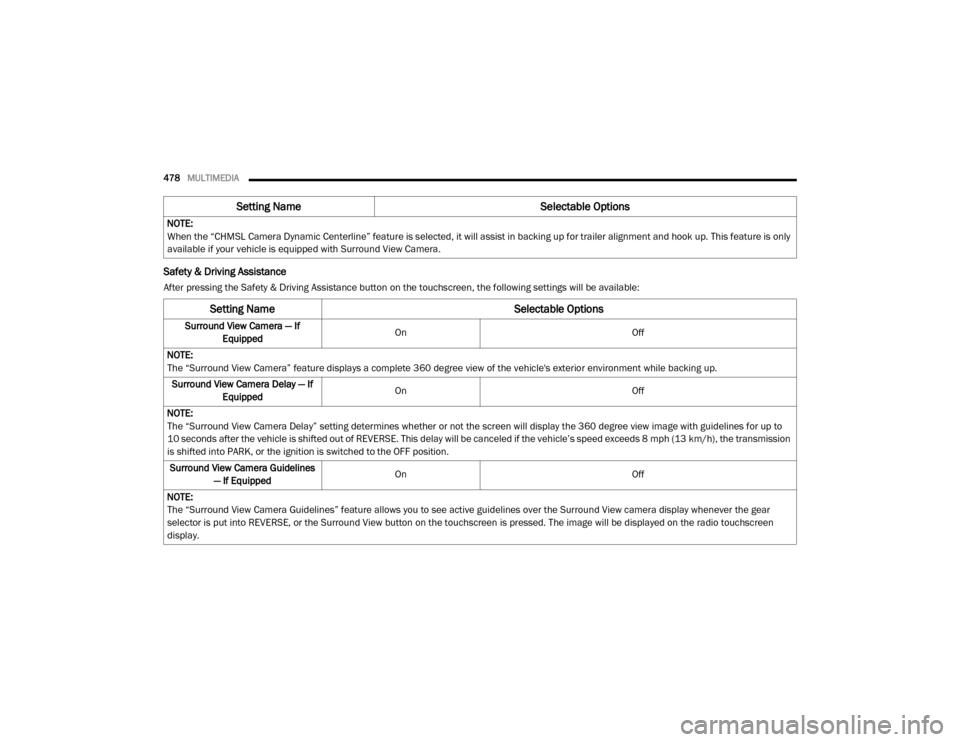
Safety & Driving Assistance
After pressing the Safety & Driving Assistance button on the touchscreen, the following settings will be available:NOTE:
When the “CHMSL Camera Dynamic Centerline” feature is selected, it will assist in backing up for trailer alignment and hook up. This feature is only
available if your vehicle is equipped with Surround View Camera.
Setting Name
Selectable Options
Setting NameSelectable Options
Surround View Camera — If
Equipped On
Off
NOTE:
The “Surround View Camera” feature displays a complete 360 degree view of the vehicle's exterior environment while backing up. Surround View Camera Delay — If Equipped On
Off
NOTE:
The “Surround View Camera Delay” setting determines whether or not the screen will display the 360 degree view image with guidelines for up to
10 seconds after the vehicle is shifted out of REVERSE. This delay will be canceled if the vehicle’s speed exceeds 8 mph (13 km/h), the transmission
is shifted into PARK, or the ignition is switched to the OFF position. Surround View Camera Guidelines — If Equipped On
Off
NOTE:
The “Surround View Camera Guidelines” feature allows you to see active guidelines over the Surround View camera display whenever the gear
selector is put into REVERSE, or the Surround View button on the touchscreen is pressed. The image will be displayed on the radio touchscreen
display.
20_DJD2_OM_EN_USC_t.book Page 478
Page 481 of 553
MULTIMEDIA479
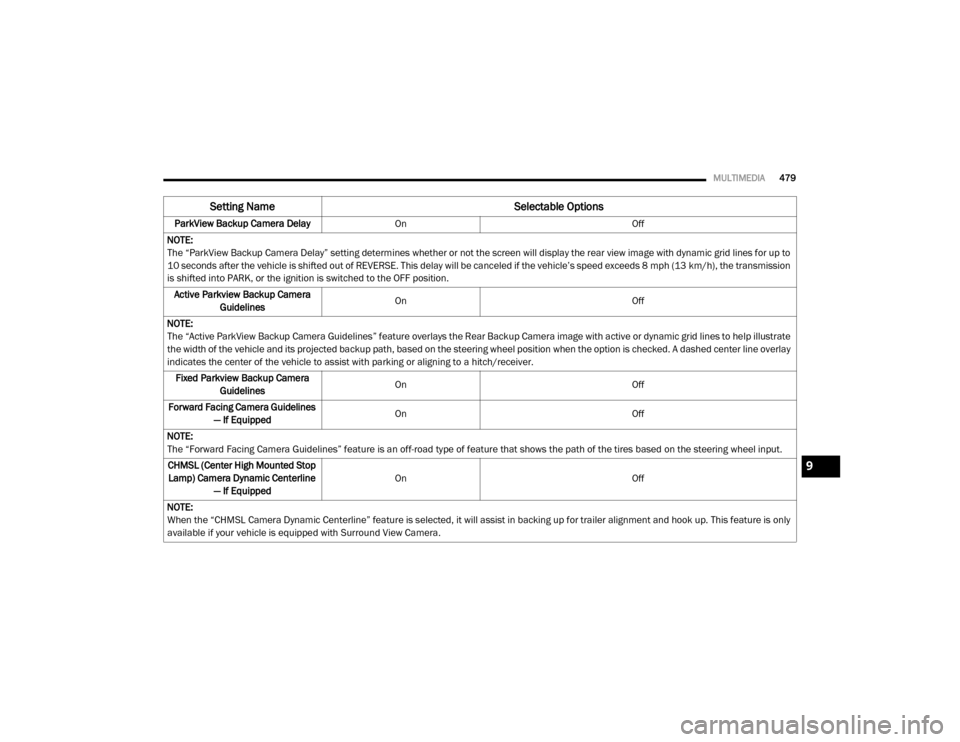
ParkView Backup Camera Delay On Off
NOTE:
The “ParkView Backup Camera Delay” setting determines whether or not the screen will display the rear view image with dynamic grid lines for up to
10 seconds after the vehicle is shifted out of REVERSE. This delay will be canceled if the vehicle’s speed exceeds 8 mph (13 km/h), the transmission
is shifted into PARK, or the ignition is switched to the OFF position. Active Parkview Backup Camera Guidelines On
Off
NOTE:
The “Active ParkView Backup Camera Guidelines” feature overlays the Rear Backup Camera image with active or dynamic grid lines to help illustrate
the width of the vehicle and its projected backup path, based on the steering wheel position when the option is checked. A dashed center line overlay
indicates the center of the vehicle to assist with parking or aligning to a hitch/receiver. Fixed Parkview Backup Camera Guidelines On
Off
Forward Facing Camera Guidelines — If Equipped On
Off
NOTE:
The “Forward Facing Camera Guidelines” feature is an off-road type of feature that shows the path of the tires based on the steering wheel input. CHMSL (Center High Mounted Stop Lamp) Camera Dynamic Centerline — If Equipped On
Off
NOTE:
When the “CHMSL Camera Dynamic Centerline” feature is selected, it will assist in backing up for trailer alignment and hook up. This feature is only
available if your vehicle is equipped with Surround View Camera.
Setting Name Selectable Options
9
20_DJD2_OM_EN_USC_t.book Page 479
Page 488 of 553
486MULTIMEDIA
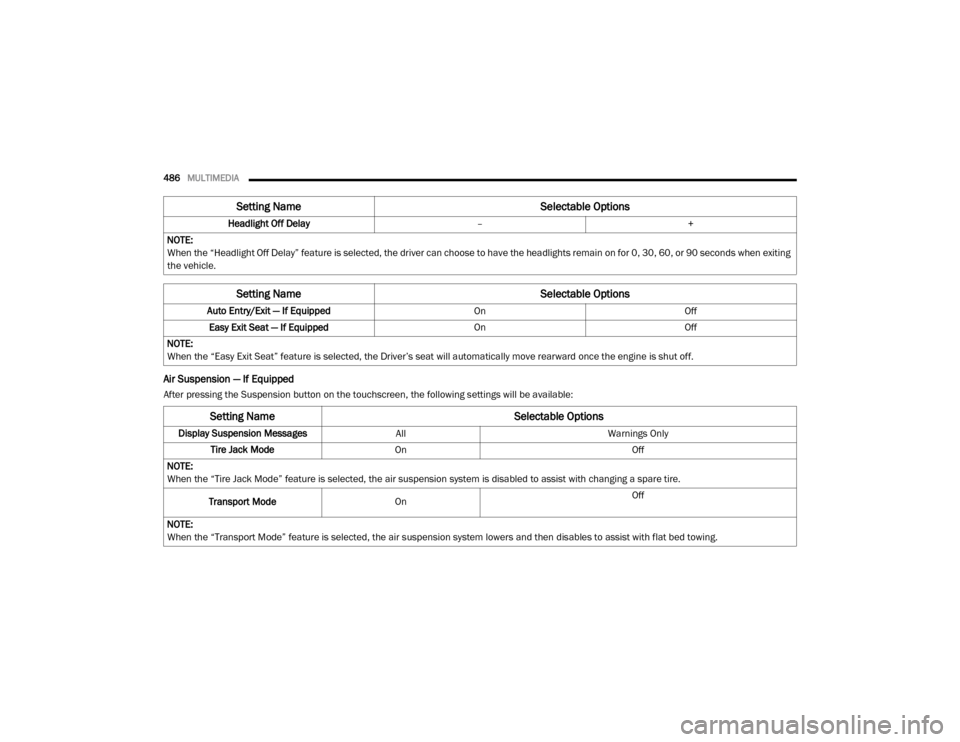
Air Suspension — If Equipped
After pressing the Suspension button on the touchscreen, the following settings will be available: Headlight Off Delay
–+
NOTE:
When the “Headlight Off Delay” feature is selected, the driver can choose to have the headlights remain on for 0, 30, 60, or 90 seconds when exiting
the vehicle.
Setting Name Selectable Options
Auto Entry/Exit — If EquippedOnOff
Easy Exit Seat — If Equipped OnOff
NOTE:
When the “Easy Exit Seat” feature is selected, the Driver’s seat will automatically move rearward once the engine is shut off.
Setting Name Selectable Options
Setting NameSelectable Options
Display Suspension MessagesAllWarnings Only
Tire Jack Mode On Off
NOTE:
When the “Tire Jack Mode” feature is selected, the air suspension system is disabled to assist with changing a spare tire.
Transport Mode On Off
NOTE:
When the “Transport Mode” feature is selected, the air suspension system lowers and then disables to assist with flat bed towing.
20_DJD2_OM_EN_USC_t.book Page 486
Page 490 of 553
488MULTIMEDIA
NOTE:
For further information about Trailer Tire Pressure Monitoring, refer to “Auxiliary Driving Systems” in “Safety.”
Audio
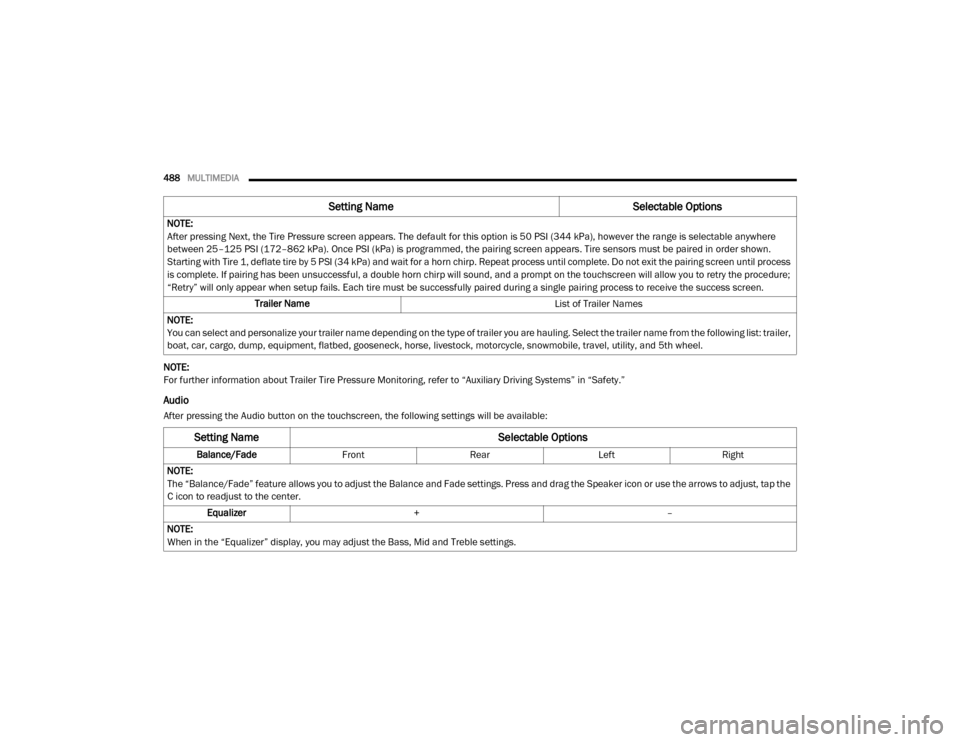
After pressing the Audio button on the touchscreen, the following settings will be available:NOTE:
After pressing Next, the Tire Pressure screen appears. The default for this option is 50 PSI (344 kPa), however the range is selectable anywhere
between 25–125 PSI (172–862 kPa). Once PSI (kPa) is programmed, the pairing screen appears. Tire sensors must be paired in order shown.
Starting with Tire 1, deflate tire by 5 PSI (34 kPa) and wait for a horn chirp. Repeat process until complete. Do not exit the pairing screen until process
is complete. If pairing has been unsuccessful, a double horn chirp will sound, and a prompt on the touchscreen will allow you to retry the procedure;
“Retry” will only appear when setup fails. Each tire must be successfully paired during a single pairing process to receive the success screen.
Trailer Name List of Trailer Names
NOTE:
You can select and personalize your trailer name depending on the type of trailer you are hauling. Select the trailer name from the following list: trailer,
boat, car, cargo, dump, equipment, flatbed, gooseneck, horse, livestock, motorcycle, snowmobile, travel, utility, and 5th wheel.
Setting Name Selectable Options
Setting NameSelectable Options
Balance/Fade Front Rear LeftRight
NOTE:
The “Balance/Fade” feature allows you to adjust the Balance and Fade settings. Press and drag the Speaker icon or use the arrows to adjust, tap the
C icon to readjust to the center. Equalizer + –
NOTE:
When in the “Equalizer” display, you may adjust the Bass, Mid and Treble settings.
20_DJD2_OM_EN_USC_t.book Page 488
Page 491 of 553
MULTIMEDIA489
Phone/Bluetooth® Settings
After pressing the Phone/Bluetooth® Settings button on the touchscreen, the following settings will be available:Speed Adjusted Volume
Off123
NOTE:
The “Speed Adjusted Volume” feature increases or decreases volume relative to vehicle speed. Surround Sound — If Equipped On
Off
NOTE:
The “Surround Sound” feature provides simulated surround sound mode. AUX Volume Offset — If Equipped On
Off
NOTE:
The “AUX Volume Offset” feature provides the ability to tune the audio level for portable devices connected through the AUX input. Auto Play On Off
Setting Name Selectable Options
Setting NameSelectable Options
Phone Pop-ups Displayed in Cluster — If
Equipped On
Off
Do Not Disturb List of Settings
NOTE:
Press “Do Not Disturb” to access the available settings. The following settings are: Auto Reply (Both, Text, Call), Auto Reply Message (Custom, Default),
and Custom Auto Reply Message (Create Message).9
20_DJD2_OM_EN_USC_t.book Page 489
Page 494 of 553
492MULTIMEDIA
Clear Personal Data
After pressing the Clear Personal Data Settings button on the touchscreen, the following settings will be available:
System Information — If Equipped
After pressing the System Information button on the touchscreen, the following settings will be available:
Setting Name Selectable Options
Clear Personal DataYesCancel
NOTE:
When this feature is selected it will remove all personal data including Bluetooth® devices and presets. If “Yes” is selected a pop-up will appear asking
"Are you sure you want to clear all personal data?” select “Yes” to Clear, or “Cancel” to exit.
Setting Name Selectable Options
Software License System Software Information Screen
NOTE:
When the “Software License” feature is selected, a “System Software Information” screen will appear, displaying the system software version.
20_DJD2_OM_EN_USC_t.book Page 492
Page 495 of 553
MULTIMEDIA493
Uconnect 4C NAV With 12-inch Display
Settings
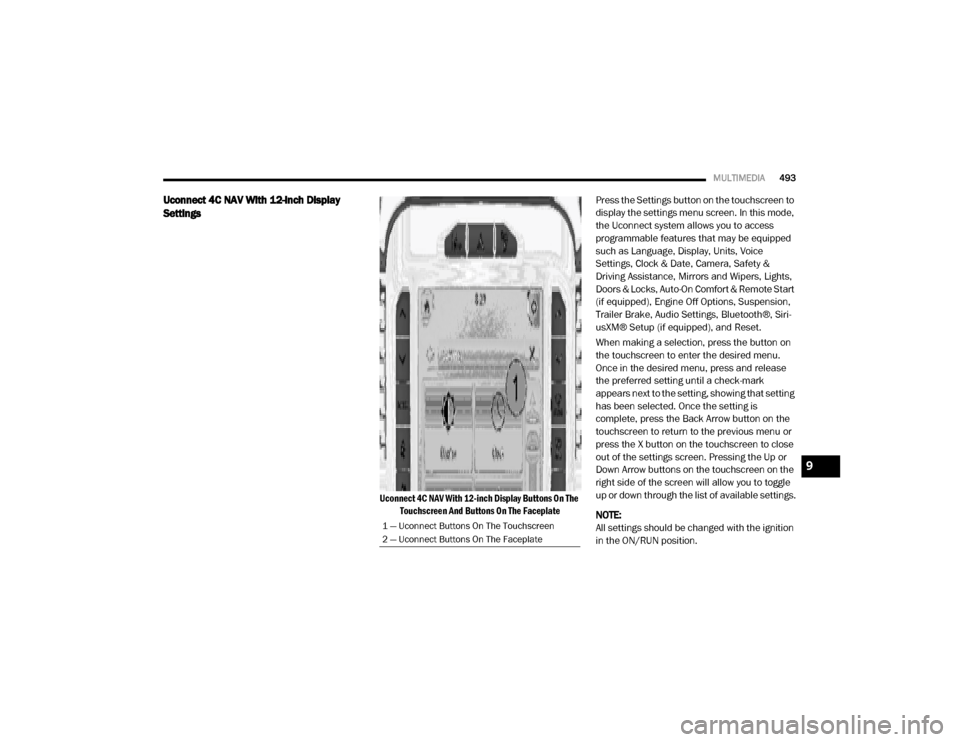
Uconnect 4C NAV With 12-inch Display Buttons On The
Touchscreen And Buttons On The Faceplate
Press the Settings button on the touchscreen to
display the settings menu screen. In this mode,
the Uconnect system allows you to access
programmable features that may be equipped
such as Language, Display, Units, Voice
Settings, Clock & Date, Camera, Safety &
Driving Assistance, Mirrors and Wipers, Lights,
Doors & Locks, Auto-On Comfort & Remote Start
(if equipped), Engine Off Options, Suspension,
Trailer Brake, Audio Settings, Bluetooth®, Siri-
usXM® Setup (if equipped), and Reset.
When making a selection, press the button on
the touchscreen to enter the desired menu.
Once in the desired menu, press and release
the preferred setting until a check-mark
appears next to the setting, showing that setting
has been selected. Once the setting is
complete, press the Back Arrow button on the
touchscreen to return to the previous menu or
press the X button on the touchscreen to close
out of the settings screen. Pressing the Up or
Down Arrow buttons on the touchscreen on the
right side of the screen will allow you to toggle
up or down through the list of available settings.
NOTE:
All settings should be changed with the ignition
in the ON/RUN position.
1 — Uconnect Buttons On The Touchscreen
2 — Uconnect Buttons On The Faceplate
9
20_DJD2_OM_EN_USC_t.book Page 493