2020 Peugeot Partner tailgate
[x] Cancel search: tailgatePage 14 of 260

12
Instruments
Parking brakeFixed.
The parking brake is applied or not
properly released.
Maximum engine coolant temperature
90° CFixed (warning lamp or LED), with
the needle in the red zone
(depending on version).
The cooling system temperature is too high.
Carry out (1), then allow the engine to cool
before topping up the level, if necessary. If the
problem persists, carry out (2).
Battery chargeFixed.
The battery charging circuit has a fault
(dirty or loose terminals, slack or cut alternator
belt, etc.).
Clean and retighten the terminals. If the warning
lamp does not go off when the engine is started,
carry out (2).
Power steeringFixed.
The power steering has a fault.
Drive carefully at moderate speed, then carry
out (3).
Seat belts not fastened / unfastenedFixed or flashing, accompanied by
an increasing audible signal.
A seat belt has not been fastened or has been
unfastened (depending on version).
Door openFixed, associated with a message
identifying the access.
An audible signal supplements the alert if the
speed is higher than 6 mph (10 km/h).
A door, the boot, the tailgate or the tailgate
screen is still open (depending on version).
Close the access.
If your vehicle is equipped with a right-hand
hinged door, its opening will not be indicated by
this warning lamp.
Electric parking brakeFixed.
The electric parking brake is applied.
Orange warning/indicator lamps
Automatic functions (with electric parking
brake)
Fixed.
The "automatic application" (on switching
off the engine) and "automatic release" functions
are deactivated.
Activate the functions again.
Malfunction (with electric parking brake)Fixed, accompanied
by the message
"Parking brake fault".
The parking brake no longer delivers optimum
performance for parking the vehicle safely in all
circumstances.
Make the vehicle safe:
►
Park on a level surface.
►
With a manual gearbox, engage a gear
.►
With an automatic gearbox, with
P
selected,
place the supplied chocks against one of the
wheels.
Then carry out (2).
Flashing, when the vehicle
is started.
The parking brake has not been properly
released.
Carry out (1) and try to fully release the parking
brake using the control lever, with your foot on
the brake pedal.
If the problem persists, carry out (2).
Fixed, accompanied by the
message "Parking brake
fault".
The parking brake is faulty: manual and
automatic functions may not be working.
When stationary, to immobilise the vehicle:
►
Pull and hold the control lever for
approximately 7 to 15 seconds, until the indicator
lamp comes on in the instrument panel.
If this procedure does not work, secure the
vehicle:
►
Park on a level surface.
►
With a manual gearbox, engage a gear
.
►
With an automatic gearbox, select
P
, then
place the supplied chocks against one of the
wheels.
Then carry out (2).
Fixed, accompanied by the
message "Parking brake fault".
The vehicle cannot be immobilised with the
engine running.
Page 27 of 260

25
Access
2If the vehicle is unlocked but the doors or
tailgate are not subsequently opened, the
vehicle will automatically lock itself again after
approximately 30
seconds. If the vehicle is
fitted with an alarm, it will also be reactivated
automatically.
Automatic door mirror folding and unfolding can be deactivated by a
PEUGEOT dealer or a qualified workshop.
As a safety measure, never leave the vehicle, even for a short time, without
taking the Keyless Entry and Starting
system’s electronic key with you.
Be aware of the risk of theft of the vehicle if
the key is present in one of the defined areas
while the vehicle is unlocked.
To preserve the battery charge in the electronic key and the vehicle's battery,
the "hands-free" functions are set to
hibernation mode after 21 days without use.
To restore these functions, press one of the
remote control buttons or start the engine with
the electronic key in the reader.
For more information on starting with the
Keyless Entry and Starting system, refer to
the corresponding section.
Electrical interference
The electronic key may not operate if
close to certain electronic devices: telephone
(switched on or on standby), laptop computer,
strong magnetic fields, etc.
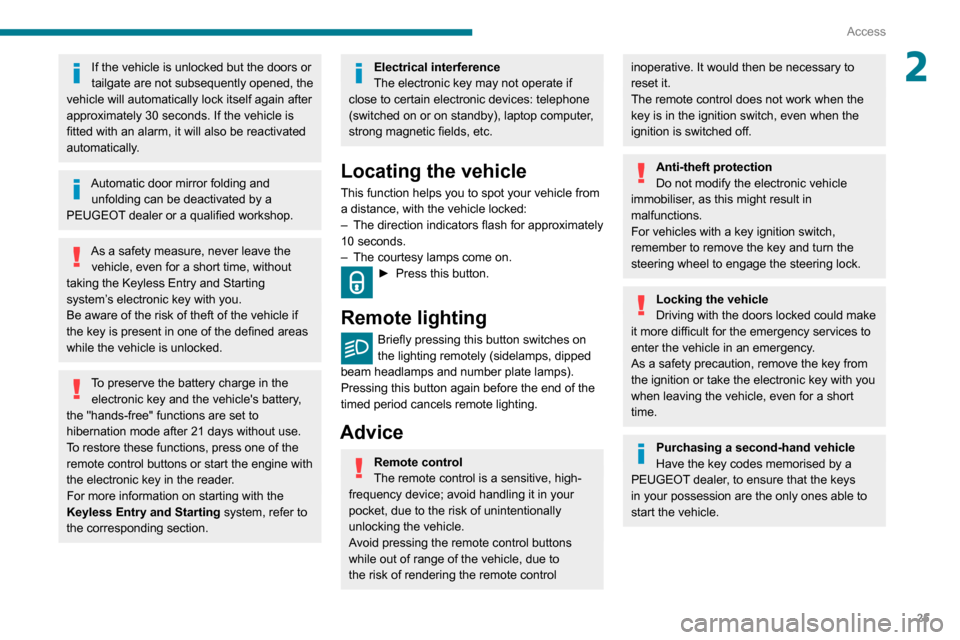
Locating the vehicle
This function helps you to spot your vehicle from
a distance, with the vehicle locked:
–
The direction indicators flash for approximately
10 seconds.
–
The courtesy lamps come on.
► Press this button.
Remote lighting
Briefly pressing this button switches on
the lighting remotely (sidelamps, dipped
beam headlamps and number plate lamps).
Pressing this button again before the end of the
timed period cancels remote lighting.
Advice
Remote control
The remote control is a sensitive, high-
frequency device; avoid handling it in your
pocket, due to the risk of unintentionally
unlocking the vehicle.
Avoid pressing the remote control buttons
while out of range of the vehicle, due to
the risk of rendering the remote control
inoperative. It would then be necessary to
reset it.
The remote control does not work
when the
key is in the ignition switch, even when the
ignition is switched off.
Anti-theft protection
Do not modify the electronic vehicle
immobiliser, as this might result in
malfunctions.
For vehicles with a key ignition switch,
remember to remove the key and turn the
steering wheel to engage the steering lock.
Locking the vehicle
Driving with the doors locked could make
it more difficult for the emergency services to
enter the vehicle in an emergency.
As a safety precaution, remove the key from
the ignition or take the electronic key with you
when leaving the vehicle, even for a short
time.
Purchasing a second-hand vehicle
Have the key codes memorised by a
PEUGEOT dealer, to ensure that the keys
in your possession are the only ones able to
start the vehicle.
Page 29 of 260

27
Access
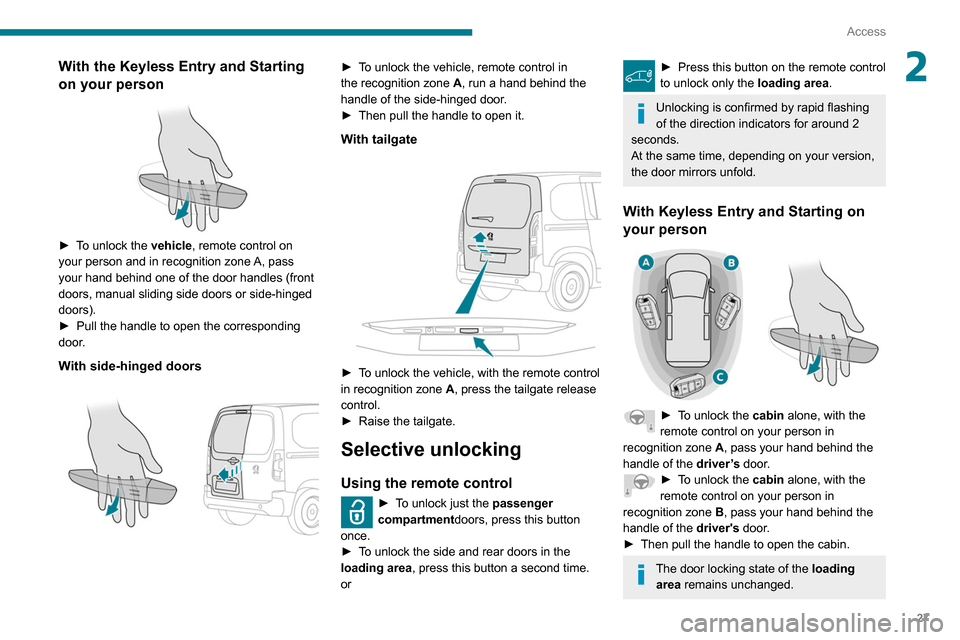
2With the Keyless Entry and Starting
on your person
► To unlock the vehicle, remote control on
your person and in recognition zone A, pass
your hand behind one of the door handles (front
doors, manual sliding side doors or side-hinged
doors).
►
Pull the handle to open the corresponding
door
.
With side-hinged doors
► To unlock the vehicle, remote control in
the recognition zone A, run a hand behind the
handle of the side-hinged door.
►
Then pull the handle to open it.
With tailgate
► To unlock the vehicle, with the remote control
in recognition zone A, press the tailgate release
control.
►
Raise the tailgate.
Selective unlocking
Using the remote control
► To unlock just the passenger
compartmentdoors, press this button
once.
►
T
o unlock the side and rear doors in the
loading area, press this button a second time.
or
► Press this button on the remote control
to unlock only the loading area.
Unlocking is confirmed by rapid flashing
of the direction indicators for around 2
seconds.
At the same time, depending on your version,
the door mirrors unfold.
With Keyless Entry and Starting on
your person
► To unlock the cabin alone, with the
remote control on your person in
recognition zone A, pass your hand behind the
handle of the driver’s door.
► To unlock the cabin alone, with the
remote control on your person in
recognition zone B, pass your hand behind the
handle of the driver's door.
►
Then pull the handle to open the cabin.
The door locking state of the loading area remains unchanged.
Page 30 of 260

28
Access
► To unlock the loading area alone, with the
remote control on your person in the recognition
zone A, B or C, pass your hand behind a handle
of the left side door, right side door or the rear
door (the left-hand hinged door or the tailgate).
►
Then pull the handle to open the loading
area.
Depending on version, the door mirrors
unfold only when the cabin is unlocked,
the alarm is deactivated.
Unlocking
Unlocking is signalled by rapid flashing of
the direction indicators for a few
seconds.
Depending on version, the door mirrors unfold
and the alarm is deactivated.
With the key
► To completely unlock the vehicle, insert the
key in the lock then turn it towards the front of
the vehicle.
►
Then pull the handle to open the door
.
If fitted to your vehicle, the alarm is not
deactivated. Opening a door will trigger the
alarm, which can be stopped by switching the
ignition on.
Using the remote control
► Press this button to unlock the vehicle.
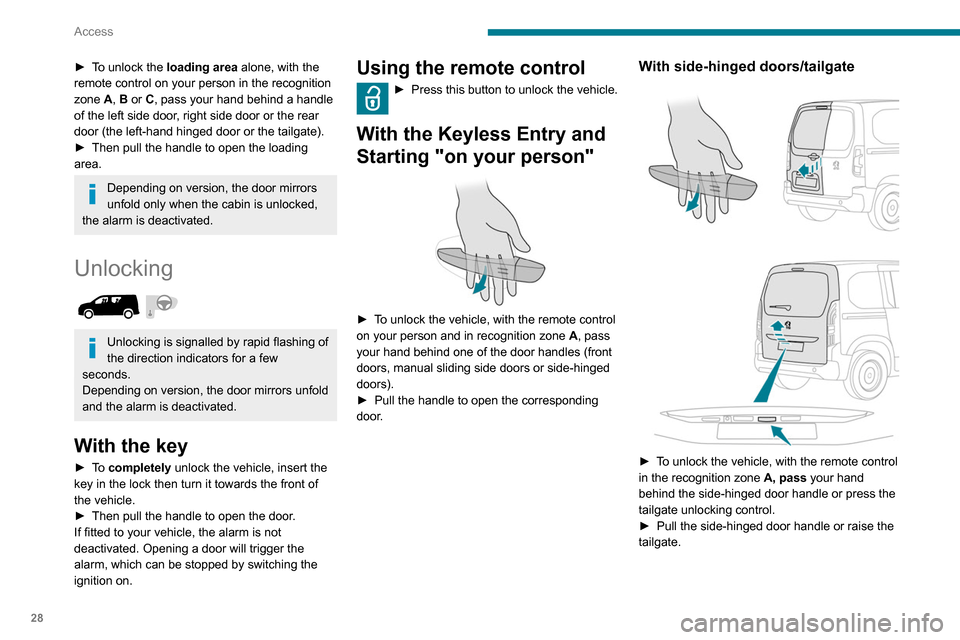
With the Keyless Entry and
Starting "on your person"
► To unlock the vehicle, with the remote control
on your person and in recognition zone A, pass
your hand behind one of the door handles (front
doors, manual sliding side doors or side-hinged
doors).
►
Pull the handle to open the corresponding
door
.
With side-hinged doors/tailgate
► To unlock the vehicle, with the remote control
in the recognition zone A, pass
your hand
behind the side-hinged door handle or press the
tailgate unlocking control.
►
Pull the side-hinged door handle or raise the
tailgate.
Page 33 of 260

31
Access
2In the event of a malfunction of the
central locking system, the battery must
be disconnected to ensure that the vehicle is
locked fully.
Locking part of the vehicle (front
passenger door/sliding side door/
side-hinged doors)
► With a sliding side door or side-hinged
doors, if fitted to your vehicle, check that the
electric child lock is not activated.
►
Open the door
.
Front passenger door
Sliding side door
Side-hinged doors
► Remove the cap located on the edge of the
door
.
►
Insert the integral key into the latch (without
forcing) and then turn
the assembly.
►
Remove the key and refit the cap.
►
Close the door(s) and check from the outside
that the vehicle is locked correctly
.
Unlocking of one part of the vehicle
(front passenger door/sliding side
door/side-hinged doors)
► Use the interior opening handle.
or
►
With
side-hinged doors , insert the integral
key in the (left-hand) door lock, then turn it.
For more information on the Child lock
on a sliding side door or side-hinged
doors, refer to the corresponding section.
Unlocking the tailgate
► From inside the vehicle, insert a small
screwdriver into hole A
on the lock to unlock the
tailgate.
►
Move the latch to the left.
If the battery is discharged and your
vehicle is equipped with a tailgate and
an
Multi-Flex bench seat, you will not be able
to access the loading area.
Replace the battery to regain access.
For more information on the 12 V battery,
refer to the corresponding section.
In the event of a malfunction or if you
experience difficulty opening or closing
the tailgate, have it checked by a PEUGEOT
dealer or a qualified workshop without delay,
to avoid the issue deteriorating and prevent
any risk of the tailgate dropping, potentially
causing serious injury.
Page 55 of 260

53
Ease of use and comfort
3Moving the partition
Moving the partition forwards
► Fold the backrests of the row 2 seats and
check that they are properly folded. If necessary ,
adjust the position of the row 1 seats (moving
them forwards).
►
Release the upper latches A
and B.
►
Check that the latches
C and D are retracted.
►
Slide the partition forwards.
►
Lock the lower latches C
and D and then
check that the locating pins are correctly
engaged in their housings.
►
Lock the upper latches A
and B.
Moving the partition backwards
► Release the upper latchesA and B.
► Release the lower latches C
and D.
►
Slide the partition backwards.
►
Lock the upper latches A
and B.
►
Return the backrests of the row 2 seats to
their positions.
The upper stops may be adjusted if: – excessive force is needed to operate
the upper latches A
and B.
–
there is noise while driving, caused by
excessive play
.
When the partition is locked behind the
row 2 or row 1 seats, an engagement
noise tells you that the upper latches are
closed.
A visible mark and a coloured mark show the
position of the latches.
The partition must not be moved with the latches extended - risk of scratches or
damage to the plastic trims!
The partition must never be removed to convert the vehicle from a commercial
vehicle to a passenger vehicle.
This would pose a risk to the safety of users
due to the absence of a child lock on the
tailgate (mandatory on passenger vehicles).
Opening/closing the hatch
► Open/close the hatch using the latch.
► Use the stay to keep it in the open position.
Always close the hatch and raise the backrest of the outer passenger seat(s)
(depending on the position of the partition)
when you are not carrying a long load.
Avoid placing loads on the hatch sill bar. Whenever possible, place loads on the
folded-down seat backrests.
Page 64 of 260

62
Ease of use and comfort
closed environment such as a garage or
workshop which is not equipped with an
exhaust gas extraction system.
Do not park the vehicle on a flammable
surface (dry grass, dead leaves, paper, etc.)
- Risk of fire!
Glazed surfaces such as the rear screen
or windscreen can become very hot in
places.
Never put objects on these surfaces; never
touch these surfaces - Risk of burns!
Do not throw remote control batteries
away, as they contain metals that are
harmful to the environment. Take them to an
approved disposal point.
Courtesy lamp
Automatic switching on/off
The front courtesy lamp comes on when the key
is removed from the ignition switch.
All courtesy lamps come on when the vehicle is
unlocked, when one of the corresponding doors
is opened and when locating the vehicle using
the remote control.
They fade to off after the ignition is switched on
and when the vehicle is locked.
Take care not to allow objects to come into contact with the courtesy lamp.
Type 1
Always lit, ignition on.
Lights up when one of the front or rear
doors is opened.
Always off.
Type 2
Front: comes on when one of the front or
rear doors is opened (sliding side door
and depending on equipment, left-hand
side-hinged door or tailgate).
Always lit, ignition on.
Always off.
Individual reading lamp
If fitted to the vehicle, these are switched
on and off by means of a manual switch.
With the ignition on, operate the corresponding
switch.
Page 90 of 260

88
Safety
Manual child lock
Mechanical system to prevent opening of the
sliding side door using its interior lever.
Locking/Unlocking
► Rotate the control located on the edge of the
side door up to lock it, or down to unlock it.
Electric child lock
Remote control system to prevent opening of the
rear doors (sliding side door(s), side-hinged rear
doors or tailgate) using their interior controls.
Child weight and age guide
Seats Under 13
kg
(groups
0 (b) and
0+)
Up to about 1 year
old From 9 to 18
kg
(group 1)
From about 1 to 3
years old 15-25 kg
(group
2)
From about 3 to 6
years old 22-36 kg
(group
3)
From about 6 to 10
years old
Cab/Row 1 (a) With individual seat, passenger seat
/
With bench seat,
outer or central
passenger seat
With passenger
airbag deactivated
"OFF" U
With passenger
airbag activated
"ON" X
UF
Key
(a) Refer to the current legislation in the country in which you are drivin\
g before placing a child in this seat position.
(b) Group 0: from birth to 10
kg. Carrycots and "car" infant carriers must not be installed on the fro\
nt passenger seat(s).
(c) Universal child seat: child seat suitable for installation in all vehic\
les using the seat belt.
U Seat position suitable for installing a child seat secured using the se\
at belt and universally approved for rearward-facing and/or forward-faci\
ng use.
UF Seat position suitable for installing a child seat secured using a seat\
belt and universally approved for forward-facing use.
X Seat position not suitable for installing a child seat for the stated w\
eight class.