Page 49 of 276

47
Ease of use and comfort
3Removing a head restraint
► First tilt the corresponding backrest.
► Pull the head restraint fully up.
►
Press the lug
A to release the head restraint
and remove it completely.
►
Store the head restraint.
Refitting a head restraint
► Insert the head restraint rods into the guides
in the corresponding seat backrest.
►
Push the head restraint down as far as it will
go.
►
Press the lug
A to release the head restraint
and push it fully down.
Never drive with passengers seated at
the rear when the head restraints are
removed; the head restraints should be in
place and in the high position.
The head restraint for the centre seat
and those for the outer seats are not
interchangeable.
Folding the backrests
Each section of the backrest has two release
controls:
–
a grip
1 on the outer edge of the backrest,
–
a lever
2 on the boot side trim (SW).
Manoeuvring the seat backrests should
only be done when the vehicle is
stationary.
First steps:
► Lower the head restraints, or remove them
when carrying heavy loads.
►
Lift up the rear armrest.
►
If necessary
, move the front seats forward.
►
Check that no person or object will interfere
with folding down the backrests (clothing,
luggage, etc.).
►
Check that the outer seat belts are lying flat
on the backrests.
When the backrest is released, the red
indicator in the release grip is visible.
From the passenger compartment
► Press backrest release handle 1 .
► Guide the backrest 3 down to the horizontal
position.
From the boot (SW)
► Pull the backrest release paddle 2 towards
you.
The backrest 3 folds fully onto the cushion.
Page 50 of 276

48
Ease of use and comfort
Repositioning the backrests
First check that the outer seat belts are
lying vertically flat alongside the backrest
latching rings.
► Put the backrest 3 in the upright position and
push it firmly to latch it home.
►
Check that the red indicator is no longer
visible in the release grip 1
.
►
Ensure that the outer seat belts were not
trapped during the operation.
Please note: an incorrectly latched
backrest compromises the safety of
passengers in the event of sudden braking or
an accident.
The contents of the boot may be thrown
forward - risk of serious injury!
Heating and Ventilation
Air intake
The air circulating in the passenger compartment
is filtered and originates either from the
exterior, via the grille located at the base of the
windscreen, or from the inside in air recirculation
mode.
Controls
Depending on version, the controls are
accessible in the " Air conditioning" touch
screen menu or are grouped together in the
control panel on the centre console.
Air distribution
1. Windscreen demisting/defrosting vents
2. Front side window demisting/defrosting vents
3. Adjustable and closable side air vents
4. Adjustable and closable central air vents
5.Air outlets to the front footwells
6. Air outlets to the rear footwells
7. Adjustable air vents
Advice
Using the ventilation and air
conditioning system
►
T
o ensure that air is distributed evenly,
keep the external air intake grilles at the base
of the windscreen, the nozzles, the vents, the
air outlets and the air extractor in the boot
free from obstructions.
►
Do not cover the sunshine sensor located
on the dashboard; this sensor is used to
regulate the automatic air conditioning
system.
►
Operate the air conditioning system for at
least 5 to 10 minutes once or twice a month to
keep it in perfect working order
.
►
If the system does not produce cold air
,
switch it off and contact a PEUGEOT dealer
or a qualified workshop.
When towing the maximum load on a steep
gradient in high temperatures, switching off
the air conditioning increases the available
engine power, enhancing the towing capacity.
Avoid driving for too long with the ventilation off or with prolonged operation
of interior air recirculation. Risk of misting and
deterioration of the air quality!
Page 51 of 276

49
Ease of use and comfort
3If the interior temperature is very high
after the vehicle has stood for a long
time in the sunshine, air the passenger
compartment for a few moments.
Put the air flow control at a setting high
enough to quickly change the air in the
passenger compartment.
Condensation created by the air
conditioning results in a discharge of
water underneath the vehicle. This is perfectly
normal.
Servicing the ventilation and air
conditioning system
►
Ensure that the passenger compartment
filter is in good condition and have the filter
elements replaced regularly
.
We recommend using a composite passenger
compartment filter. Thanks to its special active
additive, this type of filter helps to purify the
air breathed by the occupants and keep the
passenger compartment clean (by reducing
allergic symptoms, unpleasant odours and
greasy deposits).
►
T
o ensure correct operation of the
air conditioning system, have it checked
according to the recommendations in the
Maintenance and Warranty Guide.
Stop & Start
The heating and air conditioning systems
only operate when the engine is running.
Temporarily deactivate the Stop & Start
system to maintain a comfortable temperature
in the passenger compartment.
For more information on the Stop & Start,
refer to the corresponding section.
ECO driving mode
Selection of this mode optimises fuel
consumption, but limits the performance
of the heating and air conditioning, without
however deactivating them.
Dual-zone automatic air
conditioning
This system automatically controls the activation
of the air conditioning system, regulating the
temperature, air flow and air distribution inside
the passenger compartment.
The air conditioning system operates with
the engine running, but the ventilation and its
controls can be accessed with the ignition on.
Press the Climate menu button to display
the system controls page.
1. Temperature adjustment
2. Air flow adjustment
3. Air distribution adjustment
4. Air conditioning on/off
5. Automatic comfort programme on/off
6. Maximum A/C
7. Access to the secondary page
8. Mono-zone / Dual-zone
9. Selection of setting for the automatic
comfort programme (Soft / Normal / Fast)
Page 52 of 276
 to
decrease or increase the speed of the air
booster fan.
The air flow symbol (a fan) is filled in
progressive")
50
Ease of use and comfort
Air flow adjustment
► Press one of the buttons 2 (- or +) to
decrease or increase the speed of the air
booster fan.
The air flow symbol (a fan) is filled in
progressively as the speed of the fan is
increased.
When the air flow is reduced to a minimum,
ventilation stops.
"OFF " is displayed alongside the fan.
Air distribution adjustment
► Press the buttons 3 to adjust the air flow
distribution inside the passenger compartment.
Windscreen and side windows
Central and side air vents
Footwells
The lighting of the button indicates that air is
being blown in the specified direction.
It is possible to activate all three buttons
simultaneously, for uniform distribution
throughout the passenger compartment.
Air conditioning on / off
The air conditioning is designed to operate
effectively in all seasons, with the windows
closed.
It is used to:
– lower the temperature in summer;
10. "AQS (Air Quality System)” function
(depending on version)
11 . Passenger compartment pre-conditioning
(depending on version)
12. Automatic Visibility programme
13. Recirculation of interior air
14. System switch-off
Temperature adjustment
The driver and front passenger can each choose
their own temperature setting.
The value indicated corresponds to a level of
comfort and not to a precise temperature.
►
Press one of the buttons
1 to increase (red)
or decrease (blue) the value.
It is recommended that you avoid a difference of
more than 3°C in the settings for left and right.
Automatic Comfort programme
This automatic mode ensures optimum
management of the passenger compartment
temperature, air flow and air distribution, based
on the selected comfort level.
►
Press button
5 to activate or deactivate the
air conditioning system’s automatic mode .
The indicator lamp in the button lights up
when the air conditioning system is operating
automatically.
You can adjust the intensity of the
automatic Comfort programme by using the
"OPTIONS "
button to select a profile:
–
"Soft": provides soft and quiet operation by
limiting air flow.
–
"Normal": offers the best compromise
between a comfortable temperature and quiet
operation (default setting).
–
"Fast": provides strong and effective air flow.
To change the current profile (shown by the
corresponding indicator lamp), press button
9
repeatedly until the desired profile is displayed:
The "Normal" or "Fast" profiles are the most
comfortable for passengers in the rear seats.
This profile setting is associated with automatic
mode only. However, on deactivation of the
AUTO mode, the indicator lamp for the most
recently selected profile remains on.
Changing the profile setting does not reactivate
AUTO mode if it was deactivated.
In cold weather with the engine cold, the
air flow is increased gradually until the
comfort setting has been reached, in order to
limit the delivery of cold air into the passenger
compartment.
On entering the vehicle, if the interior
temperature is much colder or warmer than
the comfort setting requested, there is no
need to alter the value displayed to more
quickly reach the required level of comfort.
The system automatically corrects the
temperature difference as quickly as possible.
"Air Quality System" (AQS)
function
Using a pollution sensor, this function
automatically activates recirculation of the
interior air once a certain level of polluting
substances in the exterior air is detected.
When the air quality returns to a satisfactory
level, recirculation of interior air is automatically
deactivated.
This function is not designed to detect
unpleasant odours.
Recirculation is automatically activated when the
windscreen wash is used or when reverse gear
is engaged.
The function does not operate if the exterior
temperature is below 5
°C, to avoid the risk of
misting of the windscreen and side windows.
To activate or deactivate the function, go to the
secondary page by using the " OPTIONS" button,
then press button 10.
Manual control
You can manually adjust one or more of these
functions, while retaining automatic control of the
other functions by the system:
–
air flow
,
–
air distribution.
As soon as you modify a setting, the indicator
lamp in the "
AUTO" button goes off.
►
Press button
5 again to reactivate the
automatic comfort programme.
Page 53 of 276
 to
decrease or increase the speed of the air
booster fan.
The air flow symbol (a fan) is filled in
progressi")
51
Ease of use and comfort
3Air flow adjustment
► Press one of the buttons 2 (- or +) to
decrease or increase the speed of the air
booster fan.
The air flow symbol (a fan) is filled in
progressively as the speed of the fan is
increased.
When the air flow is reduced to a minimum,
ventilation stops.
"OFF " is displayed alongside the fan.
Air distribution adjustment
► Press the buttons 3 to adjust the air flow
distribution inside the passenger compartment.
Windscreen and side windows
Central and side air vents
Footwells
The lighting of the button indicates that air is
being blown in the specified direction.
It is possible to activate all three buttons
simultaneously, for uniform distribution
throughout the passenger compartment.
Air conditioning on / off
The air conditioning is designed to operate
effectively in all seasons, with the windows
closed.
It is used to:
–
lower the temperature in summer;
– increase the effectiveness of the demisting in
winter , above 3°C.
►
Press button
4 to activate / deactivate the air
conditioning system.
When the system is activated, the indicator lamp
of the button comes on.
The air conditioning does not operate when the air flow is deactivated.
To obtain cool air more quickly, use
recirculation of the interior air for a few
moments. Then return to the intake of exterior
air.
Switching off the air conditioning may result in
some discomfort (humidity, misting).
Maximum air conditioning
This function automatically adjusts the
temperature setting to the lowest possible, the
air distribution towards the central and side air
vents, the air flow to maximum and activates
interior air recirculation.
►
Press button
6 to activate / deactivate the
function (the indicator lamp will come on/switch
off).
Once the function is deactivated, the system
returns to the previous settings.
Mono-zone / Dual-zone
The passenger temperature setting can be linked
to the driver's setting (mono-zone function). It is available in the secondary page by pressing
the "OPTIONS
” button.
►
Press button
8 to activate the "MONO"
function; its status is displayed as " ON".
The function is automatically deactivated if the
passenger uses their temperature adjustment
buttons (dual-zone function).
Ventilation with the ignition
on
When the ignition is switched on, you can use
the ventilation system to adjust the air flow 2
and air distribution 3 settings in the passenger
compartment, for a period which depends on the
battery charge.
This function does not allow the operation of the
air conditioning system.
Switching the system off
► Press button 14.
Its indicator lamp comes on and all other
indicator lamps for the system go off.
This action deactivates all functions of the air
conditioning system.
The temperature is no longer regulated. A slight
flow of air can still be felt, due to the forward
movement of the vehicle.
Interior air recirculation
The intake of exterior air prevents the formation
of mist on the windscreen and side windows.
Page 54 of 276

52
Ease of use and comfort
as reducing the consumption of electrical
current reduces fuel consumption.
Additional heating/ventilation system
Heating
This is an additional and separate system which
heats the passenger compartment and improves
defrosting performance.
This indicator lamp is illuminated when the system is programmed.
This indicator lamp flashes while the heating is
in operation or when you carry out a remote start
via the remote control.
This indicator lamp goes off at the end of the
heating cycle or when the heating is stopped
using the remote control.
If the engine has not been started for
more than 3 days, the remote control
starting of the system may not work.
Recirculating the interior air isolates the
passenger compartment from outside odours
and fumes and allows the desired passenger
compartment temperature to be achieved more
rapidly.
► Press this button to activate/deactivate
the function (confirmed by the
illumination/extinction of the indicator lamp).
The function is automatically activated when the front screenwash is used or
reverse gear is engaged.
Front demisting
- defrosting
Automatic Visibility programme
This mode allows the windscreen and side
windows to be demisted or defrosted as quickly
as possible.
► Press this button to activate/deactivate
the mode (confirmed by the illumination/
extinction of the
indicator lamp).
The programme automatically manages the air
conditioning (depending on version), air flow
and air intake, and provides optimum distribution
towards the windscreen and side windows.
It is possible to manually change the air flow
without deactivating the automatic Visibility
programme.
With Stop & Start, when demisting has
been activated, STOP mode is not
available.
In wintry conditions, remove all snow or
ice on the windscreen near the camera
before moving off.
Otherwise, the operation of the equipment
associated with the camera may be affected.
Heated windscreen
In cold weather, this system heats the bottom of
the windscreen, as well as the area alongside
the left-hand windscreen pillar.
Without changing the settings for the air
conditioning system, it allows faster release
of the windscreen wiper blades when they are
frozen to the windscreen and helps to prevent
the accumulation of snow resulting from the
operation of the windscreen wipers.
On/Off
► With the engine running, press this button to
activate/deactivate the function (confirmed by an
indicator lamp).
The function is activated when the exterior
temperature drops below 0°C. It is deactivated
automatically when the engine is switched off.
Rear screen demisting/
defrosting
Demisting/defrosting only operates with the
engine running.
Depending on version, this also applies to the
door mirrors.
► Press this button to activate/deactivate
the function (confirmed by the
illumination/extinction of the indicator lamp).
Demisting/defrosting switches off automatically
to prevent an excessive consumption of
electrical current.
Switch off demisting/defrosting as soon
as you no longer consider it necessary,
Page 55 of 276

53
Ease of use and comfort
3as reducing the consumption of electrical
current reduces fuel consumption.
Additional heating/ventilation system
Heating
This is an additional and separate system which
heats the passenger compartment and improves
defrosting performance.
This indicator lamp is illuminated when the system is programmed.
This indicator lamp flashes while the heating is
in operation or when you carry out a remote start
via the remote control.
This indicator lamp goes off at the end of the
heating cycle or when the heating is stopped
using the remote control.
If the engine has not been started for
more than 3 days, the remote control
starting of the system may not work.
Ventilation
This system allows ventilation of the passenger
compartment with exterior air to improve the
temperature experienced on entering the vehicle
in summer.
Programming
You can programme the heating or ventilation
to come on using the second page of the " Air
conditioning " menu of the touch screen.
In the Air conditioning >
OPTIONS menu:
► Select AIR CON programming.
►
Press the
Status tab to activate/deactivate
the system.
►
Press the
Settings tab to select Heating
mode to heat the engine and passenger
compartment or Ventilation mode to ventilate
the passenger compartment.
►
Then programme/save the activation time for
each selection.
►
Press
OK to confirm.
Long range remote control
(Depending on version.)
This enables you to switch the heating in
the passenger compartment on or off from a
distance.
The remote control has a range of about 0.6
miles (1 km) in open country.
Switching on
► Press and hold this button to start the
heating immediately .
The indicator lamp in the remote control comes
on in green for about 2
seconds to confirm that
the signal has been received by the vehicle.
Switching off
► Pressing and holding this button stops
the heating immediately (confirmed by the
temporary illumination of the red indicator lamp).
The indicator lamp in the remote control flashes
for about 2 seconds if the vehicle has not
received the signal.
Then repeat the command after having changed
location.
Changing the battery
The indicator lamp in the remote control will
change to orange if the battery charge is low.
Page 56 of 276

54
Ease of use and comfort
You can define multiple programmings.Each one is saved in the system.
To optimise battery life, we recommend
programming with the vehicle plugged in.
This feature can be programmed using a smartphone, via the
MyPeugeot application.
With PEUGEOT Connect Radio, the
programming can only be carried out using a
smartphone, via the application.
For more information on Remotely operable
features , refer to the corresponding section.
Operating conditions
– The function is only activated when the
ignition is off and the vehicle locked .
– The function is not activated if the battery
charge level is below 50%.
– If recurrent programming is activated (e.g.
from Monday to Friday) and two pre-conditioning
sequences are performed without the vehicle
being used, the programming will be deactivated.
If the indicator lamp is not on, the battery is
discharged.
► Use a coin to unscrew the cap and replace
the battery .
Do not throw remote control batteries
away, as they contain metals that are
harmful to the environment. Take them to an
approved disposal point.
The maximum heating period is about 45 minutes depending on the climatic
conditions.
The ventilation is activated provided that the battery is sufficiently charged.
The heating is activated provided that:
–
the battery charge and the fuel level are
sufficient,
–
the engine has been started since the
previous heating cycle,
–
60
minutes have elapsed between two
heating requests.
The programmable heating is supplied by the vehicle fuel tank. Before use, make
sure that you have sufficient fuel. If the fuel
tank is on reserve, you are strongly
recommended not to program the heating.
The additional heating must always be
switched off while refuelling to avoid any risk
of fire or explosion.
To avoid the risks of poisoning or asphyxia, the programmable heating
must not be used, even for short periods, in a
closed environment such as a garage or
workshop which is not equipped with an
exhaust gas extraction system.
Do not park the vehicle on a flammable
surface (dry grass, dead leaves, paper, etc.)
- Risk of fire!
Glazed surfaces such as the rear screen
or windscreen can become very hot in
places.
Never put objects on these surfaces; never
touch these surfaces - Risk of burns!
Thermal pre-conditioning (Hybrid)
This function allows you to programme the
vehicle to adjust the passenger compartment
temperature to a pre-defined, non-modifiable
temperature (approx. 21°C) before you enter the
vehicle, on the days and times of your choice.
Programming
(With PEUGEOT Connect Nav)
In the Climate > OPTIONS menu:
Select Temperature conditioning .
►
Press
+ to programme.
►
Select the time of entry into the vehicle and
the desired days. Press
OK.
►
Press
ON to activate this programming.
Pre-conditioning begins approximately 45
minutes before the programmed time, and is
maintained for 10 minutes afterwards.
This indicator lamp remains lit throughout the
pre-conditioning phase.
 1
1 2
2 3
3 4
4 5
5 6
6 7
7 8
8 9
9 10
10 11
11 12
12 13
13 14
14 15
15 16
16 17
17 18
18 19
19 20
20 21
21 22
22 23
23 24
24 25
25 26
26 27
27 28
28 29
29 30
30 31
31 32
32 33
33 34
34 35
35 36
36 37
37 38
38 39
39 40
40 41
41 42
42 43
43 44
44 45
45 46
46 47
47 48
48 49
49 50
50 51
51 52
52 53
53 54
54 55
55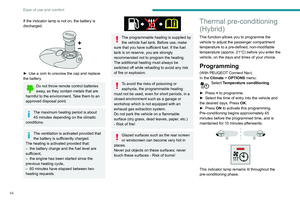 56
56 57
57 58
58 59
59 60
60 61
61 62
62 63
63 64
64 65
65 66
66 67
67 68
68 69
69 70
70 71
71 72
72 73
73 74
74 75
75 76
76 77
77 78
78 79
79 80
80 81
81 82
82 83
83 84
84 85
85 86
86 87
87 88
88 89
89 90
90 91
91 92
92 93
93 94
94 95
95 96
96 97
97 98
98 99
99 100
100 101
101 102
102 103
103 104
104 105
105 106
106 107
107 108
108 109
109 110
110 111
111 112
112 113
113 114
114 115
115 116
116 117
117 118
118 119
119 120
120 121
121 122
122 123
123 124
124 125
125 126
126 127
127 128
128 129
129 130
130 131
131 132
132 133
133 134
134 135
135 136
136 137
137 138
138 139
139 140
140 141
141 142
142 143
143 144
144 145
145 146
146 147
147 148
148 149
149 150
150 151
151 152
152 153
153 154
154 155
155 156
156 157
157 158
158 159
159 160
160 161
161 162
162 163
163 164
164 165
165 166
166 167
167 168
168 169
169 170
170 171
171 172
172 173
173 174
174 175
175 176
176 177
177 178
178 179
179 180
180 181
181 182
182 183
183 184
184 185
185 186
186 187
187 188
188 189
189 190
190 191
191 192
192 193
193 194
194 195
195 196
196 197
197 198
198 199
199 200
200 201
201 202
202 203
203 204
204 205
205 206
206 207
207 208
208 209
209 210
210 211
211 212
212 213
213 214
214 215
215 216
216 217
217 218
218 219
219 220
220 221
221 222
222 223
223 224
224 225
225 226
226 227
227 228
228 229
229 230
230 231
231 232
232 233
233 234
234 235
235 236
236 237
237 238
238 239
239 240
240 241
241 242
242 243
243 244
244 245
245 246
246 247
247 248
248 249
249 250
250 251
251 252
252 253
253 254
254 255
255 256
256 257
257 258
258 259
259 260
260 261
261 262
262 263
263 264
264 265
265 266
266 267
267 268
268 269
269 270
270 271
271 272
272 273
273 274
274 275
275