2020 PEUGEOT 5008 climate control
[x] Cancel search: climate controlPage 5 of 308

3
Contents
bit.ly/helpPSA
Lane positioning assist 143
Active Safety Brake with Distance Alert and
Intelligent emergency braking assistance
146
Distraction detection 149
Lane Departure Warning System 150
Active Lane Keeping Assistance 150
Blind Spot Monitoring System 154
Active Blind Spot Monitoring System 155
Parking sensors 155
Visiopark 1 - Visiopark 2 157
Park Assist 161
7Practical information
Compatibility of fuels 166
Refuelling 166
Misfuel prevention (Diesel) 167
Hybrid system 167
Charging the traction battery (Hybrid) 171
Towing device 173
Towing device with quickly detachable
towball
174
Roof bars 176
Snow chains 177
Very cold climate screen 178
Energy economy mode 179
Bonnet 179
Engine compartment 180
Checking levels 181
Checks 183
AdBlue® (BlueHDi) 185
Free-wheeling 187
Advice on care and maintenance 187
8In the event of a breakdown
Warning triangle 190
Running out of fuel (Diesel) 190
Tool kit 191
Temporary puncture repair kit 193
Spare wheel 196
Changing a bulb 201
Changing a fuse 205
12
V battery 210
Accessory batteries (Hybrid) 213
Towing the vehicle 215
9Technical data
Engine technical data and towed loads 219
Petrol engines 220
Diesel engines 222
Hybrid engines 225
Dimensions 226
Identification markings 227
10Bluetooth® audio system
First steps 228
Steering mounted controls 229
Menus 229
Radio 230
DAB (Digital Audio Broadcasting) radio 231
Media 232
Telephone 234
Frequently asked questions 237
11PEUGEOT Connect Radio
First steps 240
Steering mounted controls 241
Menus 242
Applications 243
Radio 243
DAB (Digital Audio Broadcasting) radio 245
Media 245
Telephone 247
Settings 250
Frequently asked questions 252
12PEUGEOT Connect Nav
First steps 254
Steering mounted controls 255
Menus 255
Voice commands 257
Navigation 260
Connected navigation 263
Applications 265
Radio 268
DAB (Digital Audio Broadcasting) radio 269
Media 270
Telephone 271
Settings 274
Frequently asked questions 275
■
Alphabetical index
Access to additional videos
Page 27 of 308

25
Instruments
1– Vehicle functions and equipment setting
menus.
–
Audio system and telephone controls and
display of related information.
–
Display of visual manoeuvring aid functions
(visual parking sensor information, Park
Assist,
etc.).
–
Internet services and display of
related
information.
–
Navigation system controls and
display
of related information (depending on
version).
For safety reasons, always stop the
vehicle before performing operations
that require sustained attention.
Some functions are not accessible while
driving.
Recommendations
This screen is of the capacitive type.
Do not use pointed objects on the touch screen.
Do not touch the touch screen with wet hands.
Use a soft, clean cloth to clean the touch screen.
* The TomTom Traffic logo displayed on the map confirms the availability of connected navigation services. For more information, refer to the connected
navigation section.
**
Depend
ing on equipment.
Principles
► Use the buttons arranged below the touch
screen for access to the menus, then press the
virtual buttons on the touch screen.
Some menus may display across two pages:
press the "
OPTIONS" button to access the
second page.
After a few moments with no action on the second page, the first page is
displayed automatically.
To deactivate/activate a function, select " OFF"
or "ON".
Settings for a function
Access to additional information on the function
Confirm
Return to the previous page or confirm
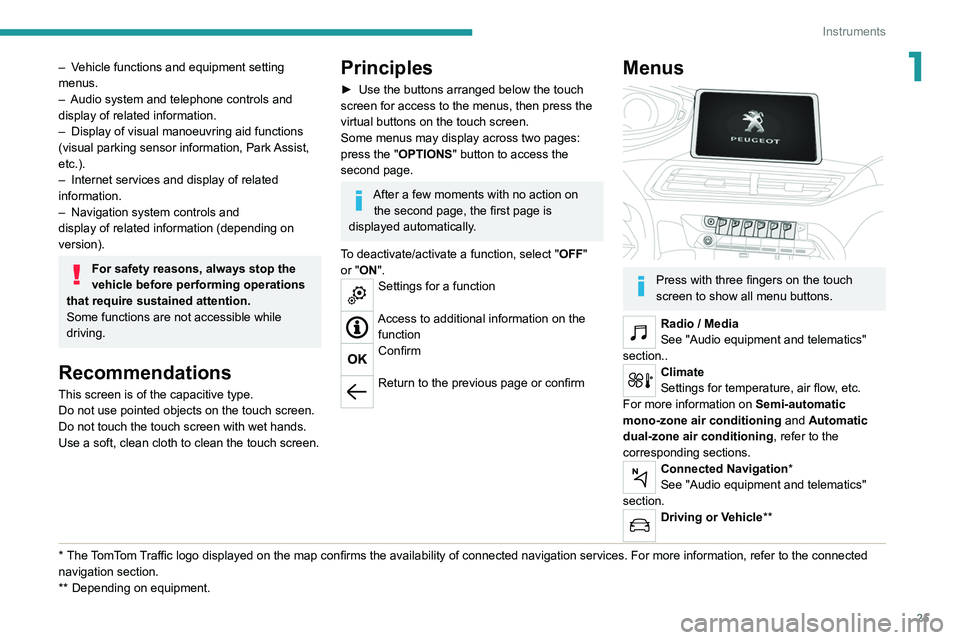
Menus
Press with three fingers on the touch
screen to show all menu buttons.
Radio / Media
See "Audio equipment and telematics"
section..
Climate
Settings for temperature, air flow, etc.
For more information on Semi-automatic
mono-zone air conditioning and Automatic
dual-zone air conditioning , refer to the
corresponding sections.
Connected Navigation*
See "Audio equipment and telematics"
section.
Driving or Vehicle**
Page 62 of 308

60
Ease of use and comfort
The temperature at the nozzles and vents
is regulated by the system according to the
temperature in the passenger compartment and
the temperature setting.
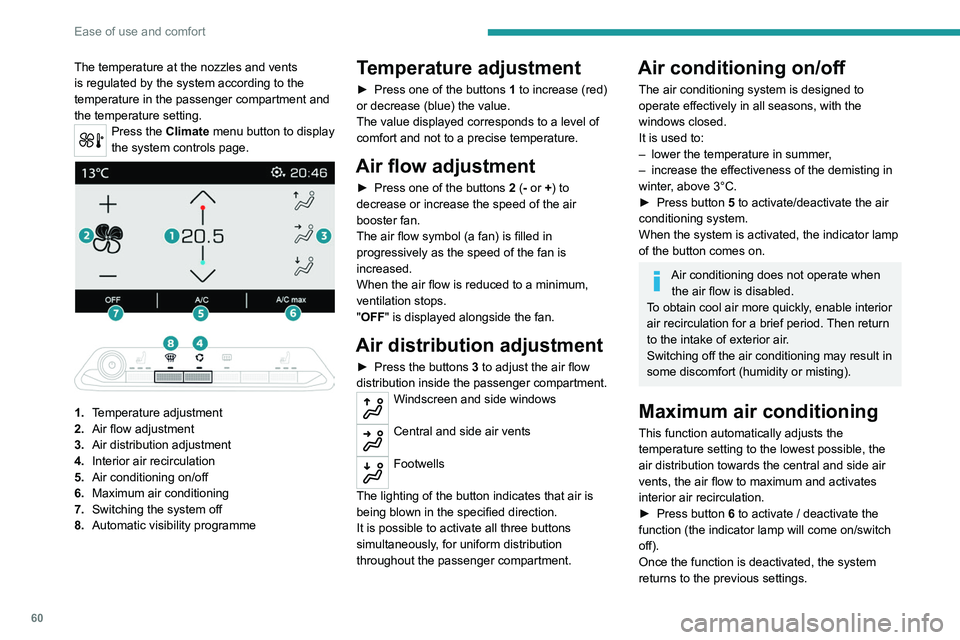
Press the Climate menu button to display
the system controls page.
1. Temperature adjustment
2. Air flow adjustment
3. Air distribution adjustment
4. Interior air recirculation
5. Air conditioning on/off
6. Maximum air conditioning
7. Switching the system off
8. Automatic visibility programme
Temperature adjustment
► Press one of the buttons 1 to increase (red)
or decrease (blue) the value.
The value displayed corresponds to a level of
comfort and not to a precise temperature.
Air flow adjustment
► Press one of the buttons 2 (- or +) to
decrease or increase the speed of the air
booster fan.
The air flow symbol (a fan) is filled in
progressively as the speed of the fan is
increased.
When the air flow is reduced to a minimum,
ventilation stops.
"OFF " is displayed alongside the fan.
Air distribution adjustment
► Press the buttons 3 to adjust the air flow
distribution inside the passenger compartment.
Windscreen and side windows
Central and side air vents
Footwells
The lighting of the button indicates that air is
being blown in the specified direction.
It is possible to activate all three buttons
simultaneously, for uniform distribution
throughout the passenger compartment.
Air conditioning on/off
The air conditioning system is designed to
operate effectively in all seasons, with the
windows closed.
It is used to:
–
lower the temperature in summer
,
–
increase the effectiveness of the demisting in
winter
, above 3°C.
►
Press button
5 to activate/deactivate the air
conditioning system.
When the system is activated, the indicator lamp
of the button comes on.
Air conditioning does not operate when the air flow is disabled.
To obtain cool air more quickly, enable interior
air recirculation for a brief period. Then return
to the intake of exterior air.
Switching off the air conditioning may result in
some discomfort (humidity or misting).
Maximum air conditioning
This function automatically adjusts the
temperature setting to the lowest possible, the
air distribution towards the central and side air
vents, the air flow to maximum and activates
interior air recirculation.
►
Press button
6 to activate / deactivate the
function (the indicator lamp will come on/switch
off).
Once the function is deactivated, the system
returns to the previous settings.
Automatic Visibility programme
For more information on button 8, refer to the
“Front Demisting/Defrosting ” section.
Switching the system off
► Press button 7; all the indicator lamps of the
system go out.
This action deactivates all functions of the air
conditioning system.
The temperature is no longer regulated. A slight
flow of air can still be felt, due to the forward
movement of the vehicle.
Dual-zone automatic air
conditioning
This air conditioning system operates with
the engine running, but the ventilation and its
controls are available with just the ignition on.
Operation of the air conditioning and regulation
of temperature, air flow and air distribution in the
passenger compartment are automatic.
Press the Climate menu button to display
the system controls page.
Page 63 of 308

61
Ease of use and comfort
3Automatic Visibility programme
For more information on button 8, refer to the
“Front Demisting/Defrosting ” section.
Switching the system off
► Press button 7; all the indicator lamps of the
system go out.
This action deactivates all functions of the air
conditioning system.
The temperature is no longer regulated. A slight
flow of air can still be felt, due to the forward
movement of the vehicle.
Dual-zone automatic air
conditioning
This air conditioning system operates with
the engine running, but the ventilation and its
controls are available with just the ignition on.
Operation of the air conditioning and regulation
of temperature, air flow and air distribution in the
passenger compartment are automatic.
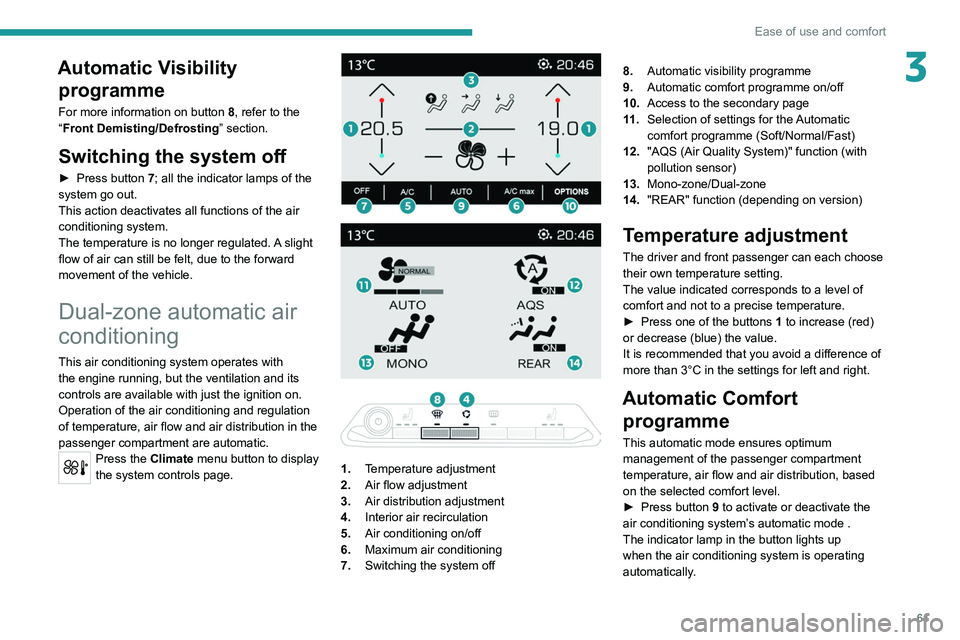
Press the Climate menu button to display
the system controls page.
1. Temperature adjustment
2. Air flow adjustment
3. Air distribution adjustment
4. Interior air recirculation
5. Air conditioning on/off
6. Maximum air conditioning
7. Switching the system off 8.
Automatic visibility programme
9. Automatic comfort programme on/off
10. Access to the secondary page
11 . Selection of settings for the Automatic
comfort programme (Soft/Normal/Fast)
12. "AQS (Air Quality System)" function (with
pollution sensor)
13. Mono-zone/Dual-zone
14. "REAR" function (depending on version)
Temperature adjustment
The driver and front passenger can each choose
their own temperature setting.
The value indicated corresponds to a level of
comfort and not to a precise temperature.
►
Press one of the buttons
1 to increase (red)
or decrease (blue) the value.
It is recommended that you avoid a difference of
more than 3°C in the settings for left and right.
Automatic Comfort programme
This automatic mode ensures optimum
management of the passenger compartment
temperature, air flow and air distribution, based
on the selected comfort level.
►
Press button
9 to activate or deactivate the
air conditioning system’s automatic mode .
The indicator lamp in the button lights up
when the air conditioning system is operating
automatically.
Page 86 of 308

84
Lighting and visibility
Front screenwash
► Pull the wiper control stalk towards you and
hold.
The screenwash and windscreen wipers operate
for as long as the control stalk is pulled.
T
ermination of the screenwash is followed by a
final wiping cycle.
The front screenwash jets are integrated in the tips of each arm.
The screenwash fluid is sprayed along the
length of the wiper blade. This improves
visibility and reduces the consumption of
screenwash fluid.
In some cases, depending on the contents
or colour of the fluid and on the exterior
brightness, the liquid spray may be hardly
noticeable.
To avoid damaging the wiper blades, do not operate the screenwash if the
screenwash reservoir is empty.
Only operate the screenwash if there is no
risk of the fluid freezing on the windscreen
and hindering visibility. During the winter
period, use "very cold climate" rated products.
Never top up with water.
Rear wiper
► Turn the ring to align the desired symbol with
the marking.
Off
Intermittent wipe
Wash-wipe
Reverse gear
When reverse gear is engaged, the rear wiper
will come into operation automatically if the front
windscreen wipers are operating.
This function is set via the vehicle configuration menu.
In the event of accumulation of snow or
hard frost or if a bicycle carrier is fitted to
a towing device, deactivate the automatic rear
wiper via the vehicle configuration menu.
Rear screenwash
► Turn the ring all the way towards the
dashboard and hold.
The screenwash and the wiper operate for as
long as the ring remains turned.
A final wiping cycle is performed when
screenwashing ends.
Special position of the
windscreen wipers
This maintenance position is used while cleaning
or replacing the wiper blades. It can also be
useful, in winter (ice, snow), to release the wiper
blades from the windscreen.
To maintain the effectiveness of the flat wiper blades, it is advisable to:
–
handle them with care.
–
clean them regularly using soapy water
.
–
avoid using them to hold cardboard on the
windscreen.
–
replace them at the first signs of wear
.