2020 PEUGEOT 5008 belt
[x] Cancel search: beltPage 102 of 308
100
Safety
– a child alone and unattended in a vehicle,
– a child or an animal in a vehicle which is
exposed to the sun, with the windows closed,
– the keys within reach of children inside the
vehicle.
Child seat at the rear
"Forward facing" or "Rearward
facing"
► Move the vehicle's front seat forward and
straighten the backrest so that the legs of the
child in the "forward facing" child seat or the
"rearward facing" child seat itself do not touch
the vehicle's front seat.
► Verify that the backrest of the "forward facing"
child seat is as close as possible to the backrest
of the vehicle's rear seat, and is ideally in contact
with it.
In the presence of a dog guard, it
is essential that booster seat type
Do not sit with the upper part of the body any
nearer to the door than necessary.
The vehicle's front door panels include side
impact sensors.
A damaged door or any unauthorised or
incorrectly executed work (modification or
repair) on the front doors or their interior trim
could compromise the operation of these
sensors - risk of malfunction of the lateral
airbags!
Such work must only be done by a PEUGEOT
dealer or a qualified workshop.
Curtain airbags
Do not fix or attach anything to the roof,
as this could cause head injuries when the
curtain airbag is deployed.
Do not remove the grab handles installed on
the roof, as they play a part in securing the
curtain airbags.
Child seats
The regulations on carrying children are specific to each country. Refer to the
legislation in force in your country.
For maximum safety, please observe the
following recommendations:
–
In accordance with European regulations, all
children under the age of 12 or less than 4
ft 1
1” (150 cm) tall must travel in approved
child seats suited to their weight , on seats
fitted with a seat belt or ISOFIX mountings.
–
Statistically
, the safest seats in your
vehicle for carrying children are the rear
seats.
–
Children weighing less than 9 kg must
travel in the "rear facing" position, whether in
the front or rear of the vehicle.
It is recommended that children travel
on the rear seats of the vehicle:
–
‘rear facing’ up to the age of 3,
–
‘forward facing’ over the age of 3.
Make sure that the seat belt is correctly
positioned and tightened.
For child seats with a support leg, ensure that
the support leg is in firm and steady contact
with the floor.
Advice
An incorrectly installed child seat compromises the child's safety in the
event of an accident.
Ensure that there is no seat belt or seat belt
buckle under the child seat, as this could
destabilise it.
Remember to fasten the seat belts or the
harness of child seats, keeping the slack
relative to the child's body to a minimum,
even for short journeys.
When installing a child seat using the seat
belt, ensure that the seat belt is tightened
correctly on the child seat and that it secures
the child seat firmly on the seat of the vehicle.
If the passenger seat is adjustable, move it
forwards if necessary.
Remove the head restraint before
installing a child seat with a backrest on a
passenger seat.
Ensure that the head restraint is stored or
attached securely to prevent it from being
thrown around the vehicle in the event of
sharp braking. Refit the head restraint once
the child seat has been removed.
Installing a booster seat
The chest part of the seat belt must be
positioned on the child's shoulder without
touching the neck.
Ensure that the lap part of the seat belt
passes correctly over the child's thighs.
Use a booster seat with backrest, equipped
with a belt guide at shoulder level.
Additional protections
To prevent accidental opening of the
doors and rear windows, use the "Child lock".
Take care not to open the rear windows by
more than one third.
To protect young children from the rays of the
sun, fit side blinds on the rear windows.
As a safety precaution, do not leave:
Page 104 of 308
102
Safety
Locations for child seats secured using the seat belt
In accordance with European regulations, this table indicates the option\
s for installing universally approved (a) child seats secured using the seat belt,
based on the child’s weight and the seat position in the vehicle.
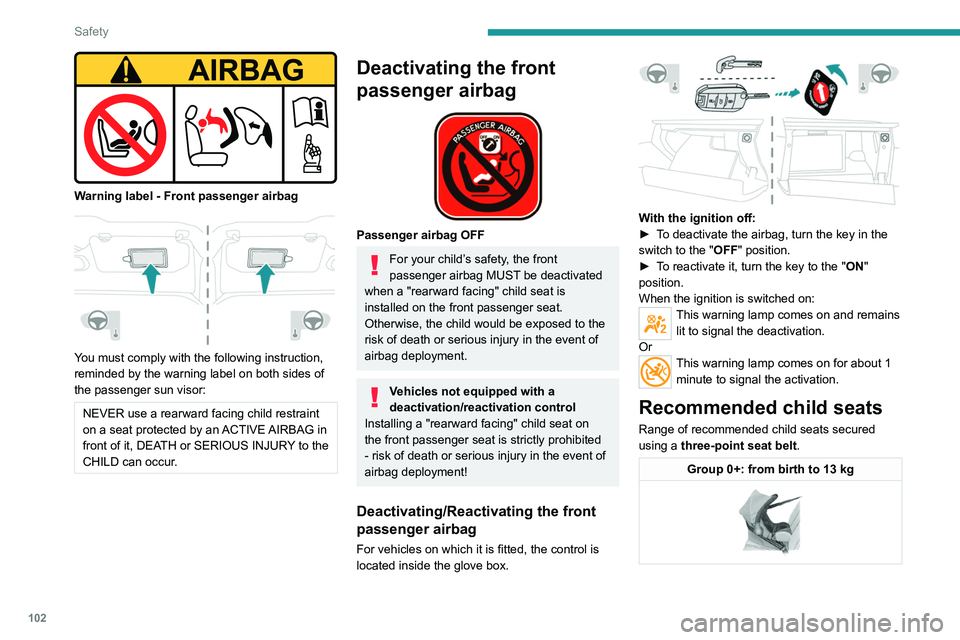
Warning label - Front passenger airbag
You must comply with the following instruction,
reminded by the warning label on both sides of
the passenger sun visor:
NEVER use a rearward facing child restraint
on a seat protected by an ACTIVE AIRBAG in
front of it, DEATH or SERIOUS INJURY to the
CHILD can occur.
Deactivating the front
passenger airbag
Passenger airbag OFF
For your child’s safety, the front
passenger airbag MUST be deactivated
when a "rearward facing" child seat is
installed on the front passenger seat.
Otherwise, the child would be exposed to the
risk of death or serious injury in the event of
airbag deployment.
Vehicles not equipped with a
deactivation/reactivation control
Installing a "rearward
facing" child seat on
the front passenger seat is strictly prohibited
- risk of death or serious injury in the event of
airbag deployment!
Deactivating/Reactivating the front
passenger airbag
For vehicles on which it is fitted, the control is
located inside the glove box.
With the ignition off:
► T o deactivate the airbag, turn the key in the
switch to the "OFF " position.
►
T
o reactivate it, turn the key to the "ON"
position.
When the ignition is switched on:
This warning lamp comes on and remains lit to signal the deactivation.
Or
This warning lamp comes on for about 1 minute to signal the activation.
Recommended child seats
Range of recommended child seats secured
using a three-point seat belt.
Group 0+: from birth to 13 kg
Page 105 of 308
103
Safety
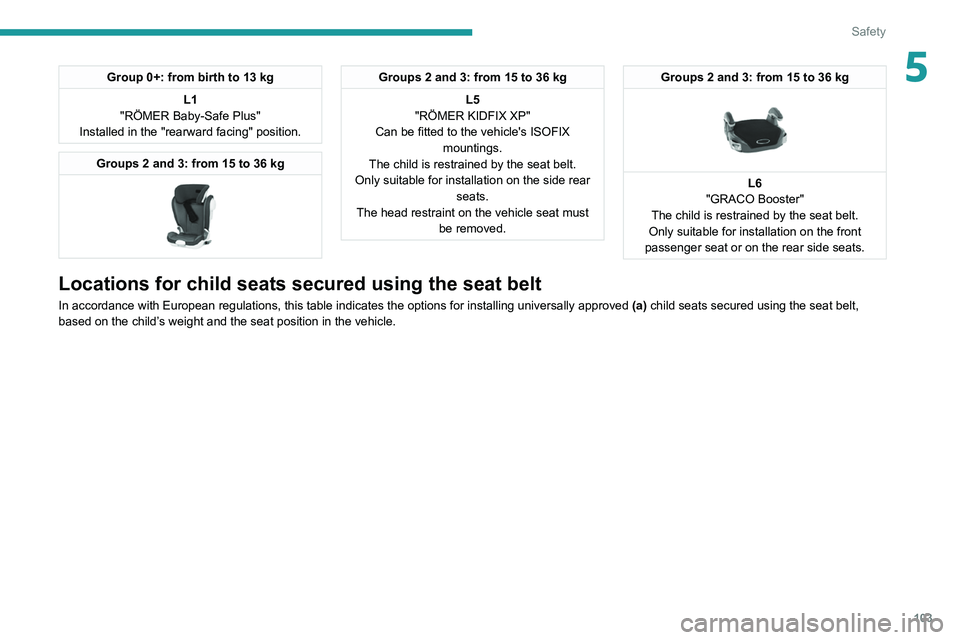
5Group 0+: from birth to 13 kgL1
"RÖMER Baby-Safe Plus"
Installed in the "rearward facing" position.
Groups 2 and 3: from 15 to 36 kg
Groups 2 and 3: from 15 to 36 kg
L5
"RÖMER KIDFIX XP"
Can be fitted to the vehicle's ISOFIX mountings.
The child is restrained by the seat belt.
Only suitable for installation on the side rear seats.
The head restraint on the vehicle seat must be removed.Groups 2 and 3: from 15 to 36 kg
L6
"GRACO Booster"
The child is restrained by the seat belt.
Only suitable for installation on the front
passenger seat or on the rear side seats.
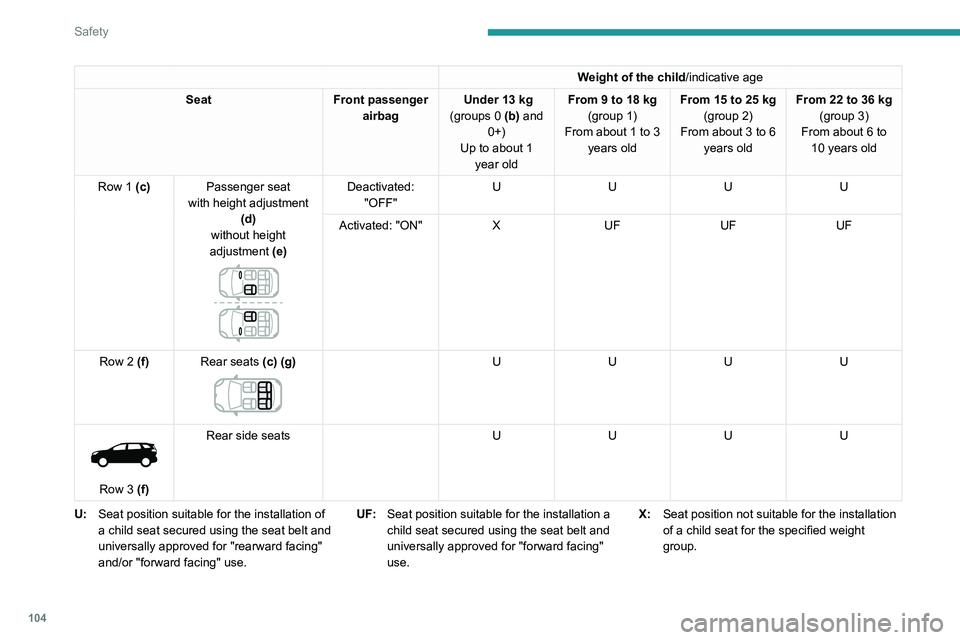
Locations for child seats secured using the seat belt
In accordance with European regulations, this table indicates the option\
s for installing universally approved (a) child seats secured using the seat belt,
based on the child’s weight and the seat position in the vehicle.
Page 106 of 308
104
Safety
Weight of the child/indicative age
Seat Front passenger
airbag Under 13
kg
(groups 0 (b) and 0+)
Up to about 1 year old From 9 to 18
kg
(group 1)
From about 1 to 3 years old From 15 to 25
kg
(group 2)
From about 3 to 6 years old From 22 to 36
kg
(group 3)
From about 6 to 10 years old
Row 1 (c) Passenger seat
with height adjustment (d)
without height
adjustment (e)
Deactivated: "OFF" U
UUU
Activated: "ON" XUF UFUF
Row 2 (f) Rear seats (c) (g)
U UUU
Row 3 (f)Rear side seats
UUUU
U: Seat position suitable for the installation of
a child seat secured using the seat belt and
universally approved for "rearward facing"
and/or "forward facing" use. UF:
Seat position suitable for the installation a
child seat secured using the seat belt and
universally approved for "forward facing"
use. X:
Seat position not suitable for the installation
of a child seat for the specified weight
group.
Page 107 of 308
105
Safety
5(a)Universal child seat: child seat that can be
installed in all vehicles using the seat belt.
(b) Group 0: from birth to 10
kg.
Carrycots and "car" infant carriers cannot be
installed on the front passenger seat.
Carrycots and "car" infant carriers cannot be
installed on the front passenger seat or in
the 3
rd row.
(c) Refer to the current legislation in your
country before installing your child on this
seat.
(d) Maximum height position
(e) Backrest straightened.
(f) To install a "rearward facing" or "forward
facing" child seat at the rear, move the front
seat forward, then straighten the backrest to
allow enough room for the child seat and the
child's legs. (g)
A child seat with a support leg must never
be installed on the centre rear seat.
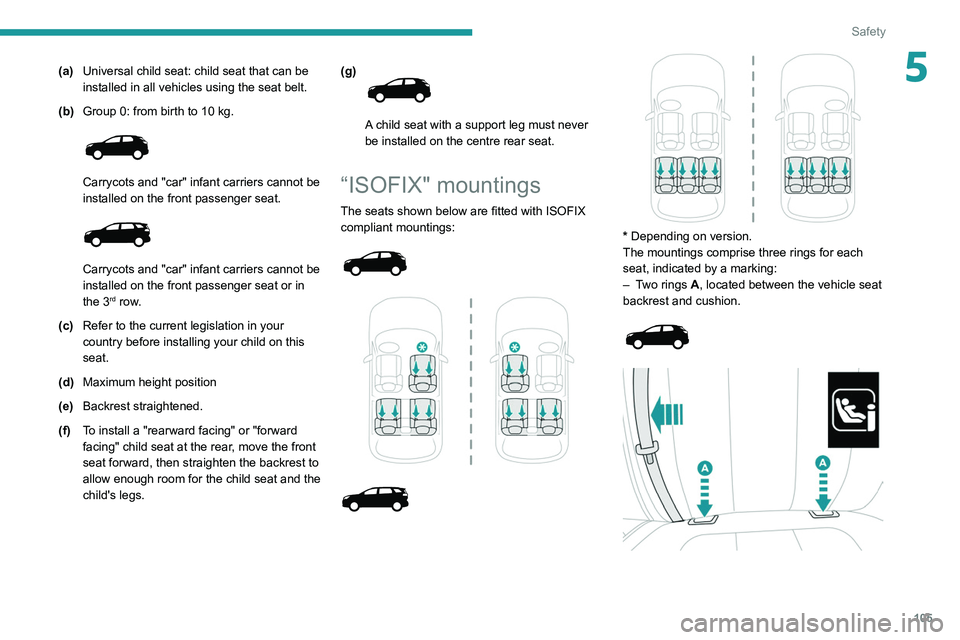
“ISOFIX" mountings
The seats shown below are fitted with ISOFIX
compliant mountings:
* Depending on version.
The mountings comprise three rings for each
seat, indicated by a marking:
–
T
wo rings A, located between the vehicle seat
backrest and cushion.
Page 108 of 308
106
Safety
Recommended ISOFIX child
seats
Also consult the user guide from the child seat’s manufacturer to find out how to
install and remove the seat.
"RÖMER Baby-Safe Plus and its ISOFIX base"
(size category: E)
Group 0+: from birth to 13 kg
Locations for ISOFIX child seats
In accordance with European regulations, this table shows the options for installing ISOFIX child seats on vehicle seats fitted with ISOFIX mountings.
In the case of universal and semi-universal ISOFIX child seats, the ISOF\
IX size category, as determined by a letter from A to G, is indicated on the child
seat next to the i-Size logo.
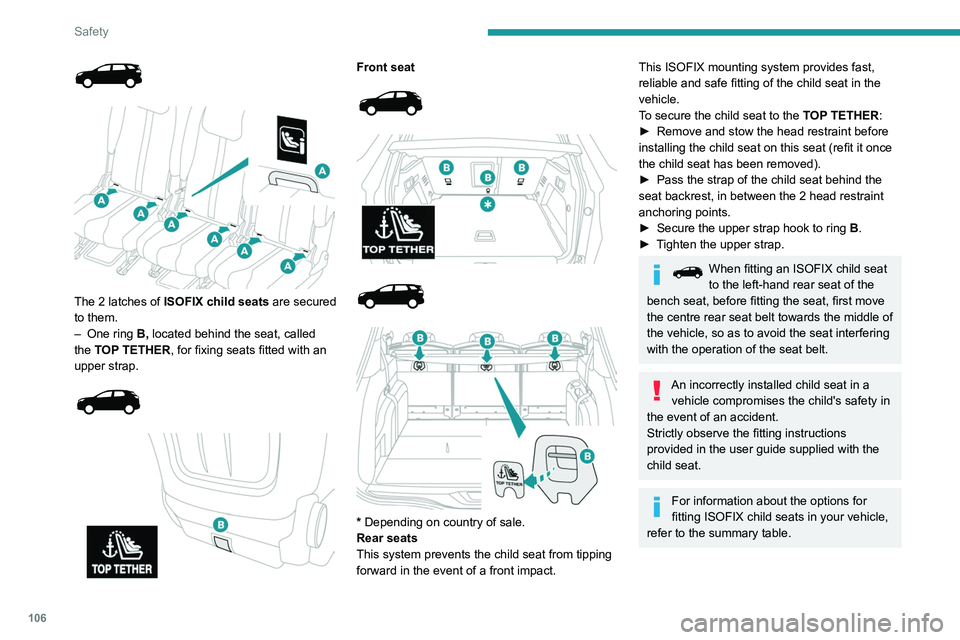
The 2 latches of ISOFIX child seats are secured
to them.
–
One ring
B, located behind the seat, called
the TOP TETHER, for fixing seats fitted with an
upper strap.
Front seat
* Depending on country of sale.
Rear seats
This system prevents the child seat from tipping
forward in the event of a front impact.
This ISOFIX mounting system provides fast,
reliable and safe fitting of the child seat in the
vehicle.
To secure the child seat to the TOP TETHER:
►
Remove and stow the head restraint before
installing the child seat on this seat (refit it once
the child seat has been removed).
►
Pass the strap of the child seat behind the
seat backrest, in between the 2 head restraint
anchoring points.
►
Secure the upper strap hook to ring
B
.
►
T
ighten the upper strap.
When fitting an ISOFIX child seat
to the left-hand rear seat of the
bench seat, before fitting the seat, first move
the centre rear seat belt towards the middle of
the vehicle, so as to avoid the seat interfering
with the operation of the seat belt.
An incorrectly installed child seat in a vehicle compromises the child's safety in
the event of an accident.
Strictly observe the fitting instructions
provided in the user guide supplied with the
child seat.
For information about the options for
fitting ISOFIX child seats in your vehicle,
refer to the summary table.
Page 109 of 308
107
Safety
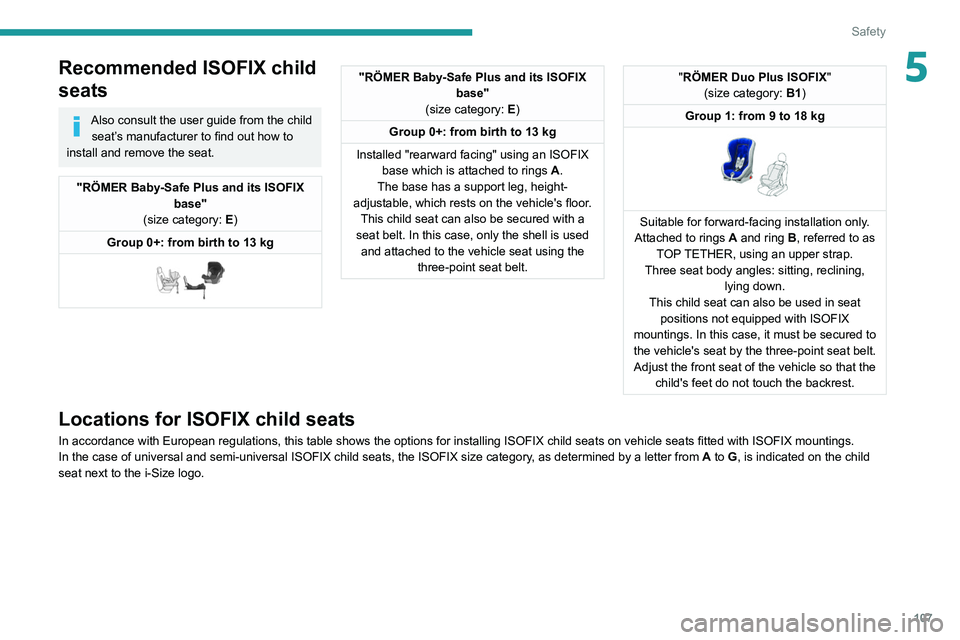
5Recommended ISOFIX child
seats
Also consult the user guide from the child seat’s manufacturer to find out how to
install and remove the seat.
"RÖMER Baby-Safe Plus and its ISOFIX base"
(size category: E)
Group 0+: from birth to 13 kg
"RÖMER Baby-Safe Plus and its ISOFIX base"
(size category: E)
Group 0+: from birth to 13 kg
Installed "rearward facing" using an ISOFIX base which is attached to rings
A
.
The base has a support leg, height-
adjustable, which rests on the vehicle's floor. This child seat can also be secured with a
seat belt. In this case, only the shell is used and attached to the vehicle seat using the three-point seat belt."RÖMER Duo Plus ISOFIX "
(size category: B1)
Group 1: from 9 to 18 kg
Suitable for forward-facing installation only.
Attached to rings A and ring B, referred to as
TOP TETHER, using an upper strap.
Three seat body angles: sitting, reclining, lying down.
This child seat can also be used in seat positions not equipped with ISOFIX
mountings. In this case, it must be secured to the vehicle's seat by the three-point seat belt. Adjust the front seat of the vehicle so that the child's feet do not touch the backrest.
Locations for ISOFIX child seats
In accordance with European regulations, this table shows the options for installing ISOFIX child seats on vehicle seats fitted with ISOFIX mountings.
In the case of universal and semi-universal ISOFIX child seats, the ISOF\
IX size category, as determined by a letter from A to G, is indicated on the child
seat next to the i-Size logo.
Page 130 of 308
128
Driving
Restarting the engine (START mode)
The engine automatically restarts as soon as the
driver indicates the intention of moving off again.
– With a manual gearbox: with the clutch pedal
fully depressed.
– With an automatic gearbox:
• With the selector in position D or M: with the
brake pedal released.
• With the selector in position N and the brake
pedal released: with the selector at D or M.
• With the selector in position P and the brake
pedal depressed: with the selector at R, N,
D or M.
Special cases
The engine will restart automatically if all
conditions for operation are met again and in the
following cases.
– Vehicle speed exceeds 16 mph (25 km/h) on
2.0 BlueHDi versions with automatic gearbox in
mode D, or 2 mph (3 km/h) on other versions.
– The electric parking brake is being applied.
In these cases, this indicator lamp flashes
for a few seconds, then goes off.
Malfunctions
In the event of a malfunction, this warning
lamp flashes for a few moments, then
remains on, accompanied by an onscreen
message.
Have the vehicle checked by a PEUGEOT
dealer or a qualified workshop.
When the function is deactivated, the orange=
indicator lamp is lit; if the engine was in standby,=
it restarts immediately.
With the touch screen button
It is set via the Driving / Vehicle touch
screen menu.
A message in the instrument panel confirms the
change of status.
When the function is deactivated, if the engine
was in standby, it restarts immediately.
Associated indicator lamps
Function activated.
Function deactivated or malfunction.
Opening the bonnet
Before doing anything under the bonnet,
deactivate the Stop & Start system to avoid
any risk of injury caused by the engine
restarting automatically.
Driving on flooded roads
Before entering into a flooded area, it is
strongly recommended that you deactivate
the Stop & Start system.
For more information on Driving
recommendations, particularly on flooded
roads, refer to the corresponding section.
Operation
Main conditions for operation
– The driver ’s door must be closed.
–
The driver's seat belt must be fastened.
–
The state of charge of the battery must be
sufficient.
–
The temperature of the engine must be within
its nominal operating range.
–
The outside temperature must be between
0°C and 35
°C.
Putting the engine into standby
(STOP mode)
The engine automatically enters standby mode
as soon as the driver indicates their intention to
stop.
–
W
ith a manual gearbox, at speeds below 2
mph (3 km/h) on 1.5 BlueHDi versions, or with
the vehicle stationary on 1.2 PureTech versions,
when you place the gear lever in neutral and
release the clutch pedal.
–
W
ith an automatic gearbox, at speeds below
12 mph (20 km/h) on BlueHDi versions, or with
the vehicle stationary on other versions, when
you depress the brake pedal or place the gear
selector in mode N.
Time counter
A time counter adds up the time spent in standby
during the journey. It is reset to zero every time
the ignition is switched on using the key or the
START/STOP button.
Special cases:
The engine will not go into standby if all of the
conditions for operation are not met and in the
following cases.
–
Steep slope (ascending or descending).
–
V
ehicle has not exceeded 6 mph (10 km/h)
since the last engine start (with the key or the
“START/STOP” button).
–
The electric parking brake is applied or being
applied.
–
Needed
to maintain a comfortable temperature
in the passenger compartment.
–
Demisting active.
In these cases, this indicator lamp flashes
for a few seconds, then goes off.
After the engine has restarted, STOP mode is not available until the vehicle
has reached a speed of 5 mph (8
km/h).
During parking manoeuvres, STOP mode
is not available for a few seconds after
coming out of reverse gear or turning the
steering wheel.