2020 PEUGEOT 5008 wheel
[x] Cancel search: wheelPage 37 of 308
35
Access
2When the vehicle is parked, the alarm
will not be triggered if the vehicle is
knocked.
Self-protection function
The system checks for the putting out of service
of its components.
The alarm is triggered if the battery, the central
control or the siren wiring is put out of service or
damaged.
For all work on the alarm system, contact
a PEUGEOT dealer or a qualified
workshop.
Locking the vehicle with full
alarm system
Activation
► Switch off the ignition and exit the vehicle.
► Lock or deadlock the vehicle using the
remote control or with the “Keyless Entry and
Starting” system.
When the monitoring system is active, the red
indicator lamp in the button flashes once per
second and the direction indicators come on for
about 2 seconds.
The exterior perimeter monitoring is activated
after 5 seconds and the interior volumetric and
anti-tilt monitoring after 45 seconds.
If an opening (door, boot or bonnet) is not
properly closed, the vehicle is not locked,
but the exterior perimeter monitoring will be
activated after 45 seconds, at the same time
as the interior volumetric and anti-tilt
monitoring.
Deactivation
► Press one of the remote control unlocking
buttons:
short press
long press
or
►
Unlock the vehicle with the Keyless Entry and
Starting system.
The monitoring system is deactivated: the
indicator lamp in the button goes off and the
direction indicators flash for about 2 seconds.
If the vehicle automatically locks itself
again (as happens if a door or the boot is
not opened within 30 seconds of unlocking),
the monitoring system is automatically
reactivated.
Locking the vehicle
with exterior perimeter
monitoring only
Deactivate the interior volumetric and anti-tilt
monitoring to avoid the unwanted triggering of
the
alarm, in certain cases such as:
–
Slightly open window
.
–
W
ashing the vehicle.
–
Changing a wheel.
–
T
owing the vehicle.
–
T
ransport on a ship or ferry.
Deactivating the interior volumetric
and anti-tilt monitoring
► Switch off the ignition and within 10 seconds
press the alarm button until its red indicator lamp
is on fixed.
►
Get out of the vehicle.
►
Lock the vehicle immediately using the
remote control or with the “Keyless Entry and
Starting” system.
Only the exterior perimeter monitoring is
activated; the red indicator lamp in the button
flashes every second.
To take effect, this deactivation must be carried out after each time the ignition is
switched off.
Page 42 of 308
40
Access
Recommendations on the hands-free
function ("Hands-Free Tailgate Access")
If it does not work, check that the electronic key
is not exposed to a source of electromagnetic
interference (e.g. smartphone).
The function may be deactivated or affected if
there is rain or snow.
The function may not work correctly with a
prosthetic leg.
In some circumstances, the tailgate may open or
close by itself, particularly when:
–
hitching up or removing a trailer;
–
fitting or removing a bicycle carrier;
–
loading or unloading bicycles on / from a
bicycle carrier;
–
depositing or lifting something behind the
vehicle;
–
an animal approaches the rear bumper;
–
washing the vehicle;
–
maintenance is performed on the vehicle;
–
accessing the spare wheel.
T
o avoid such operating problems, keep the
electronic key away from the recognition zone or
deactivate the hands-free function.
The installation of a towing device may disturb the detection system.
Memorising an opening
position
To memorise a position, in order to limit the
motorised tailgate opening angle:
► move the tailgate to the desired position
manually or by pressing the button.
►
press button
C or the exterior control B for
more than 3 seconds (memorisation is confirmed
by a brief audible signal).
Memorising is not available until the
height of opening is more than or equal
to 1 metre between the low position and the
high position of the tailgate.
To delete the memorised position:
►
open the tailgate to any position.
►
press button
C or the exterior control B for
more than 3 seconds (deletion is confirmed by a
long audible signal).
Manual operation
The tailgate can be manoeuvred by hand, even
with motorised operation activated.
The tailgate must be stationary.
When opening and closing the motorised tailgate
manually, there is no assistance from gas struts.
Resistance to opening and closing is therefore
entirely normal.
Repeatedly opening and closing the
motorised tailgate can cause overheating
of its electric motor, after which opening and
closing will not be possible.
Allow at least 10 minutes for the electric
motor to cool down before operating the
tailgate again.
If you are unable to wait, operate it manually.
Manual closing of the
motorised tailgate in case of
failure
This operation is only necessary in the case of
failure of the tailgate motor .
If the failure originates from the battery, it is
recommended to recharge it or change it with the
tailgate closed.
In this situation, a significant force may be
needed to close the tailgate.
►
Close it gently without slamming, as slowly as
possible, by pushing at the centre of the tailgate.
Do not lower the tailgate by pushing at
one of its sides - risk of damage!
Precautions in use
To avoid unintentionally opening the tailgate while operating the towing
device:
–
Deactivate the “Hands-Free
Tailgate
Access” function in advance in the vehicle
configuration menu.
–
Or remove the electronic key from the
recognition zone, with the tailgate closed.
For more information on the T
owing device
with quickly detachable towball , refer to the
corresponding section.
In wintry conditions
To avoid any operating problems, remove
the snow or wait until the ice melts before
requesting motorised opening of the tailgate.
When washing
When washing the vehicle in an
automatic car wash, do not forget to lock
the vehicle to prevent any risk of unwanted
opening.
Electric windows
1. Left-hand front
2. Right-hand front
3. Right-hand rear
4. Left-hand rear
5. Deactivation of the electric window controls
located by the rear seats
Manual operation
► To open/close the window, press/pull the
switch without passing the point of resistance;
the window stops as soon as the switch is
released.
Page 46 of 308

44
Ease of use and comfort
Driving position
Correct seating position
Adopting a good driving position helps improve
your comfort and protection.
It also optimises interior and exterior visibility as
well as access to controls.
Whether or not the vehicle has certain seat
adjustments described in this section depends
on the trim level and country of sale.
Driver’s side
Sit fully back in the seat with your pelvis, back
and shoulders in contact with the seat backrest.
Adjust the seat cushion height so that your eyes
are level with the centre of the windscreen.
The head room (from the roof) should be at least
10 cm.
Adjust the longitudinal position of the seat so
that you can fully depress the pedals with legs
slightly flexed.
The distance between your knees and the
dashboard should be at least 10 cm, for easy
access to the dashboard controls.
Adjust the backrest angle to as vertical a position
as possible; never tilt it more than 25°.
Adjust the head restraint so that its upper edge is
level with the top of your head.
Adjust the length of the seat cushion to support
your thighs.
Adjust the lumbar support so that it conforms to
the shape of your spine.
Adjust the steering wheel so that it is at least 25
cm from your sternum and you can hold it with
your arms slightly bent.
The steering wheel should not hide the
instrument panel.
As a safety precaution, adjust the seats only when the vehicle is stationary.
If your vehicle has electric seats, the
ignition must be on to adjust them.
Passenger’s side
Sit fully back in the seat with your pelvis, back
and shoulders in contact with the seat backrest.
Adjust the longitudinal position of the seat so that
you are at a distance of at least 25 cm from the
dashboard.
Adjust the head restraint so that its upper edge is
level with the top of your head.
Before moving off
Adjust the interior and exterior door mirrors to
reduce blind spots.
Fasten your seat belt: place the diagonal belt in
the middle of your shoulder and adjust the lap
belt so that it is tightened across your pelvis.
Ensure that all passengers have fastened their
seat belts correctly.
If your vehicle has electric door mirrors,
the ignition must be on to adjust them.
When driving
Maintain a good driving position and hold the
steering wheel with both hands at the 'quarter to
three' position, so that you can easily and quickly
reach the controls behind and near the steering
wheel.
Never adjust the seats or steering wheel
when driving.
Always keep your feet on the floor.
Front seats
Before moving the seat backwards,
ensure that there is no person or object
that might prevent the full travel of the seat.
There is a risk of trapping or pinching
passengers if present in the rear seats or of
jamming the seat if large objects are placed
on the floor behind the seat.
Page 47 of 308
45
Ease of use and comfort
3When driving
Maintain a good driving position and hold the
steering wheel with both hands at the 'quarter to
three' position, so that you can easily and quickly
reach the controls behind and near the steering
wheel.
Never adjust the seats or steering wheel
when driving.
Always keep your feet on the floor.
Front seats
Before moving the seat backwards,
ensure that there is no person or object
that might prevent the full travel of the seat.
There is a risk of trapping or pinching
passengers if present in the rear seats or of
jamming the seat if large objects are placed
on the floor behind the seat.
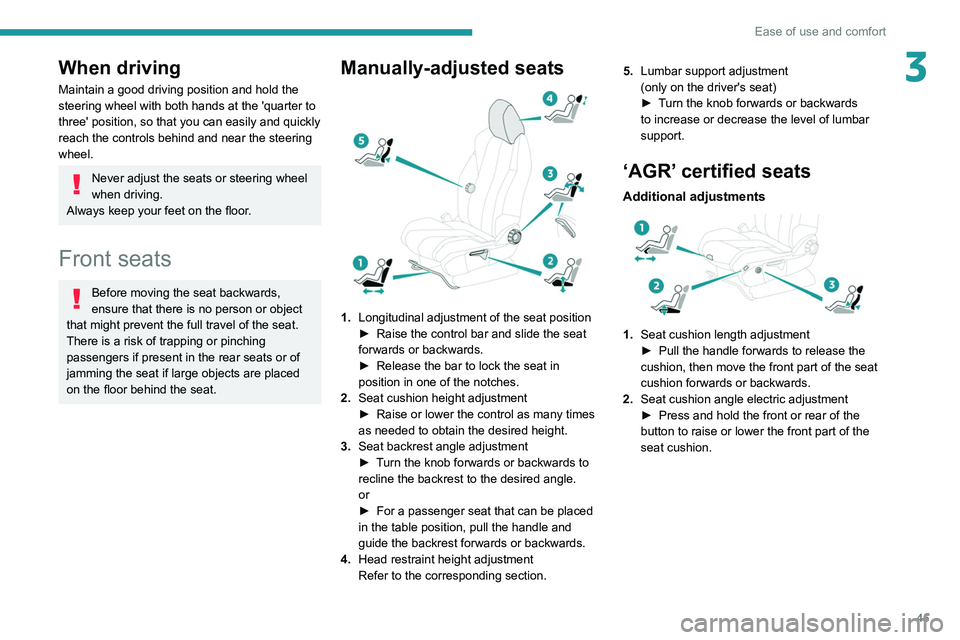
Manually-adjusted seats
1. Longitudinal adjustment of the seat position
►
Raise the control bar and slide the seat
forwards or backwards.
►
Release the bar to lock the seat in
position in one of the notches.
2. Seat cushion height adjustment
►
Raise or lower the control as many times
as needed to obtain the desired height.
3. Seat backrest angle adjustment
►
T
urn the knob forwards or backwards to
recline the backrest to the desired angle.
or
►
For a passenger seat that can be placed
in the table position, pull the handle and
guide the backrest forwards or backwards.
4. Head restraint height adjustment
Refer to the corresponding section. 5.
Lumbar support adjustment
(only on the driver's seat)
►
T
urn the knob forwards or backwards
to increase or decrease the level of lumbar
support.
‘AGR’ certified seats
Additional adjustments
1. Seat cushion length adjustment
►
Pull the handle forwards to release the
cushion, then move the front part of the seat
cushion forwards or backwards.
2. Seat cushion angle electric adjustment
►
Press and hold the front or rear of the
button to raise or lower the front part of the
seat cushion.
Page 50 of 308
48
Ease of use and comfort
► Enter the vehicle and switch the ignition on.
► Adjust your seat and the door mirrors.
►
Press button
M, then press button 1 or 2
within 4 seconds.
An audible signal confirms the memorisation.
Memorising a new position cancels the previous
position.
Recalling a stored position
Ignition on or engine running
► Press button 1 or 2 to recall the
corresponding position.
An audible signal sounds when the adjustment
is finished.
You can interrupt the current movement by
pressing button M, 1 or 2 or by using one of the
seat adjustment controls.
A stored position cannot be recalled while
driving.
Recalling stored positions is deactivated 45
seconds after switching off the ignition.
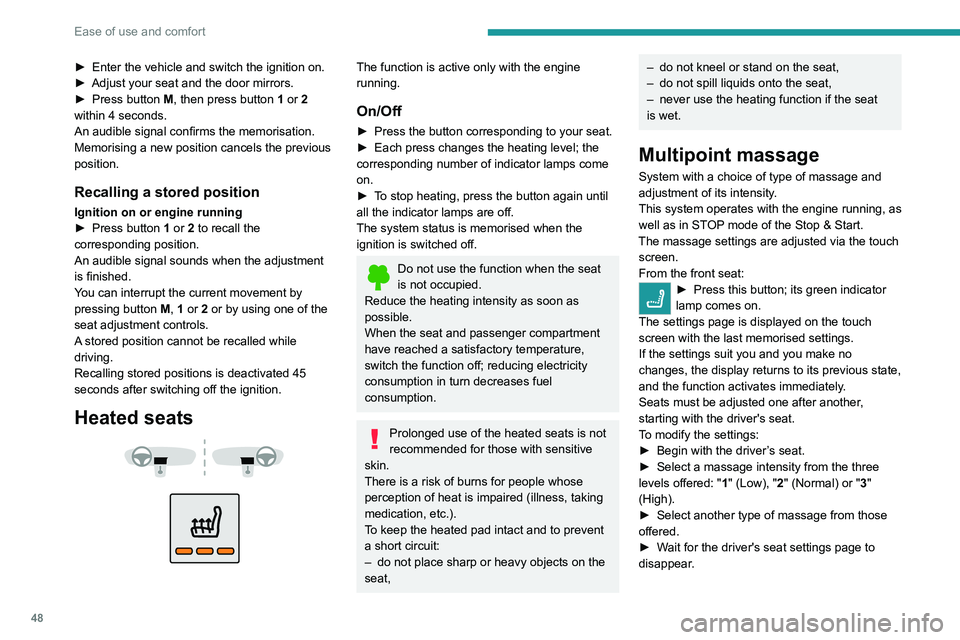
Heated seats
The function is active only with the engine
running.
On/Off
► Press the button corresponding to your seat.
► Each press changes the heating level; the
corresponding number of indicator lamps come
on.
►
T
o stop heating, press the button again until
all the indicator lamps are off.
The system status is memorised when the
ignition is switched off.
Do not use the function when the seat
is not occupied.
Reduce the heating intensity as soon as
possible.
When the seat and passenger compartment
have reached a satisfactory temperature,
switch the function off; reducing electricity
consumption in turn decreases fuel
consumption.
Prolonged use of the heated seats is not
recommended for those with sensitive
skin.
There is a risk of burns for people whose
perception of heat is impaired (illness, taking
medication, etc.).
To keep the heated pad intact and to prevent
a short circuit:
–
do not place sharp or heavy objects on the
seat,
– do not kneel or stand on the seat,
– do not spill liquids onto the seat,
–
never use the heating function if the seat
is wet.
Multipoint massage
System with a choice of type of massage and
adjustment of its intensity.
This system operates with the engine running, as
well as in STOP mode of the
Stop & Start.
The massage settings are adjusted via the touch screen.
From the front seat:
► Press this button; its green indicator
lamp comes on.
The settings page is displayed on the touch
screen with the last memorised settings.
If the settings suit you and you make no
changes, the display returns to its previous state,
and the function activates immediately
.
Seats must be adjusted one after another,
starting with the driver's seat.
To modify the settings:
►
Begin with the driver
’s seat.
►
Select a massage intensity from the three
levels offered: " 1
" (Low), "2" (Normal) or "3"
(High).
►
Select another type of massage from those
offered.
►
W
ait for the driver's seat settings page to
disappear.
► Next, proceed with the passenger's seat in
the same way.
The changes are applied immediately.
Once activated, the system starts a one hour
massage cycle, made up of sequences of 6
minutes of massage followed by 3 minutes at
rest.
The system automatically stops at the end of the
cycle; the indicator lamp for the button goes off.
Steering wheel
adjustment
► When stationary, pull the control to release
the steering wheel.
► Adjust the height and reach to suit your
driving position.
► Push the control lever to lock the steering
wheel.
As a safety measure, these adjustments must only be carried out with the vehicle
stationary.
Page 51 of 308
49
Ease of use and comfort
3► Next, proceed with the passenger's seat in
the same way .
The changes are applied immediately.
Once activated, the system starts a one hour
massage cycle, made up of sequences of 6
minutes of massage followed by 3 minutes at
rest.
The system automatically stops at the end of the
cycle; the indicator lamp for the button goes off.
Steering wheel
adjustment
► When stationary , pull the control to release
the steering wheel.
►
Adjust the height and reach to suit your
driving position.
►
Push the control lever to lock the steering
wheel.
As a safety measure, these adjustments must only be carried out with the vehicle
stationary.
Mirrors
Door mirrors
As a safety measure, the mirrors should be adjusted to reduce the "blind spots".
The objects that you see in the mirrors are
in fact closer than they appear. Take this
into account in order to correctly judge the
distance of vehicles approaching from behind.
Demisting/Defrosting
If the vehicle is so equipped, demisting/
defrosting of the heated door mirrors is
performed when the heated rear screen is
switched on.
For more information on Rear screen
demisting/defrosting , refer to the
corresponding section.
Adjustment
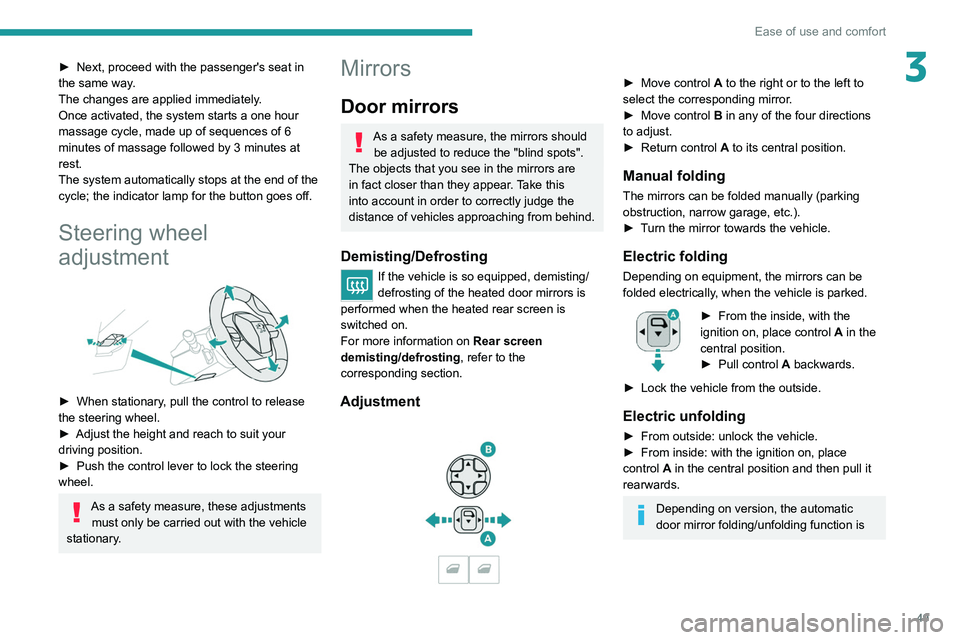
► Move control A to the right or to the left to
select the corresponding mirror.
►
Move control
B in any of the four directions
to adjust.
►
Return control A
to its central position.
Manual folding
The mirrors can be folded manually (parking
obstruction, narrow garage, etc.).
►
T
urn the mirror towards the vehicle.
Electric folding
Depending on equipment, the mirrors can be
folded electrically, when the vehicle is parked.
► From the inside, with the
ignition on, place control A
in the
central position.
►
Pull control A
backwards.
►
Lock the vehicle from the outside.
Electric unfolding
► From outside: unlock the vehicle.
► From inside: with the ignition on, place
control
A in the central position and then pull it
rearwards.
Depending on version, the automatic
door mirror folding/unfolding function is
Page 68 of 308
66
Ease of use and comfort
sequences are performed without the vehicle
being used, the programming will be deactivated.
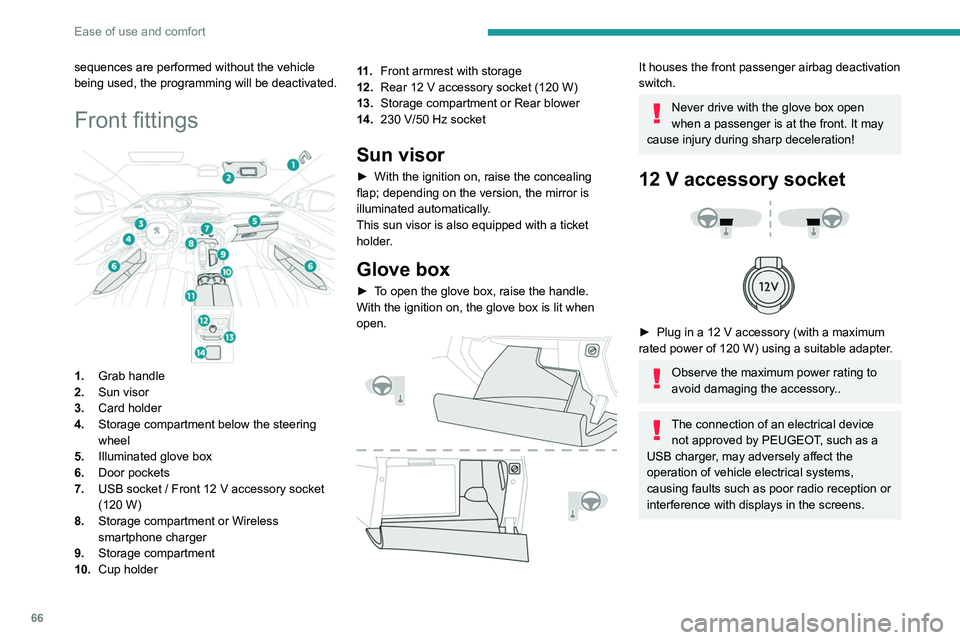
Front fittings
1.Grab handle
2. Sun visor
3. Card holder
4. Storage compartment below the steering
wheel
5. Illuminated glove box
6. Door pockets
7. USB socket
/ Front 12 V accessory socket
(120
W)
8. Storage compartment or Wireless
smartphone charger
9. Storage compartment
10. Cup holder 11 .
Front armrest with storage
12. Rear 12 V accessory socket (120 W)
13. Storage compartment or Rear blower
14. 230 V/50 Hz socket
Sun visor
► With the ignition on, raise the concealing
flap; depending on the version, the mirror is
illuminated automatically
.
This sun visor is also equipped with a ticket
holder.
Glove box
► To open the glove box, raise the handle.
With the ignition on, the glove box is lit when
open.
It houses the front passenger airbag deactivation
switch.
Never drive with the glove box open
when a passenger is at the front. It may
cause injury during sharp deceleration!
12 V accessory socket
► Plug in a 12 V accessory (with a maximum
rated power of 120 W) using a suitable adapter.
Observe the maximum power rating to
avoid damaging the accessory..
The connection of an electrical device not approved by PEUGEOT, such as a
USB charger, may adversely affect the
operation of vehicle electrical systems,
causing faults such as poor radio reception or
interference with displays in the screens.
USB socket
It allows the connection of a portable device or a
USB memory stick.
It reads audio files that are sent to your audio
system and played via the vehicle's speakers.
These files can be managed using the steering-
mounted controls or those on the touch screen.
Depending on version, the
USB port located on the
centre console also allows a smartphone to be
connected by MirrorLink
TM, Android Auto® or
CarPlay®, so that certain smartphone
applications can be used on the touch screen.
To achieve the best results, it is necessary to
use a cable made or approved by the device
manufacturer.
These applications can be managed using the
steering mounted controls or those of the audio
system.
Page 78 of 308
76
Ease of use and comfort
Behind the rear seats
► Remove the load space cover roller.
► Insert the ends of the bar , one after the other,
into the fixing points in the roof.
►
Attach the straps of the net to the lower rings,
located on each side trim of the boot.
►
Pull on the straps to stretch the net.
2-position boot floor
This two-position floor allows the boot volume to
be optimised using the lateral stops located on
the sides:
–
High position ( 100
kg max.): to obtain a flat
floor up to the front seats, when the rear seats
are folded down.
–
Low position ( 150
kg max.): maximum boot
volume.
On certain versions, the adjustable boot
floor cannot be fitted in the low position.
To change the height:
►
Lift and pull the floor towards you using its
central handle, then use the lateral stops to
move it.
►
Push the floor all the way forwards to place it
in the desired position.
To keep it in the inclined position:
► From the high position, lift the floor towards
the load space cover
.
►
T
ake it past the retractable stops, then rest
the floor on these stops.
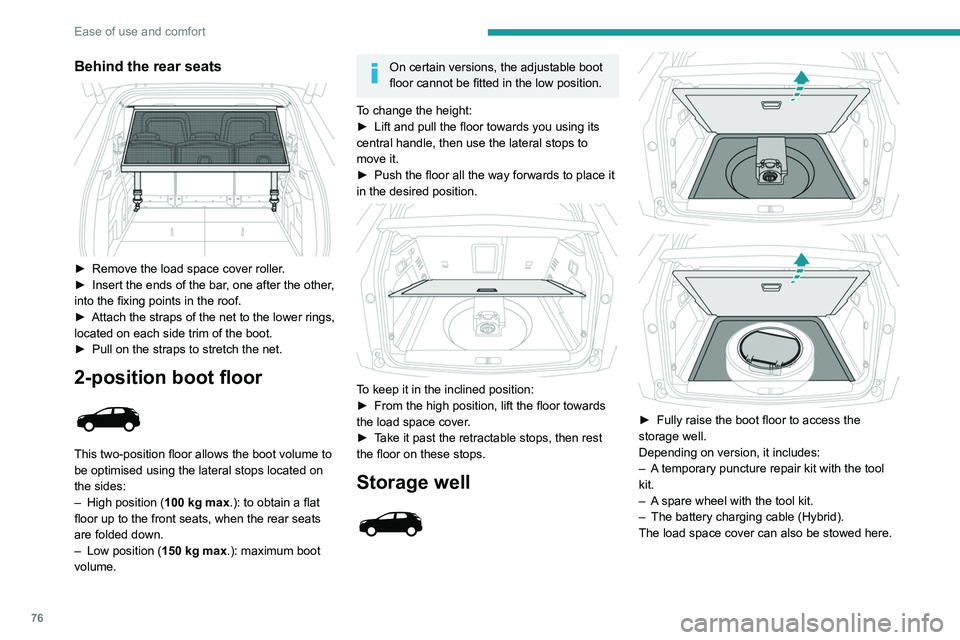
Storage well
► Fully raise the boot floor to access the
storage well.
Depending on version, it includes:
–
A
temporary puncture repair kit with the tool
kit.
–
A
spare wheel with the tool kit.
–
The battery charging cable (Hybrid).
The load space cover can also be stowed here.
12 V accessory socket
► To connect a 12 V accessory (maximum
power: 120 W), lift the cover and plug in a
suitable adaptor.
► Switch on the ignition.
The connection of an electrical device
not approved by PEUGEOT, such as a
USB charger, may adversely affect the
operation of vehicle electrical systems,
causing faults such as poor radio reception or
interference with displays in the screens.
Boot lamp
It comes on automatically when the boot is
opened and goes off automatically when the
boot is closed.
The lighting time varies according to the
circumstances:
– When the ignition is off, approximately 10
minutes.
– In energy saving mode, approximately 30
seconds.
– With the engine running, unlimited.