2020 PEUGEOT 5008 height adjustment
[x] Cancel search: height adjustmentPage 82 of 308
80
Lighting and visibility
Headlamp beam height
adjustment
Manual adjustment of the
halogen headlamps
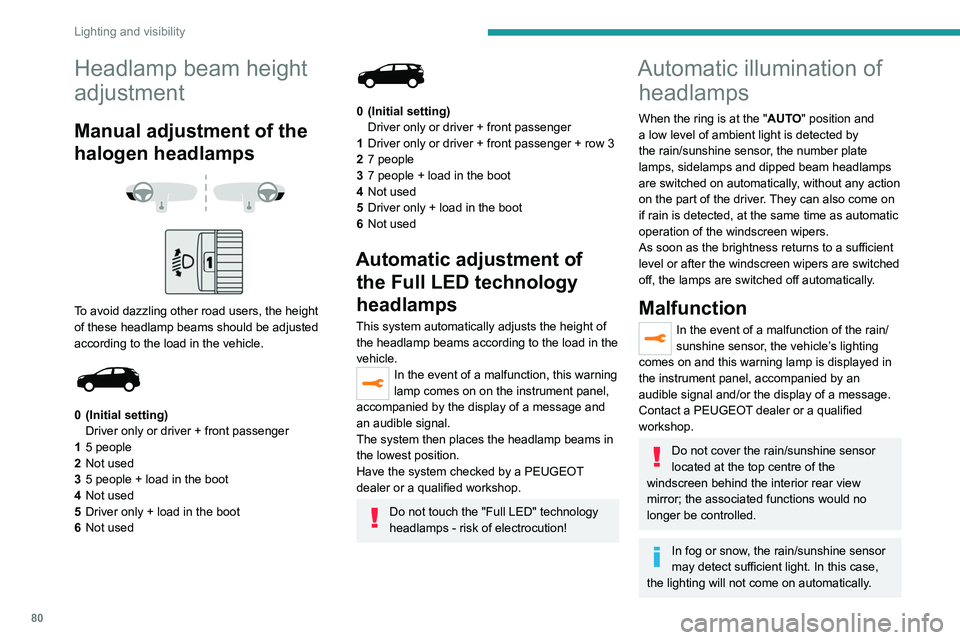
To avoid dazzling other road users, the height
of these headlamp beams should be adjusted
according to the load in the vehicle.
0 (Initial setting) Driver only or driver + front passenger
1 5 people
2 Not used
3 5 people + load in the boot
4 Not used
5 Driver only + load in the boot
6 Not used
0 (Initial setting)
Driver only or driver + front passenger
1 Driver only or driver + front passenger + row 3
2 7 people
3 7 people + load in the boot
4 Not used
5 Driver only + load in the boot
6 Not used
Automatic adjustment of
the Full LED technology
headlamps
This system automatically adjusts the height of
the headlamp beams according to the load in the
vehicle.
In the event of a malfunction, this warning
lamp comes on on the instrument panel,
accompanied by the display of a message and
an audible signal.
The system then places the headlamp beams in
the lowest position.
Have the system checked by a PEUGEOT
dealer or a qualified workshop.
Do not touch the "Full LED" technology
headlamps - risk of electrocution!
Automatic illumination of headlamps
When the ring is at the "AUTO" position and
a low level of ambient light is detected by
the rain/sunshine sensor
, the number plate
lamps,
sidelamps and dipped beam headlamps
are switched on automatically, without any action
on the part of the driver. They can also come on
if rain is detected, at the same time as automatic
operation of the windscreen wipers.
As soon as the brightness returns to a sufficient
level or after the windscreen wipers are switched
off, the lamps are switched off automatically.
Malfunction
In the event of a malfunction of the rain/
sunshine sensor, the vehicle’s lighting
comes on and this warning lamp is displayed in
the instrument panel, accompanied by an
audible signal and/or the display of a message.
Contact a PEUGEOT dealer or a qualified
workshop.
Do not cover the rain/sunshine sensor
located at the top centre of the
windscreen behind the interior rear view
mirror; the associated functions would no
longer be controlled.
In fog or snow, the rain/sunshine sensor
may detect sufficient light. In this case,
the lighting will not come on automatically.
Guide-me-home and
welcome lighting
Guide-me-home lighting
Automatic
With the ring in the "AUTO" position, when the
light is poor, the dipped beam headlamps come
on automatically when the ignition is switched
off.
You can activate/deactivate this function and adjust the guide-me-
home lighting duration in the vehicle
configuration menu.
Manual
► With the ignition off, pull the lighting control
stalk toward you ("headlamp flash") to activate/
deactivate the function.
Manual guide-me-home lighting goes off
automatically after a period of time.
Page 96 of 308
94
Safety
Fastening
► Pull the strap, then insert the tongue in the
buckle.
► Check that the seat belt is fastened correctly
by pulling on the strap.
Unfastening
► Press the red button on the buckle.
► Guide the seat belt as it is reeled in.
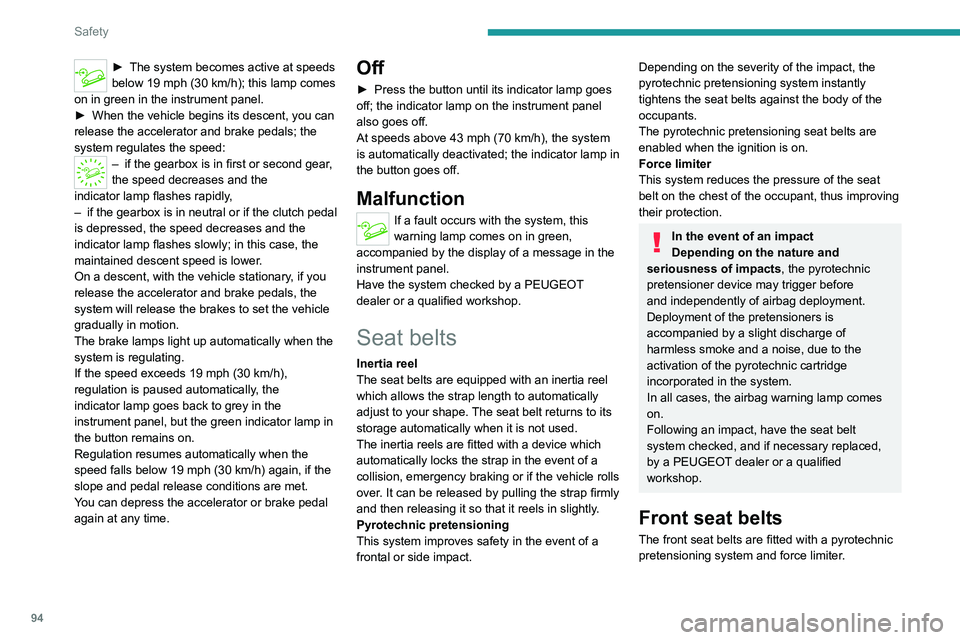
Height adjustment
► To adjust the height of the anchorage point,
squeeze control A and slide it to the notch
desired.
Rear seat belts
► The system becomes active at speeds
below 19 mph (30 km/h); this lamp comes
on in green in the instrument panel.
►
When the vehicle begins its descent, you can
release the accelerator and brake pedals; the
system regulates the speed:
– if the gearbox is in first or second gear ,
the speed decreases and the
indicator
lamp flashes rapidly,
–
if the gearbox is in neutral or if the clutch pedal
is depressed, the speed decreases and the
indicator
lamp flashes slowly; in this case, the
maintained descent speed is lower.
On a descent, with the vehicle stationary, if you
release the accelerator and brake pedals, the
system will release the brakes to set the vehicle
gradually in motion.
The brake lamps light up automatically when the
system is regulating.
If the speed exceeds 19 mph (30
km/h),
regulation is paused automatically, the
indicator
lamp goes back to grey in the
instrument panel, but the green indicator lamp in
the button remains on.
Regulation resumes automatically when the
speed falls below 19 mph (30
km/h) again, if the
slope and pedal release conditions are met.
You can depress the accelerator or brake pedal
again at any time.
Off
► Press the button until its indicator lamp goes
off; the indicator lamp on the instrument panel
also goes off.
At speeds above 43 mph (70
km/h), the system
is automatically deactivated; the indicator lamp in
the button goes off.
Malfunction
If a fault occurs with the system, this
warning lamp comes on in green,
accompanied by the display of a message in the
instrument panel.
Have the system checked by a PEUGEOT
dealer or a qualified workshop.
Seat belts
Inertia reel
The seat belts are equipped with an inertia reel
which allows the strap length to automatically
adjust to your shape. The seat belt returns to its
storage automatically when it is not used.
The inertia reels are fitted with a device which
automatically locks the strap in the event of a
collision, emergency braking or if the vehicle rolls
over. It can be released by pulling the strap firmly
and then releasing it so that it reels in slightly.
Pyrotechnic pretensioning
This system improves safety in the event of a
frontal or side impact.
Depending on the severity of the impact, the
pyrotechnic pretensioning system instantly
tightens the seat belts against the body of the
occupants.
The pyrotechnic pretensioning seat belts are
enabled when the ignition is on.
Force limiter
This system reduces the pressure of the seat
belt on the chest of the occupant, thus improving
their protection.
In the event of an impact
Depending on the nature and
seriousness of impacts, the pyrotechnic
pretensioner device may trigger before
and independently of airbag deployment.
Deployment of the pretensioners is
accompanied by a slight discharge of
harmless smoke and a noise, due to the
activation of the pyrotechnic cartridge
incorporated in the system.
In all cases, the airbag warning lamp comes
on.
Following an impact, have the seat belt
system checked, and if necessary replaced,
by a PEUGEOT dealer or a qualified
workshop.
Front seat belts
The front seat belts are fitted with a pyrotechnic
pretensioning system and force limiter.
Page 97 of 308
95
Safety
5Fastening
► Pull the strap, then insert the tongue in the
buckle.
►
Check that the seat belt is fastened correctly
by pulling on the strap.
Unfastening
► Press the red button on the buckle.
► Guide the seat belt as it is reeled in.
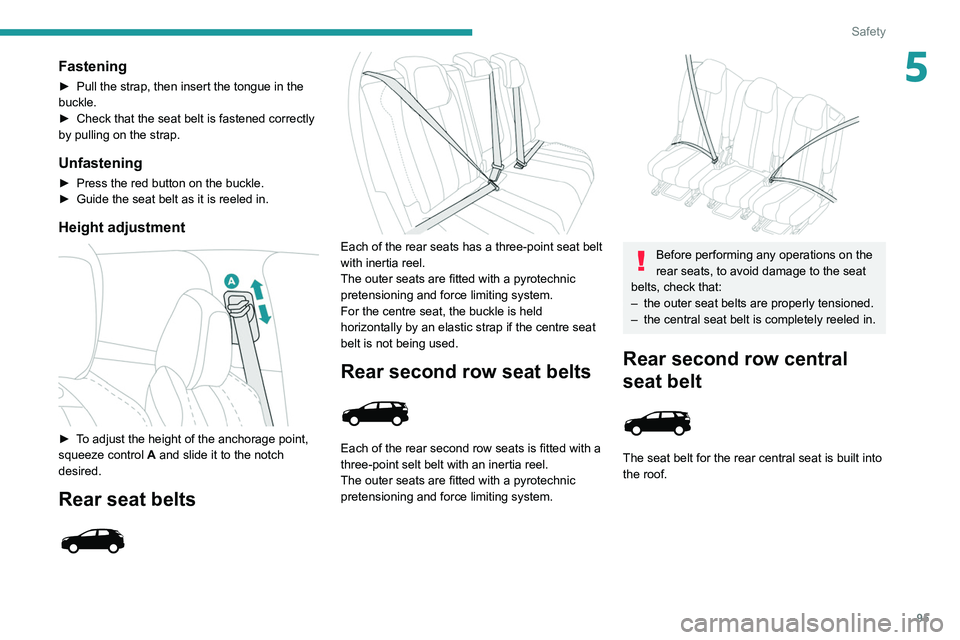
Height adjustment
► To adjust the height of the anchorage point,
squeeze control A and slide it to the notch
desired.
Rear seat belts
Each of the rear seats has a three-point seat belt
with inertia reel.
The outer seats are fitted with a pyrotechnic
pretensioning and force limiting system.
For the centre seat, the buckle is held
horizontally by an elastic strap if the centre seat
belt is not being used.
Rear second row seat belts
Each of the rear second row seats is fitted with a
three-point selt belt with an inertia reel.
The outer seats are fitted with a pyrotechnic
pretensioning and force limiting system.
Before performing any operations on the
rear seats, to avoid damage to the seat
belts, check that:
–
the outer seat belts are properly tensioned.
–
the central seat belt is completely reeled in.
Rear second row central
seat belt
The seat belt for the rear central seat is built into
the roof.
Page 106 of 308
104
Safety
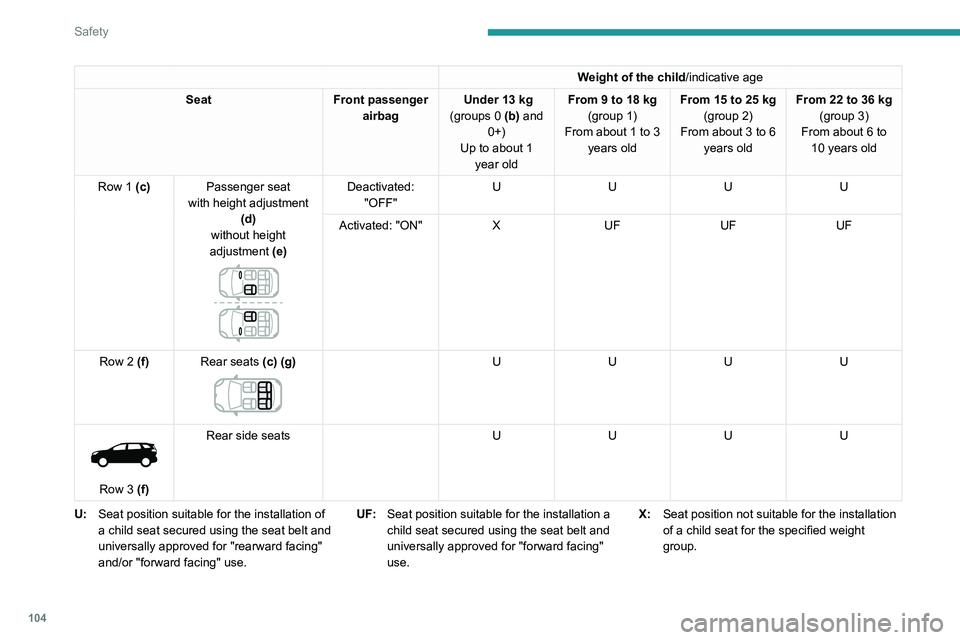
Weight of the child/indicative age
Seat Front passenger
airbag Under 13
kg
(groups 0 (b) and 0+)
Up to about 1 year old From 9 to 18
kg
(group 1)
From about 1 to 3 years old From 15 to 25
kg
(group 2)
From about 3 to 6 years old From 22 to 36
kg
(group 3)
From about 6 to 10 years old
Row 1 (c) Passenger seat
with height adjustment (d)
without height
adjustment (e)
Deactivated: "OFF" U
UUU
Activated: "ON" XUF UFUF
Row 2 (f) Rear seats (c) (g)
U UUU
Row 3 (f)Rear side seats
UUUU
U: Seat position suitable for the installation of
a child seat secured using the seat belt and
universally approved for "rearward facing"
and/or "forward facing" use. UF:
Seat position suitable for the installation a
child seat secured using the seat belt and
universally approved for "forward facing"
use. X:
Seat position not suitable for the installation
of a child seat for the specified weight
group.
Page 110 of 308
108
Safety
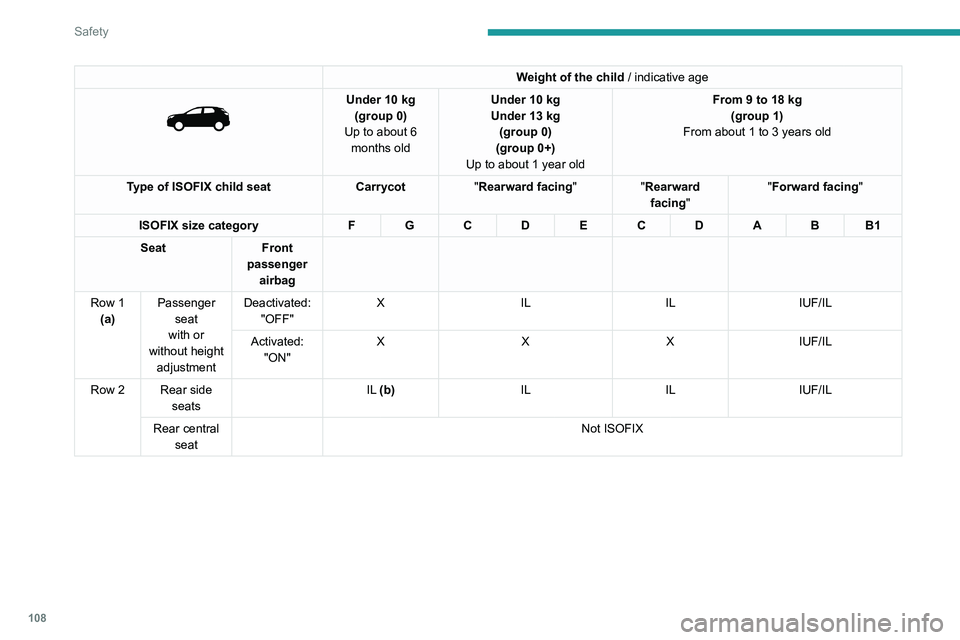
Weight of the child / indicative age
Under 10 kg
(group 0)
Up to about 6 months old Under 10
kg
Under 13 kg
(group 0)
(group 0+)
Up to about 1 year old From 9 to 18
kg
(group 1)
From about 1 to 3 years old
Type of ISOFIX child seat Carrycot"Rearward facing" "Rearward
facing" "Forward facing
"
ISOFIX size category F G C D E C D A B B1
Seat Front
passenger airbag
Row 1 (a) Passenger
seat
with or
without height adjustment Deactivated:
"OFF" X
IL ILIUF/IL
Activated: "ON" X
XXIUF/IL
Row 2 Rear side seats IL (b)
ILILIUF/IL
Rear central seat Not ISOFIX
Page 111 of 308
109
Safety
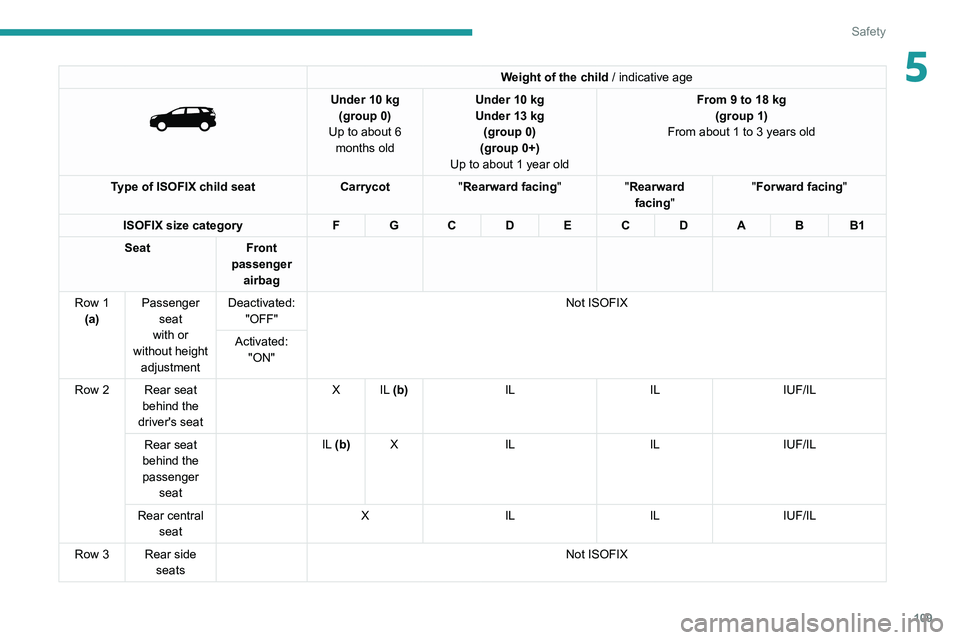
5Weight of the child / indicative age
Under 10 kg
(group 0)
Up to about 6 months old Under 10
kg
Under 13 kg
(group 0)
(group 0+)
Up to about 1 year old From 9 to 18
kg
(group 1)
From about 1 to 3 years old
Type of ISOFIX child seat Carrycot"Rearward facing" "Rearward
facing" "Forward facing
"
ISOFIX size category F G C D E C D A B B1
Seat Front
passenger airbag
Row 1 (a) Passenger
seat
with or
without height adjustment Deactivated:
"OFF" Not ISOFIX
Activated: "ON"
Row 2 Rear seat behind the
driver's seat X
IL (b) IL ILIUF/IL
Rear seat
behind the
passenger seat IL (b)
X IL ILIUF/IL
Rear central seat X
IL ILIUF/IL
Row 3 Rear side seats Not ISOFIX
Page 113 of 308
111
Safety
5
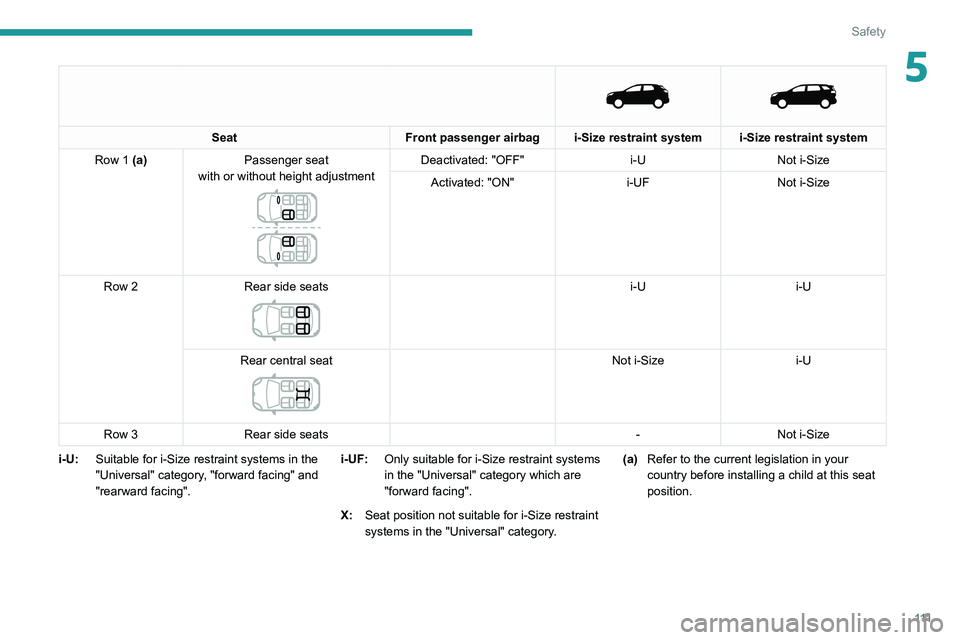
Seat
Front passenger airbag i-Size restraint system i-Size restraint system
Row 1 (a) Passenger seat
with or without height adjustment
Deactivated: "OFF" i-UNot i-Size
Activated: "ON" i-UFNot i-Size
Row 2 Rear side seats
i-U i-U
Rear central seat
Not i-Size i-U
Row 3 Rear side seats -Not i-Size
i-U: Suitable for i-Size restraint systems in the
"Universal" category, "forward facing" and
"rearward facing". i-UF:
Only suitable for i-Size restraint systems
in the "Universal" category which are
"forward facing".
X: Seat position not suitable for i-Size restraint
systems in the "Universal" category. (a)
Refer to the current legislation in your
country before installing a child at this seat
position.
Page 176 of 308
174
Practical information
After use
When travelling without a trailer or
load carrier, remove the towball and fit the
protective plug into the carrier, to provide
clear visibility of the number plate and/or its
lighting.
Fitting the towball
► Below the rear bumper, remove the protective
plug 2 from the carrier 1.
► Insert the end of the towball 5 into the carrier
1 and push it upwards; it will lock into position
automatically.
Vehicle equipped with motorised
tailgate with "Hands-Free Tailgate
Access" function
To avoid unwanted opening of the tailgate
when using the towing device:
–
deactivate this function in advance in your
vehicle's configuration menu,
–
or move the electronic key away from the
recognition zone, with the tailgate closed.
Towing device with quickly detachable towball
Presentation
This genuine towing device can be fitted and
removed with no need for tools.
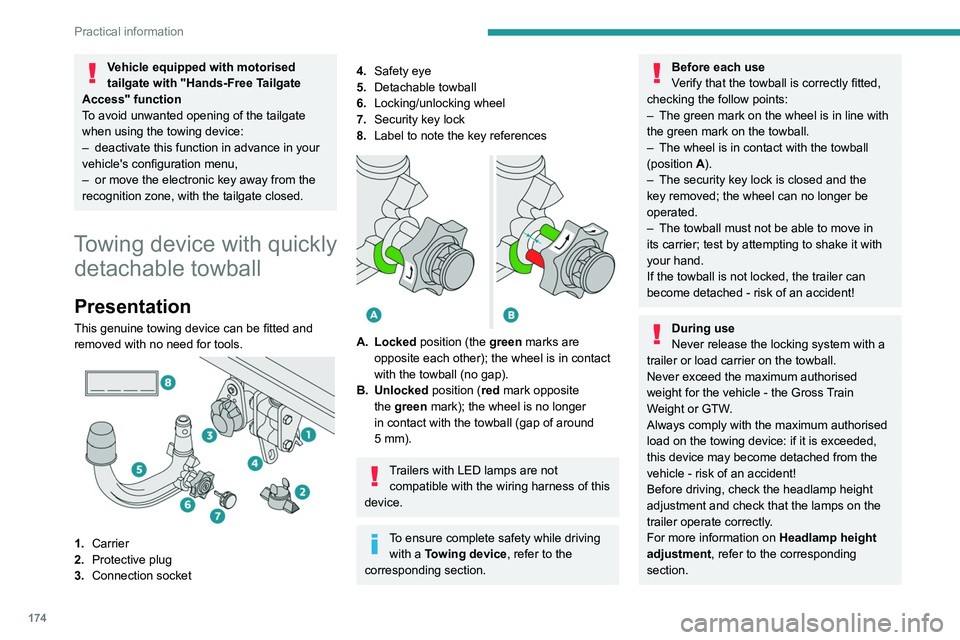
1. Carrier
2. Protective plug
3. Connection socket
4.Safety eye
5. Detachable towball
6. Locking/unlocking wheel
7. Security key lock
8. Label to note the key references
A. Locked position (the green marks are
opposite each other); the wheel is in contact
with the towball (no gap).
B. Unlocked position (red mark opposite the green mark); the wheel is no longer
in contact with the towball (gap of around
5
mm).
Trailers with LED lamps are not compatible with the wiring harness of this
device.
To ensure complete safety while driving with a Towing device , refer to the
corresponding section.
Before each use
Verify that the towball is correctly fitted,
checking the follow points:
–
The green mark on the wheel is in line with
the green mark on the towball.
–
The wheel is in contact with the towball
(position A
).
–
The security key lock is closed and the
key removed; the wheel can no longer be
operated.
–
The towball must not be able to move in
its carrier; test by attempting to shake it with
your hand.
If the towball is not locked, the trailer can
become detached - risk of an accident!
During use
Never release the locking system with a
trailer or load carrier on the towball.
Never exceed the maximum authorised
weight for the vehicle - the Gross Train
Weight or GTW.
Always comply with the maximum authorised
load on the towing device: if it is exceeded,
this device may become detached from the
vehicle - risk of an accident!
Before driving, check the headlamp height
adjustment and check that the lamps on the
trailer operate correctly.
For more information on Headlamp height
adjustment, refer to the corresponding
section.