2020 PEUGEOT 5008 instrument panel
[x] Cancel search: instrument panelPage 209 of 308
207
In the event of a breakdown
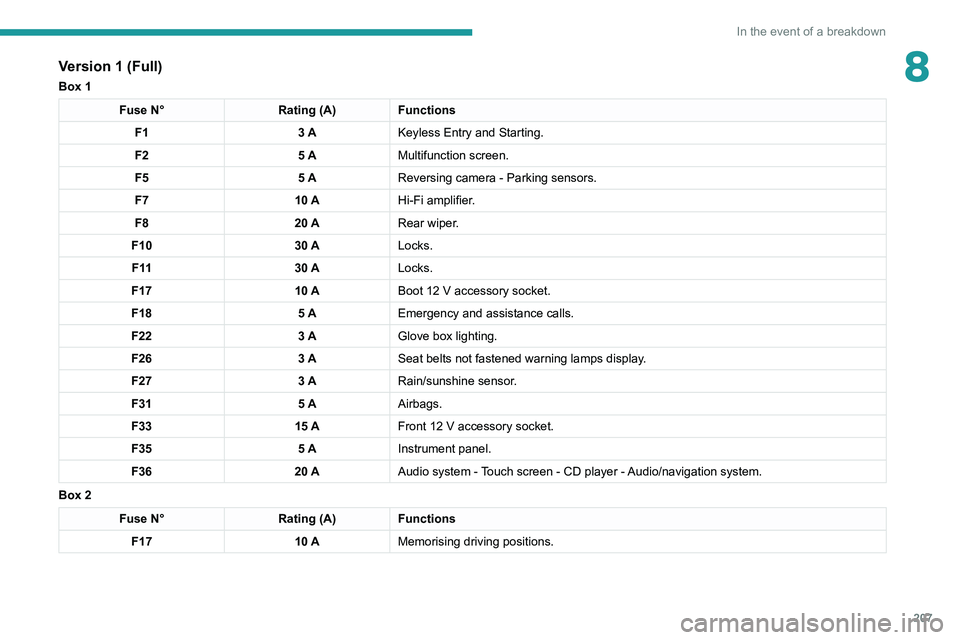
8Version 1 (Full)
Box 1
Fuse N°Rating (A)Functions
F1 3 AKeyless Entry and Starting.
F2 5 AMultifunction screen.
F5 5 AReversing camera - Parking sensors.
F7 10 AHi-Fi amplifier.
F8 20 ARear wiper.
F10 30 ALocks.
F 11 30 ALocks.
F17 10 ABoot 12
V accessory socket.
F18 5 AEmergency and assistance calls.
F22 3 AGlove box lighting.
F26 3 ASeat belts not fastened warning lamps display.
F27 3 ARain/sunshine sensor.
F31 5 AAirbags.
F33 15 AFront 12
V accessory socket.
F35 5 AInstrument panel.
F36 20 AAudio system - Touch screen - CD player - Audio/navigation system.
Box 2
Fuse N° Rating (A)Functions
F17 10 AMemorising driving positions.
Page 210 of 308
208
In the event of a breakdown
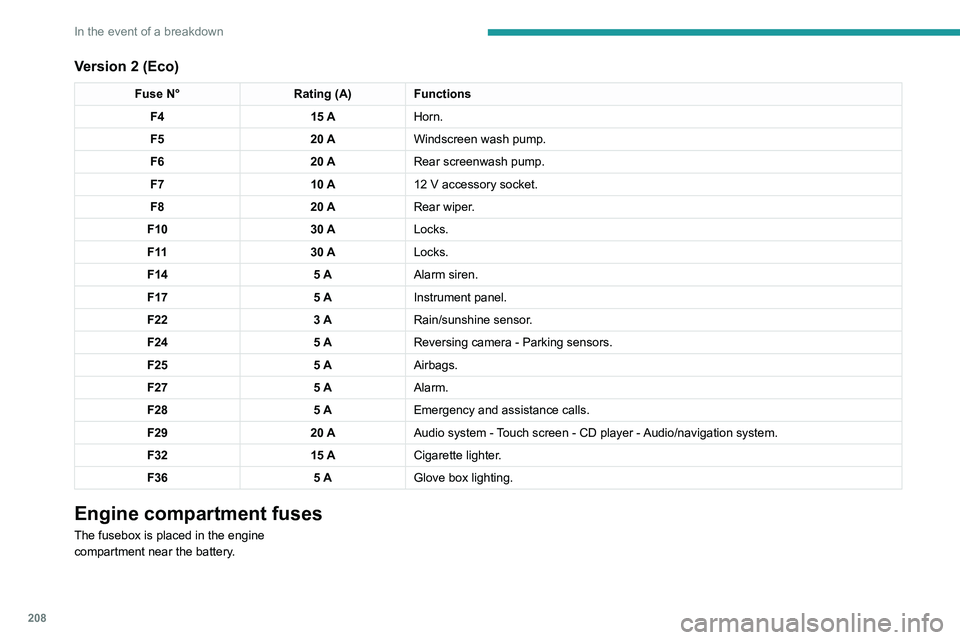
Version 2 (Eco)
Fuse N°Rating (A)Functions
F4 15 AHorn.
F5 20 AWindscreen wash pump.
F6 20 ARear screenwash pump.
F7 10 A12
V accessory socket.
F8 20 ARear wiper.
F10 30 ALocks.
F 11 30 ALocks.
F14 5 AAlarm siren.
F17 5 AInstrument panel.
F22 3 ARain/sunshine sensor.
F24 5 AReversing camera - Parking sensors.
F25 5 AAirbags.
F27 5 AAlarm.
F28 5 AEmergency and assistance calls.
F29 20 AAudio system - Touch screen - CD player - Audio/navigation system.
F32 15 ACigarette lighter.
F36 5 AGlove box lighting.
Engine compartment fuses
The fusebox is placed in the engine
compartment near the battery.
Accessing the fuses
Version 1 (Full)
Box 1
Fuse N° Rating (A)Functions
F14 15 AScreenwash pump.
F15 5 APower steering.
F20 25 AScreenwash pump.
F22 15 AHorn.
F23 15 ARight-hand main beam headlamp.
F24 15 ALeft-hand main beam headlamp.
Box 2 Fuse N° Rating (A)Functions
F8 30 ADiesel emissions control system (AdBlue)
F12 15 AAutomatic gearbox.
F14 5 AAutomatic gearbox.
Page 214 of 308
212
In the event of a breakdown
► At the end of the charging operation, switch
off charger B
before disconnecting the cables
from battery A.
24v 12v
If this label is present, use only a 12 V
charger to avoid causing irreversible
damage to the electrical components related
to the Stop & Start system.
Never try to charge a frozen battery - risk
of explosion!
If the battery has frozen, have it checked by a
PEUGEOT dealer or by a qualified workshop
who will verify that the internal components
have not been damaged and that the case
has not cracked, which would mean a risk of
toxic and corrosive acid leaking.
Some functions, including Stop & Start,
are not available if the battery is not
sufficiently charged.
Disconnecting the battery
In order to maintain an adequate state of charge
for starting the engine, it is recommended that
the battery be disconnected if the vehicle is
taken out of service for a long period. Before disconnecting the battery:
►
Close all openings (doors, boot, windows,
roof).
►
Switch off all electrical consumers (audio
system, wipers, lighting, etc.).
►
Switch off the ignition and wait for 4
minutes.
At the battery, it is only necessary to disconnect
the (+) terminal.
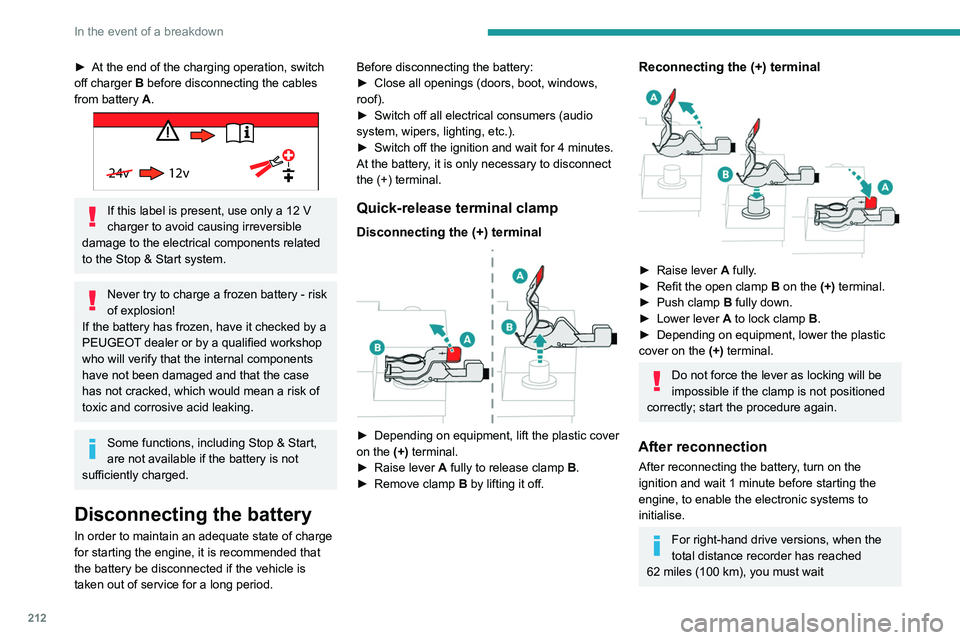
Quick-release terminal clamp
Disconnecting the (+) terminal
► Depending on equipment, lift the plastic cover
on the (+) terminal.
►
Raise lever
A
fully to release clamp
B
.
►
Remove clamp
B
by lifting it off.
Reconnecting the (+) terminal
► Raise lever A fully.
► Refit the open clamp B on the (+) terminal.
►
Push clamp
B fully down.
►
Lower lever
A
to lock clamp B.
►
Depending on equipment, lower the plastic
cover on the
(+) terminal.
Do not force the lever as locking will be
impossible if the clamp is not positioned
correctly; start the procedure again.
After reconnection
After reconnecting the battery, turn on the
ignition and wait 1 minute before starting the
engine, to enable the electronic systems to
initialise.
For right-hand drive versions, when the
total distance recorder has reached
62
miles (100 km), you must wait
approximately 15 minutes before starting the
engine.
If minor problems nevertheless persist following
this operation, contact a PEUGEOT dealer or a
qualified workshop.
Referring to the relevant section, reset certain
equipment:
– Remote control key or electronic key
(depending on version).
– Sunroof and electric sun blind.
– Electric windows.
– Date and time.
– Preset radio stations.
After reconnection of the battery, the
“Collision risk detection system fault”
message is displayed on the instrument panel
when the ignition is switched on. This
operation is perfectly normal. The message
will disappear while driving.
The Stop & Start system may not be operational during the trip following the
first engine start.
In this case, the system will only be available
again after a continuous period with the
vehicle immobilised, the duration of which
depends on the exterior temperature and the
state of charge of the battery (up to about 8
hours).
Page 215 of 308
213
In the event of a breakdown
8approximately 15 minutes before starting the
engine.
If minor problems nevertheless persist following
this operation, contact a PEUGEOT
dealer or a
qualified workshop.
Referring to the relevant section, reset certain
equipment:
–
Remote control key or electronic key
(depending on version).
–
Sunroof and electric sun blind.
–
Electric windows.
–
Date and time.
–
Preset radio stations.
After reconnection of the battery, the “Collision risk detection system fault”
message is displayed on the instrument panel
when the ignition is switched on. This
operation is perfectly normal. The message
will disappear while driving.
The Stop & Start system may not be operational during the trip following the
first engine start.
In this case, the system will only be available
again after a continuous period with the
vehicle immobilised, the duration of which
depends on the exterior temperature and the
state of charge of the battery (up to about 8
hours).
Accessories batteries (Hybrid)
The hybrid system has two accessory batteries:
one at the front and one at the rear of the
vehicle.
The batteries contain harmful substances (sulphuric acid and lead).
They must be disposed of in accordance
with regulations and must not, in any
circumstances, be discarded with household
waste.
Take used remote control batteries and
vehicle batteries to a special collection point.
Protect your eyes and face before
handling batteries.
All operations on the batteries must be carried
out in a well ventilated area and away from
naked flames and sources of sparks, so as to
avoid the risk of explosion or fire.
Wash your hands afterwards.
For the replacement of batteries,
contact a
PEUGEOT dealer or a qualified workshop.
Accessing the batteries
Front
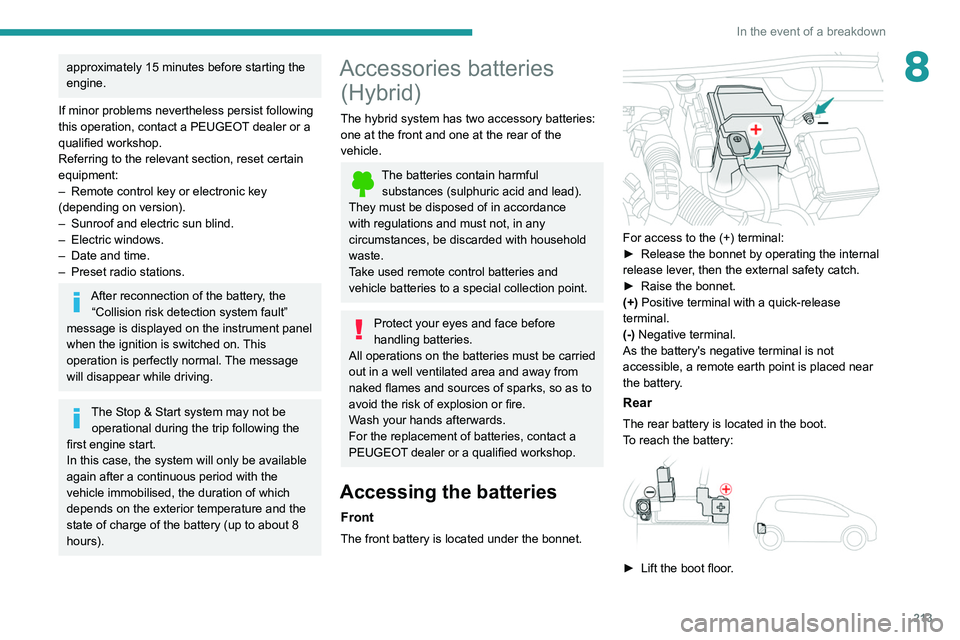
The front battery is located under the bonnet.
For access to the (+) terminal:
► Release the bonnet by operating the internal
release lever
, then the external safety catch.
►
Raise the bonnet.
(+)
Positive terminal with a quick-release
terminal.
(-) Negative terminal.
As the battery's negative terminal is not
accessible, a remote earth point is placed near
the battery.
Rear
The rear battery is located in the boot.
To reach the battery:
► Lift the boot floor .
Page 242 of 308
240
PEUGEOT Connect Radio
PEUGEOT Connect
Radio
Multimedia audio system -
Applications - Bluetooth
®
telephone
The functions and settings described
vary according to the vehicle version and
configuration.
For safety reasons and because they
require sustained attention by the driver,
the following operations must be carried out
with the vehicle stationary and the ignition
on:
–
Pairing the smartphone with the system in
Bluetooth mode.
–
Using the smartphone.
–
Connection to the CarPlay®, MirrorLinkTM
or Android Auto applications (certain
applications interrupt their display while the
vehicle is moving).
–
Changing the system settings and
configuration.
The system is protected in such a way that it will only operate in the vehicle.
The Energy Economy Mode message is
displayed when the system is about to enter
the corresponding mode.
The system’s Open Source Software (OSS) source codes are available at the
following addresses:
https://www.groupe-psa.com/fr/oss/
https://www.groupe-psa.com/en/oss/
First steps
With the engine running, a press mutes
the sound.
With the ignition off, a press turns the system on.
Increase or decrease the volume using
the wheel or the "plus" or "minus" buttons
(depending on the equipment).
Use the buttons on either side of or below the
touch screen for access to the menus, then
press the virtual buttons in the touch screen.
Depending on the model, use the "Source" or
"Menu" buttons on the left of the touch screen
for access to the menus, then press the virtual
buttons in the touch screen.
At all times it is possible to display the rolling
menus by pressing the screen briefly with three
fingers.
All of the touch areas of the screen are white.
For pages with multiple tabs at the bottom of the
screen, it is possible to switch between pages
either by tapping the tab for the desired page, or
by using a finger, sliding the pages to the left or
to the right.
Press in the grey zone to go back up a level or
to confirm.
Press the back arrow to go back a level or
confirm.
The touch screen is of the "capacitive" type.
To clean the screen, use a soft, non-abrasive
cloth (e.g. spectacles cloth) with no additional
product.
Do not use sharp objects on the screen.
Do not touch the screen with wet hands.
Certain information is displayed permanently in
the upper bar of the touch screen:
–
Air conditioning status information (depending
on version), and direct access to the
corresponding menu.
–
Radio Media and
Telephone menu status
information.
–
Privacy status information.
–
Access to the touch screen and digital
instrument panel settings.
Audio source selection (depending on
equipment):
Page 252 of 308

250
PEUGEOT Connect Radio
Calling a new number
Press Telephone to display the main
page.
Enter the phone number using the digital
keypad.
Press "Call" to start the call.
Calling a contact
Press Telephone to display the main
page.
Or press and hold
the steering mounted PHONE button.
Press "Contacts".
Select the desired contact from the displayed list.
Press "Call".
Calling a recently used
number
Press Telephone to display the main
page.
Or
Press and hold
the steering mounted button.
Press "Recent calls".
Select the desired contact from the displayed list.
It is always possible to make a call
directly from the telephone; as a safety
measure, first park the vehicle.
Setting the ringtone
Press Telephone to display the main
page.
Press the "OPTIONS " button to access the
secondary page.
Press "Ring volume" to display the
volume bar.
Press the arrows or move the slider to set
the ring volume.
Settings
Configuring profiles
Press Settings to display the main page.
Press "Profiles".
Select "Profile 1", "Profile 2", "Profile 3” or
"Common profile ".
Press this button to enter a name for the
profile using the virtual keypad.
Press "OK" to save.
Press the back arrow to confirm.
Press this button to activate the profile.
Press the back arrow again to confirm.
Press this button to reset the selected
profile.
Adjusting the brightness
Press Settings to display the main page.
Press Brightness.
Move the slider to adjust the brightness of
the screen and/or the instrument panel
(depending on version).
Press in the shaded area to confirm.
Modifying system settings
Press Settings to display the main page.
Press "Configuration" to access the
secondary page.
Press "System configuration".
Press the "Units" tab to change the units of
distance, fuel consumption and temperature.
Press the "Factory settings" tab to restore the
initial settings.
Returning the system to factory settings
activates the English language by default
(depending on version).
Page 253 of 308
251
PEUGEOT Connect Radio
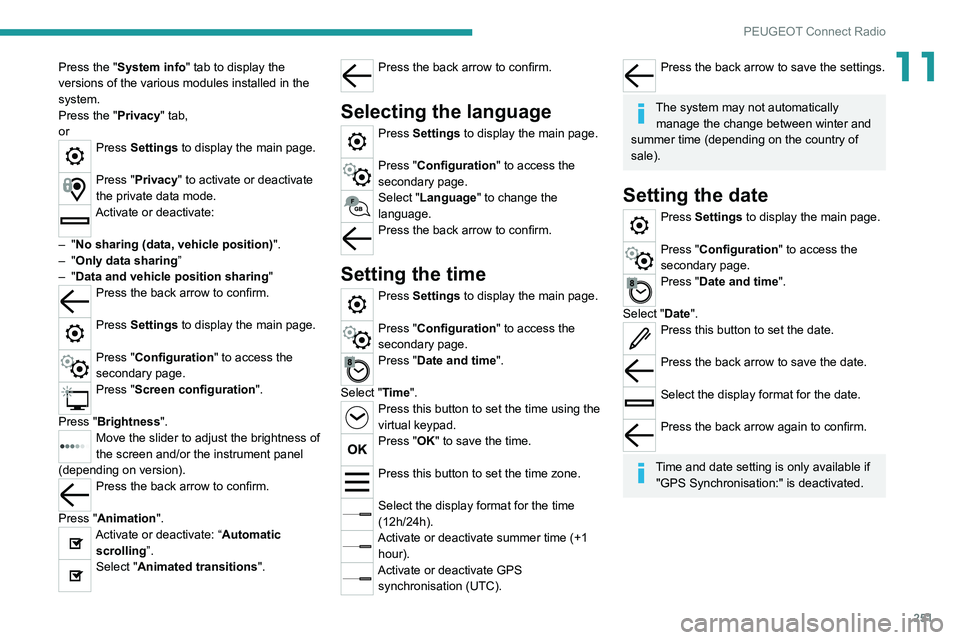
11Press the "System info" tab to display the
versions of the various modules installed in the
system.
Press the "Privacy" tab,
or
Press Settings to display the main page.
Press "Privacy" to activate or deactivate
the private data mode.
Activate or deactivate:
–
"No sharing (data, vehicle position) ".
–
"Only data sharing ”
–
"Data and vehicle position sharing "
Press the back arrow to confirm.
Press Settings to display the main page.
Press "Configuration" to access the
secondary page.
Press "Screen configuration".
Press "Brightness".
Move the slider to adjust the brightness of
the screen and/or the instrument panel
(depending on version).
Press the back arrow to confirm.
Press "Animation".
Activate or deactivate: “Automatic scrolling ”.
Select "Animated transitions".
Press the back arrow to confirm.
Selecting the language
Press Settings to display the main page.
Press "Configuration" to access the
secondary page.
Select "Language" to change the
language.
Press the back arrow to confirm.
Setting the time
Press Settings to display the main page.
Press "Configuration" to access the
secondary page.
Press "Date and time".
Select "Time".
Press this button to set the time using the
virtual keypad.
Press "OK" to save the time.
Press this button to set the time zone.
Select the display format for the time
(12h/24h).
Activate or deactivate summer time (+1 hour).
Activate or deactivate GPS synchronisation (UTC).
Press the back arrow to save the settings.
The system may not automatically manage the change between winter and
summer time (depending on the country of
sale).
Setting the date
Press Settings to display the main page.
Press "Configuration" to access the
secondary page.
Press "Date and time".
Select "Date".
Press this button to set the date.
Press the back arrow to save the date.
Select the display format for the date.
Press the back arrow again to confirm.
Time and date setting is only available if
"GPS Synchronisation:" is deactivated.
Page 256 of 308
254
PEUGEOT Connect Nav
PEUGEOT Connect Nav
GPS navigation -
Applications - Multimedia
audio system - Bluetooth
®
telephone
The functions and settings described
vary according to the vehicle version and
configuration.
For safety reasons and because they
require sustained attention by the driver,
the following operations must be carried out
with the vehicle stationary and the ignition
on:
–
Pairing the smartphone with the system in
Bluetooth mode.
–
Using the smartphone.
–
Connection to the CarPlay®, MirrorLinkTM
or Android Auto applications (certain
applications interrupt their display while the
vehicle is moving).
–
W
atching a video (the video stops when the
vehicle starts to move again).
–
Changing the system settings and
configuration.
The system is protected in such a way that it will only operate in the vehicle.
The Energy Economy Mode message is
displayed when the system is about to enter
the corresponding mode.
System and map updates can be
downloaded from the Brand’s website.
The update procedure is also available on the
website.
The system’s Open Source Software (OSS) source codes are available at the
following addresses:
https://www.groupe-psa.com/fr/oss/
https://www.groupe-psa.com/en/oss/
First steps
With the engine running, a press mutes
the sound.
With the ignition off, a press turns the system on.
Increase or decrease the volume using
the wheel or the "plus" or "minus" buttons
(depending on the equipment).
Use the menu buttons on either side of or below
the touch screen for access to the menus, then
press the virtual buttons in the touch screen.
Depending on the model, use the "Source" or
"Menu" buttons to access the rolling menus, then
press the virtual buttons in the touch screen.
Display the rolling menus at any time by pressing
the screen briefly with three fingers.
All of the touch areas of the screen are white.
Press the back arrow to go back a level.
Press "OK" to confirm.
The touch screen is of the "capacitive" type.
To clean the screen, use a soft, non-abrasive
cloth (e.g. spectacles cloth) with no additional
product.
Do not use sharp objects on the screen.
Do not touch the screen with wet hands.
Certain information is displayed permanently
in the side bars or in the upper bar of the touch
screen (depending on equipment):
–
Air conditioning status information (depending
on version), and direct access to the
corresponding menu.
–
Go directly to the audio source selection
option, to view the list of radio stations (or list of
titles depending on the source).
–
Go to the "Notifications" of messages, emails,
map updates and, depending on the services,
the navigation notifications.
–
Go to the settings for the touch screen and the
digital instrument panel.